Contents Menu Expand Light mode Dark mode Auto light/dark, in light mode Auto light/dark, in dark mode Skip to content
TrackMe documentation
Logo
TrackMe documentation

Use Cases

  • Quickstart
    • QUICK START - Starting with TrackMe: (feed tracking quickstart)
    • QUICK START - TrackMe Impact-Based Alerting (IBA)
    • QUICK START - Design and automate through lookup knowledge
    • QUICK START - Cross-tenant domain views with Virtual Groups
  • Use-case demos
    • Use Case Demo: This is All About Feeds
    • Use Case Demo: 360 Services Monitoring with TrackMe
    • Use Case Demo: Fields Quality (CIM and non-CIM)
    • Flex Objects - Adapt TrackMe to any monitoring use case (splk-flx)
  • TrackMe Use Cases Referential — Overview
    • TrackMe Use Cases — Organised by User Intent
    • TrackMe Capability × Component Matrix
    • FLX (Flex Objects) Use Case Template Catalog
    • TrackMe Ecosystem — Companion Add-ons
    • TrackMe Adoption Roadmap

Artificial Intelligence

  • Artificial Intelligence in TrackMe
  • Configuring AI Provider accounts
  • AI Assistant & Concierge
    • AI Assistant
    • The AI Concierge
  • The AI Advisors
    • AI Feeds Advisor
    • AI ML Advisor
    • AI FQM Advisor
    • AI Component Health Advisor
  • AI Routines & Automation
    • AI Routines
    • AI Agents automation
    • Natural-language FLX tracker generation
  • Governance
    • Auditing AI activity
    • AI Compliance, Privacy and Data Governance

License, terms & conditions, support

  • EULA License
  • Terms & Conditions
  • Support

Compatibility & Download

  • Compatibility
  • Download

Requirements

  • Requirements for TrackMe

Installation

  • Installation of TrackMe
  • Upgrading TrackMe
  • Migrating and Cloning TrackMe
  • License registration

Product guide

  • Introduction
    • What is TrackMe?
    • Core concepts and vocabulary
    • How TrackMe works
    • Navigating the TrackMe UI — in depth
  • Virtual Tenants & Access
    • Virtual Tenants explained
    • Creating a tenant
    • Managing tenants
    • Virtual Groups
    • Roles & access control
    • Roles & access control — in depth
    • Personal preferences
  • Monitoring Components
    • The six components at a glance
    • DSM — Data Source Monitoring
    • DHM — Data Host Monitoring
    • Feeds thresholds (delay & latency)
      • Delay vs latency: what they actually mean
      • Delay & latency thresholds
      • Lagging classes
      • Adaptive delay (ML)
      • Variable delay
    • Expected sources & hosts — in depth
    • MHM — Metric Host Monitoring
    • FLX — Flex Objects
    • Flex Object trackers — in depth
    • FQM — Field Quality Monitoring
    • WLK — Workload Knowledge
    • Workload monitoring — in depth
    • Hybrid trackers
    • Hybrid trackers — in depth
    • Replica trackers
  • Entity State & Scoring
    • The entity state machine
    • Impact scoring & thresholds
    • Status flapping
  • Classification & Protection
    • Priority
    • Priority — in depth
    • Tags
    • Tags — in depth
    • Labels & auto-labels
    • SLA policies
    • Logical groups
    • Disruption queue
    • Notes
  • Alerting
    • Stateful alerting
    • Notable events
    • Acknowledgments
    • Alerting & third-party integration — in depth
  • Topology Studio
    • Overview
    • End-to-end example — monitoring a production Web platform
    • Authoring topologies
    • Topology Alerts
    • AI integration
    • Administration
  • Machine Learning
    • Outlier detection
    • Incremental baseline training
    • Outlier detection — in depth
  • Integrations & Remote Deployments
    • Remote Splunk deployments
    • Remote deployments — in depth
    • CMDB integration
    • Lookup monitoring
    • Lookups monitoring — in depth
    • Splunk SOAR
    • SOAR monitoring — in depth
    • TrackMe App on SOAR
    • TrackMe App on SOAR — in depth
    • Cribl monitoring
    • Elastic sources
    • Elastic sources — in depth
  • Operations & Administration
    • Configuration
    • Configuration — in depth
    • Large-scale environments
    • Large-scale environments — in depth
    • Maintenance mode
    • Bank holidays
    • Data sampling
    • Data sampling — in depth
    • Backup & restore
    • Configuration Guardian
    • Configuration Manager (CI/CD)
    • CI/CD & config manager — in depth
    • Support diagnostics
    • REST API reference
    • Events & sourcetypes
    • Metrics reference

White papers

  • TrackMe’s White Papers
  • Running a TrackMe Proof of Concept
  • Splunk infrastructure monitoring
    • Tracking Splunk Cloud SVC consumption in TrackMe
    • Monitor Splunk Workload with TrackMe’s Workload component
    • Monitor Splunk Indexer Clusters
    • Monitor Splunk Search Head Clusters
  • Detection & alerting use cases
    • Use TrackMe to detect abnormal events count drop in Splunk feeds
    • Analyse log messages logging level to detect behaviour anomalies using TrackMe’s Flex Object and Machine Learning Anomaly Detection
    • Using SLA alerting to build a 2-tier monitoring system
  • Operations & administration
    • Backing up and Restoring TrackMe
    • Auto deletion or management of TrackMe entities
    • Performing mass operations in TrackMe

Troubleshoot

  • Troubleshooting TrackMe
  • Frequently asked questions (FAQ)

Versioning

  • Release notes

Third party integrations

  • Palo Alto XSOAR Integration
  • Cribl Stream & Edge API

Various

  • Third-party components credits

Archives

  • Migrate from TrackMe V1 to TrackMe V2
Back to top

Navigating the TrackMe UI — in depth

Tip

This is an in-depth visual tour of the TrackMe user interface. For the conceptual introduction, start with Overview and How it works. This page walks the Virtual Tenant interface, the Tenant Home, the three-dot menus, bulk editing, theme preferences, and hiding tenants.

Note

TrackMe Design

  • This page describes the essential concepts and design principles behind TrackMe’s user interfaces.

  • TrackMe 2.3.0 introduced a complete rewrite of the user interfaces, built on Splunk’s native React UI.

  • It covers the key things to know to navigate the interface and use its features.

TrackMe has two primary interfaces: the Virtual Tenant interface — the landing page where you see and manage all your tenants — and the Tenant Home — the rich per-tenant screen where you work with entities. A consistent three-dot menu exposes actions everywhere, and a per-user theme (dark or light) applies across both. This page tours each in turn.

The Virtual Tenant interface

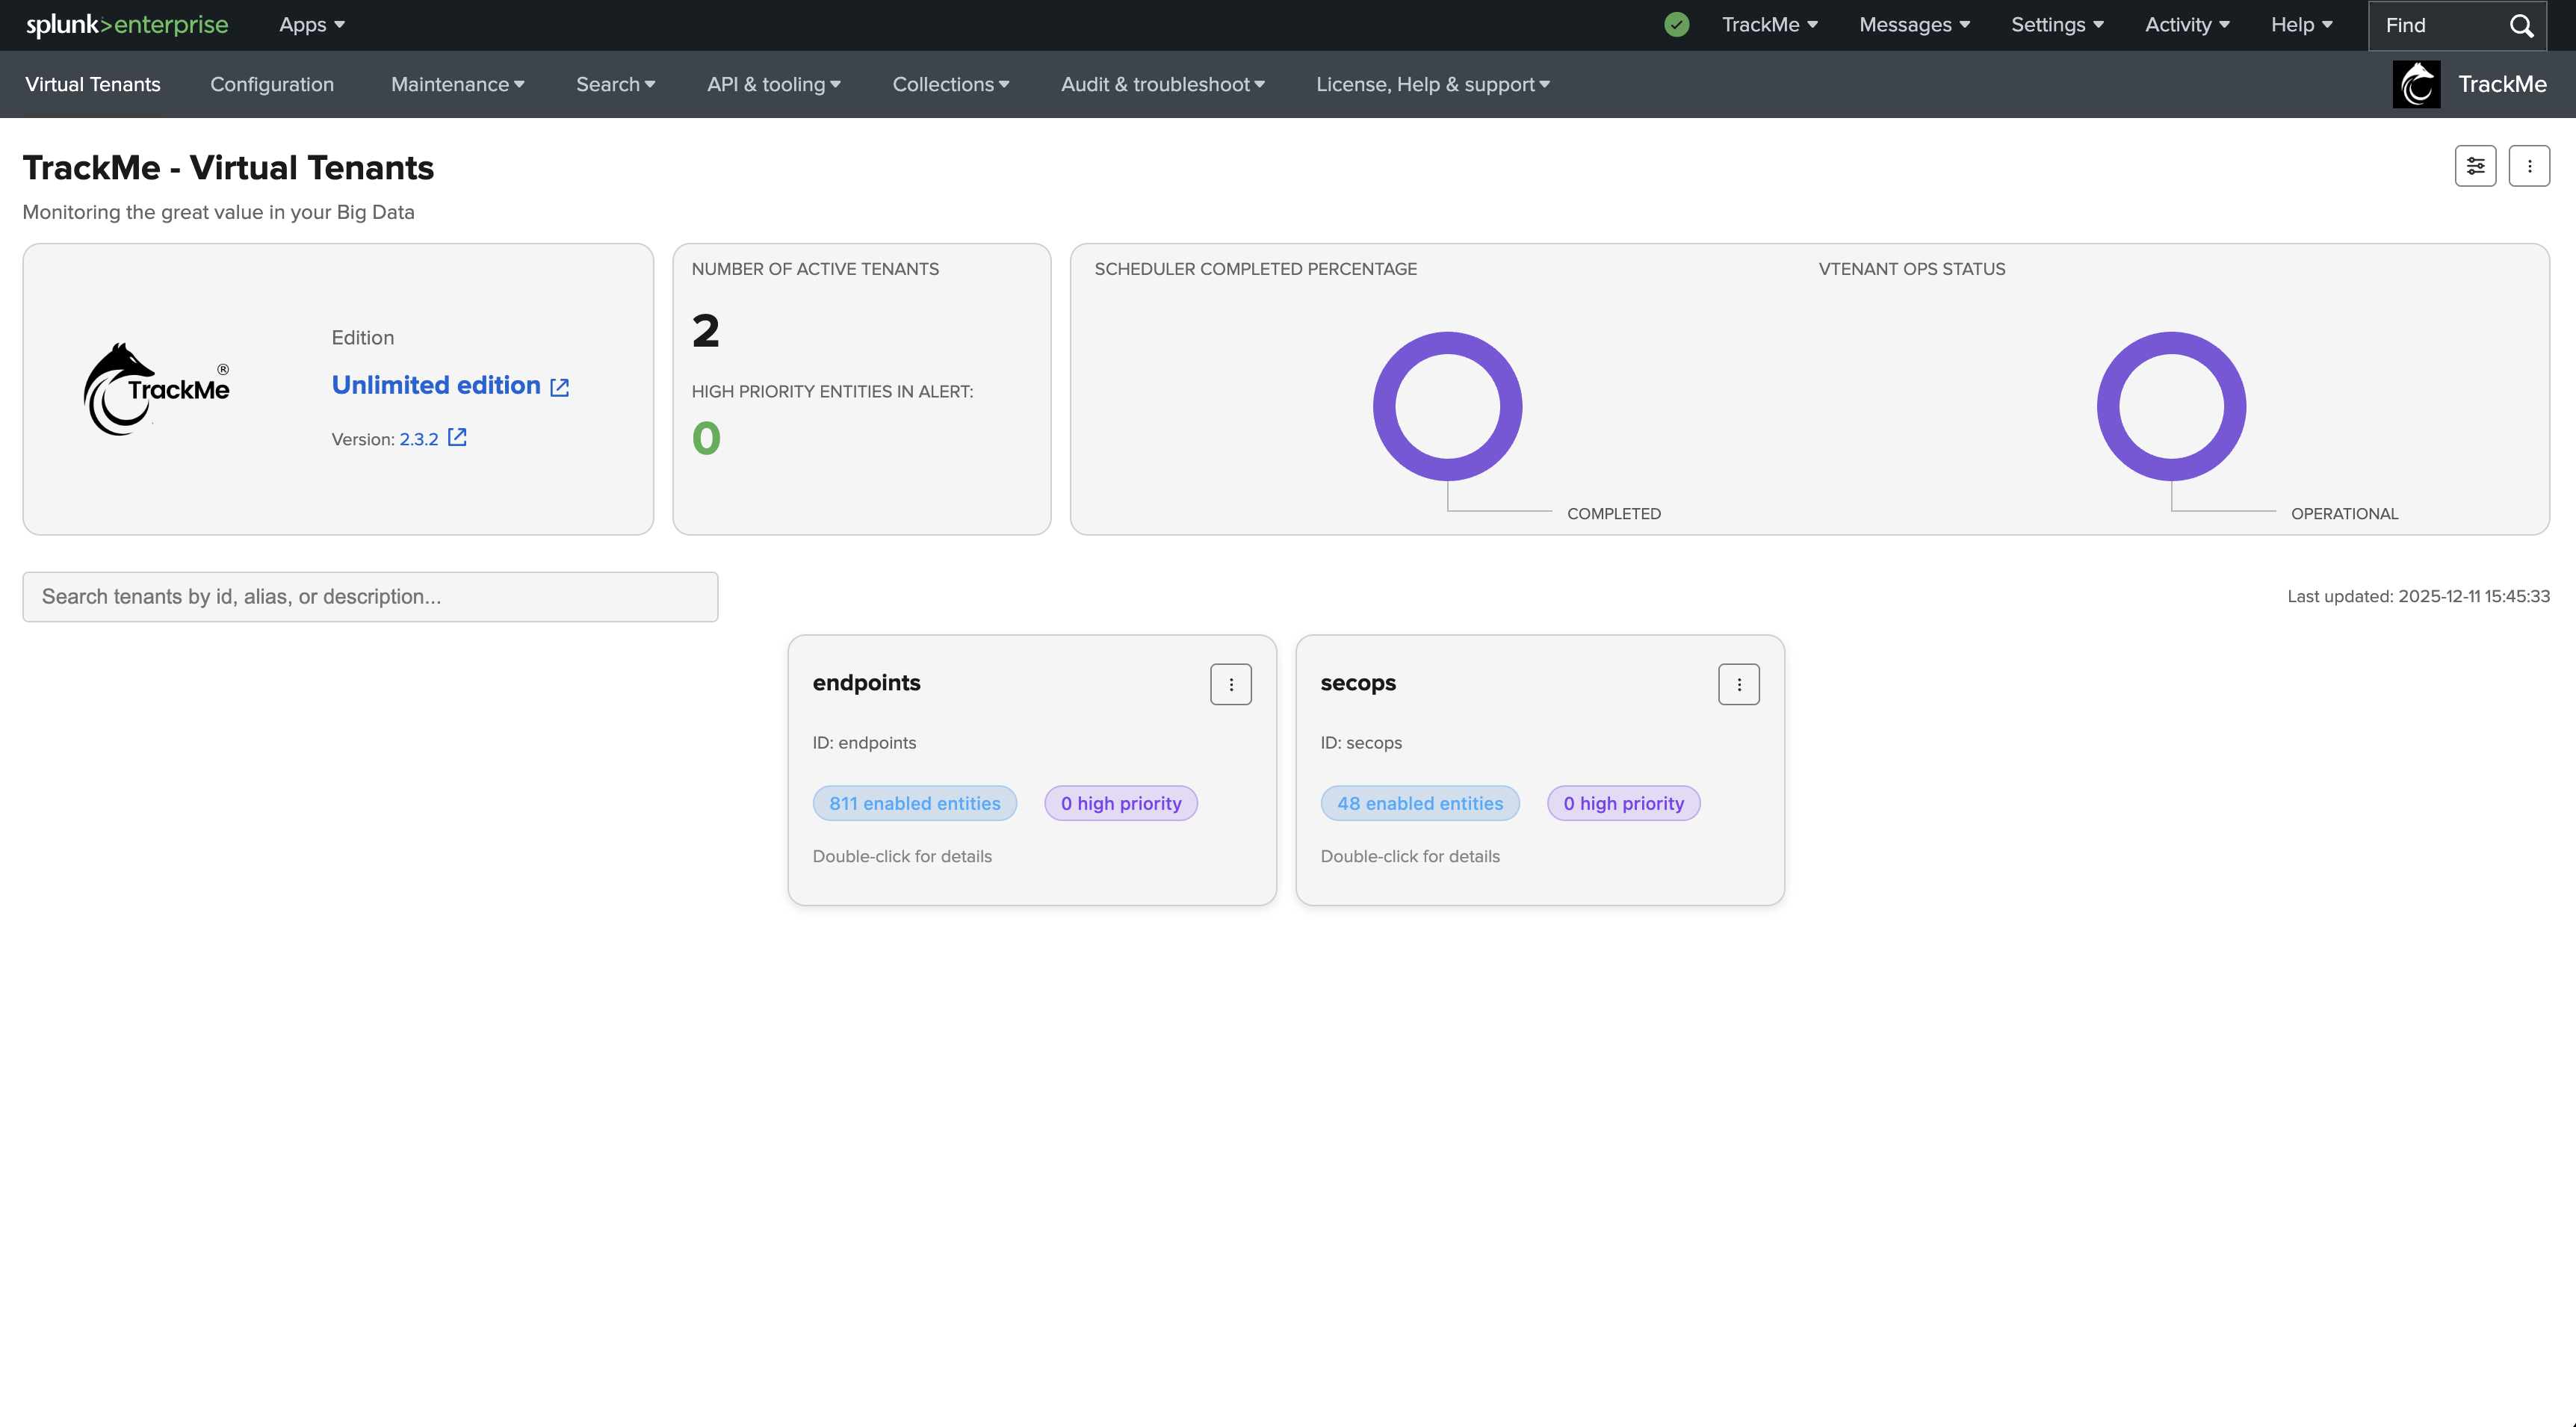
When you open TrackMe, the default page is the Virtual Tenant interface. It gives an overview of your Virtual Tenants and the actions you can perform on them — such as creating, managing, or entering a specific tenant.
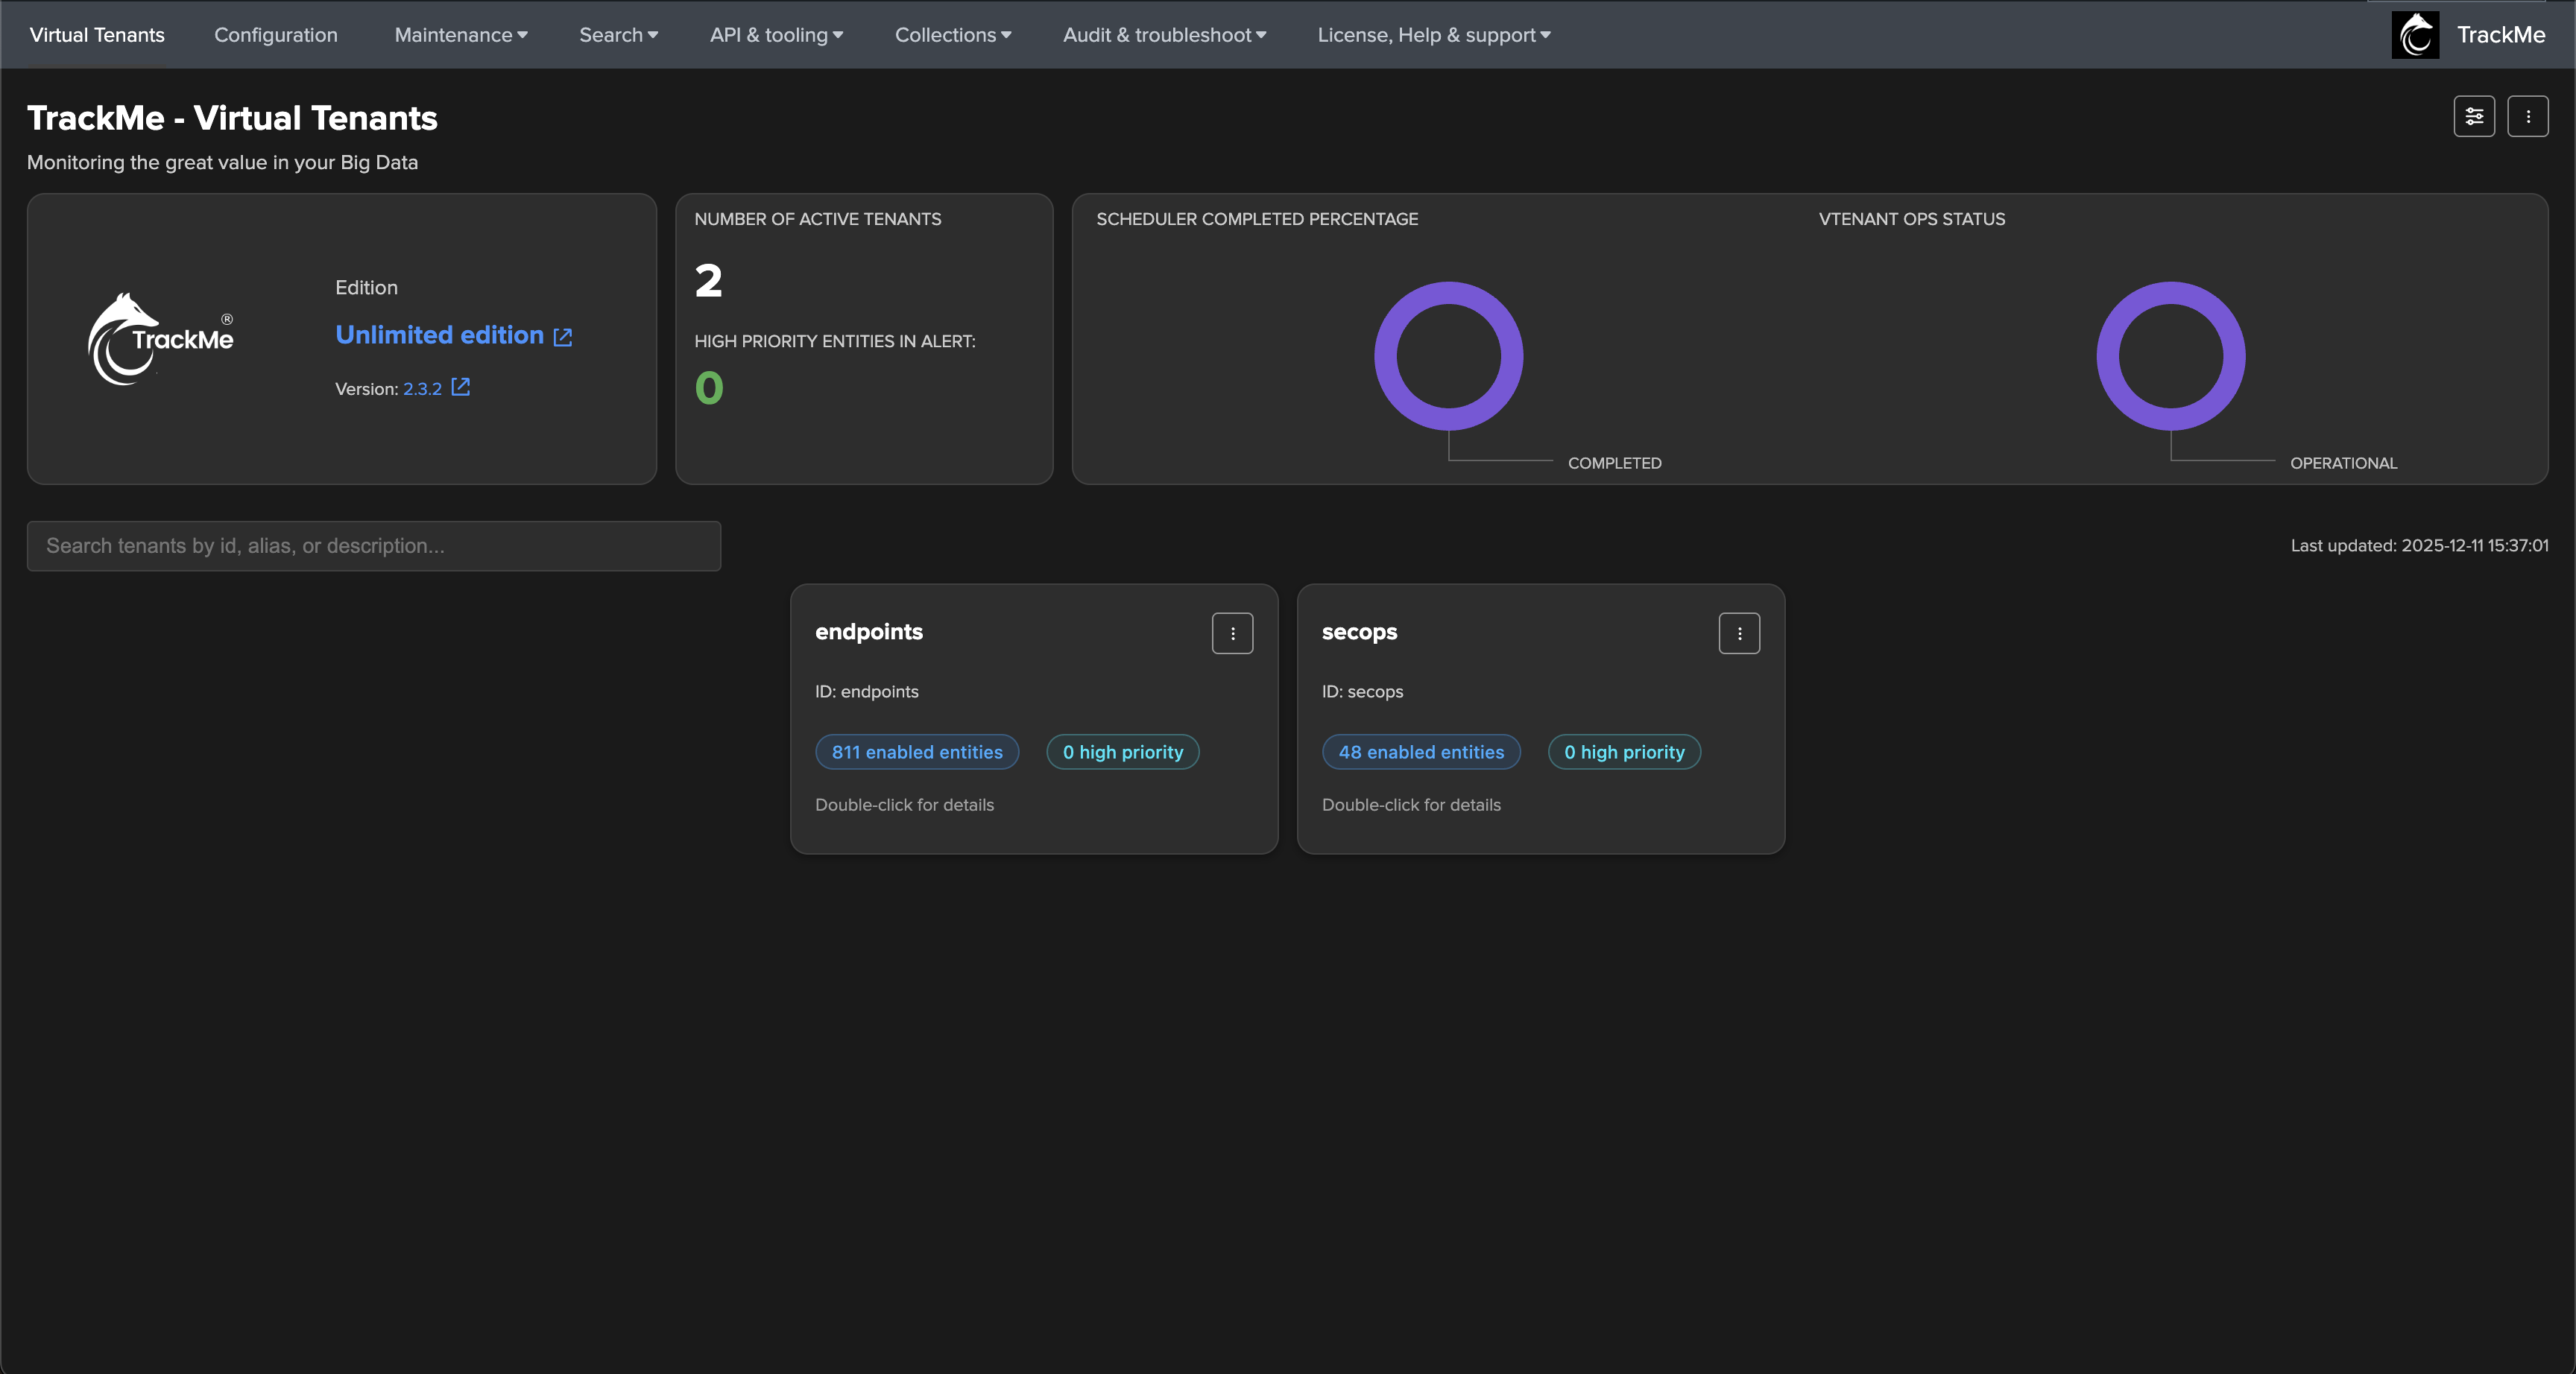
img-004994@2x.png

The home page at a glance

The key interactions of the Virtual Tenant interface:

main screen:
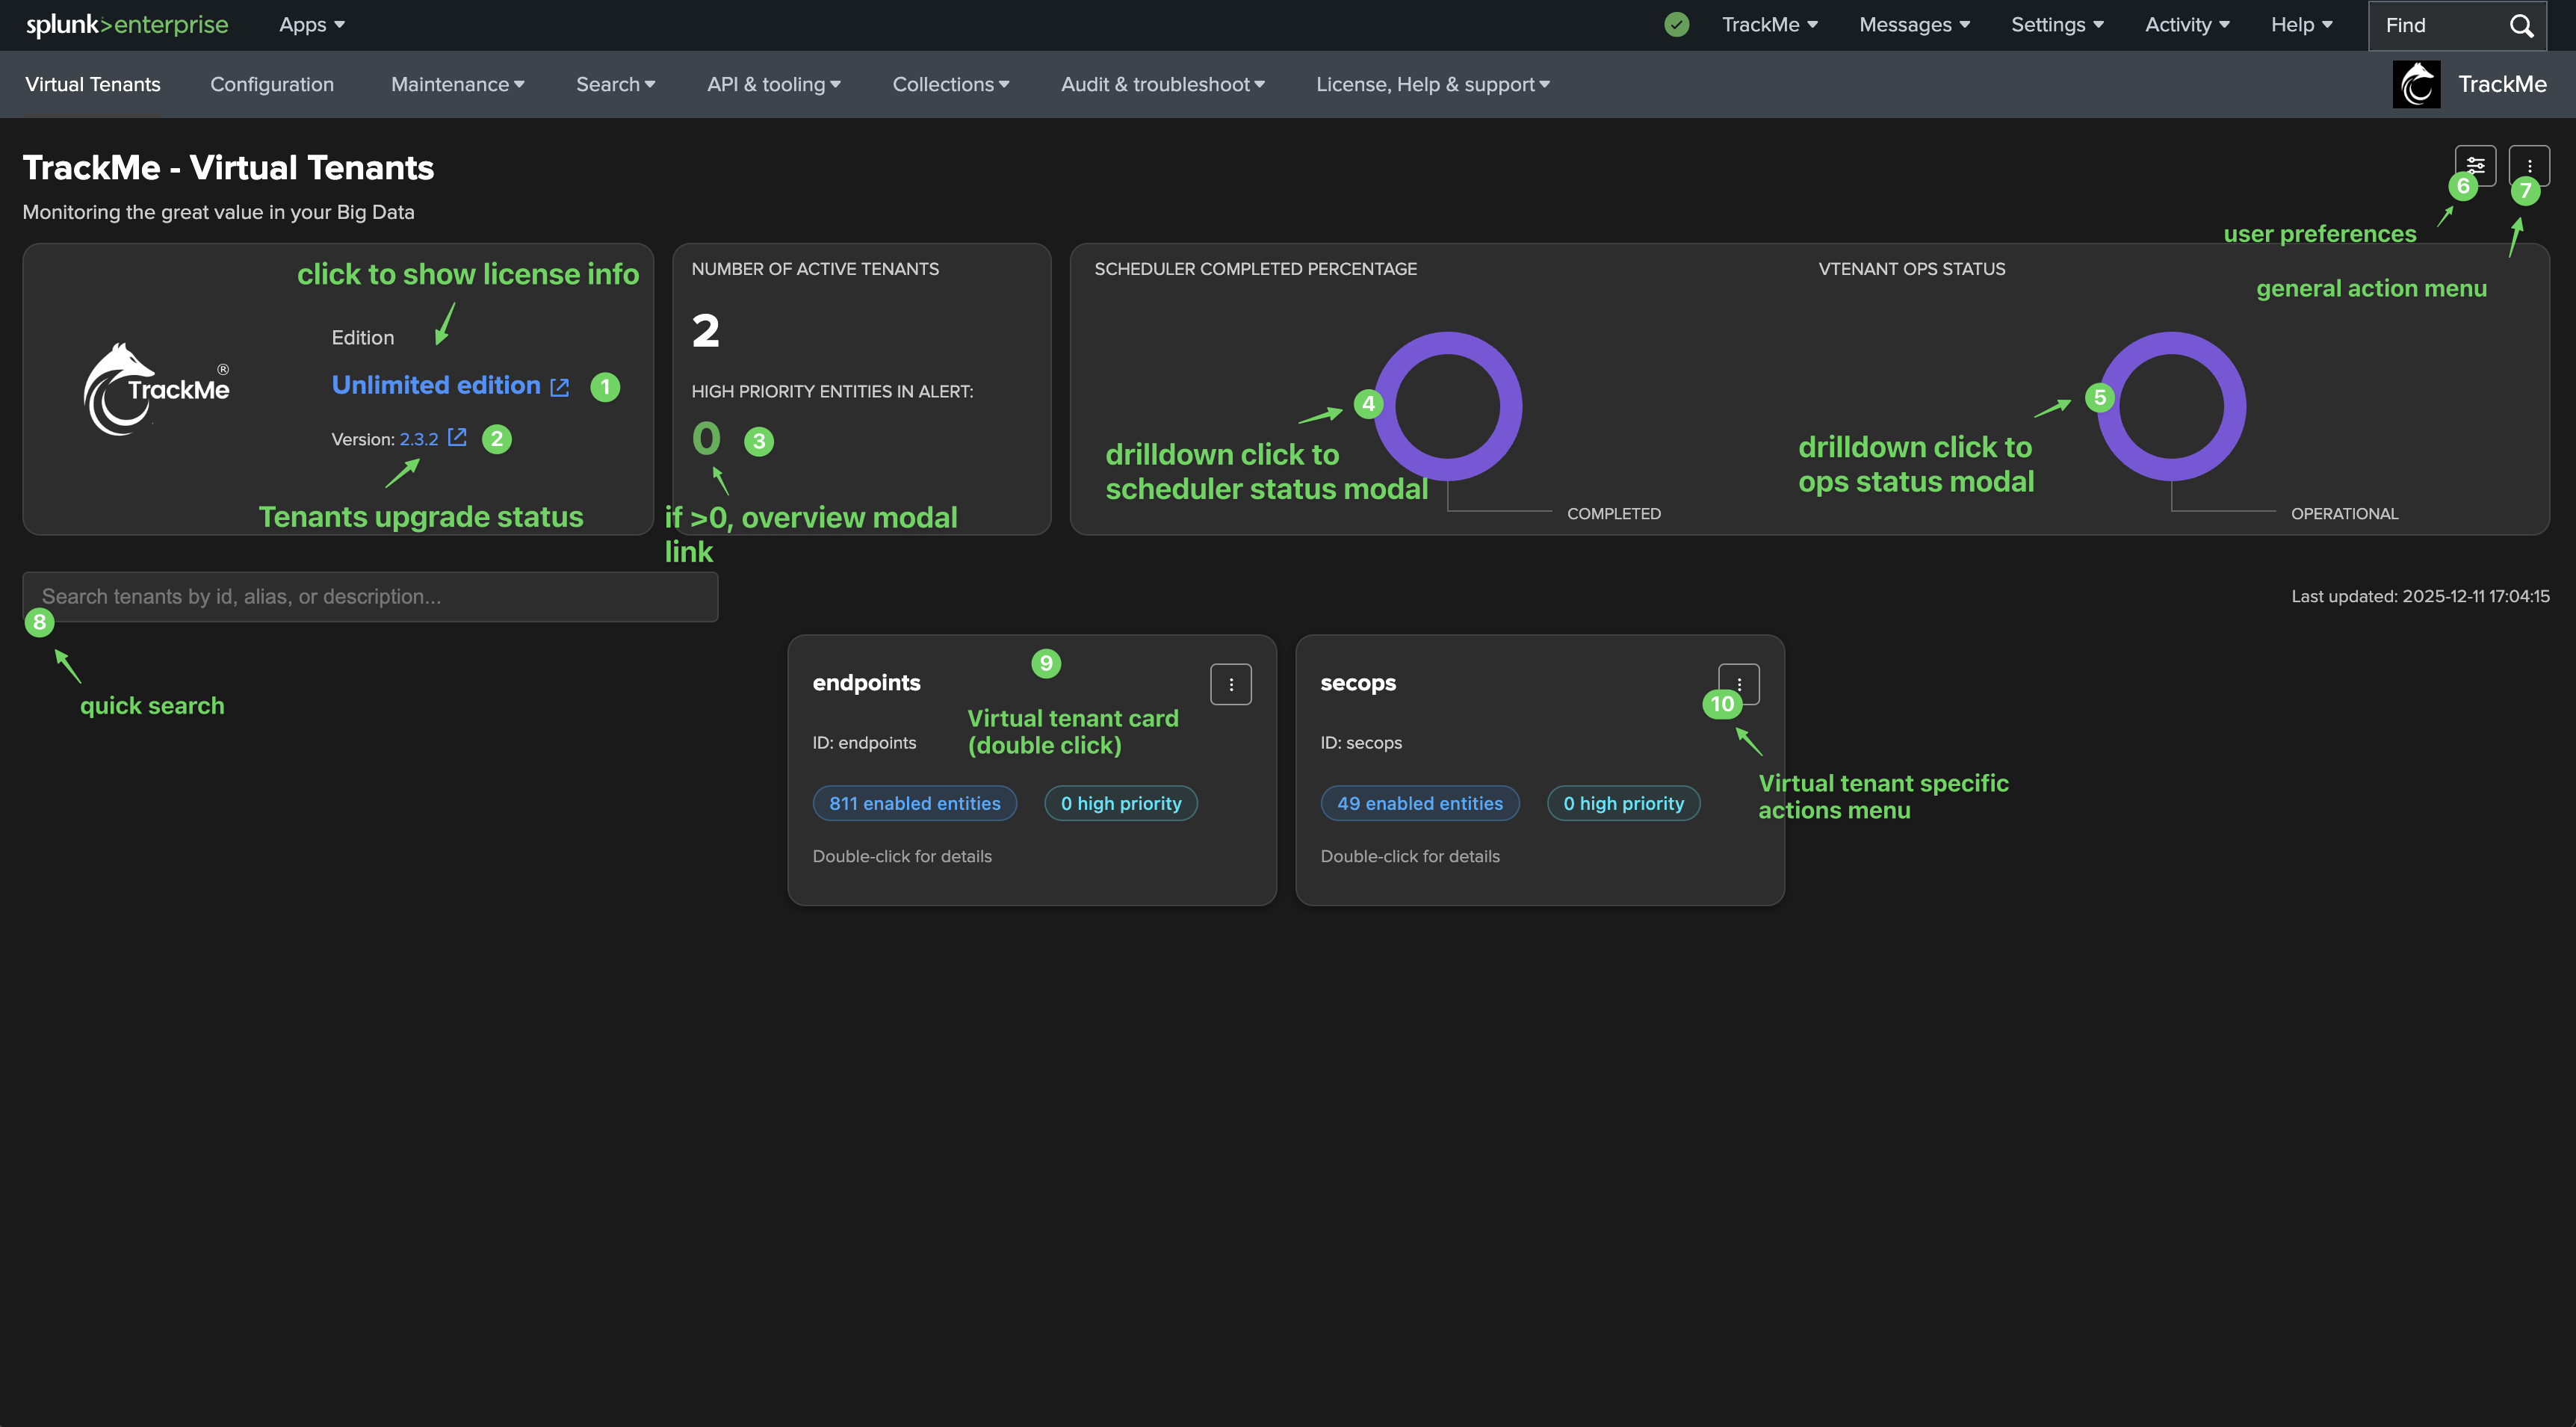
img-005016@2x.png

tenant overview:

img-005017@2x.png

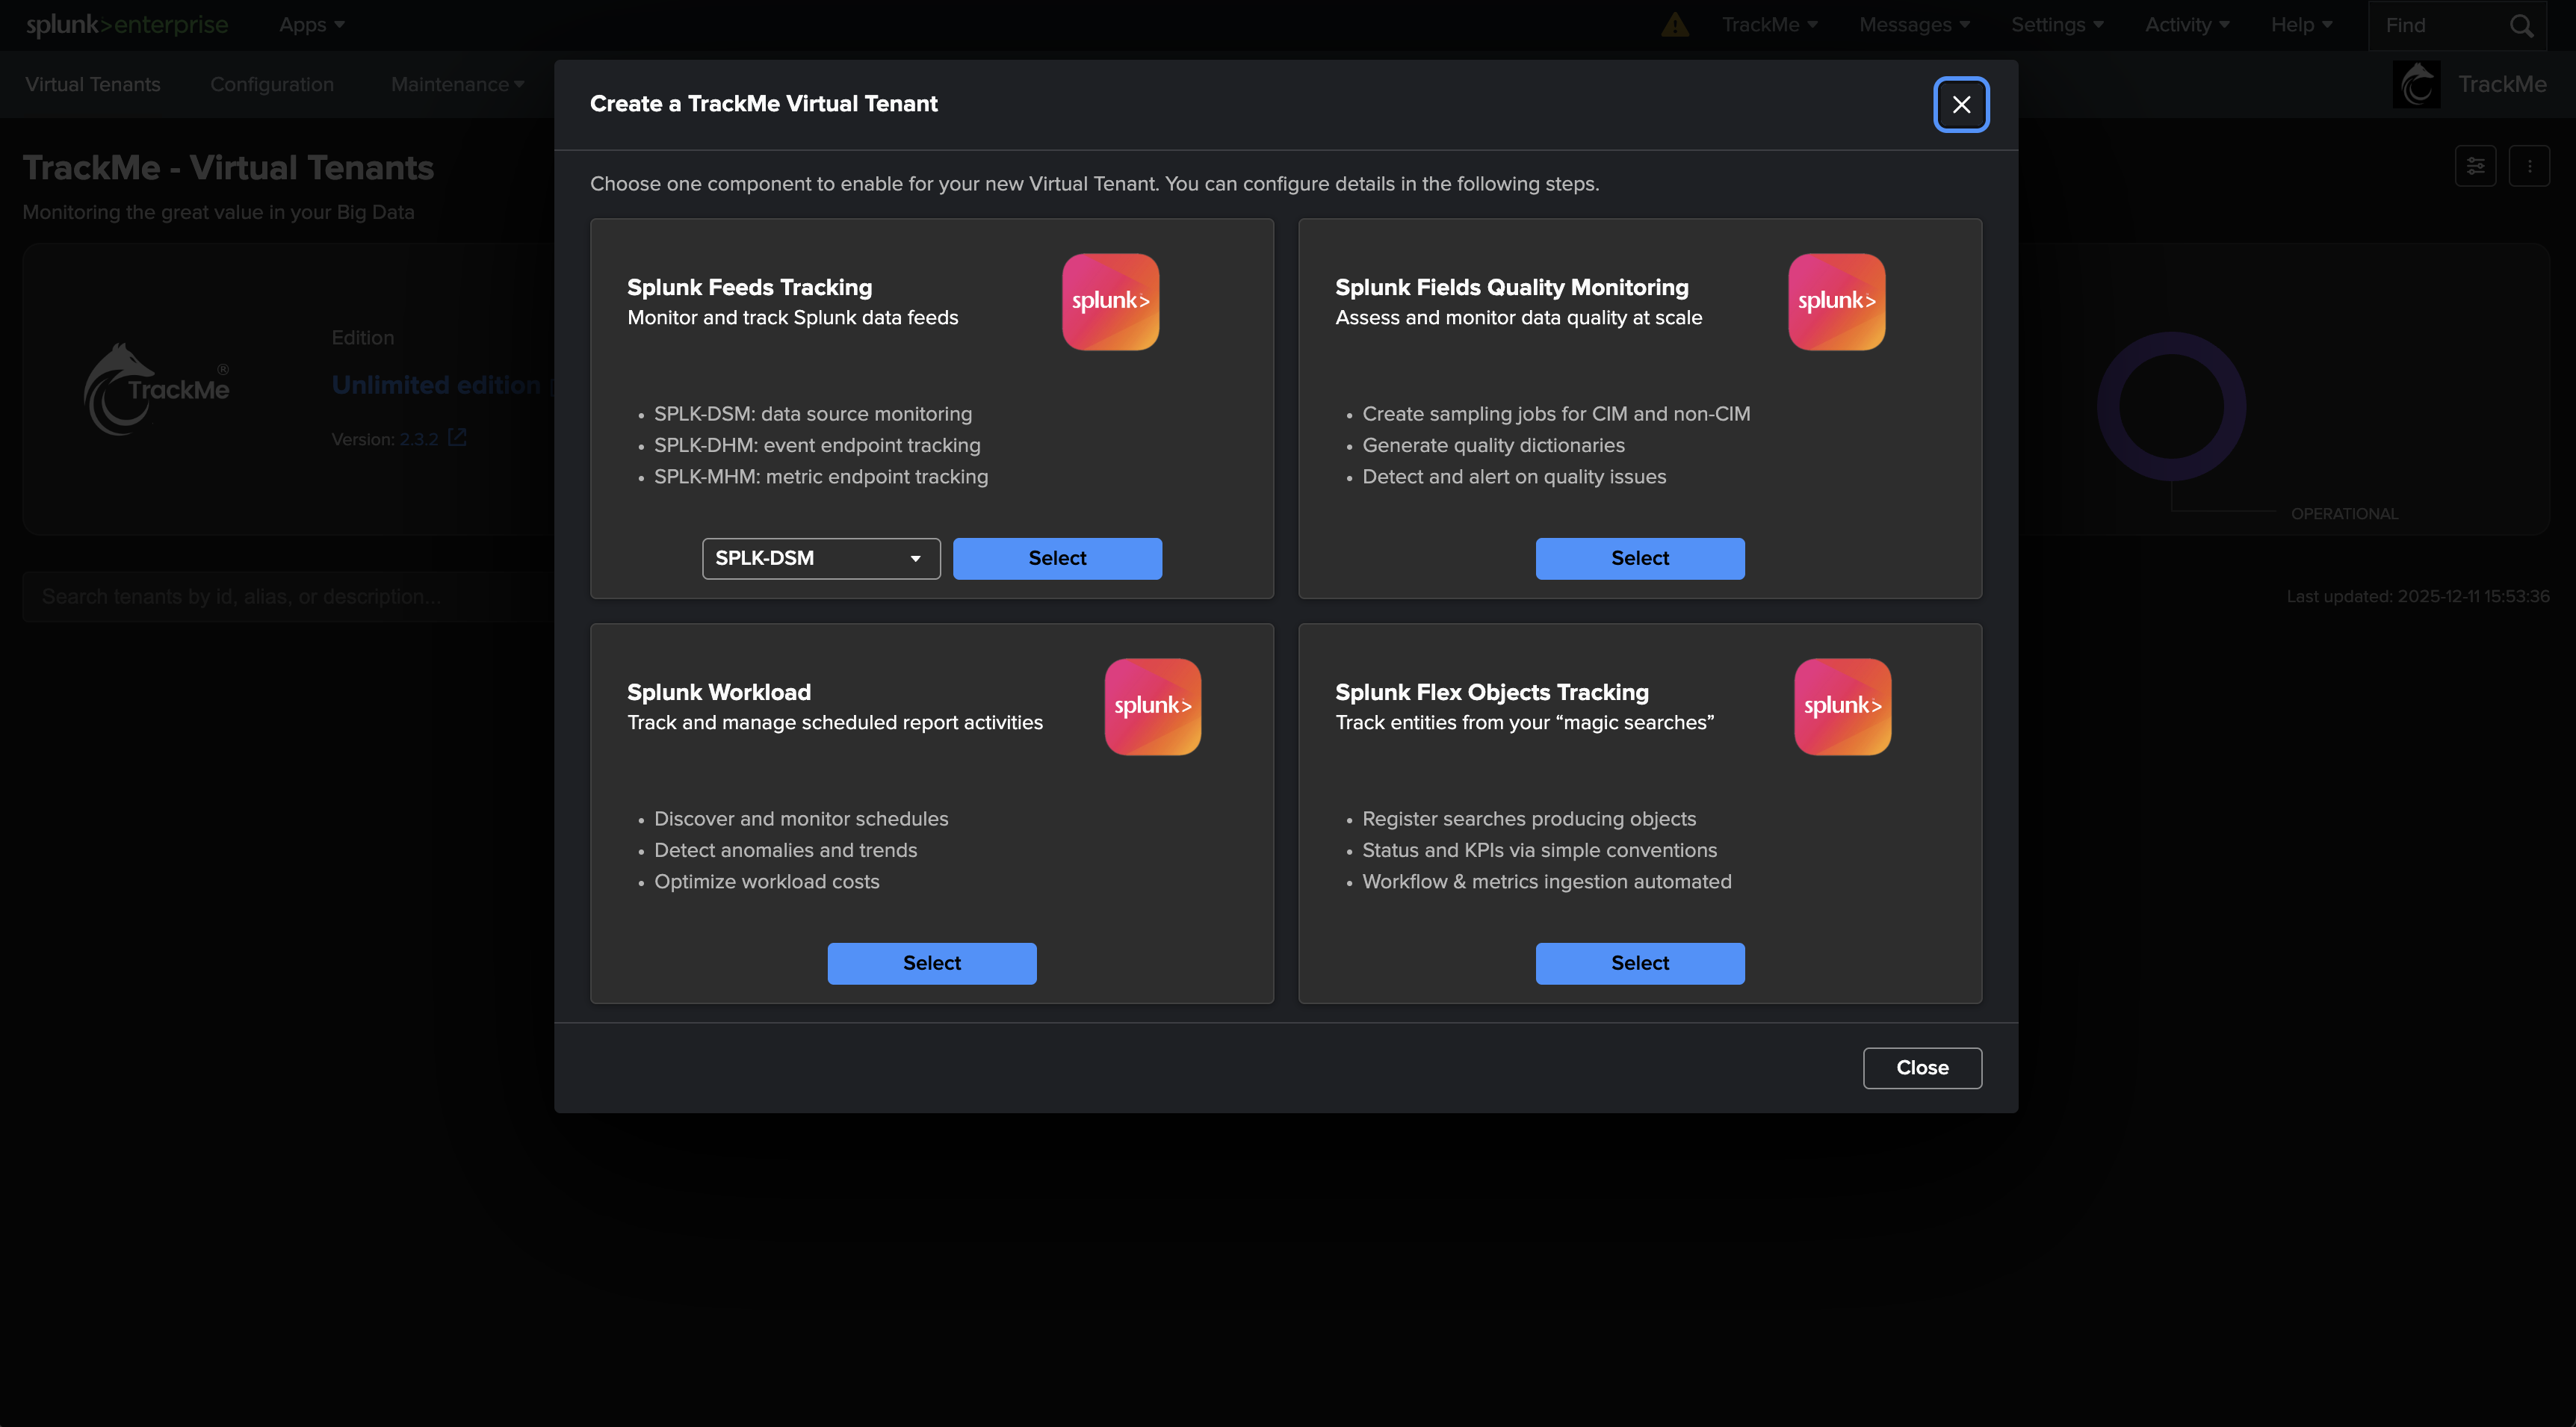
The three-dot menu

The three vertical dots in the top right of the screen are the main selector menu. They give quick access to the main actions, such as creating a new Virtual Tenant:
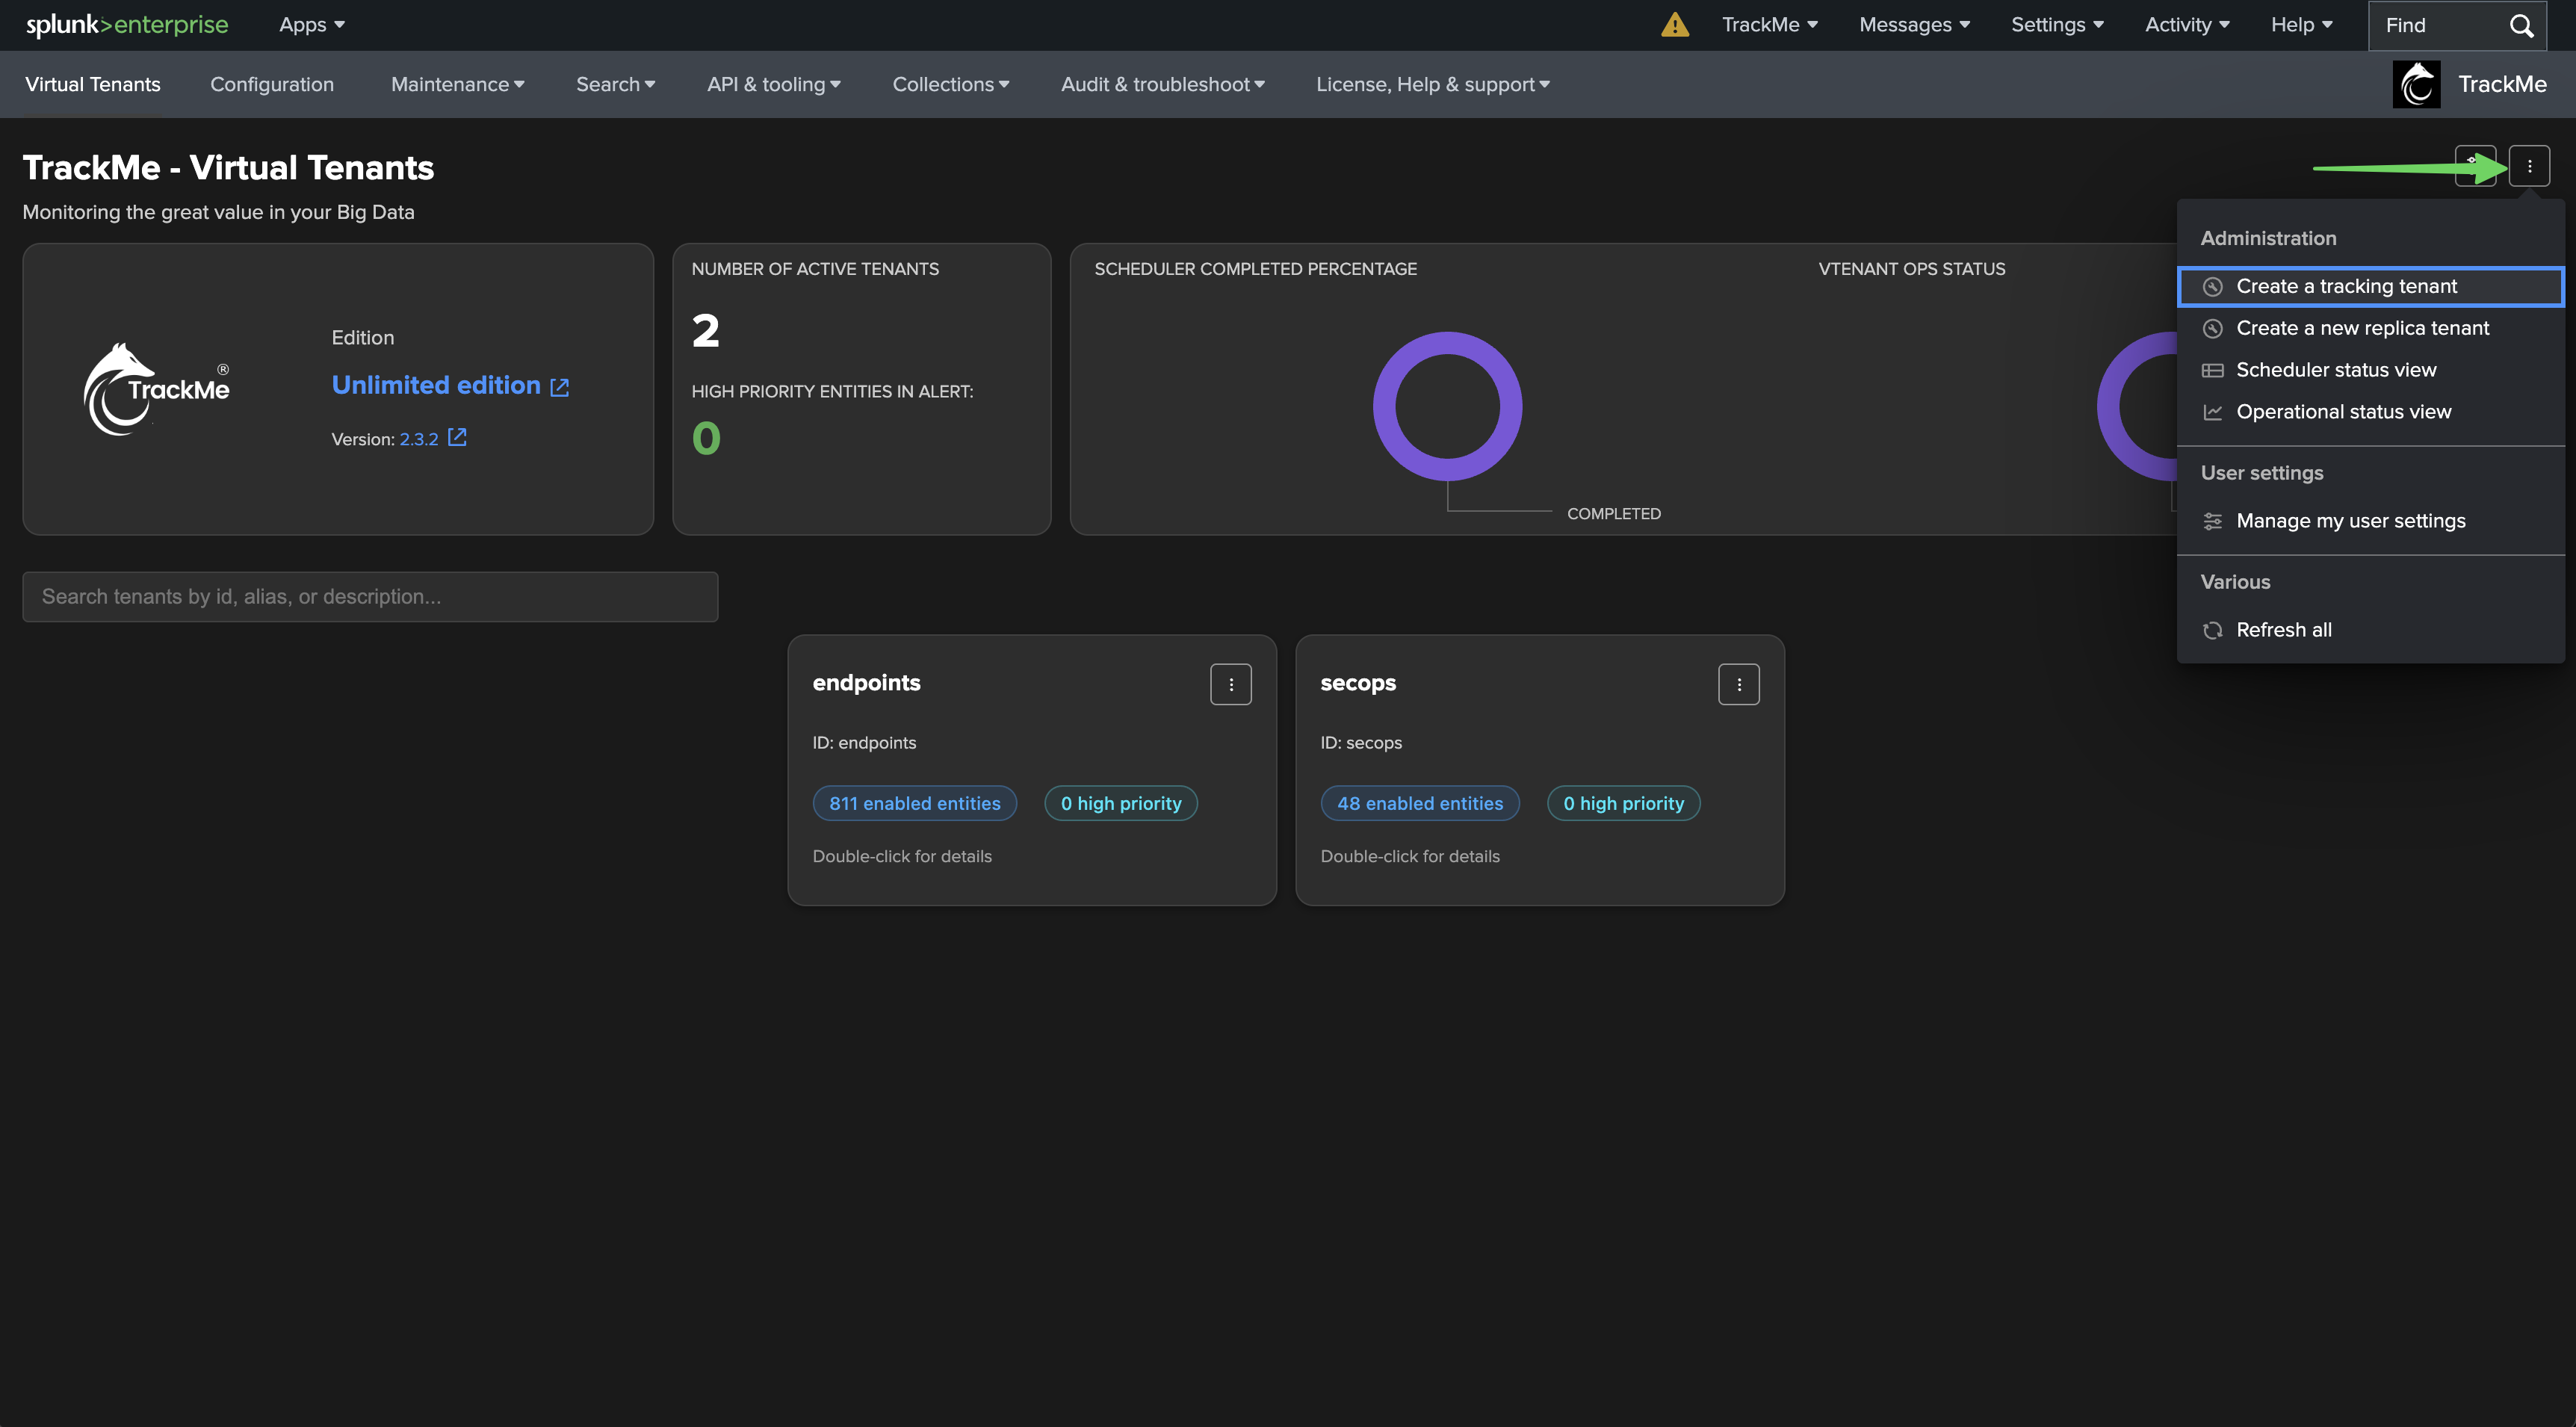
img-005004@2x.png img-005005@2x.png

As a core design principle, every action in TrackMe — whether on a Virtual Tenant, an entity, a chart, and so on — is available through this same three-dot menu, placed on the relevant element.

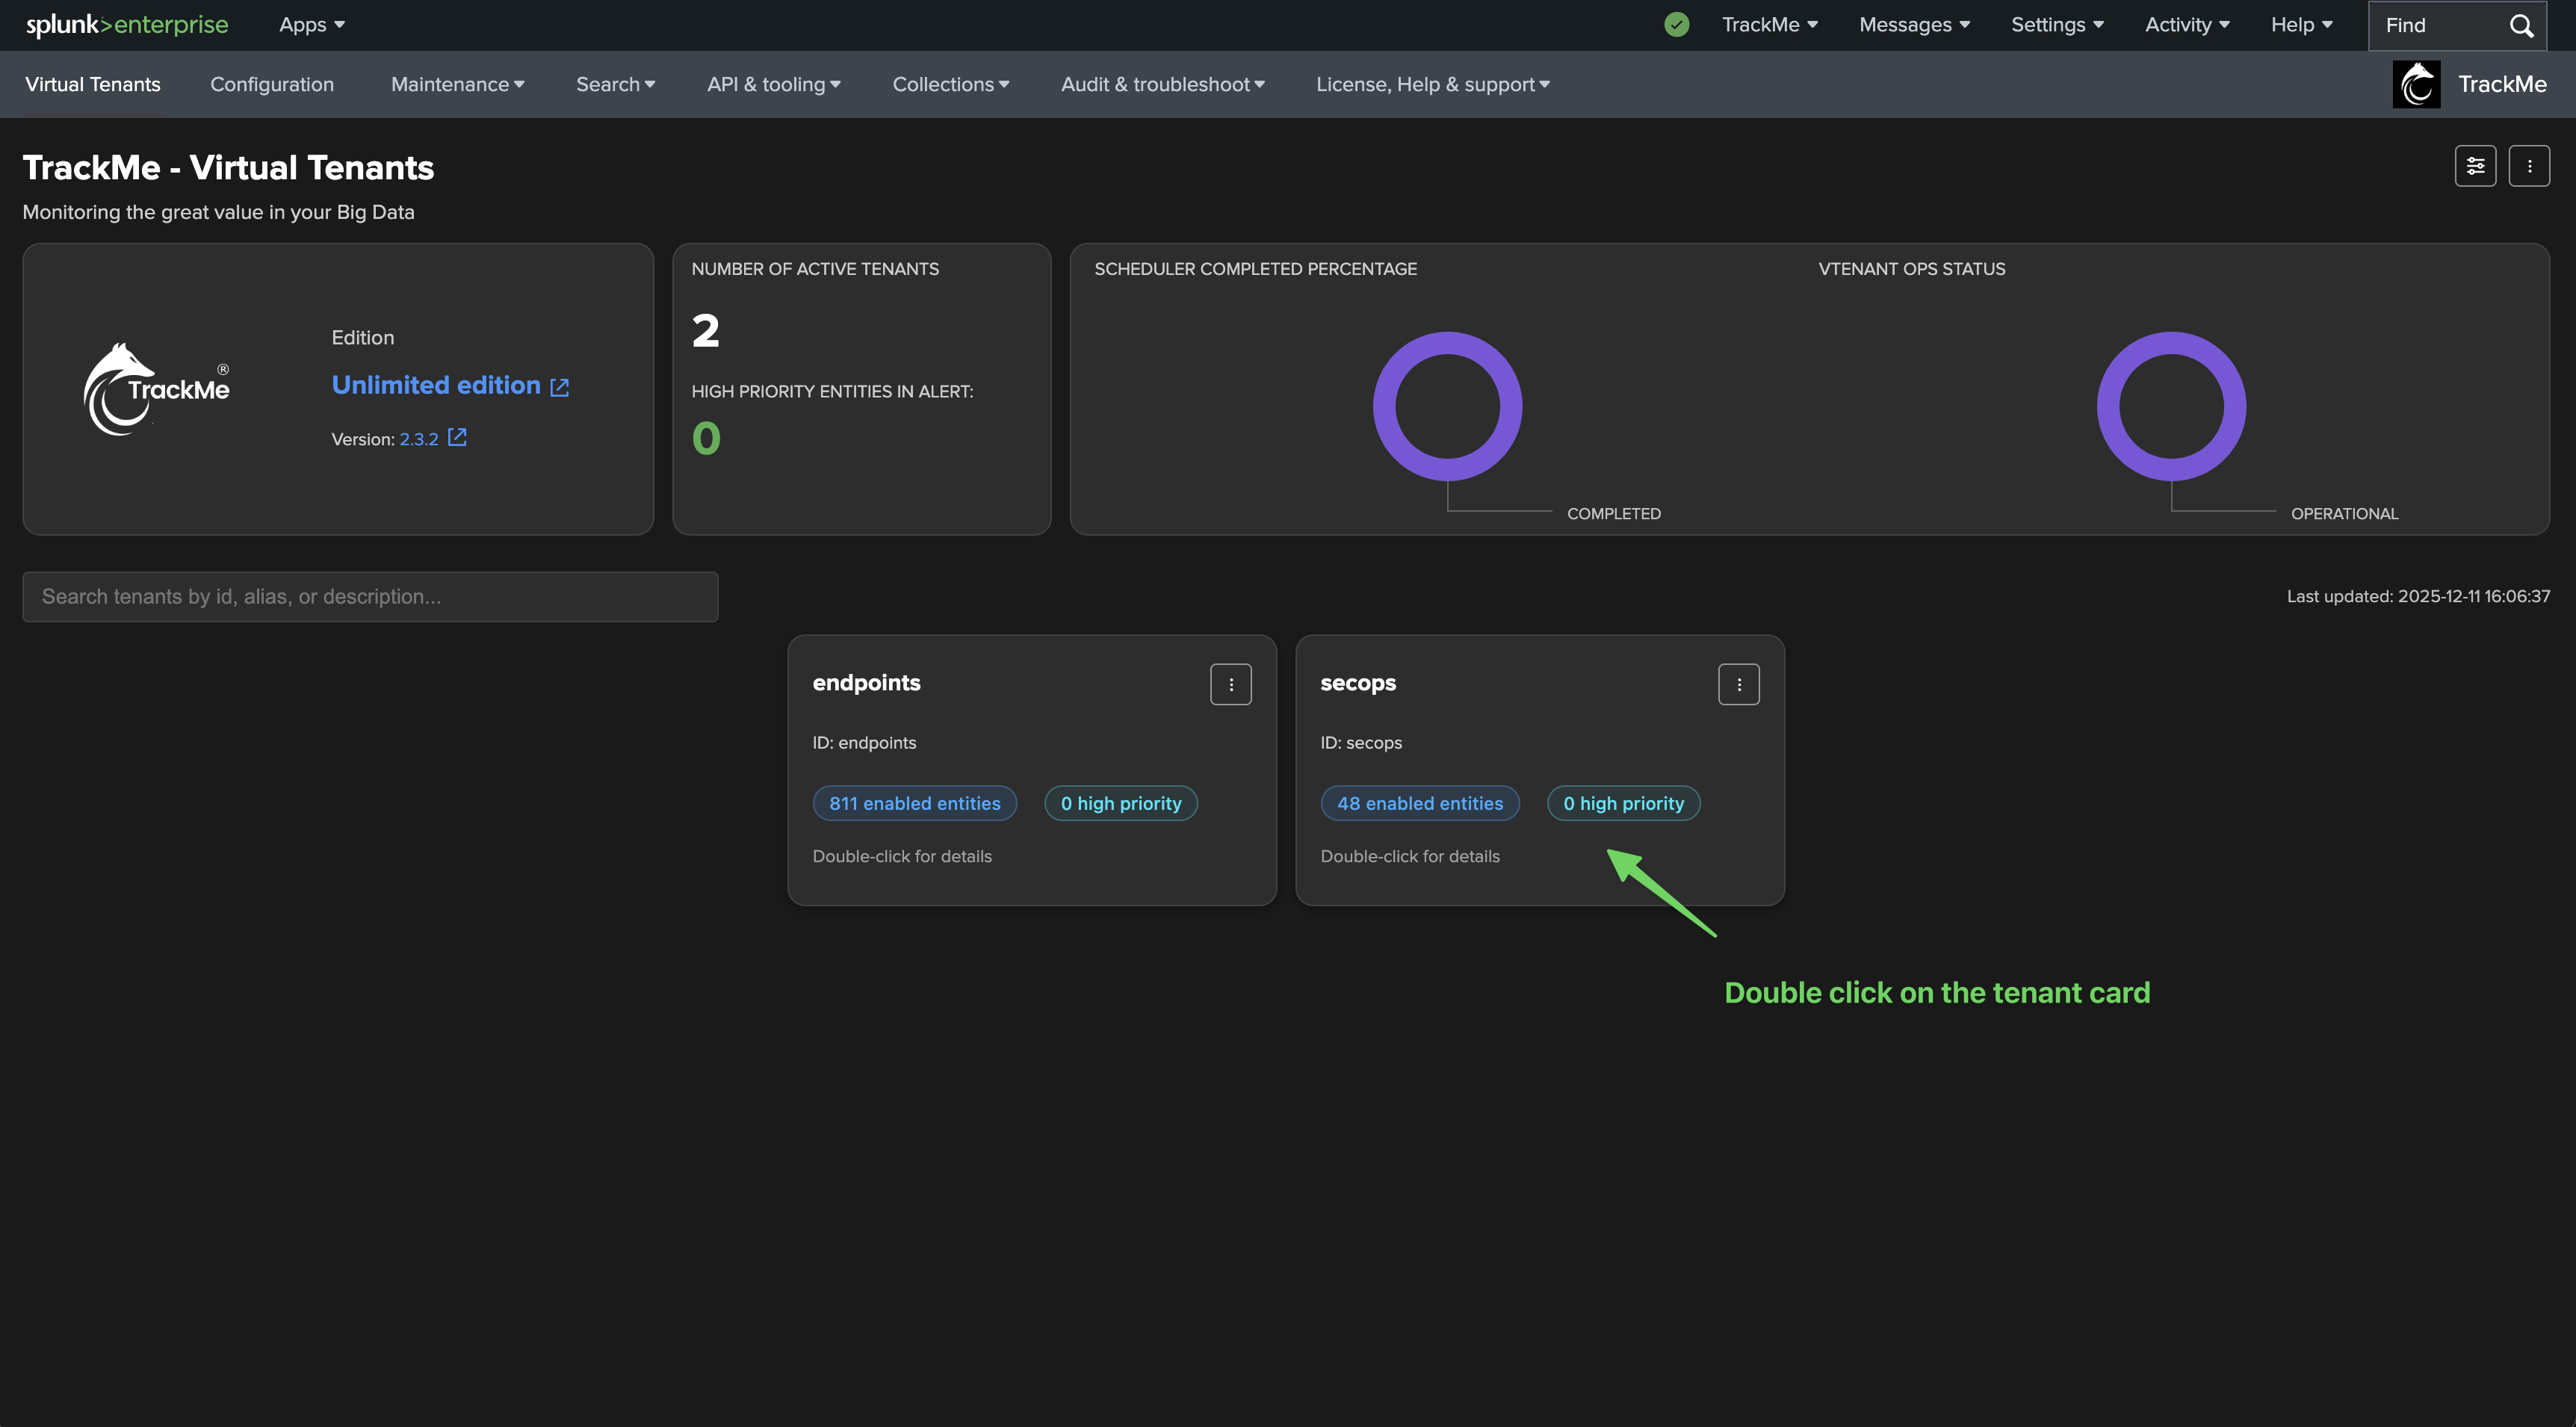
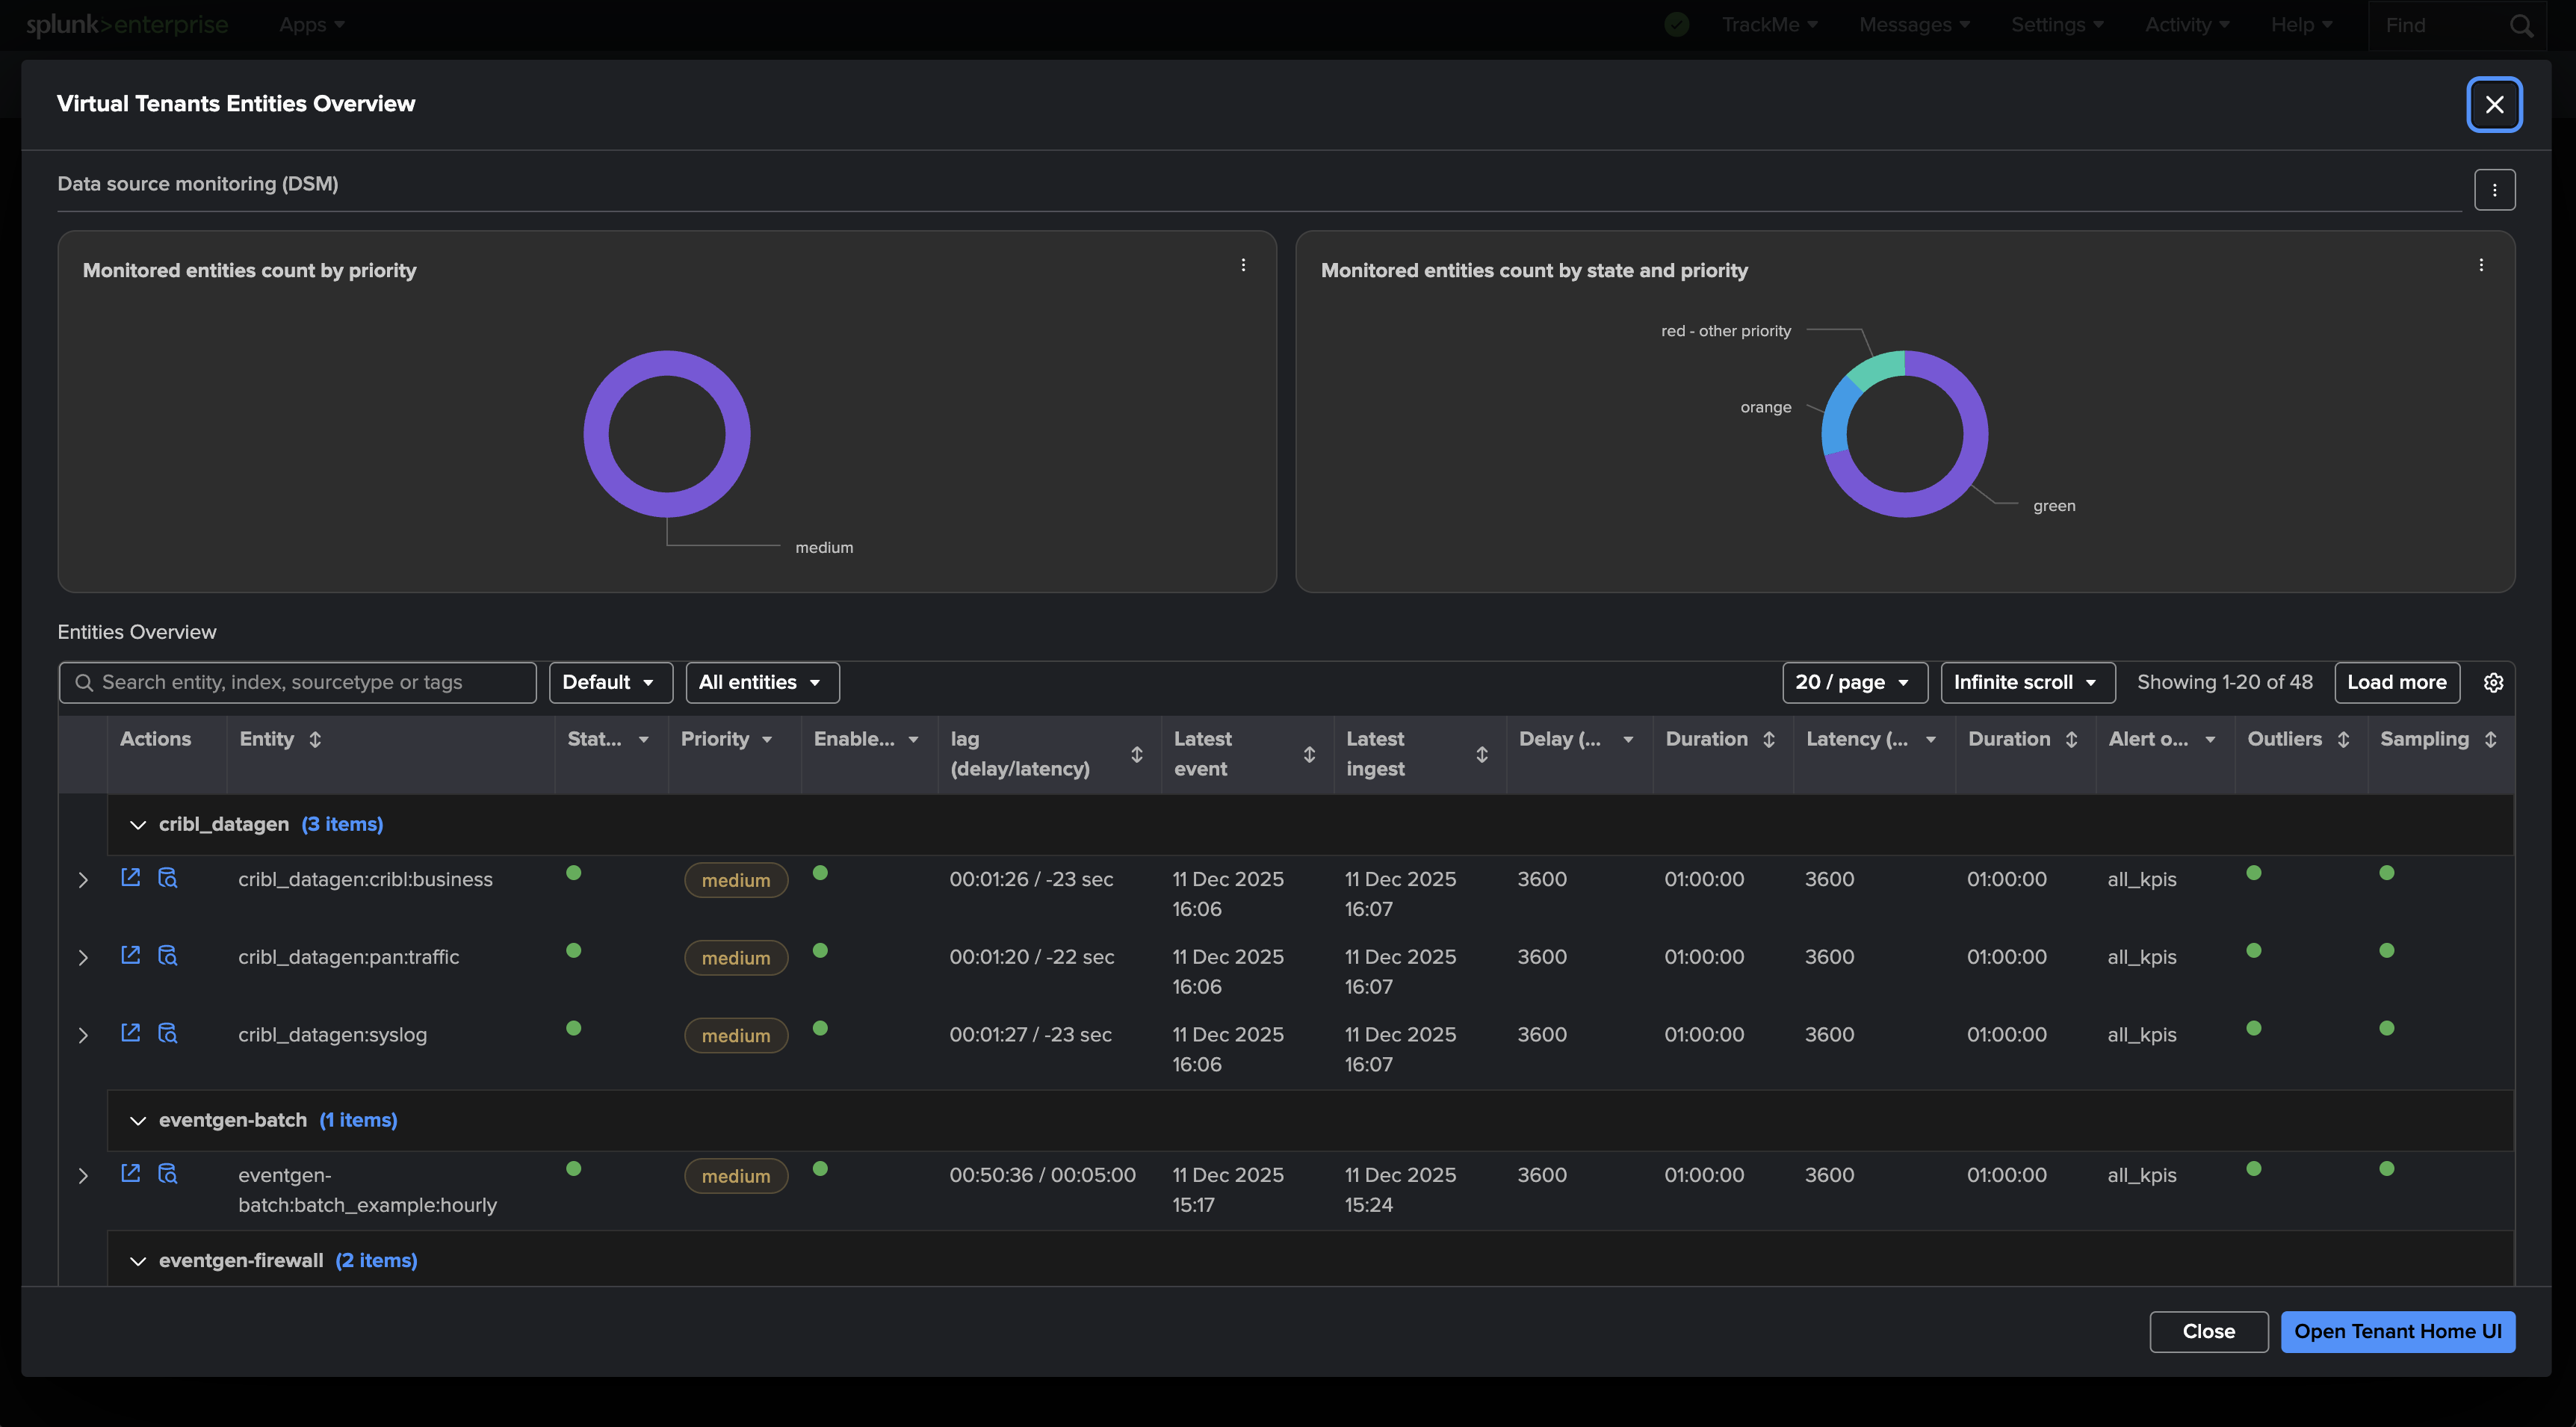
Opening a Virtual Tenant overview

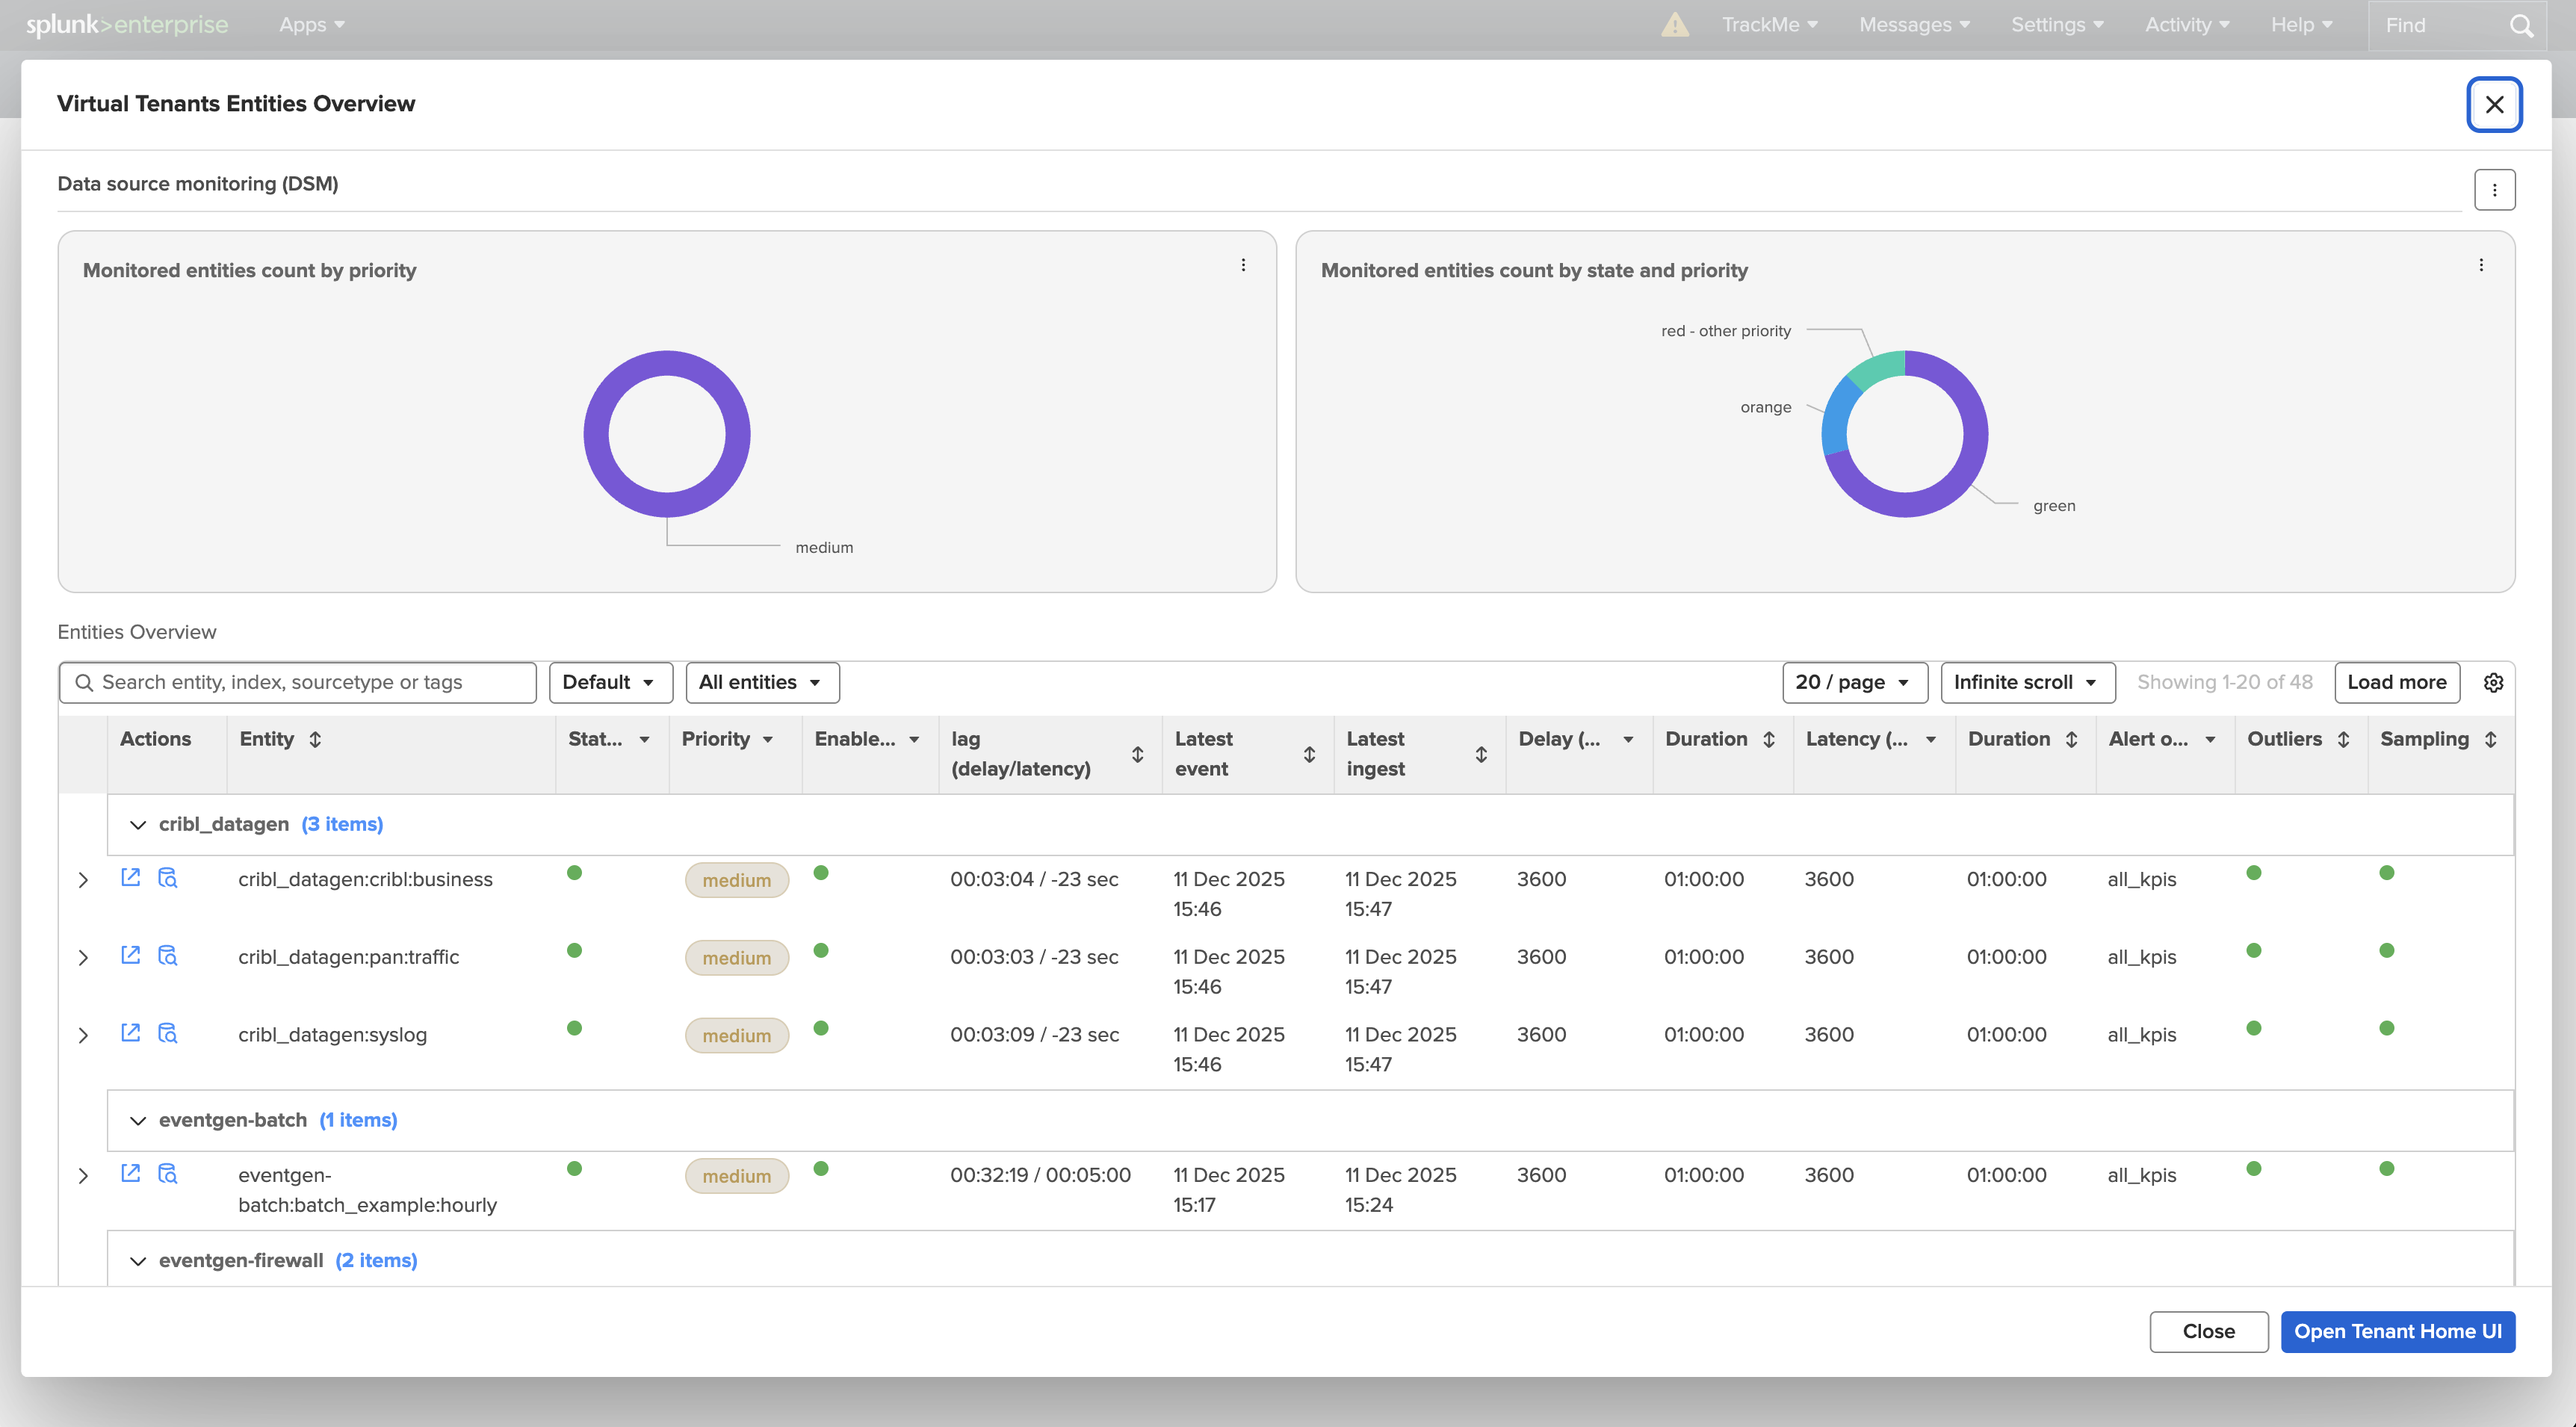
Double-click a Virtual Tenant card to open its overview — a modal that summarises the tenant and offers actions such as managing or entering it.
img-005006@2x.png img-005007@2x.png

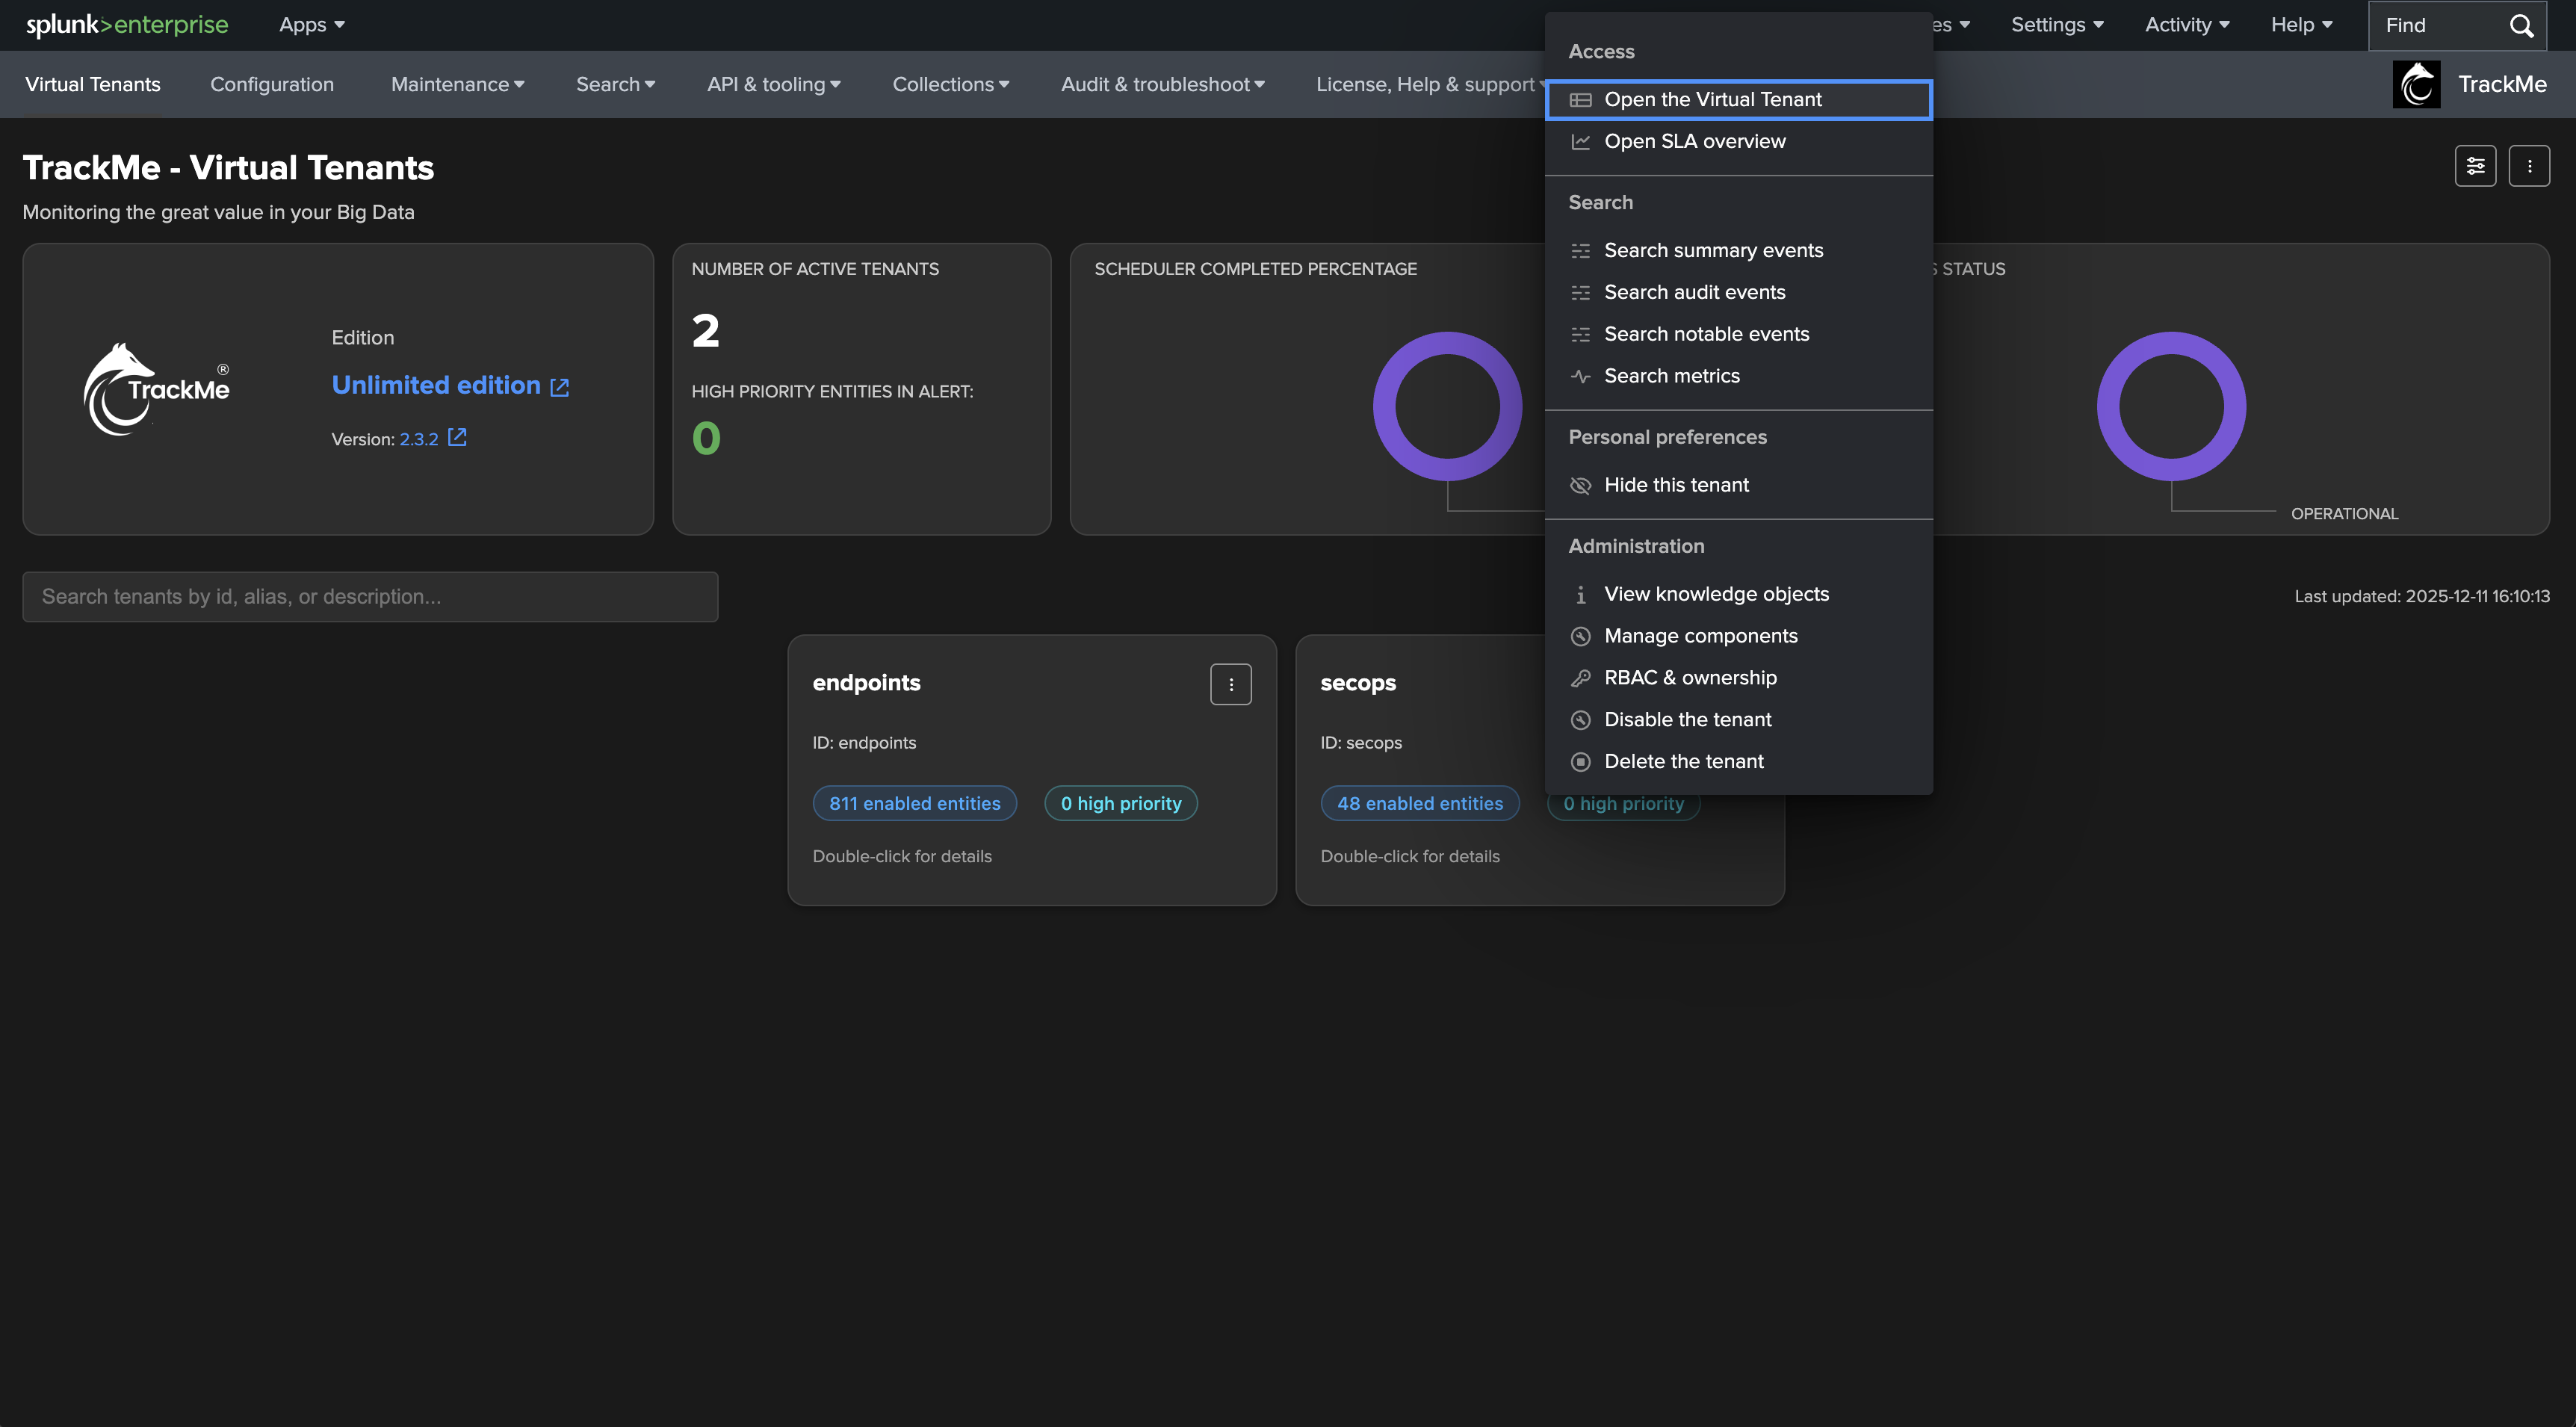
The tenant actions menu

Click the tenant’s three-dot icon to open the menu specific to that tenant. The available actions depend on your privileges and the tenant’s status.
img-005008@2x.png

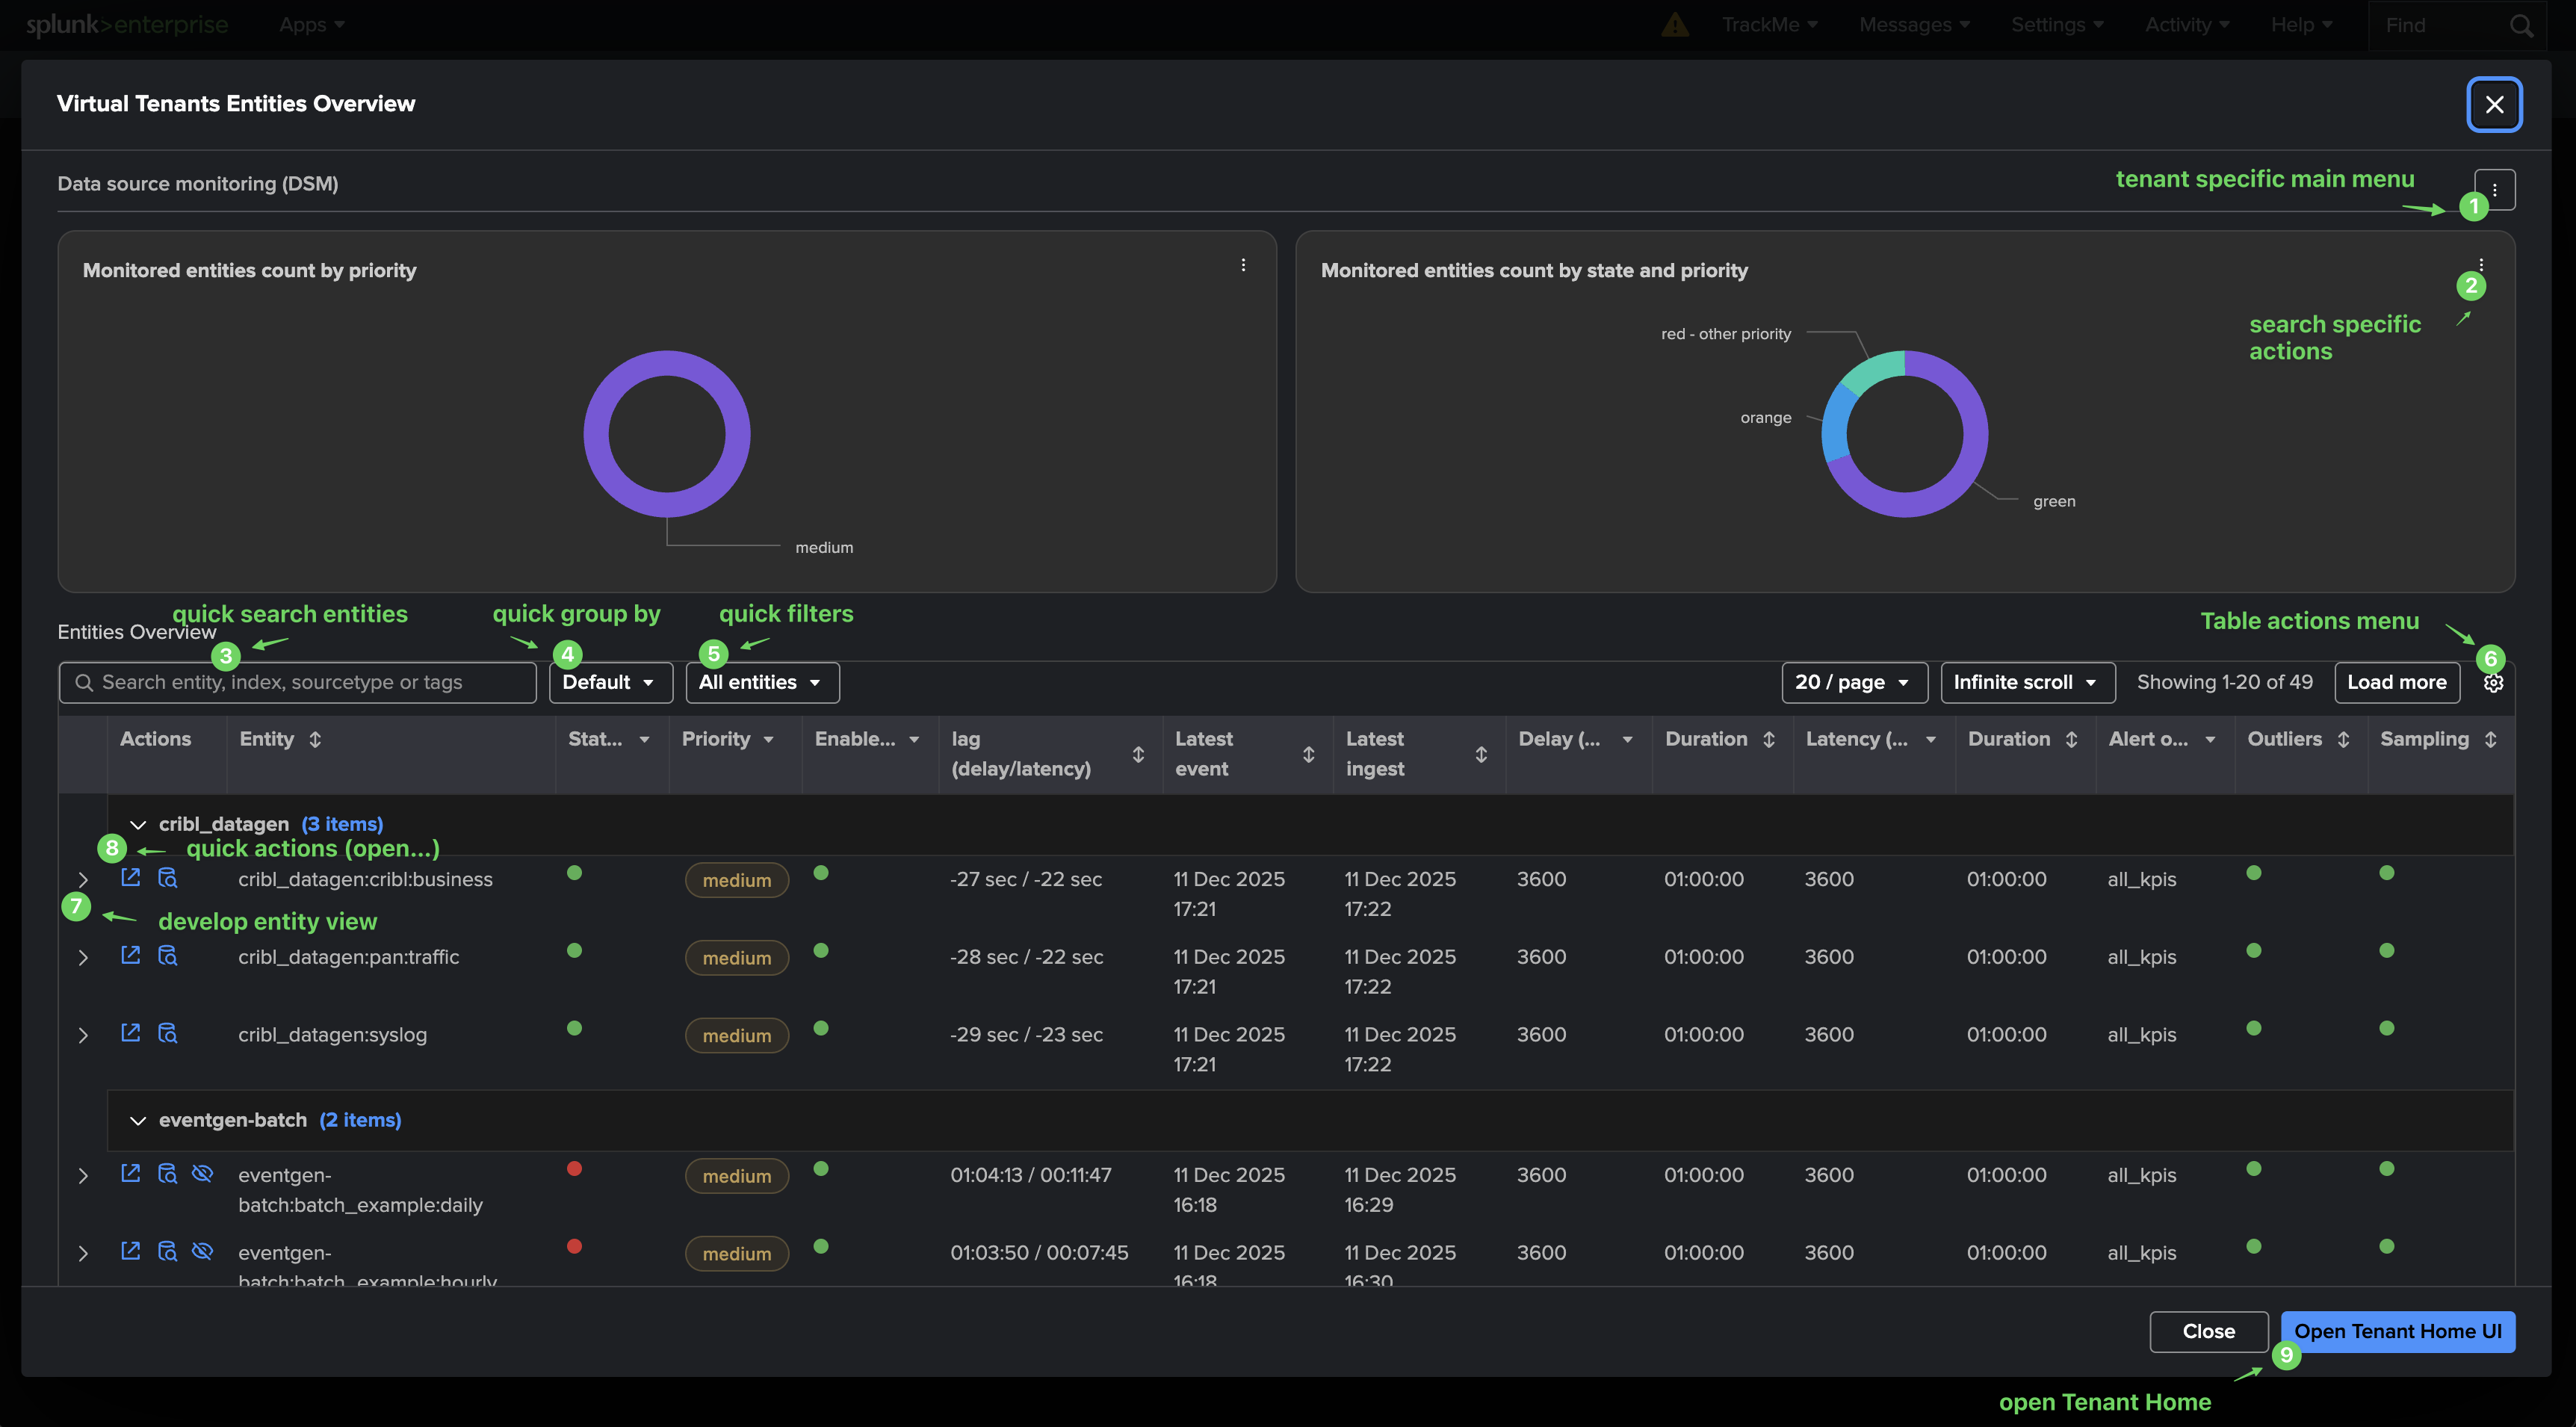
Reviewing entities (read-only)

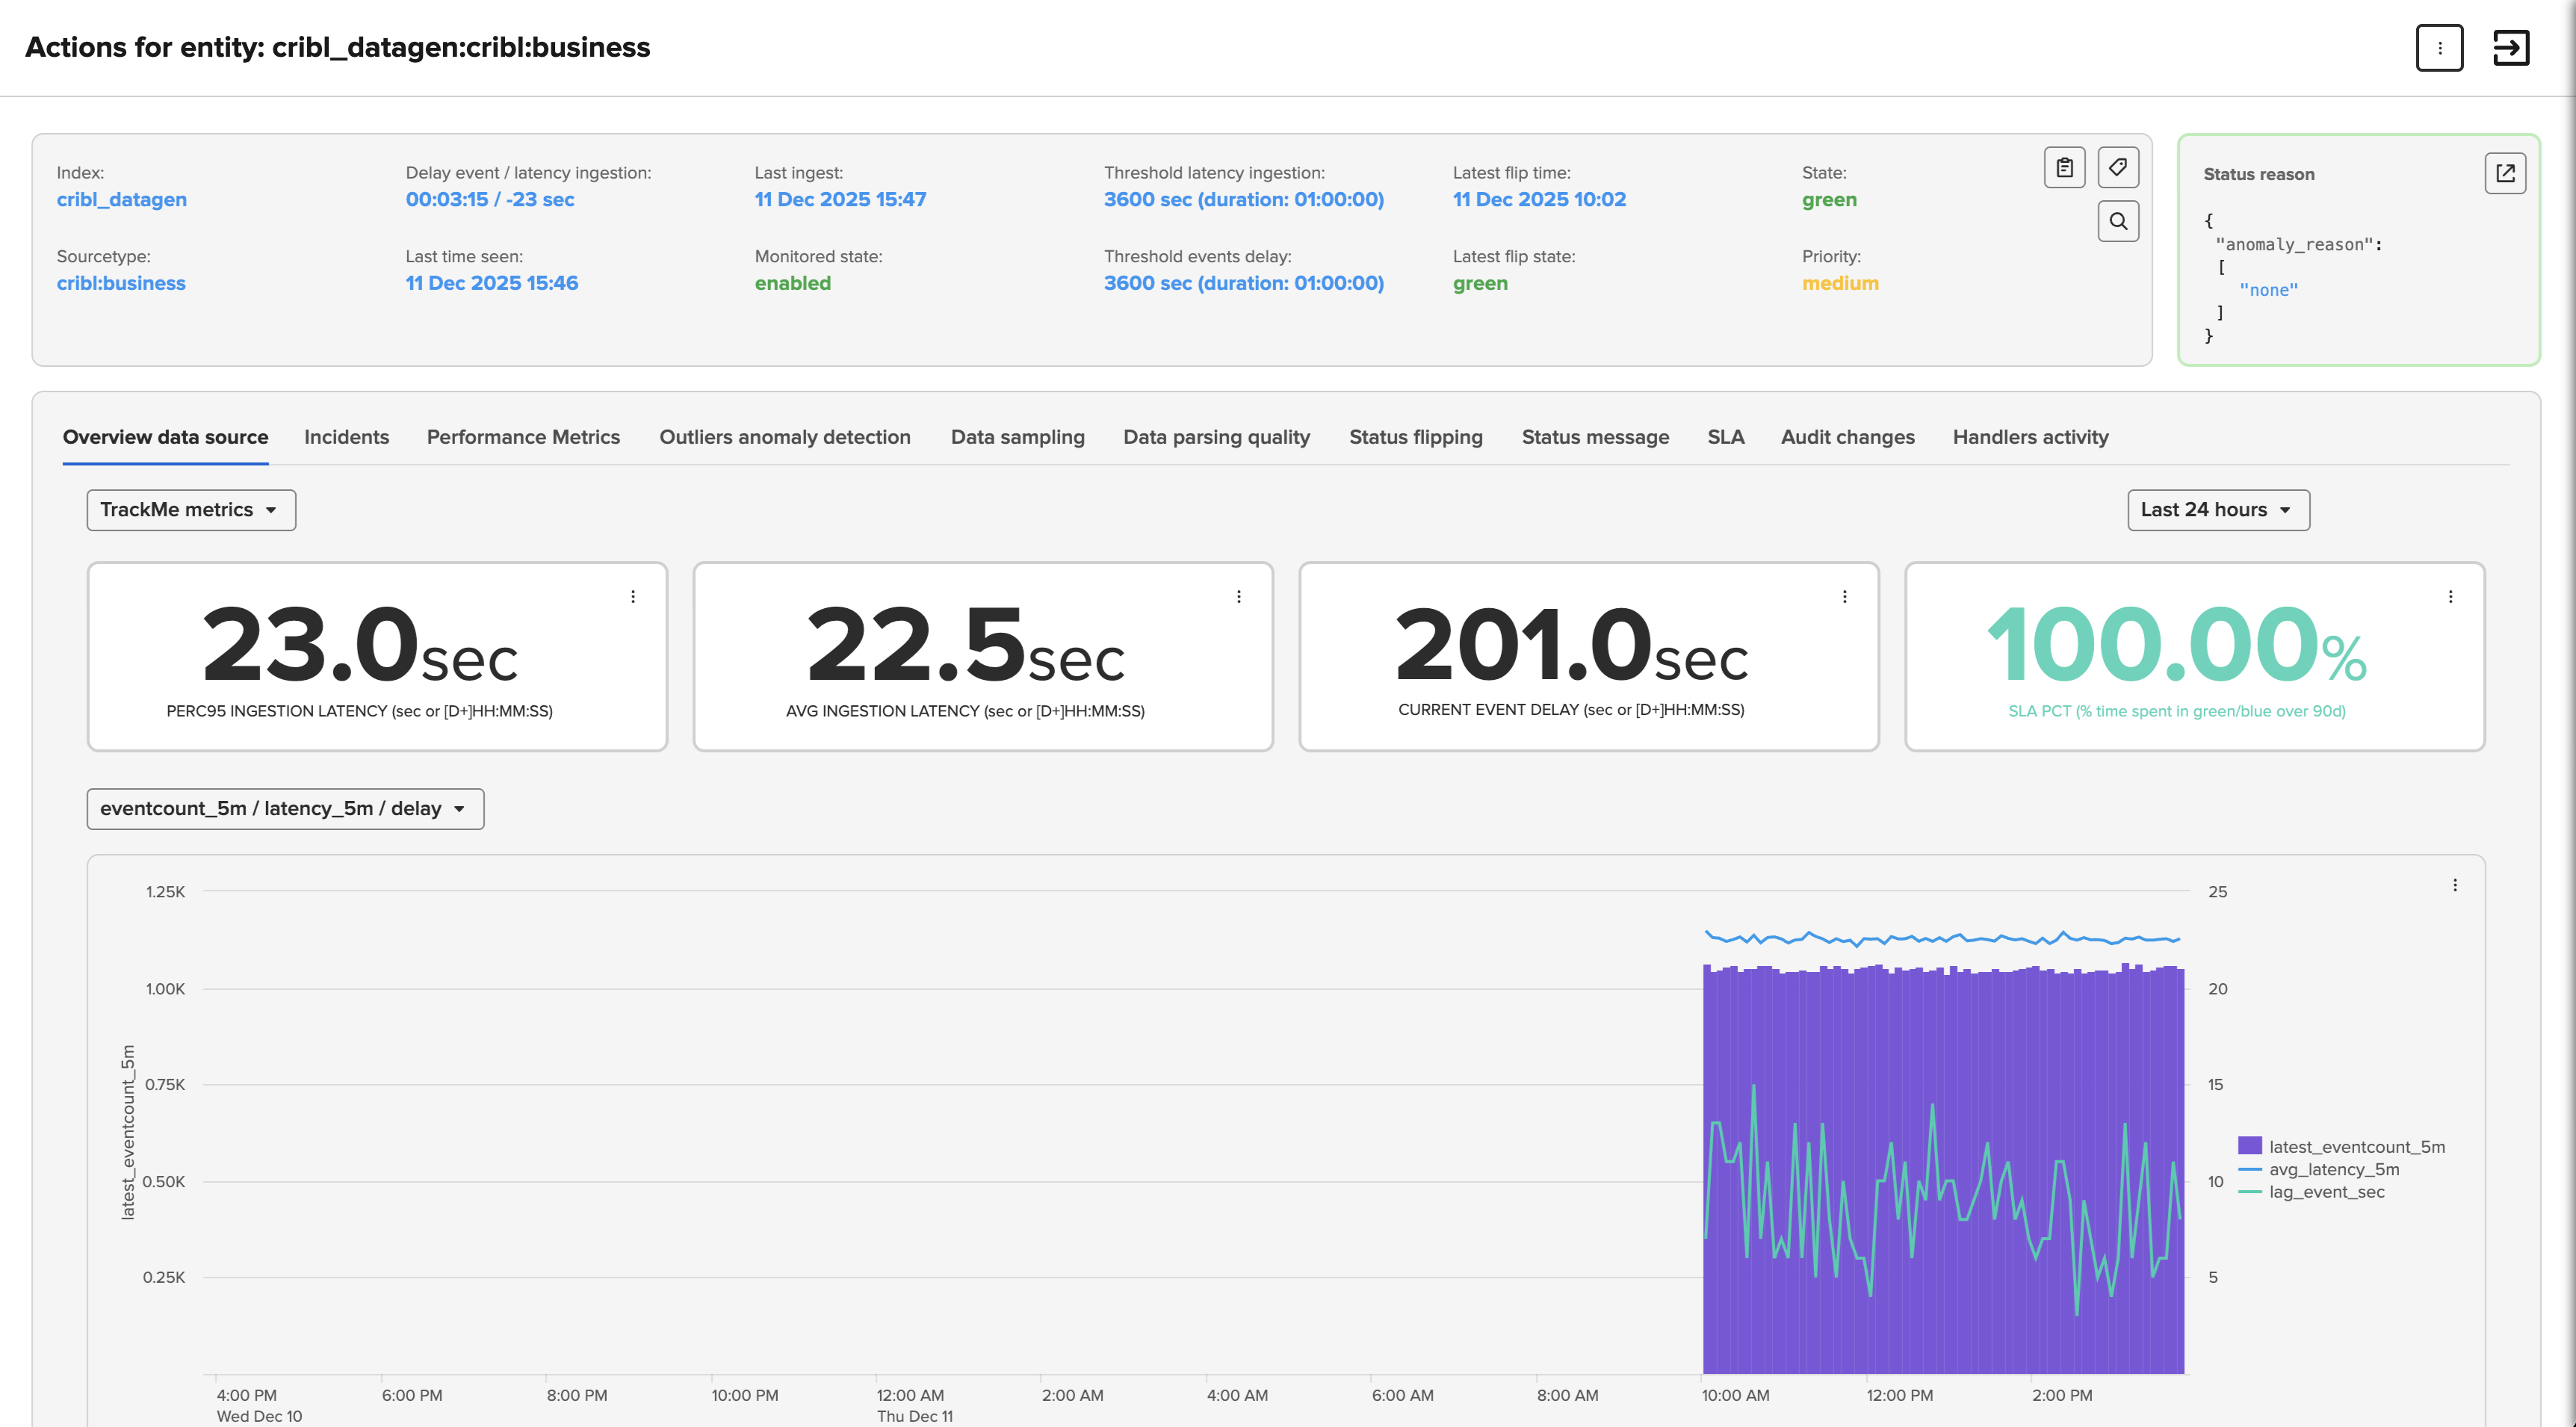
From the Virtual Tenant overview you can browse the tenant’s entities in read-only mode. Many actions are available — for instance, expand an entity to review detailed information and mini-charts.
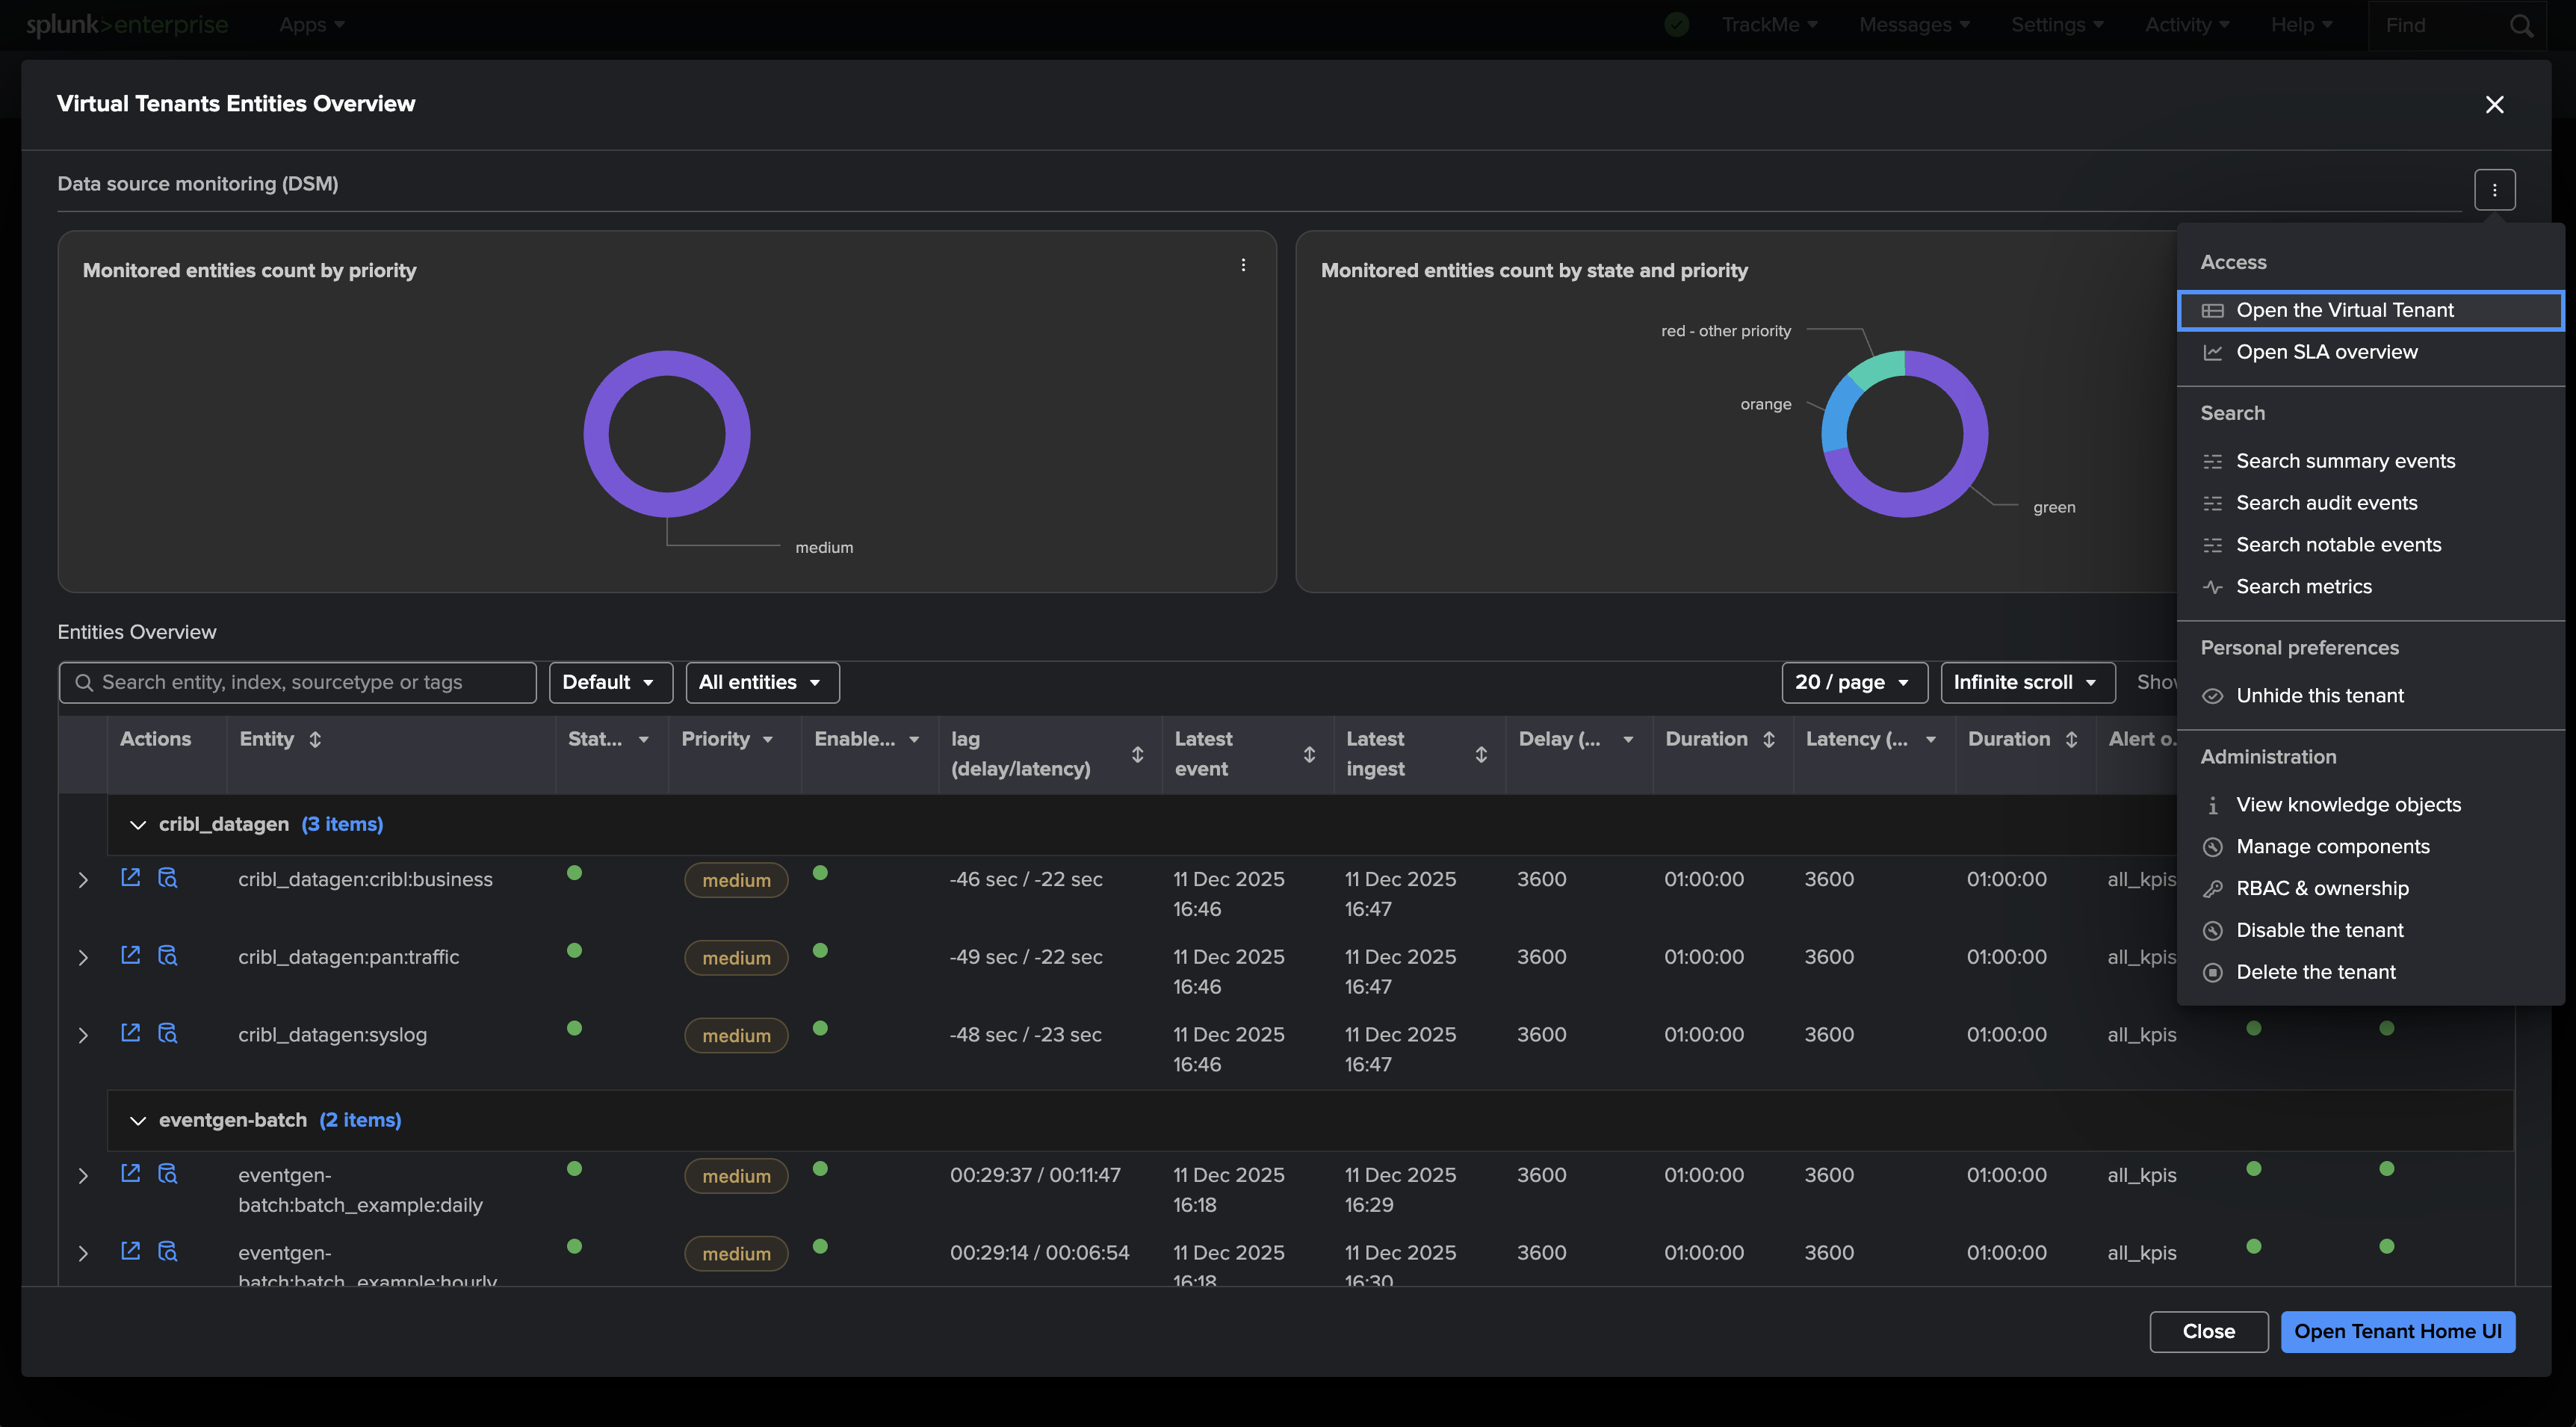
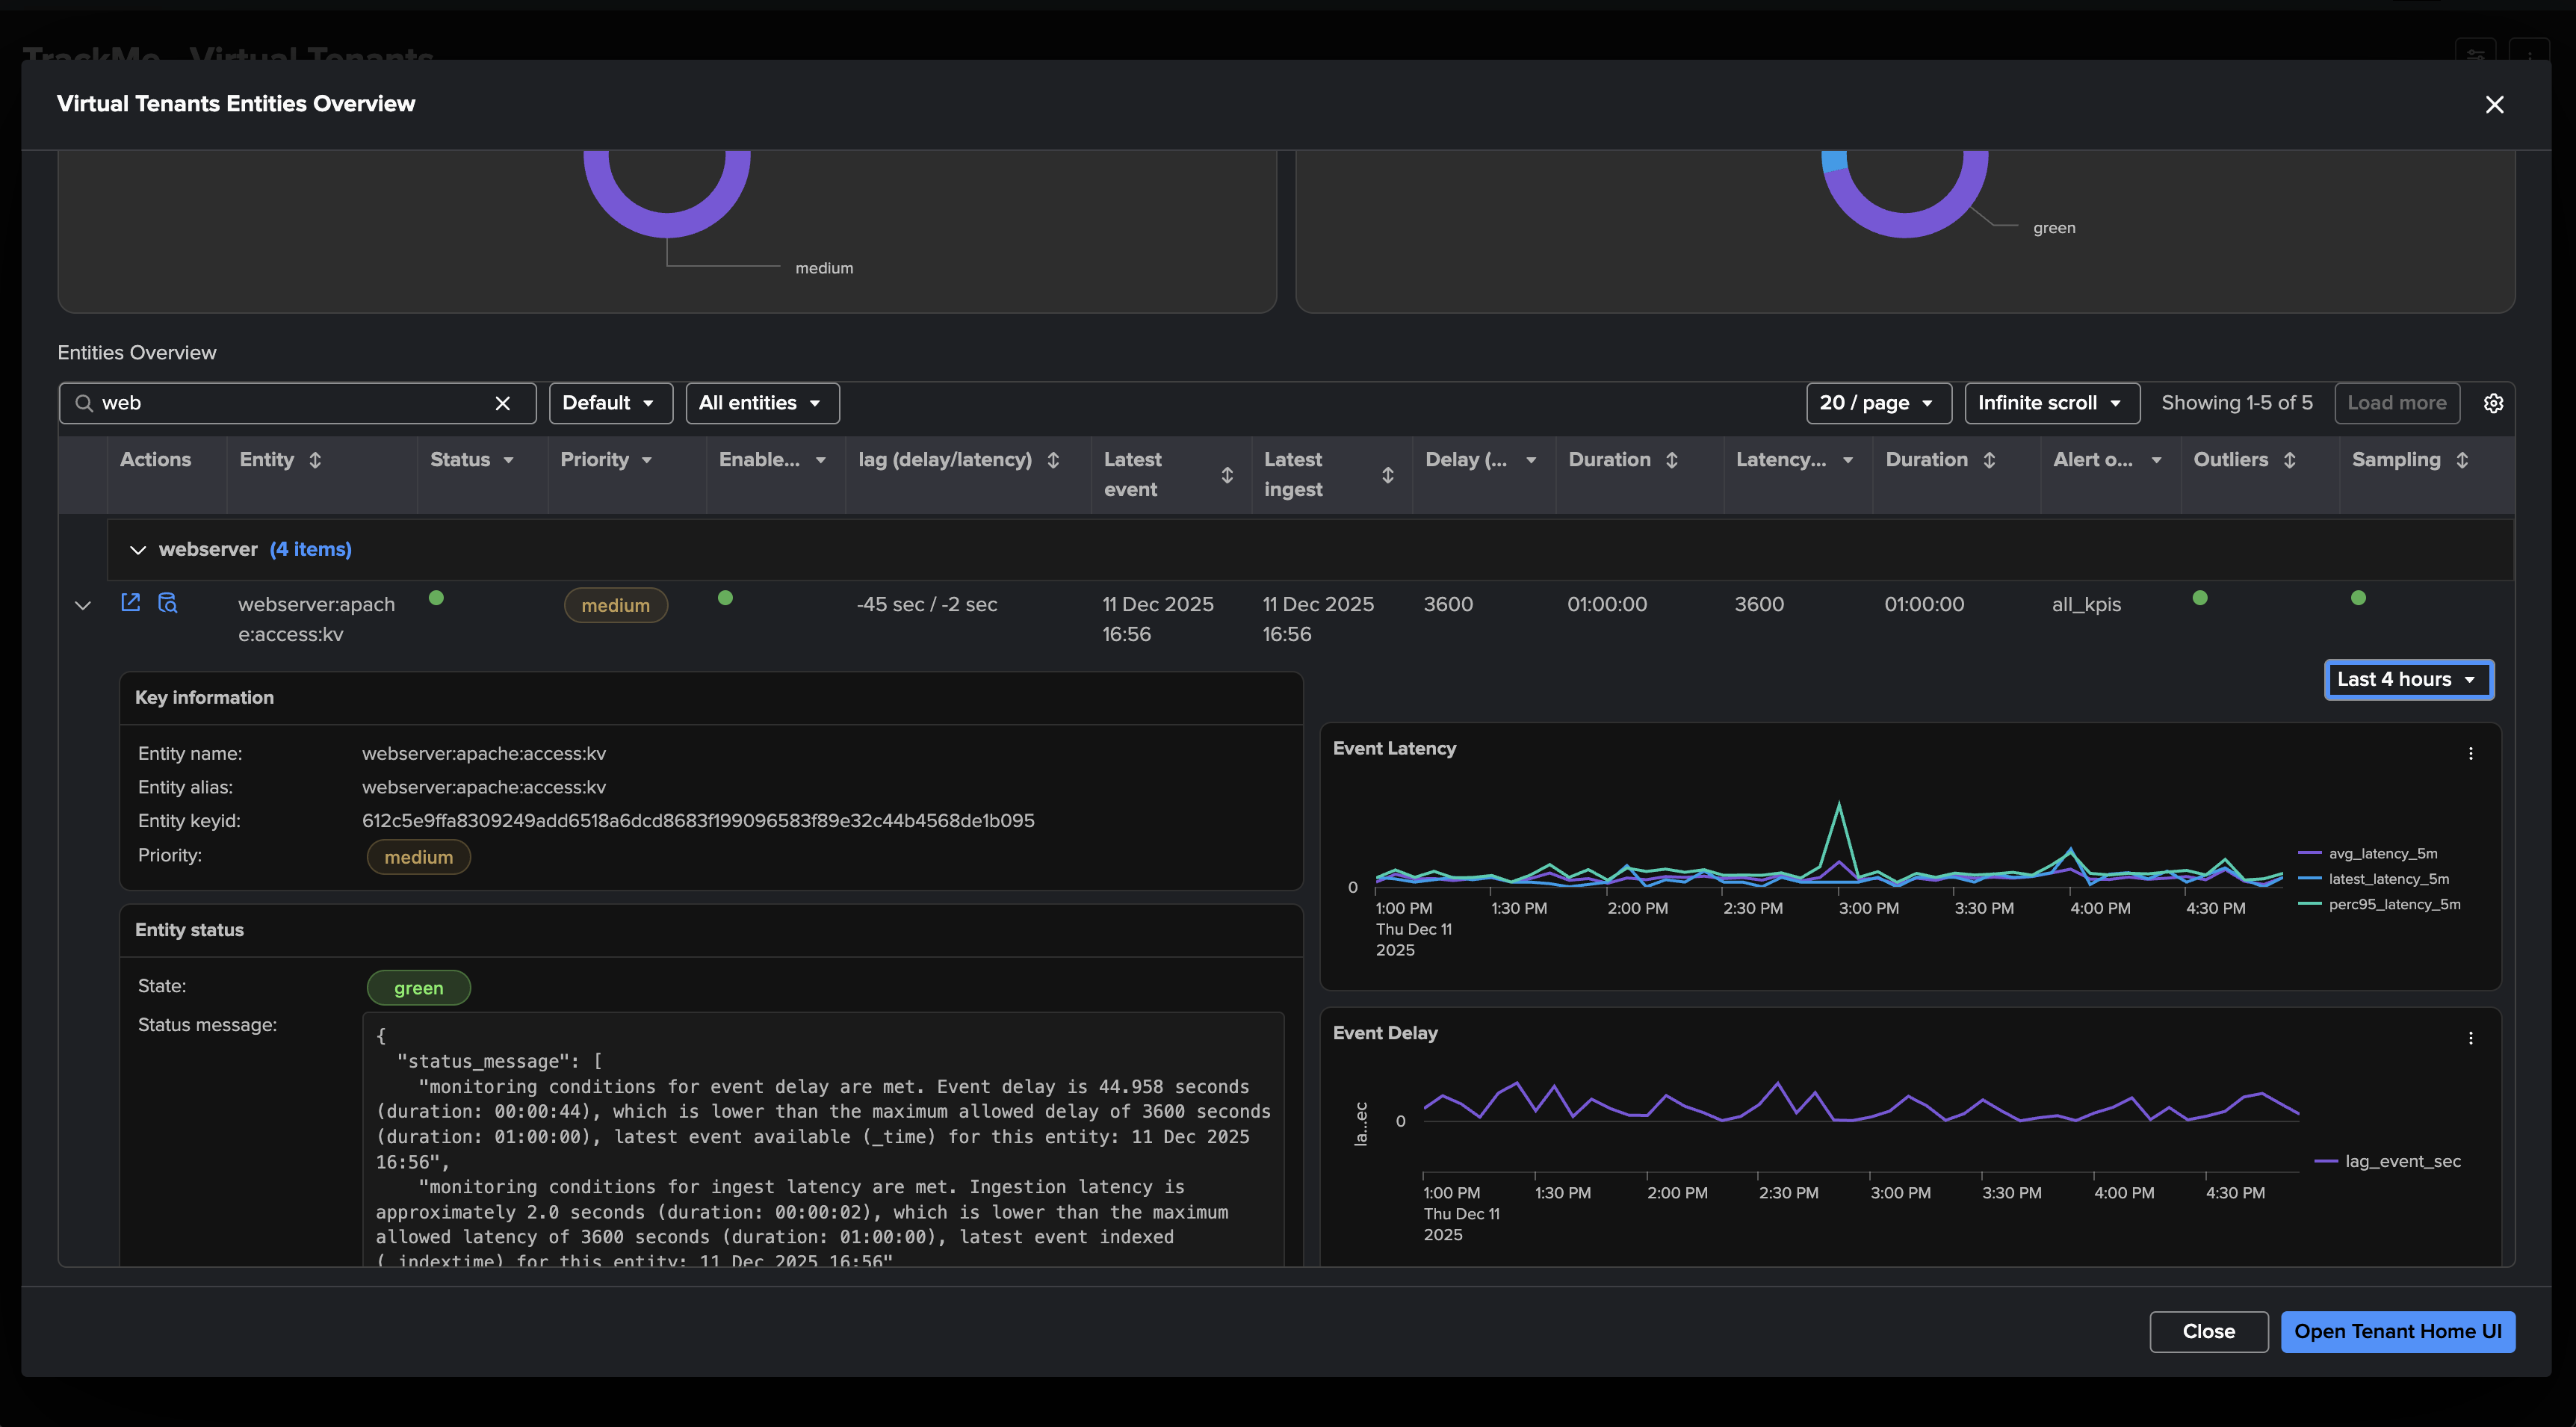
img-005013@2x.png img-005015@2x.png

Hiding a Virtual Tenant

You can hide a specific Virtual Tenant from the interface; the preference is stored per-user and persists. In a large environment this is useful when a user has access to a tenant (through RBAC) but does not need to see it in the UI. Once one or more tenants are hidden, the three-dot menu adapts to offer the show/hide action accordingly.
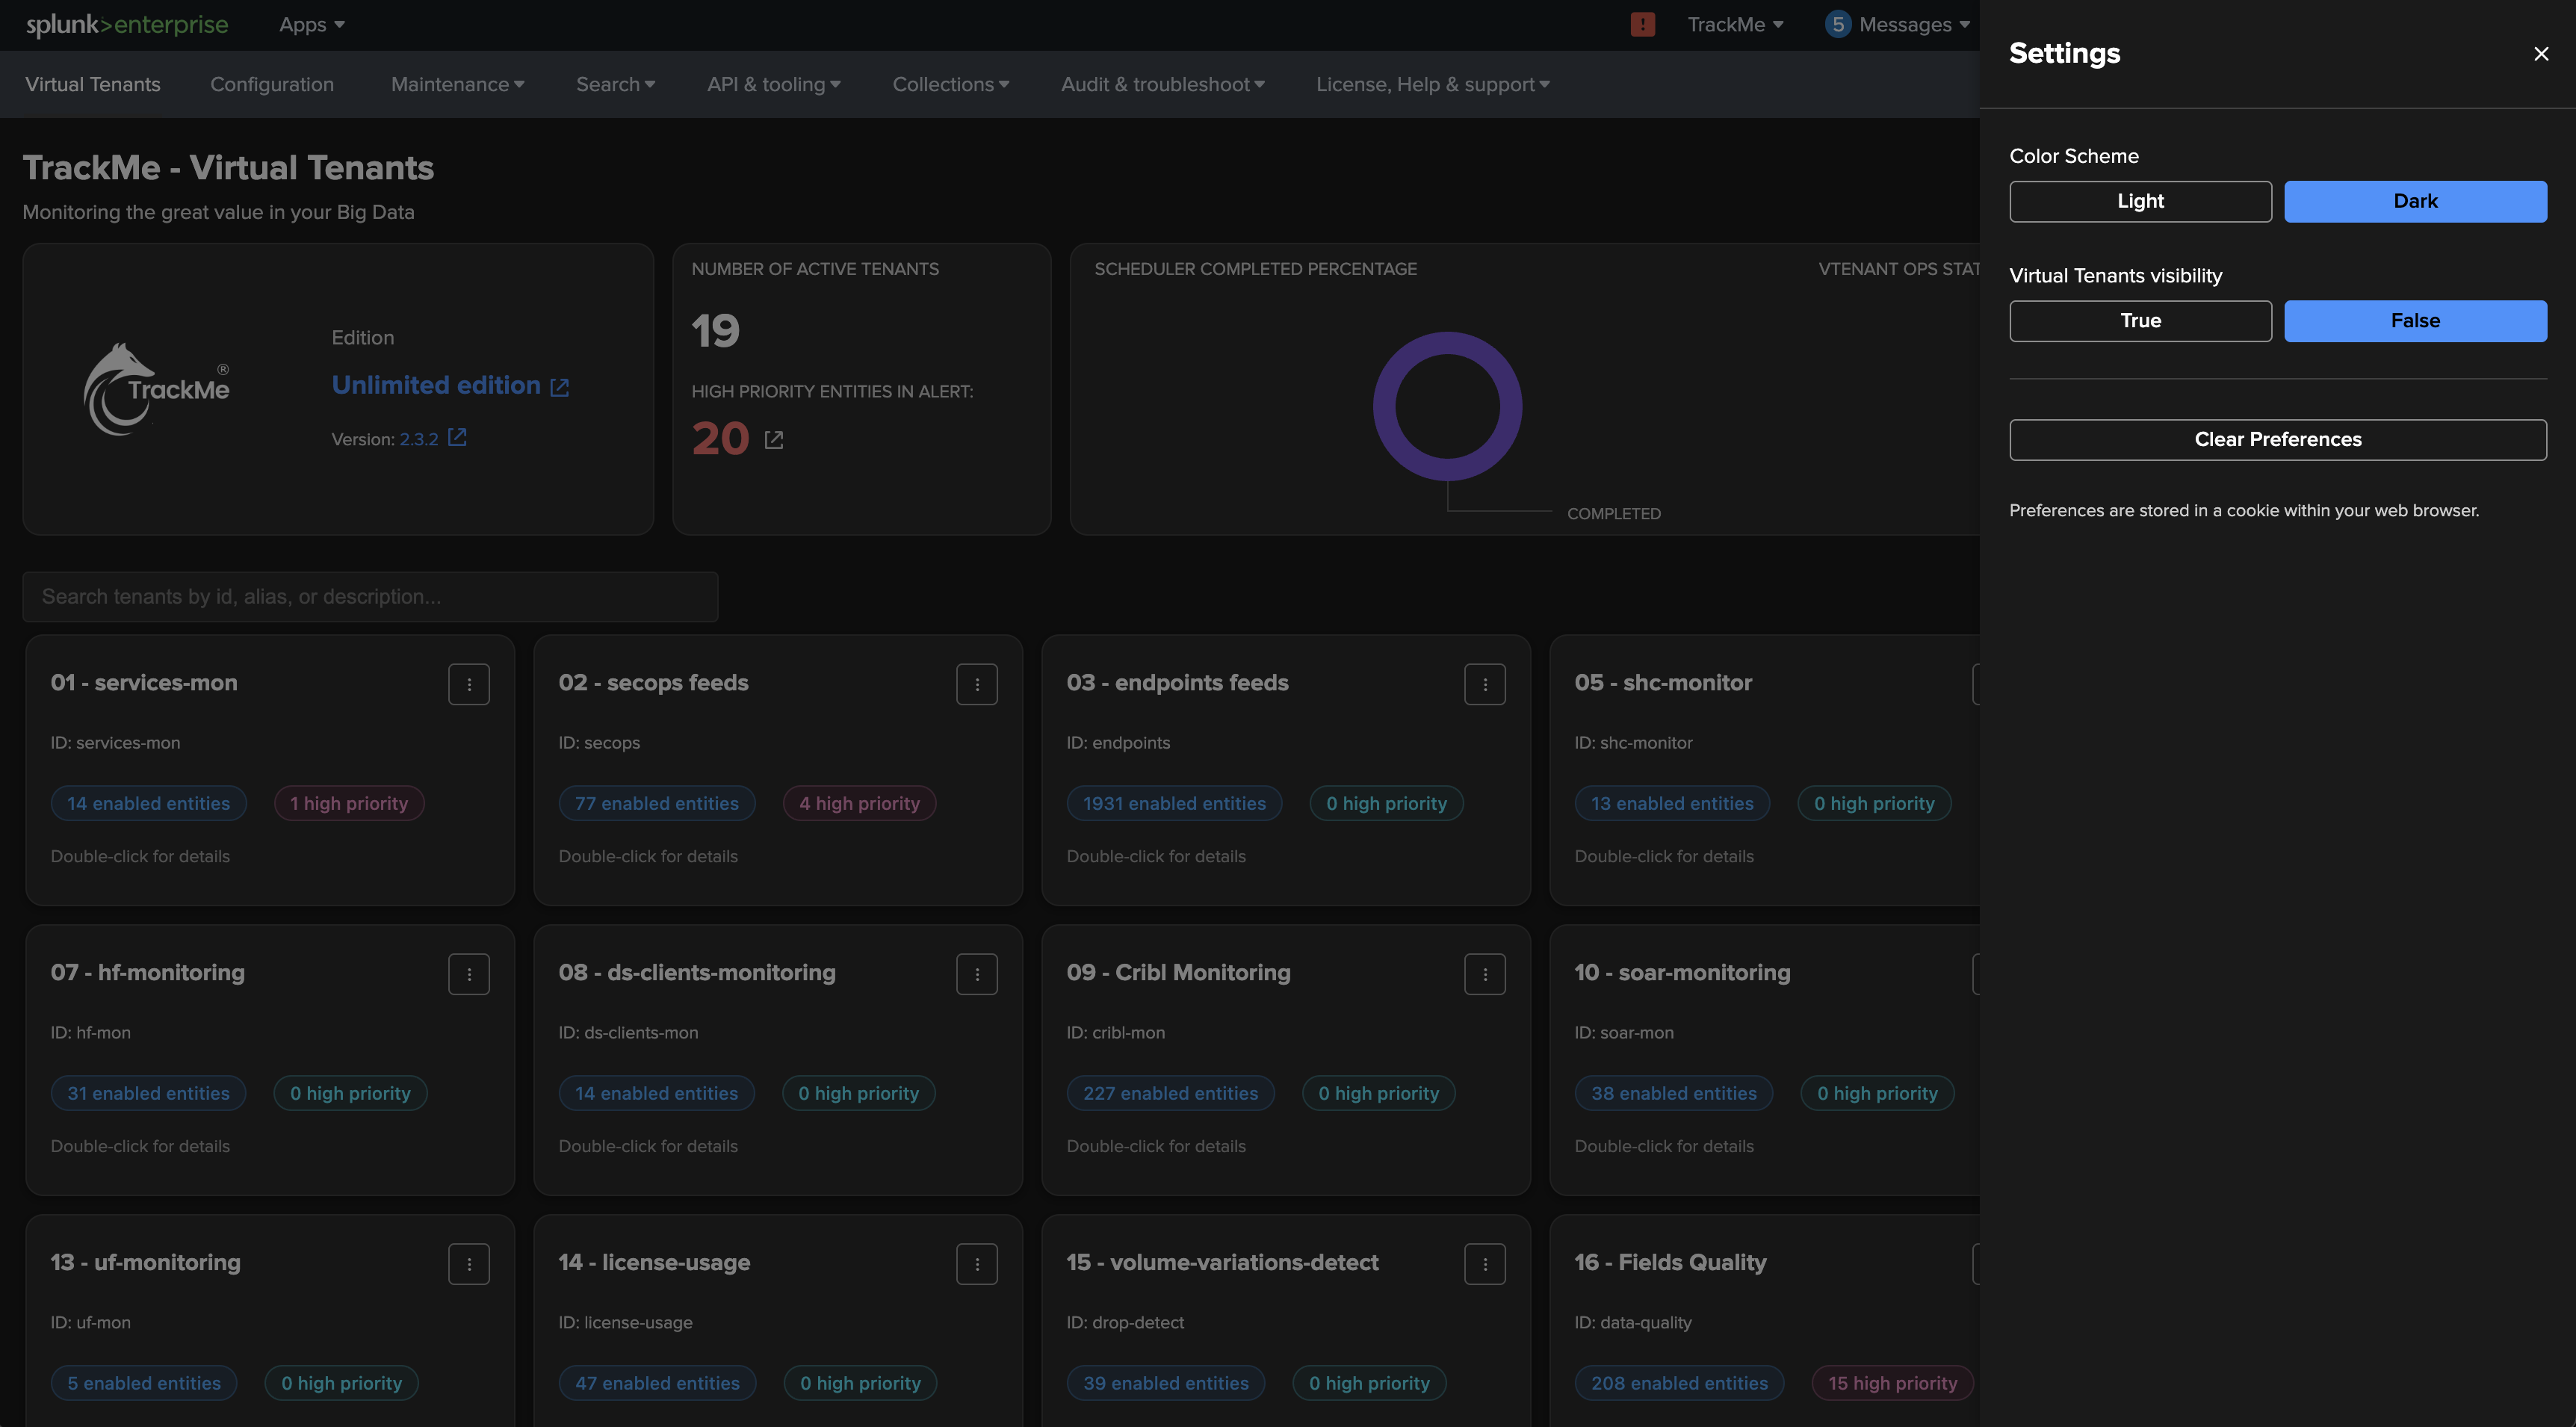
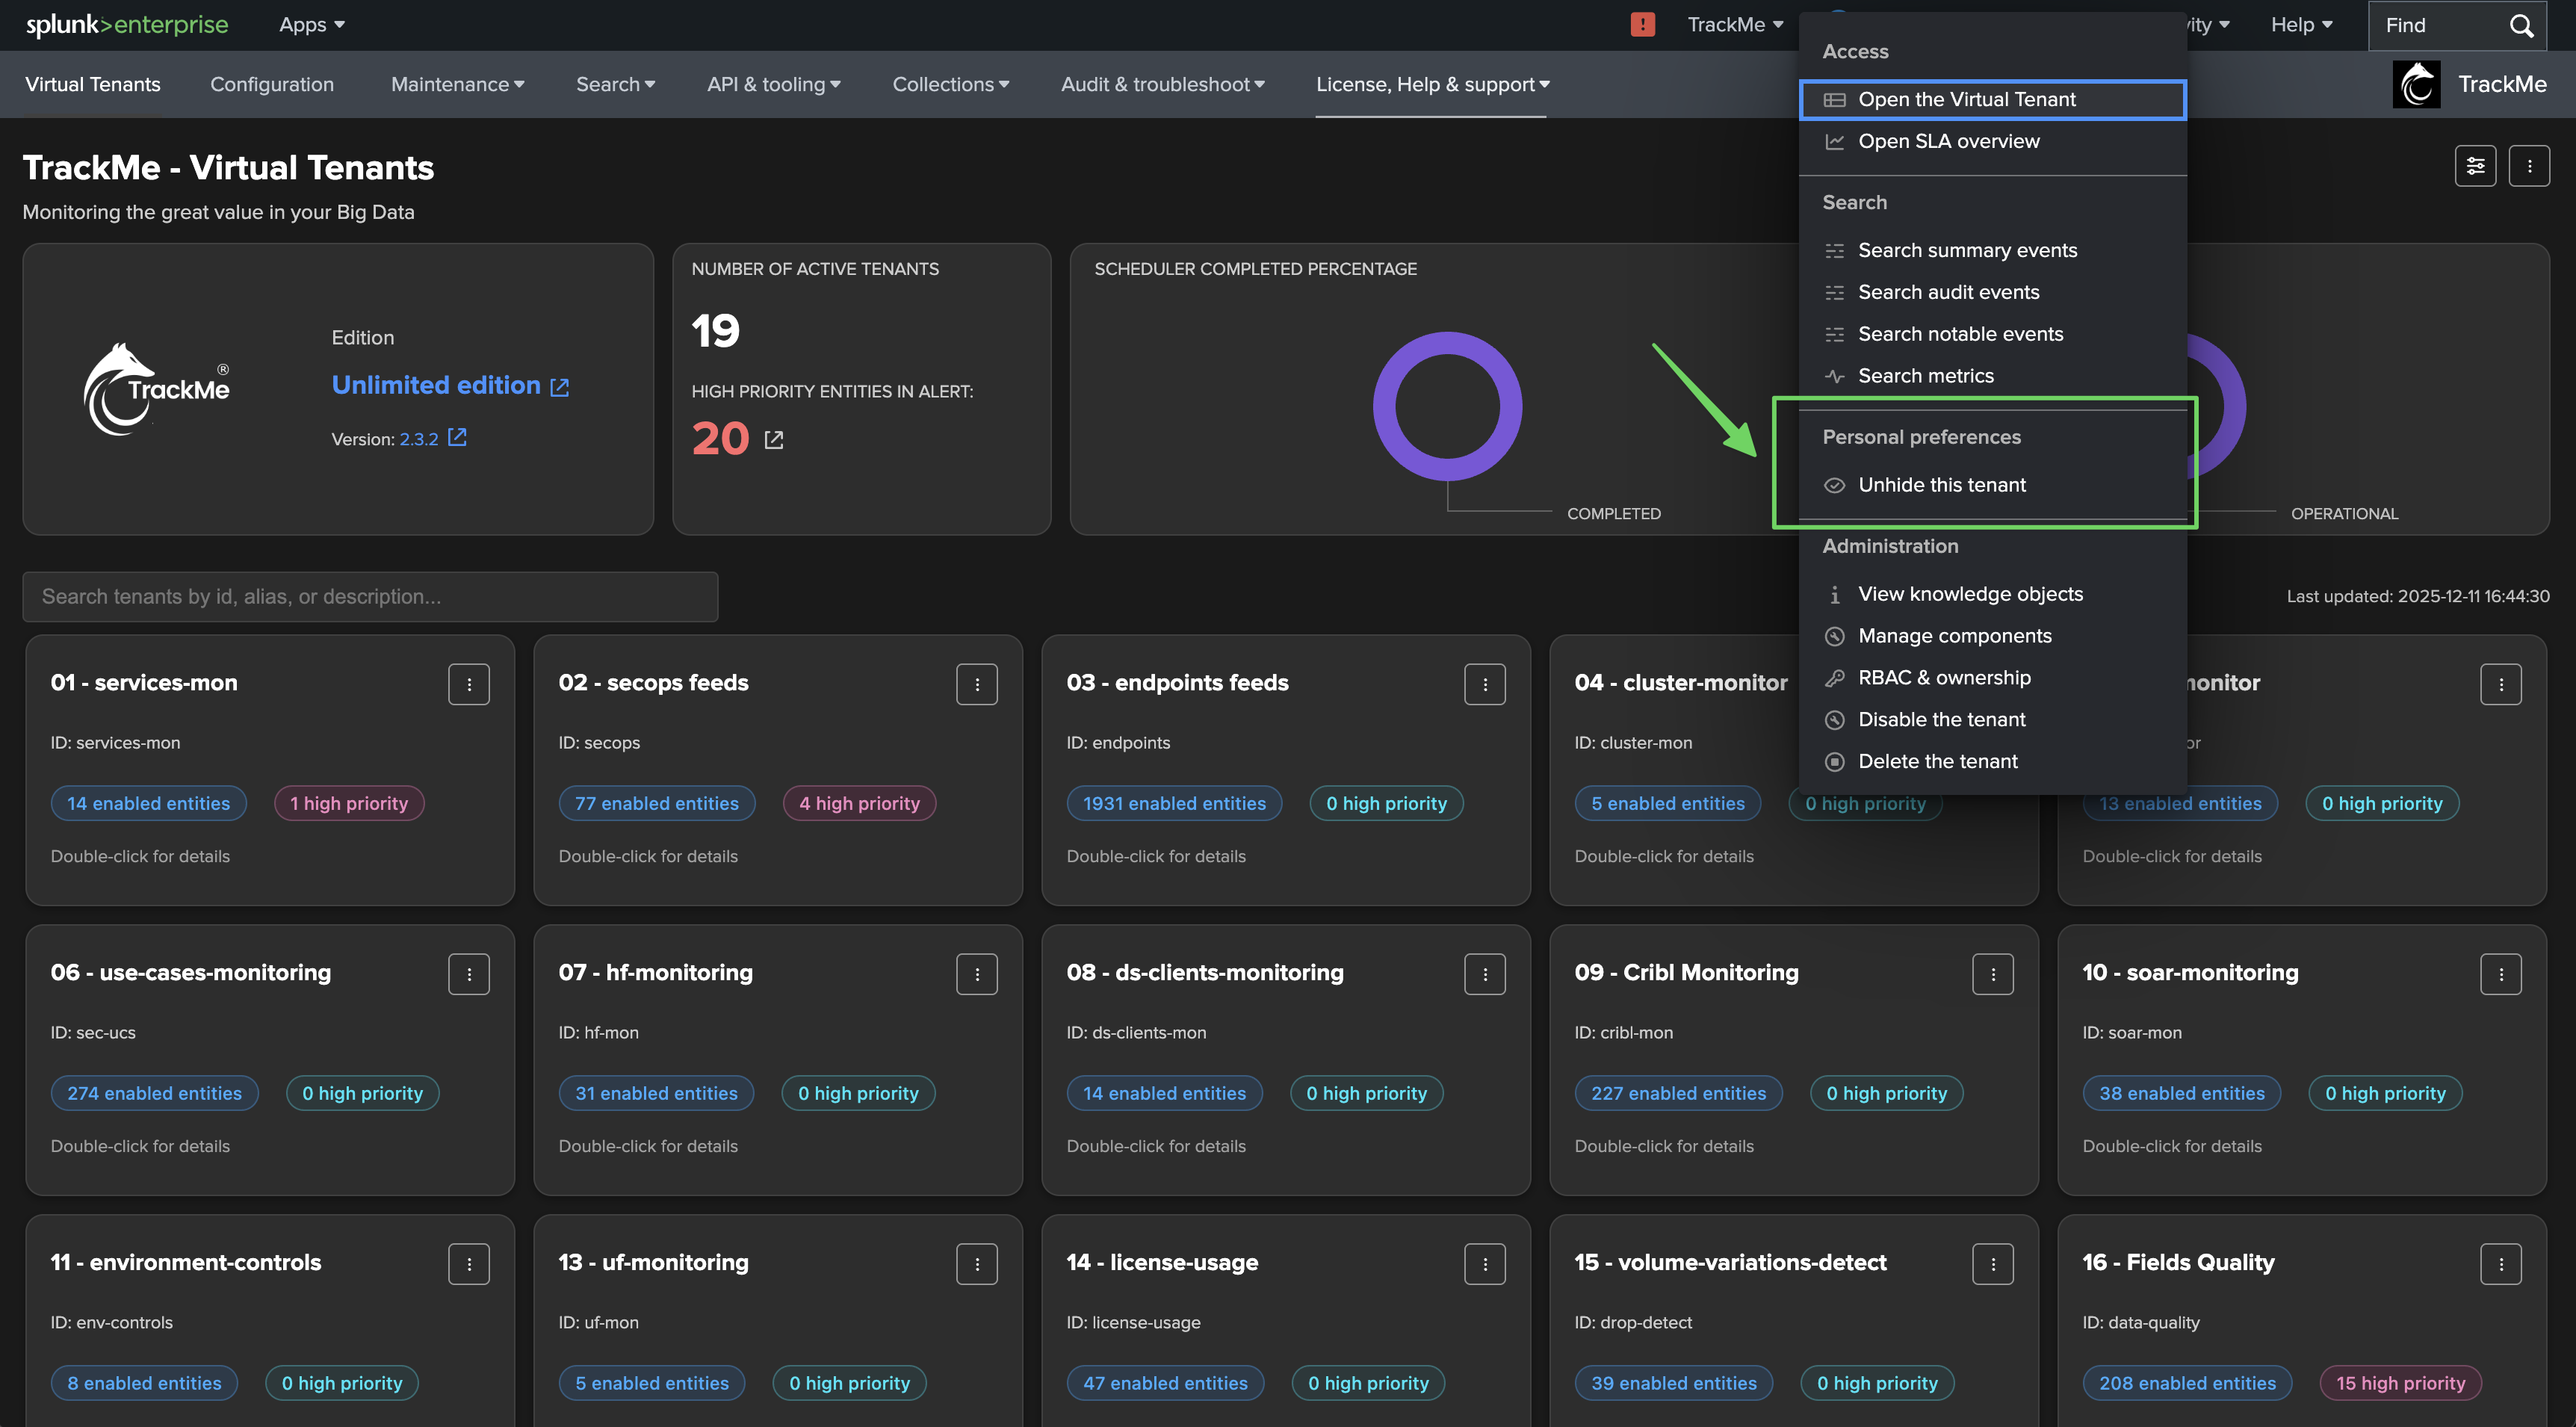
img-005011@2x.png img-005012@2x.png

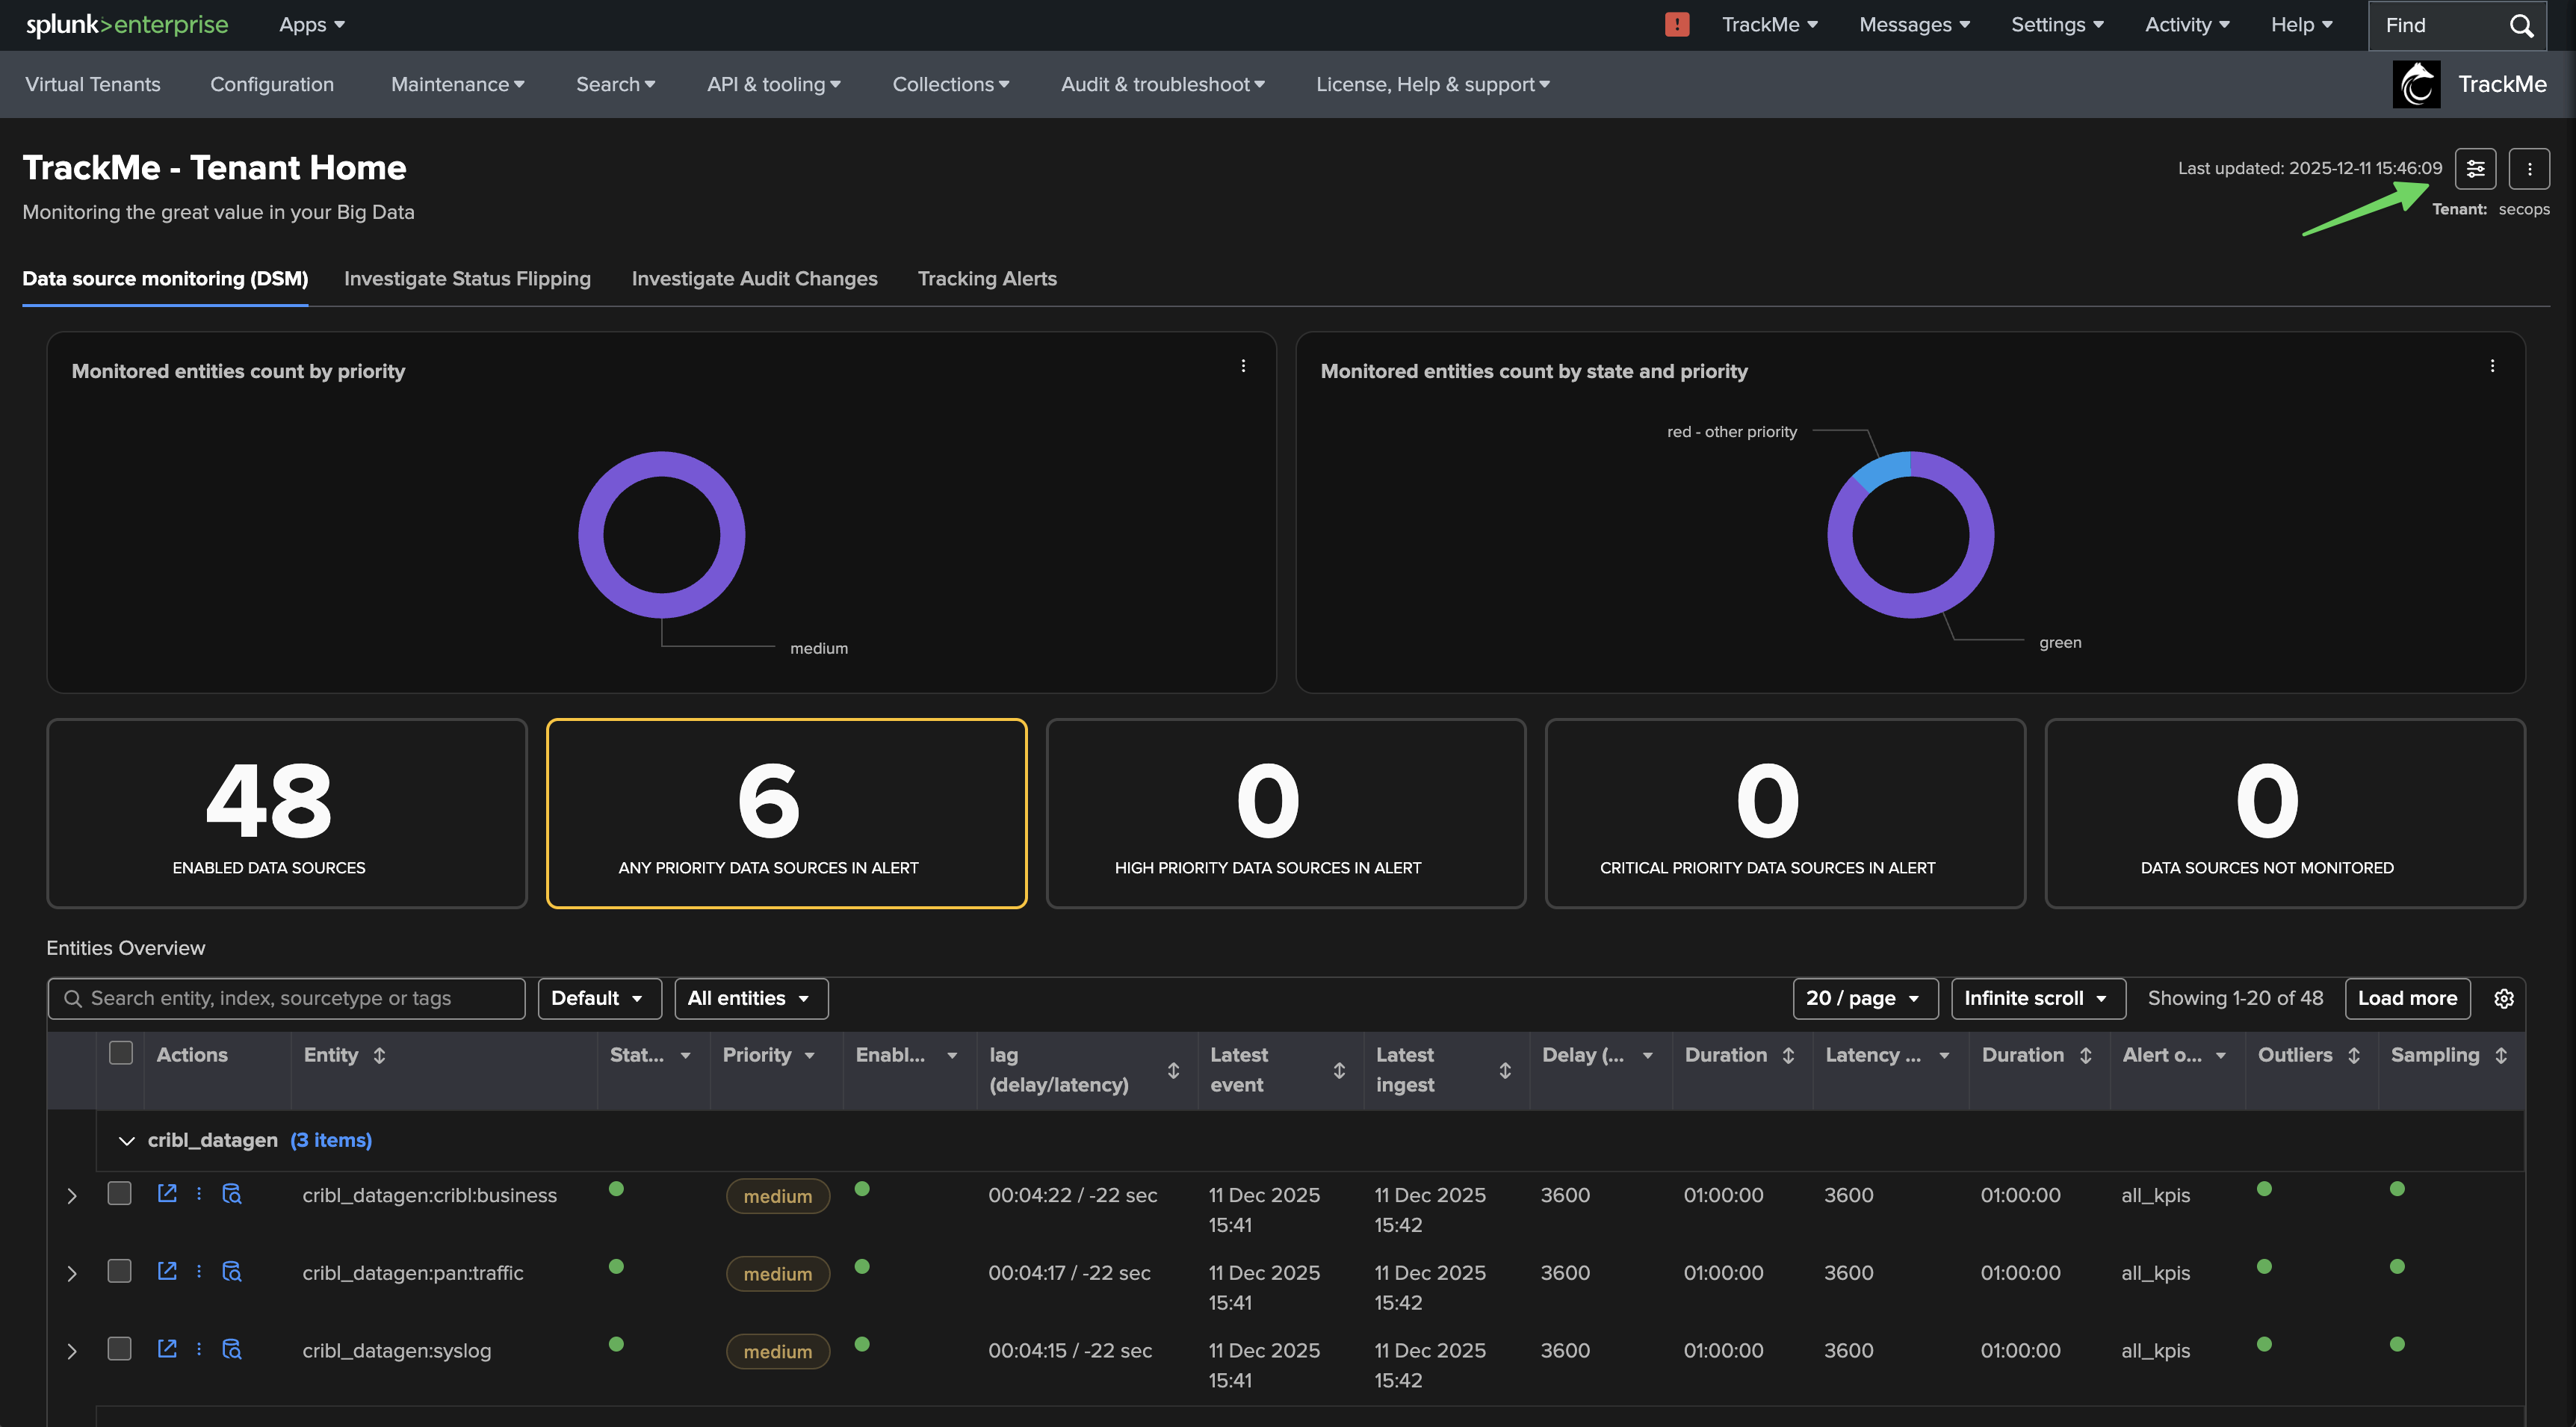
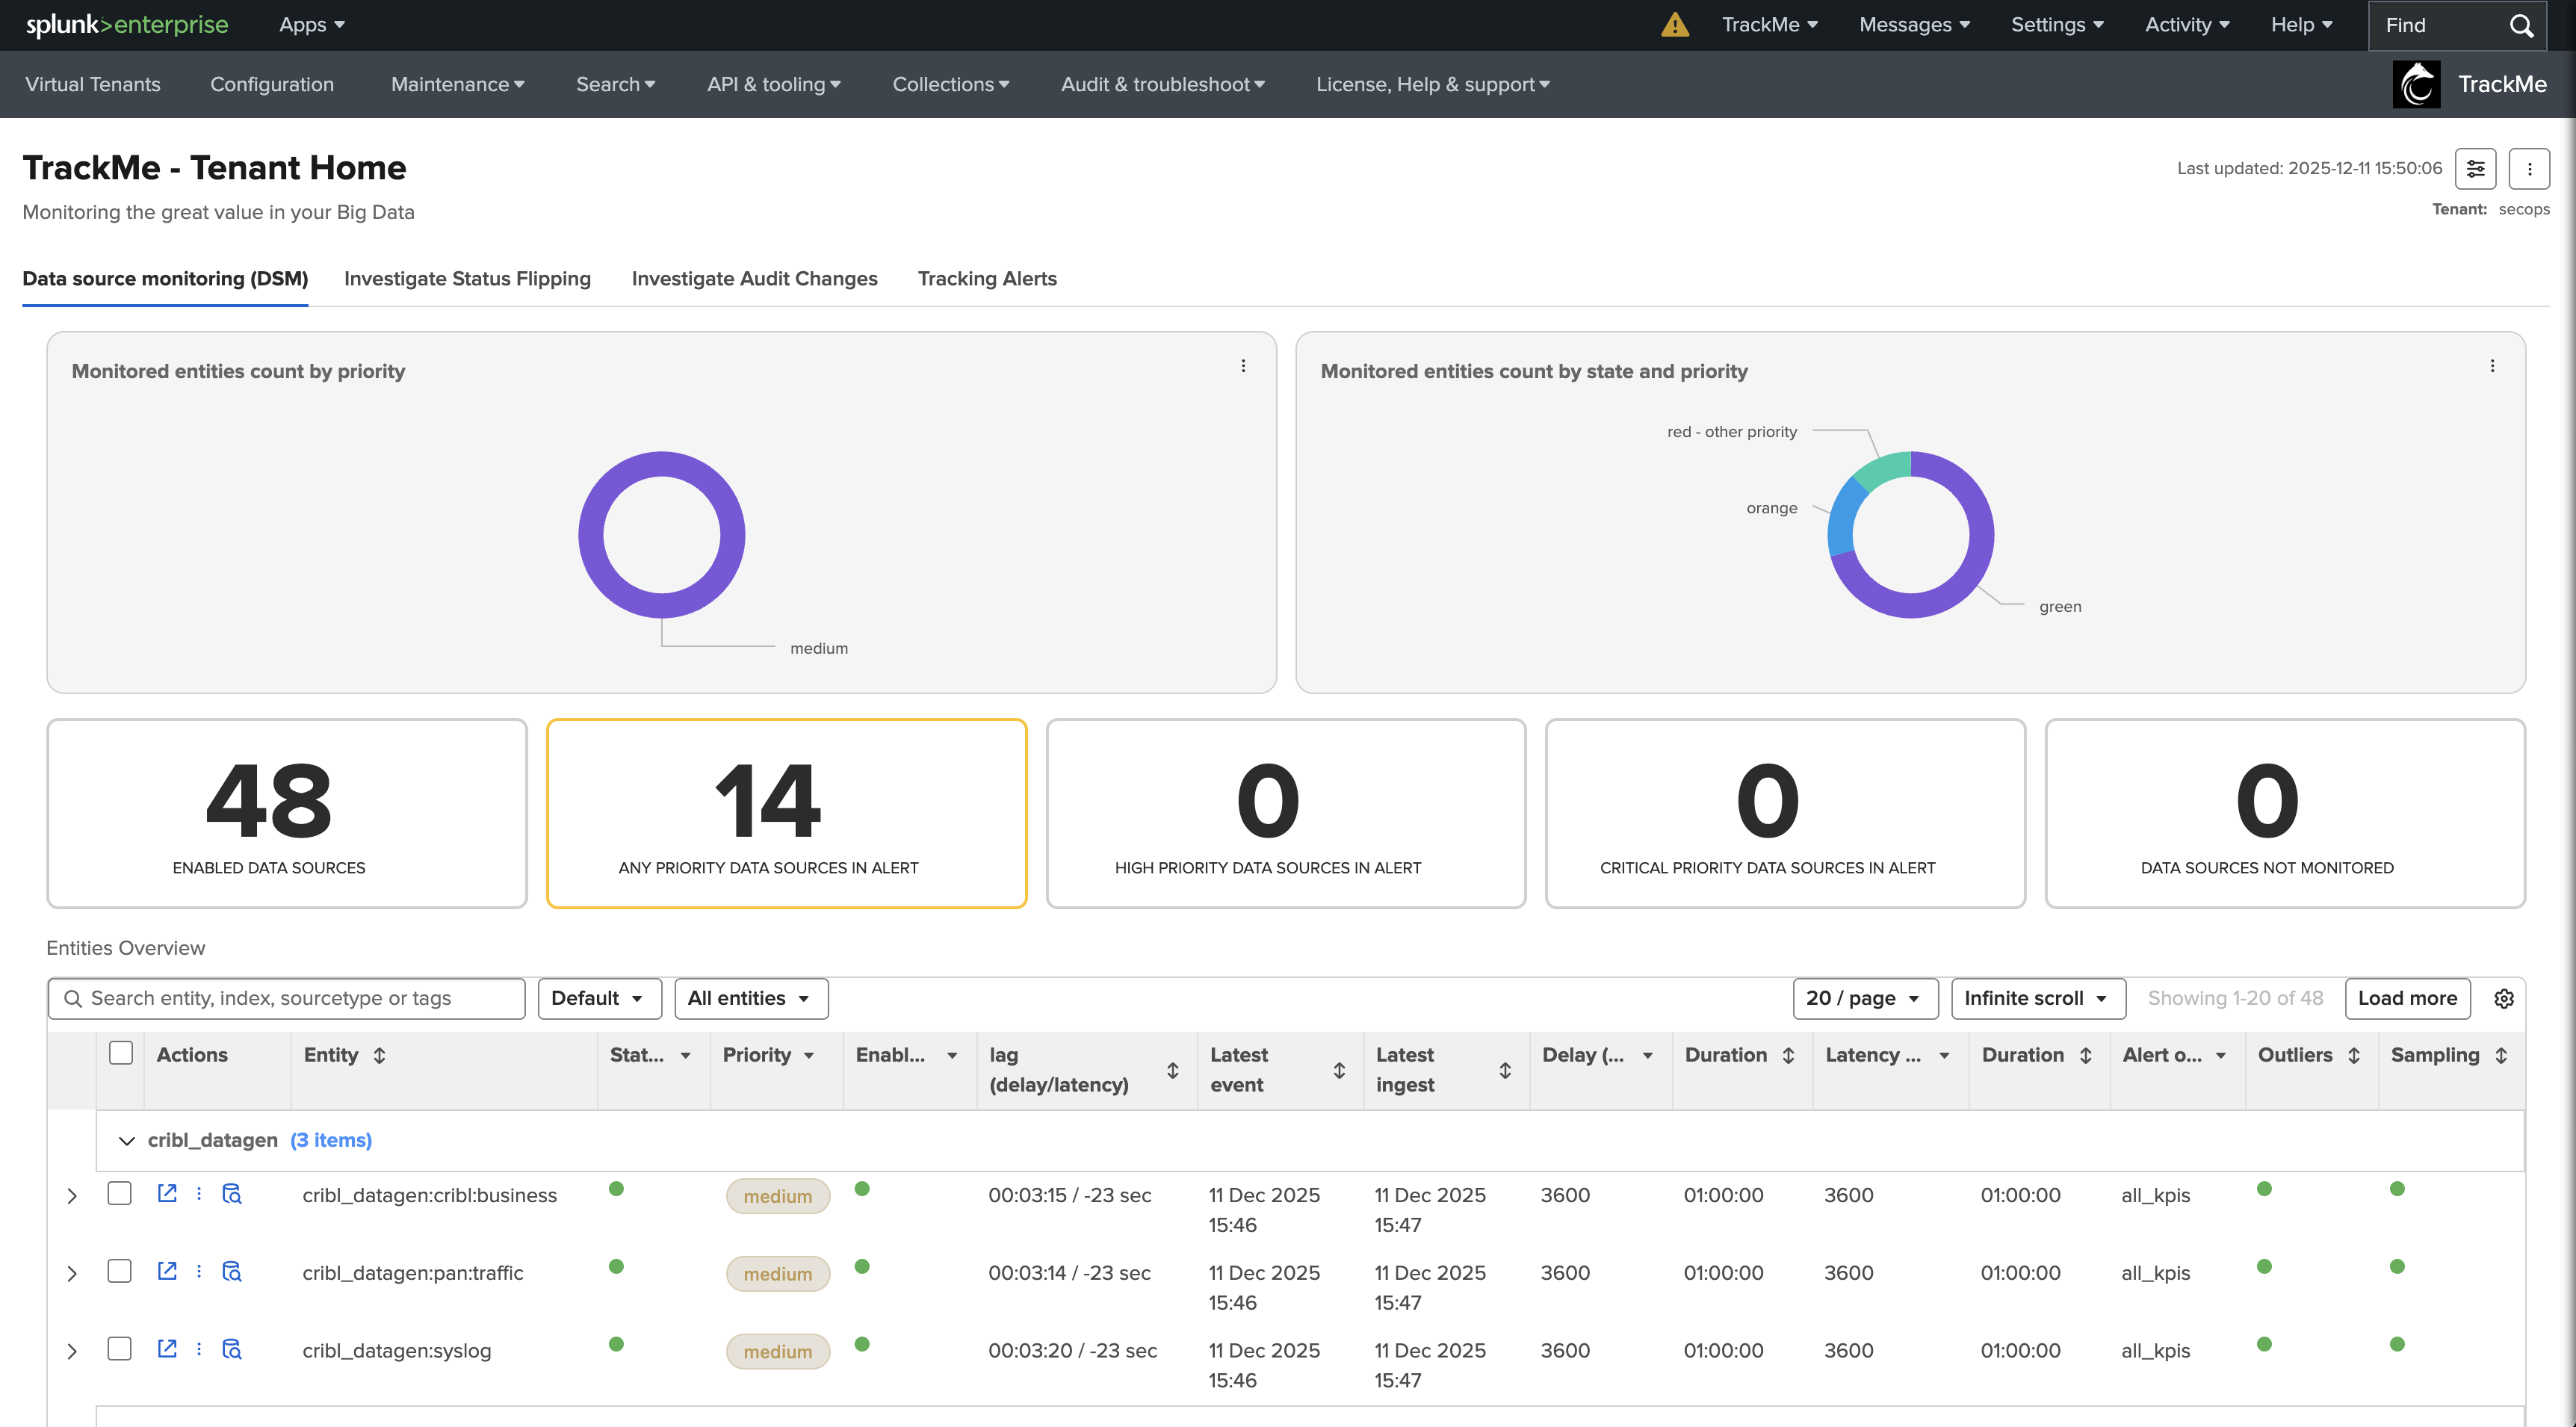
The Tenant Home interface

The Tenant Home is the main interface for managing a tenant’s entities — a rich screen whose interactions vary by component type. You can reach it several ways from the Virtual Tenant interface:
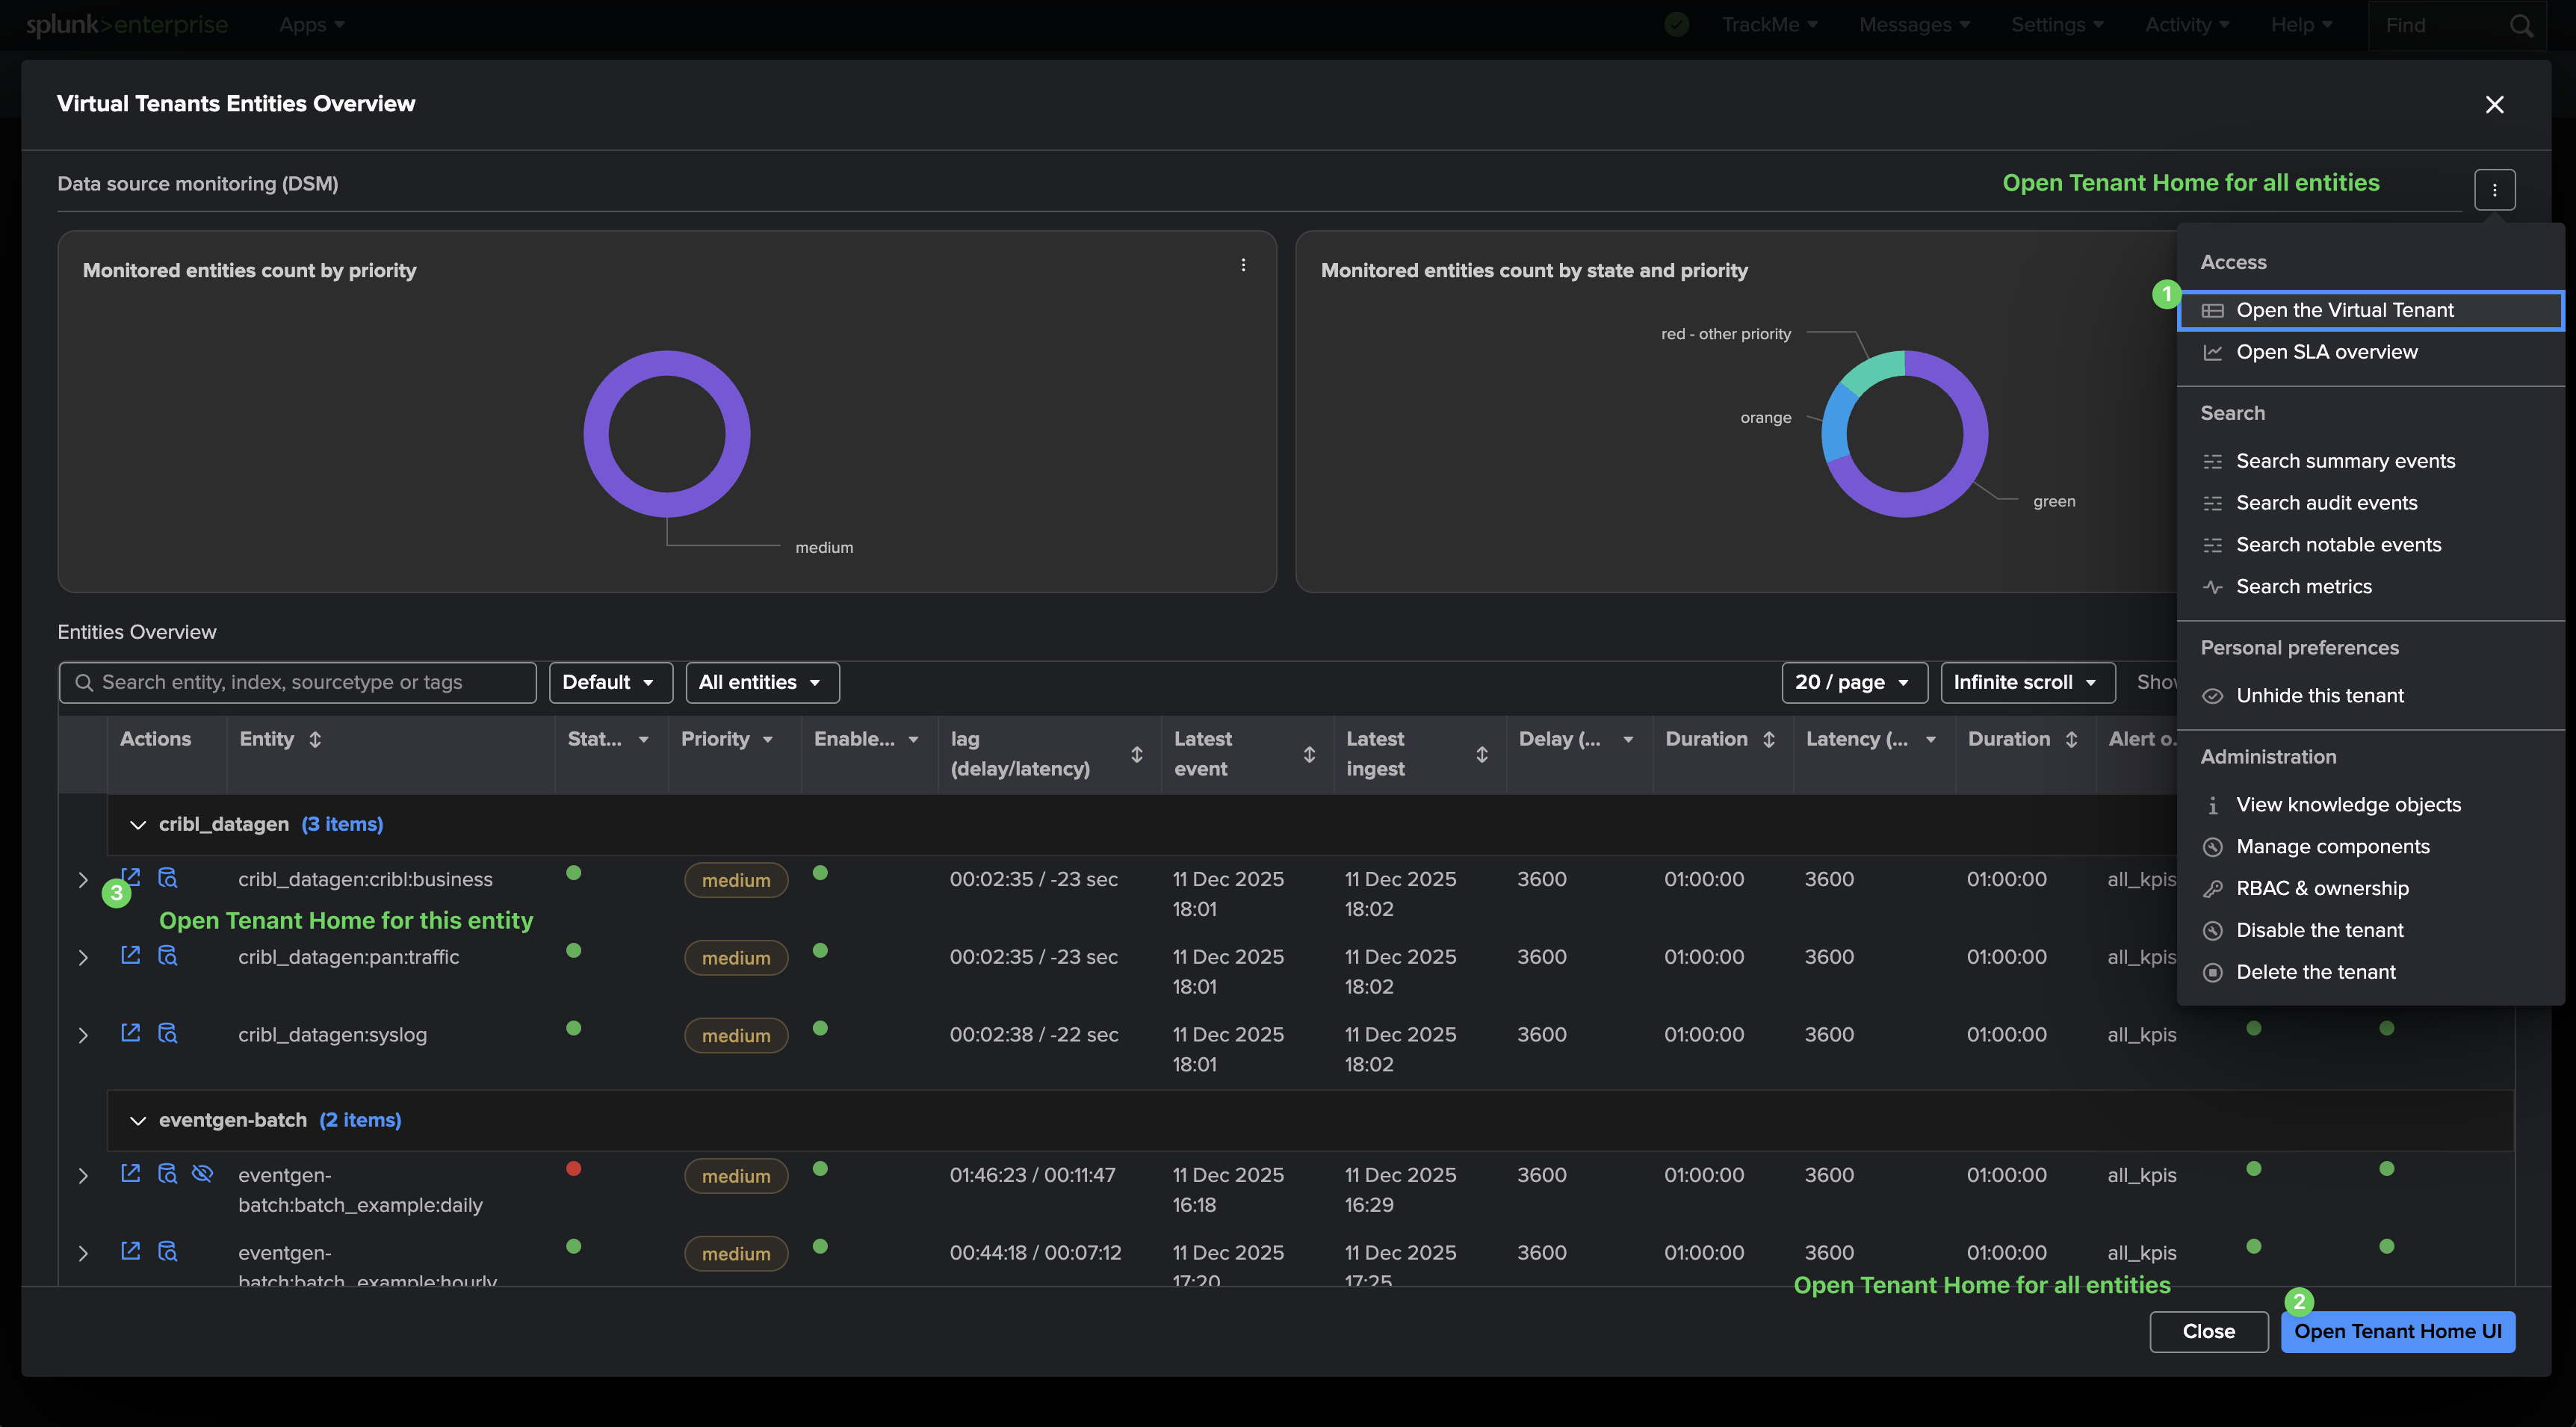
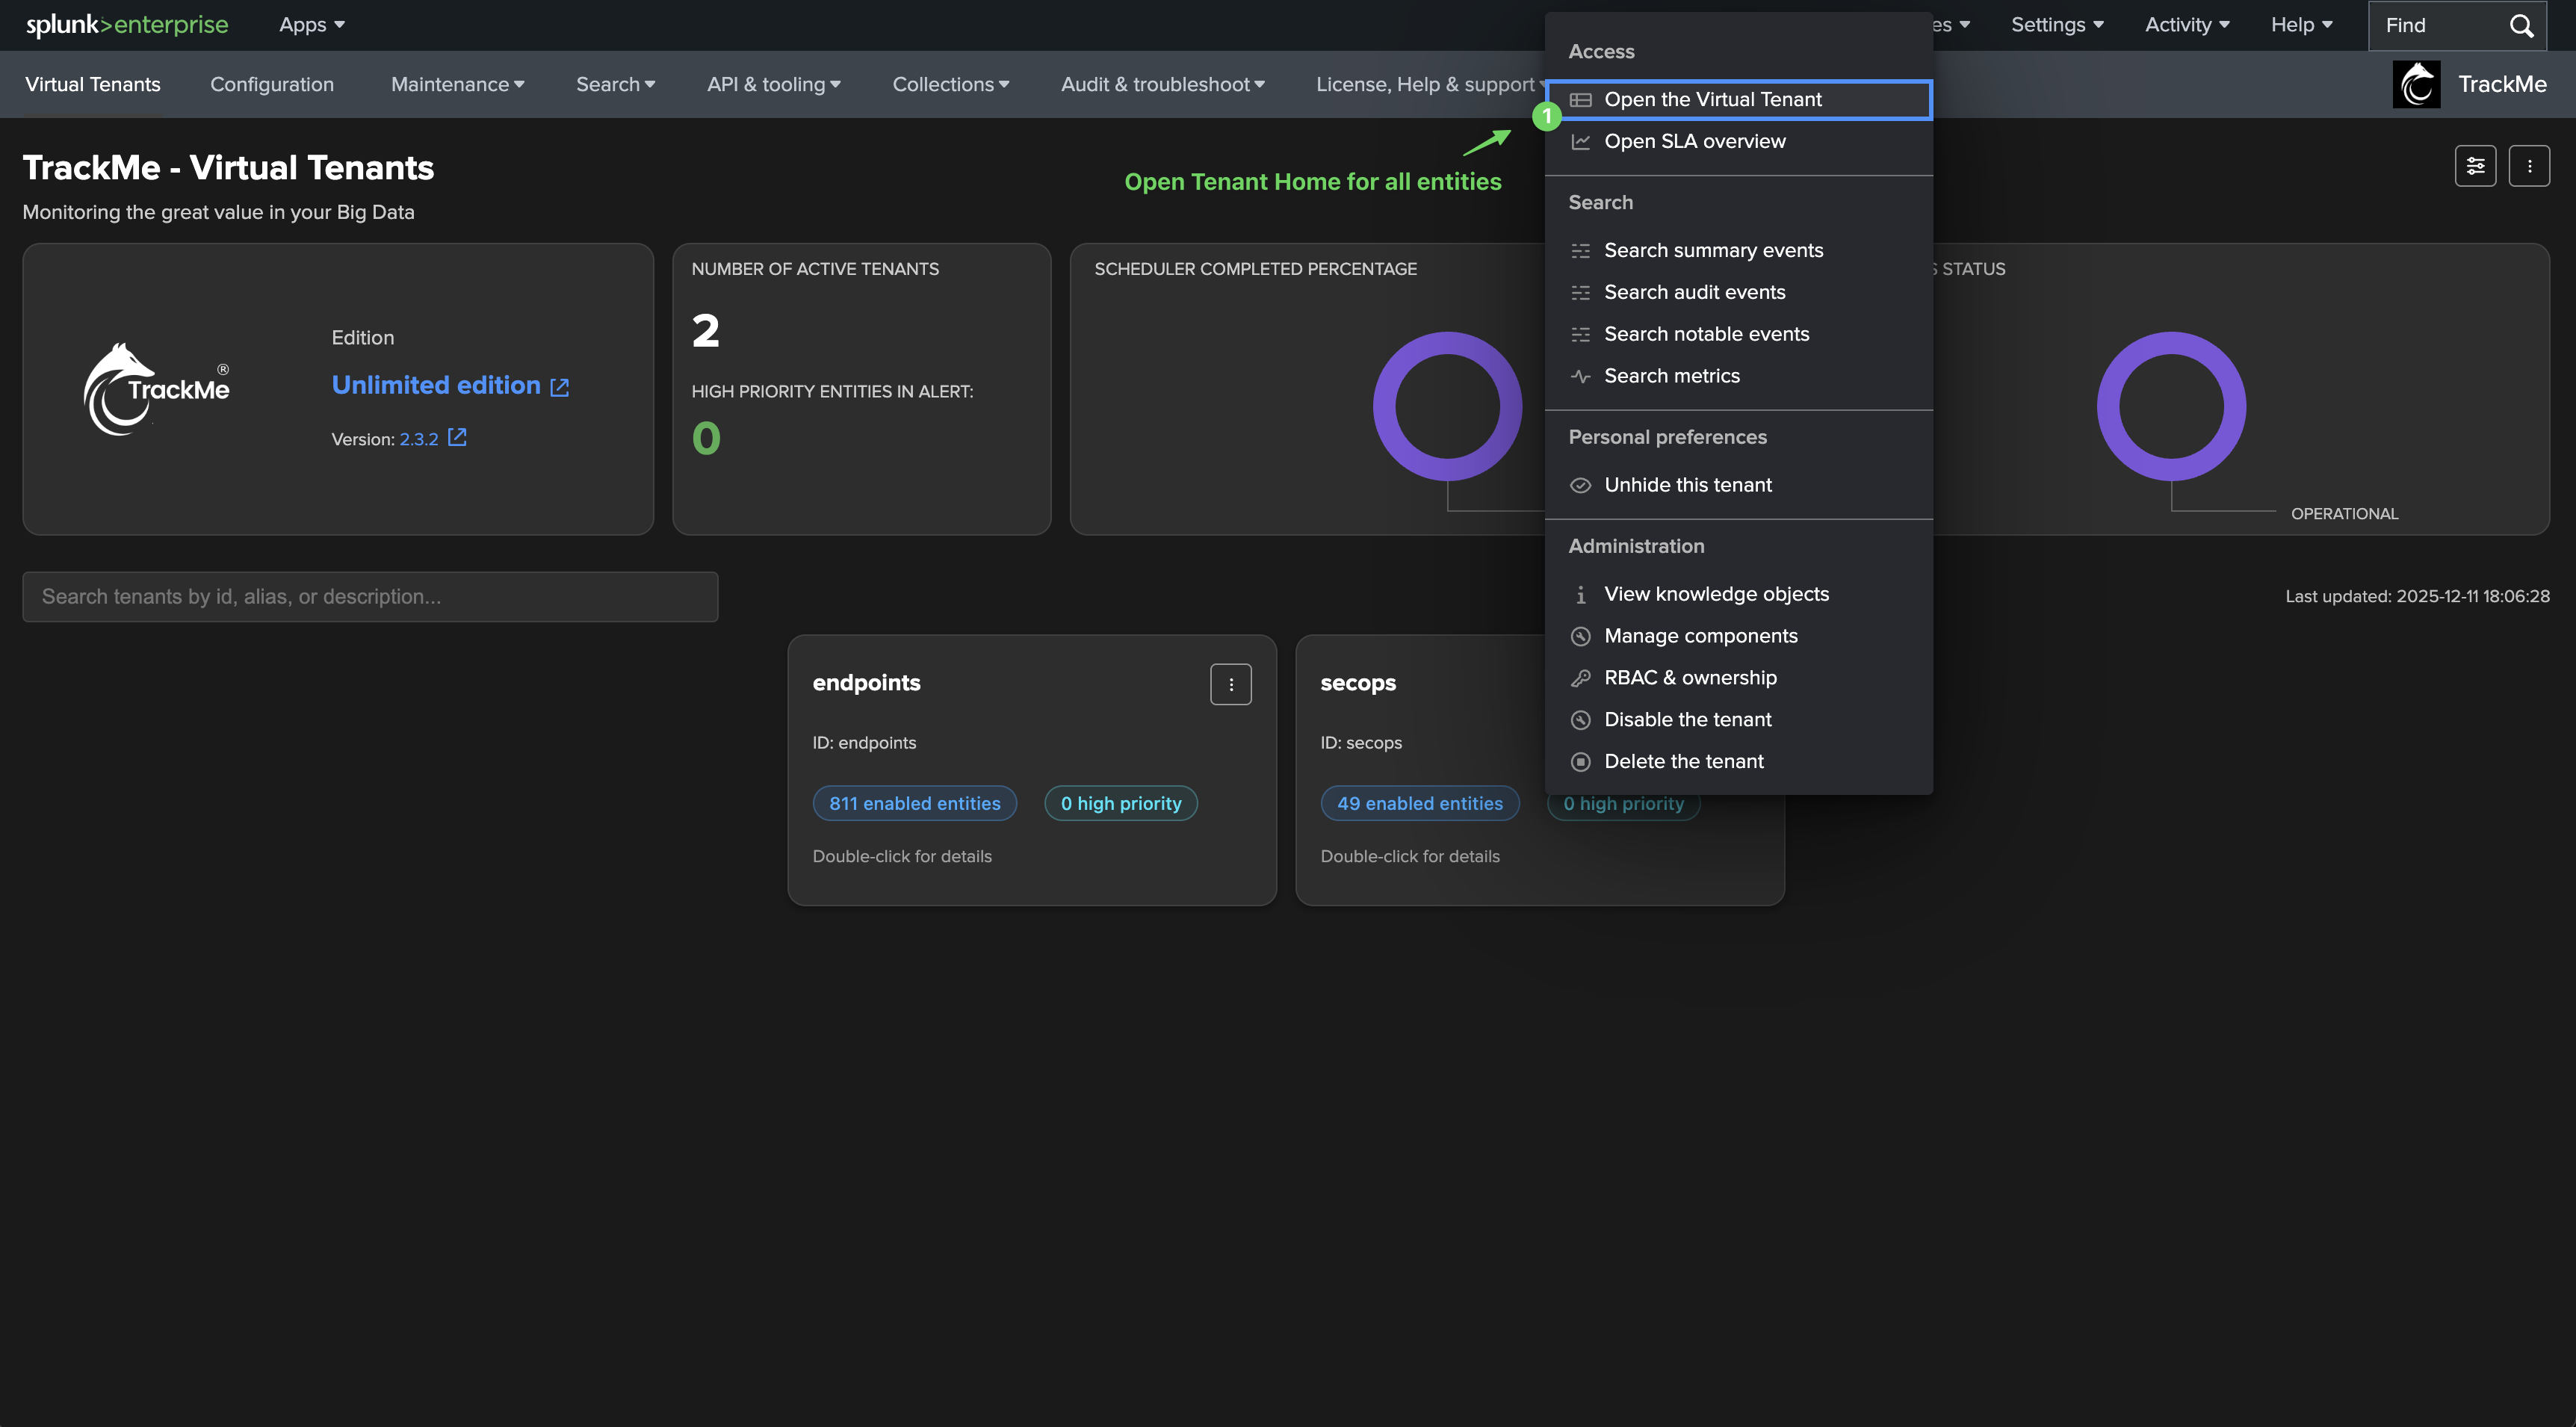
img-005019@2x.png img-005020@2x.png

Key interactions

The key interactions in the Tenant Home (the exact view varies by component type):
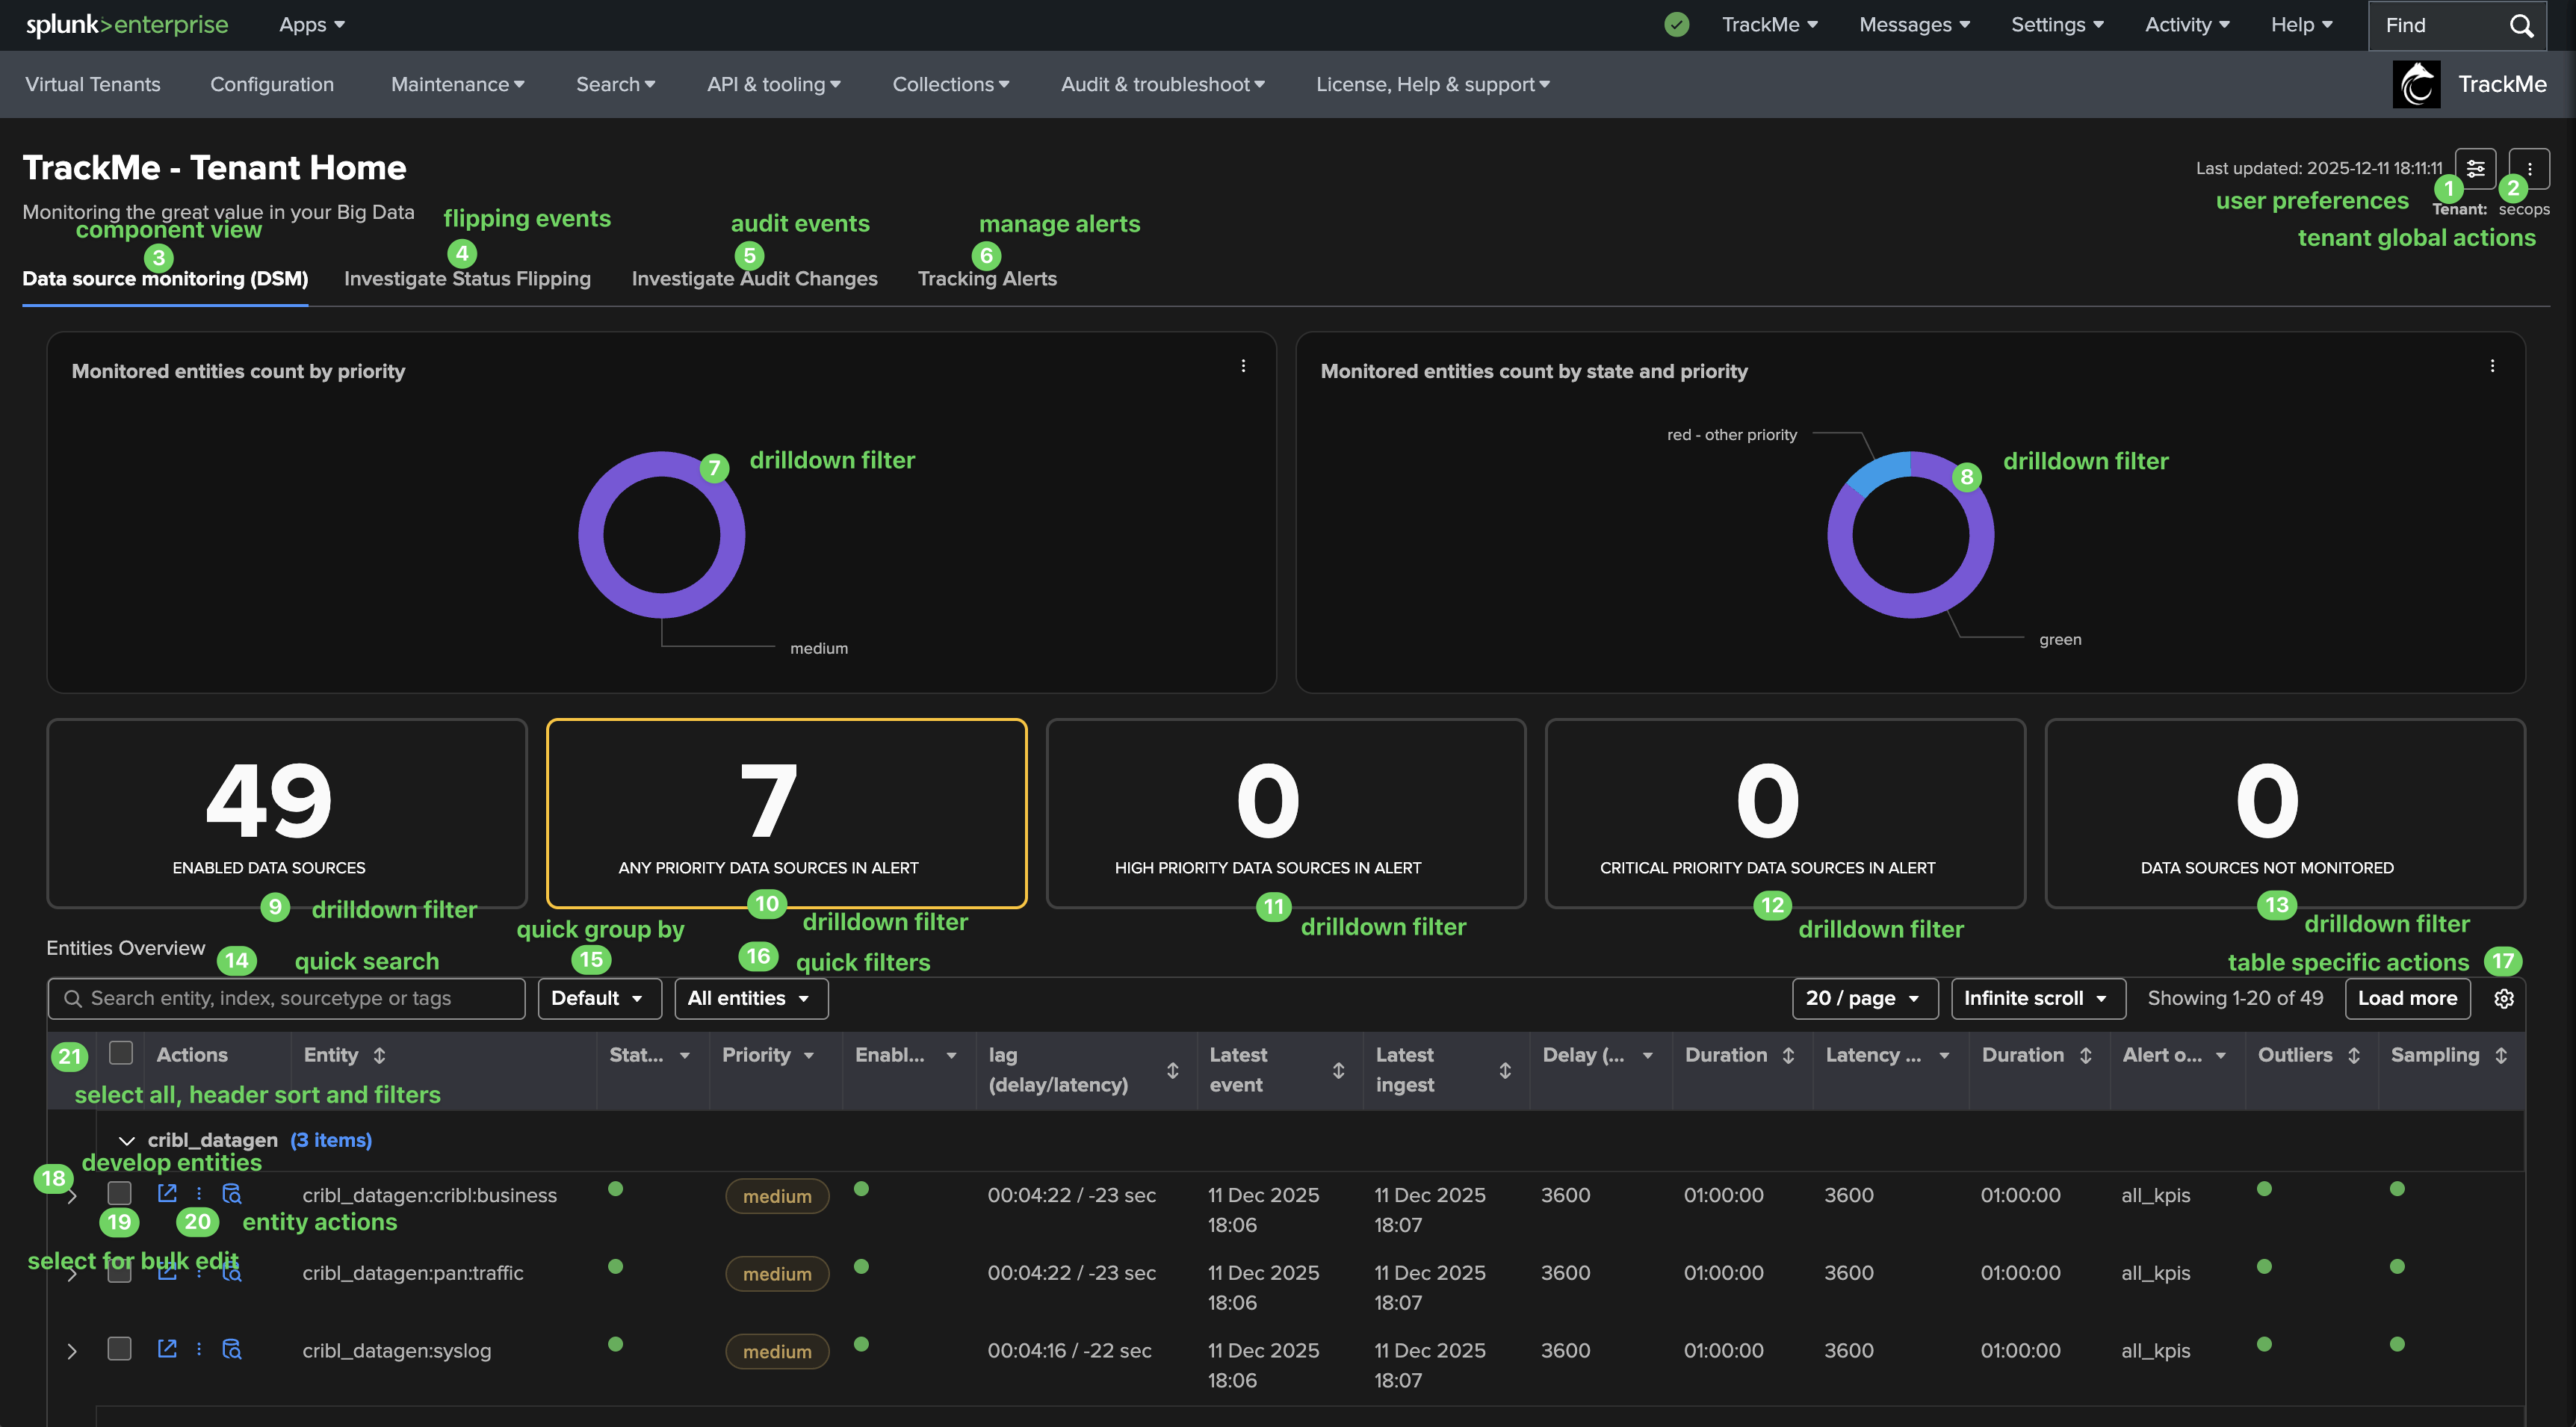
img-005021@2x.png

key interactions from the entity view:
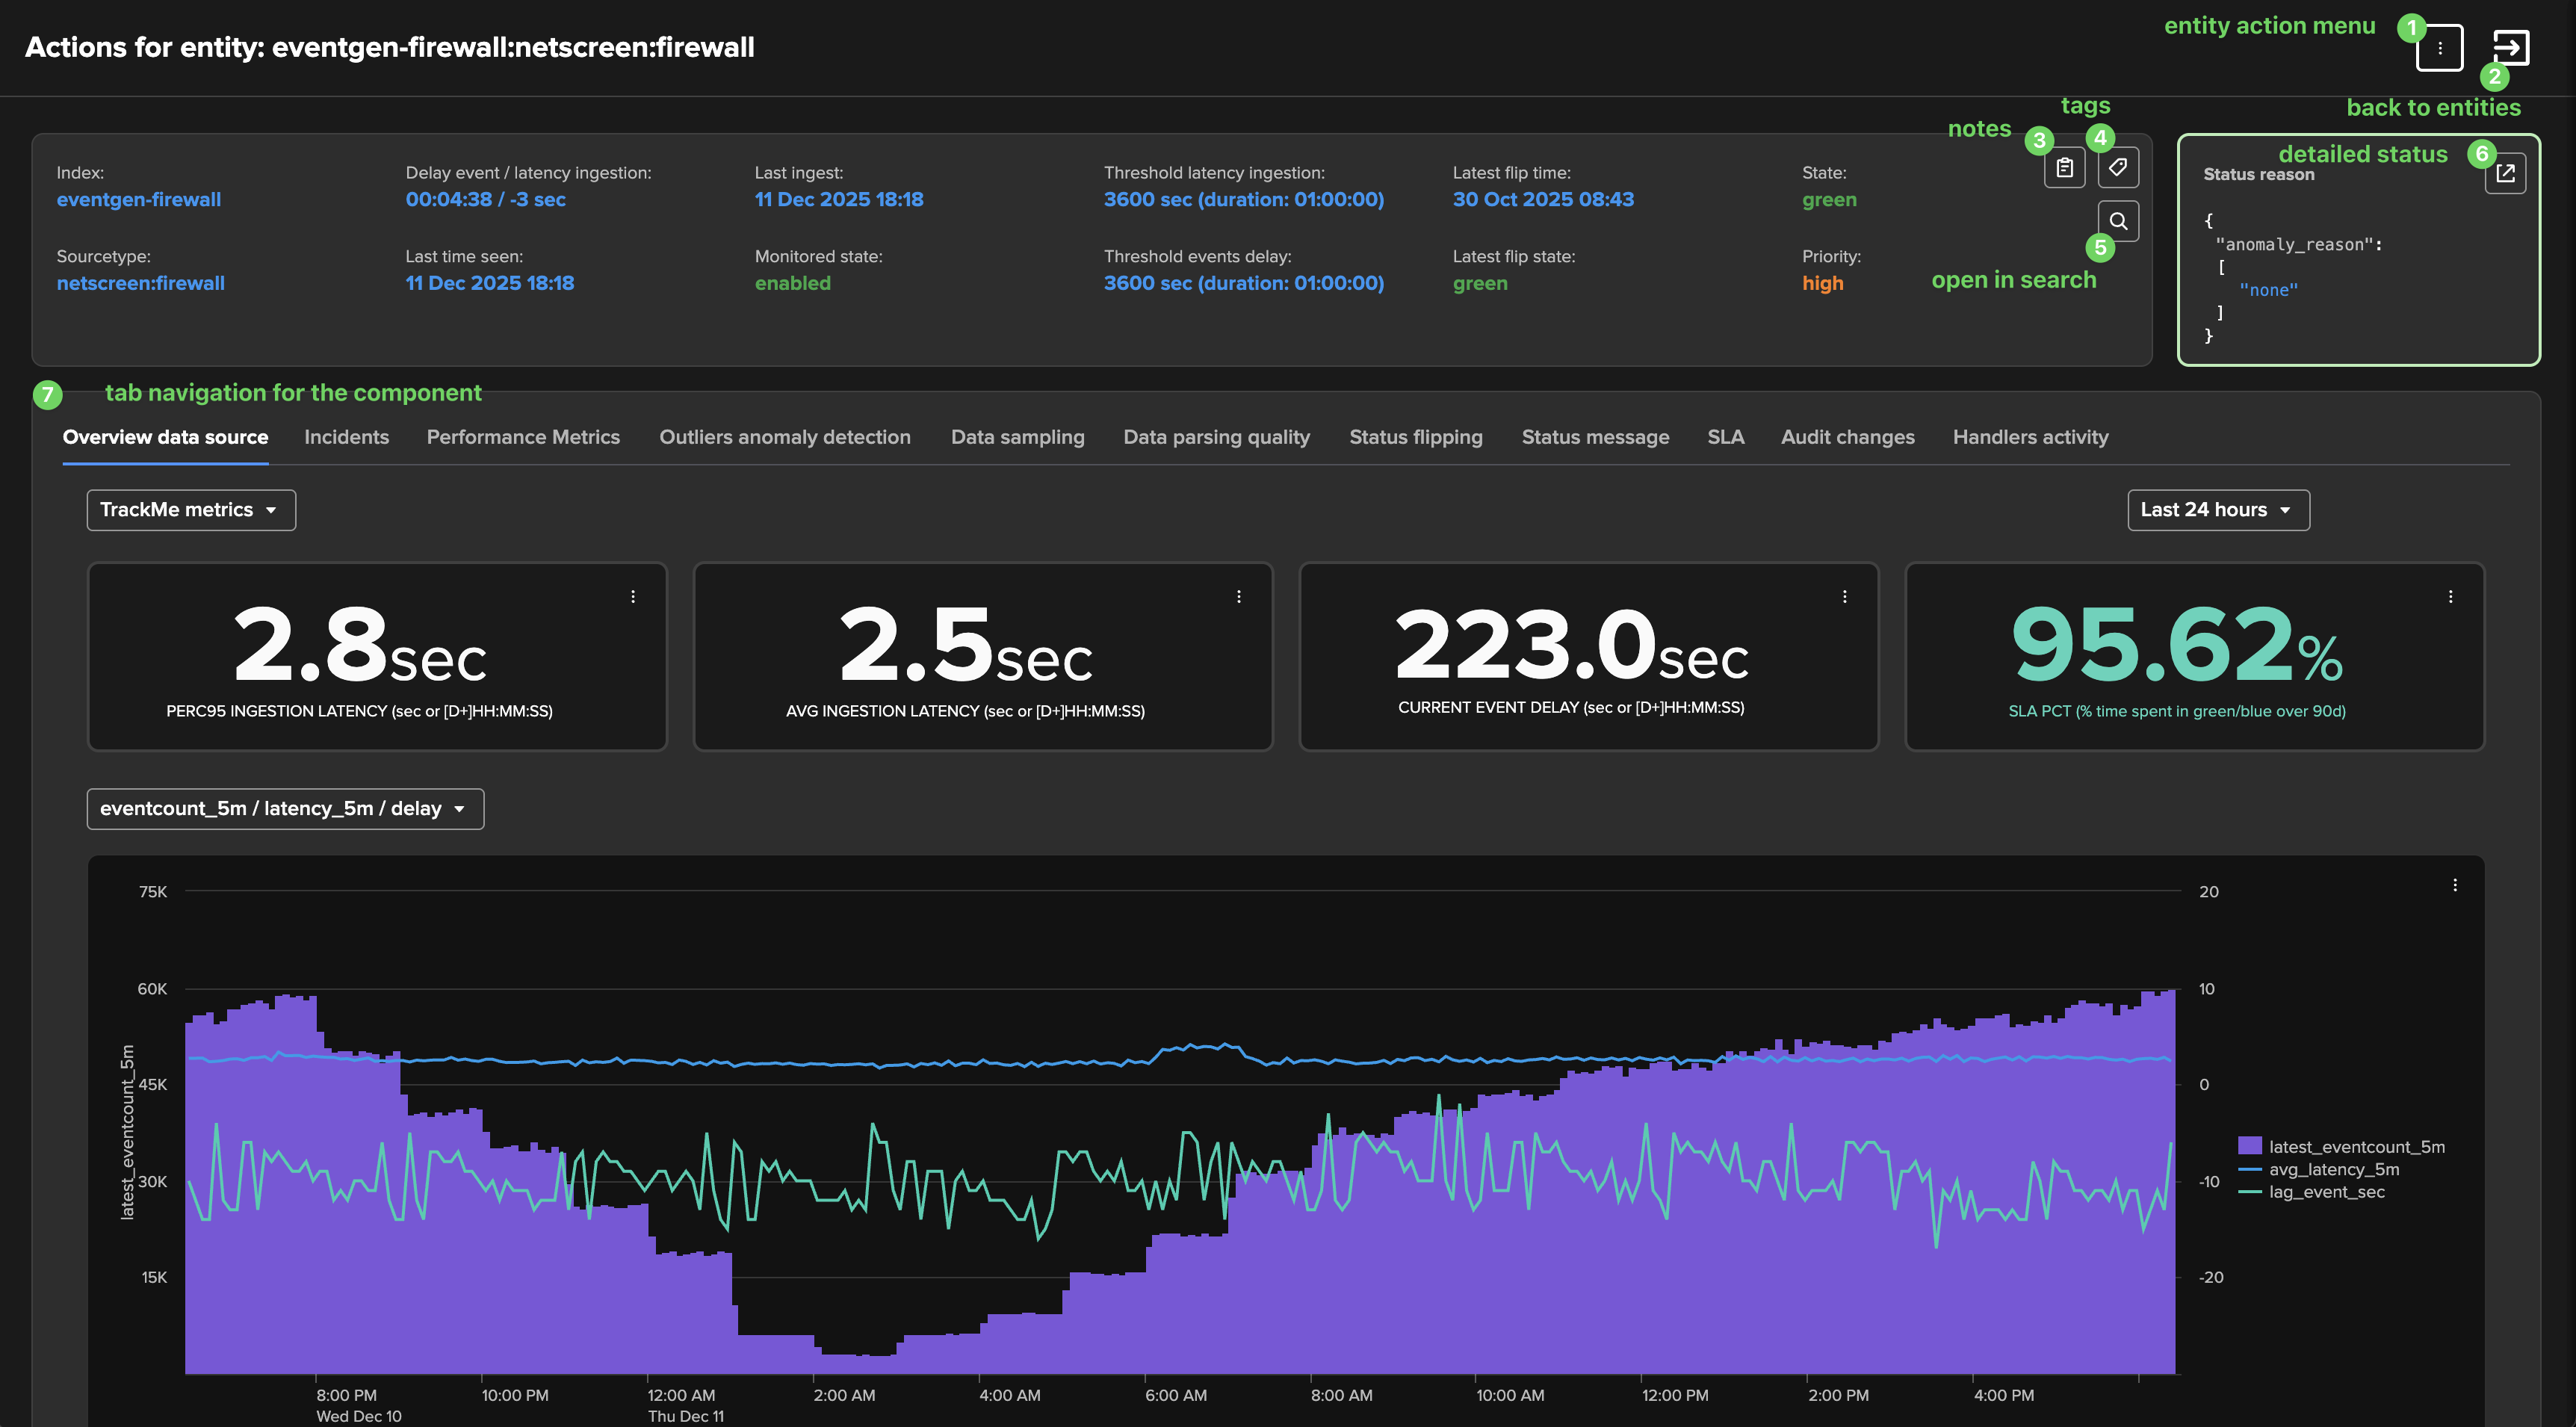
img-005025@2x.png

Entity and tenant menus

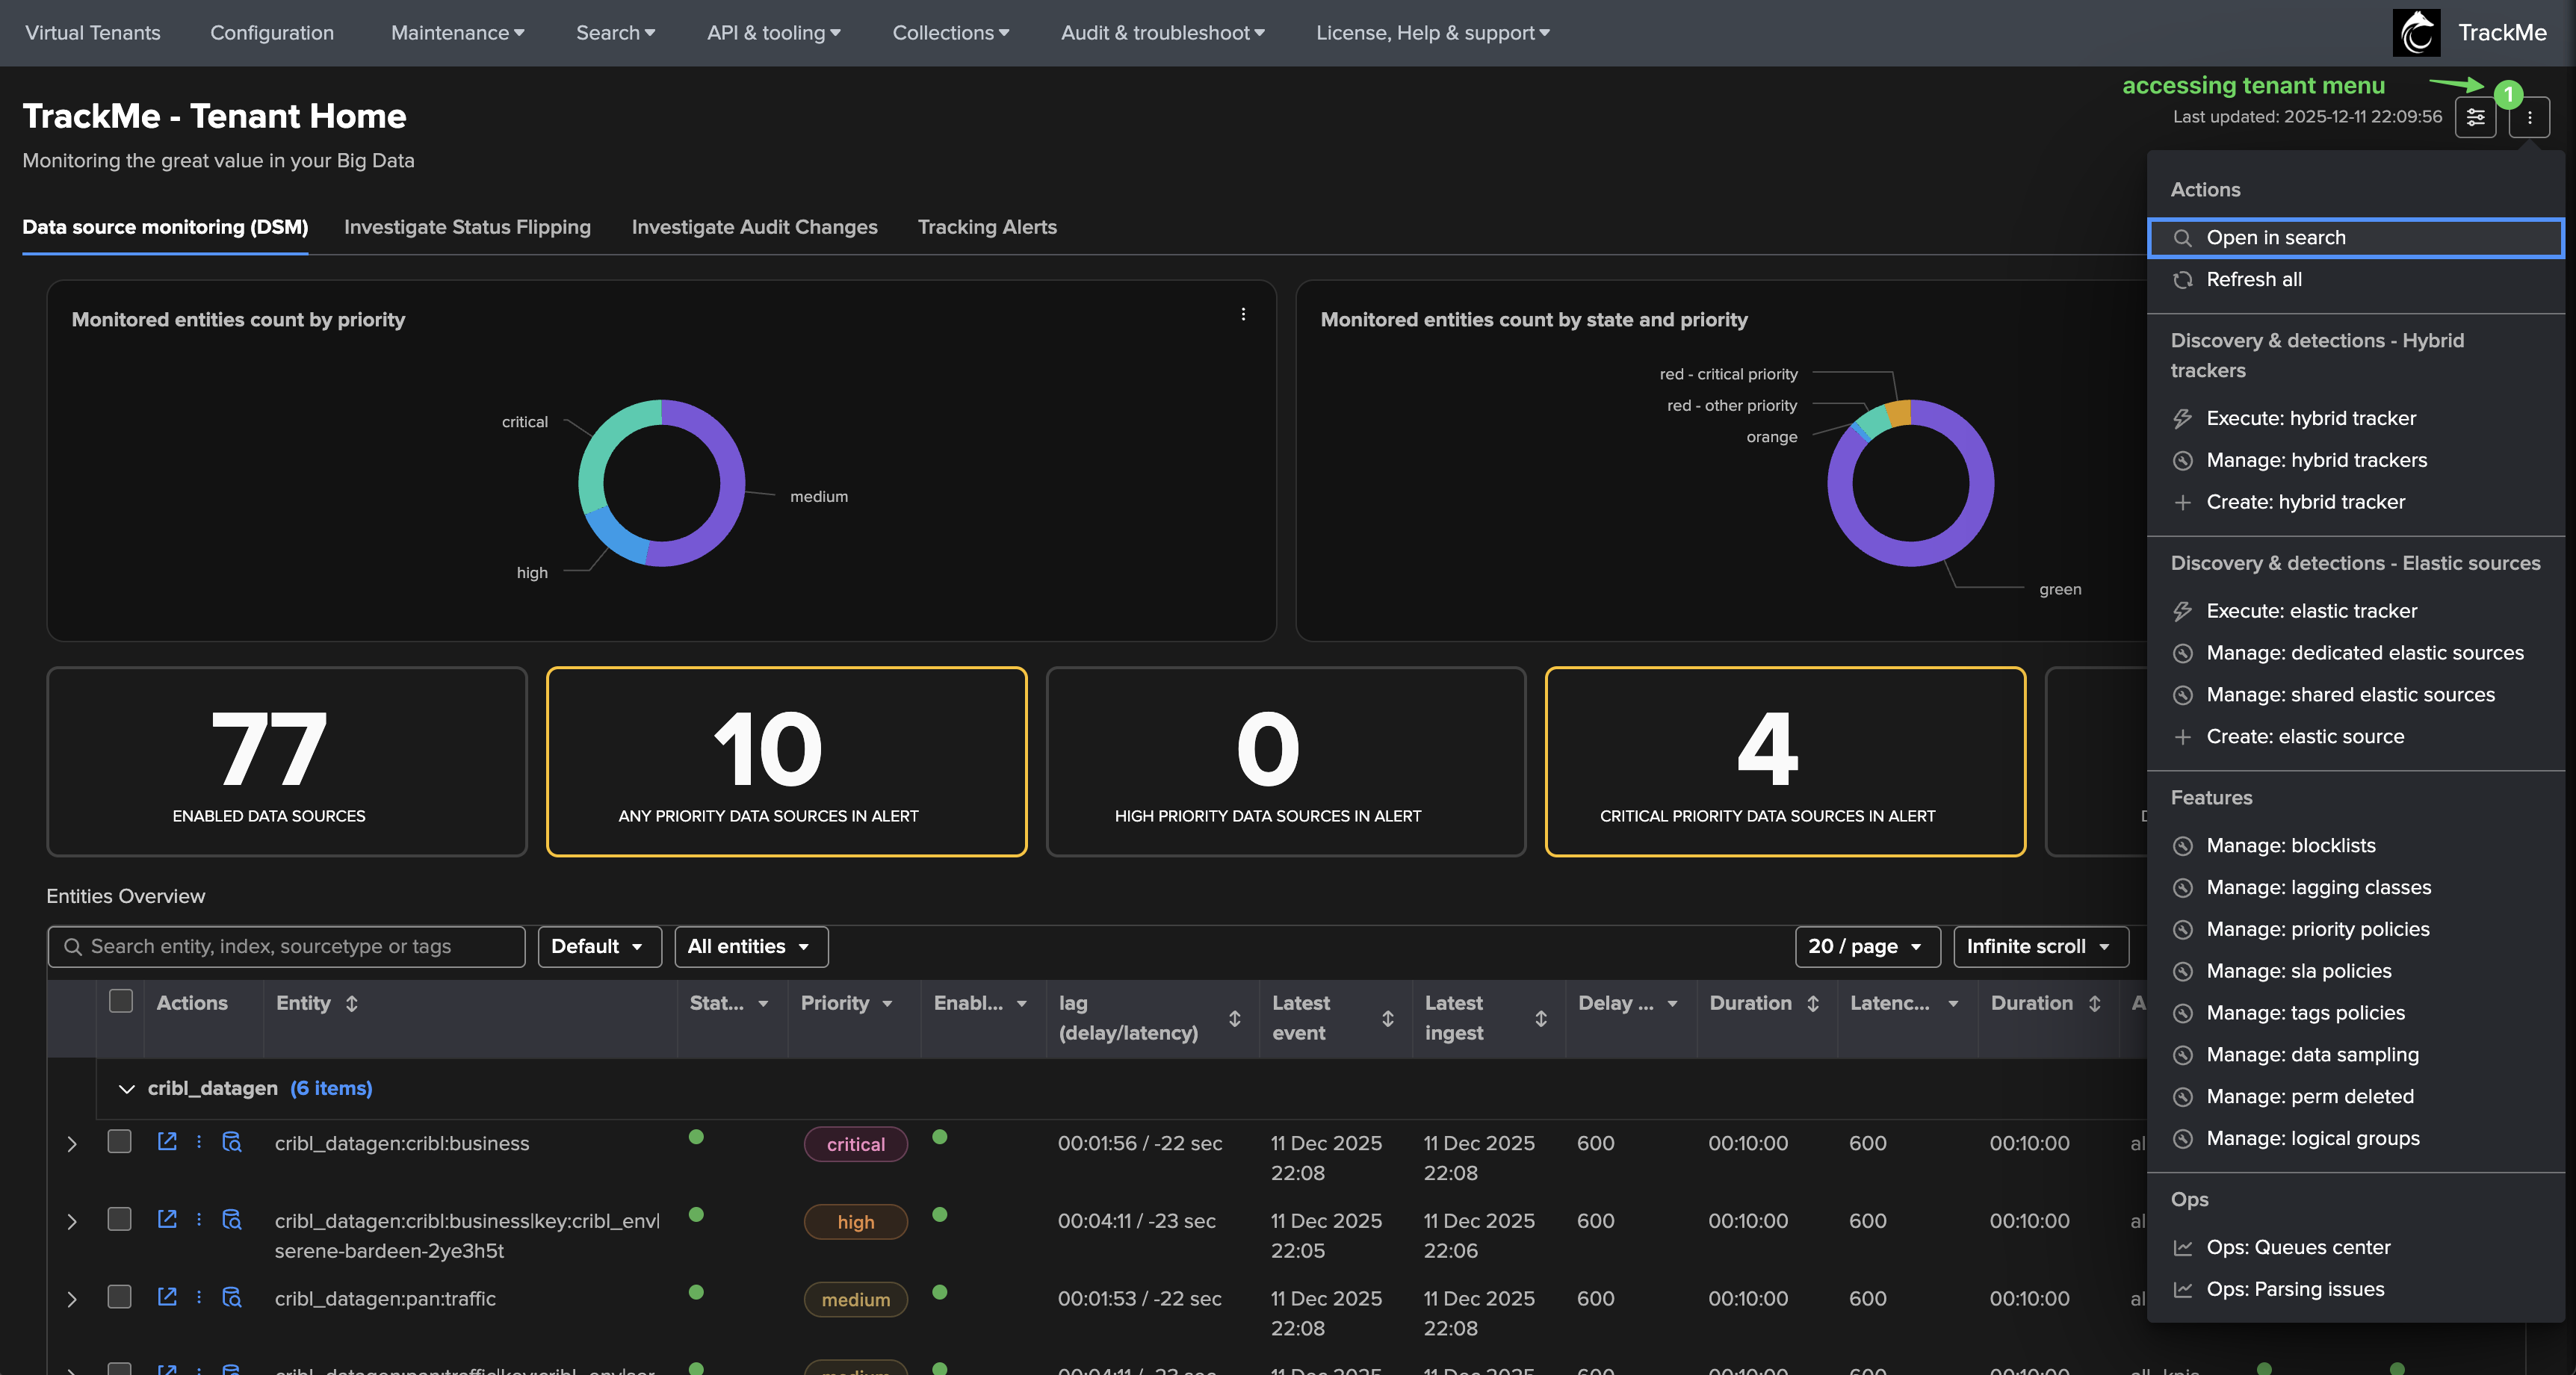
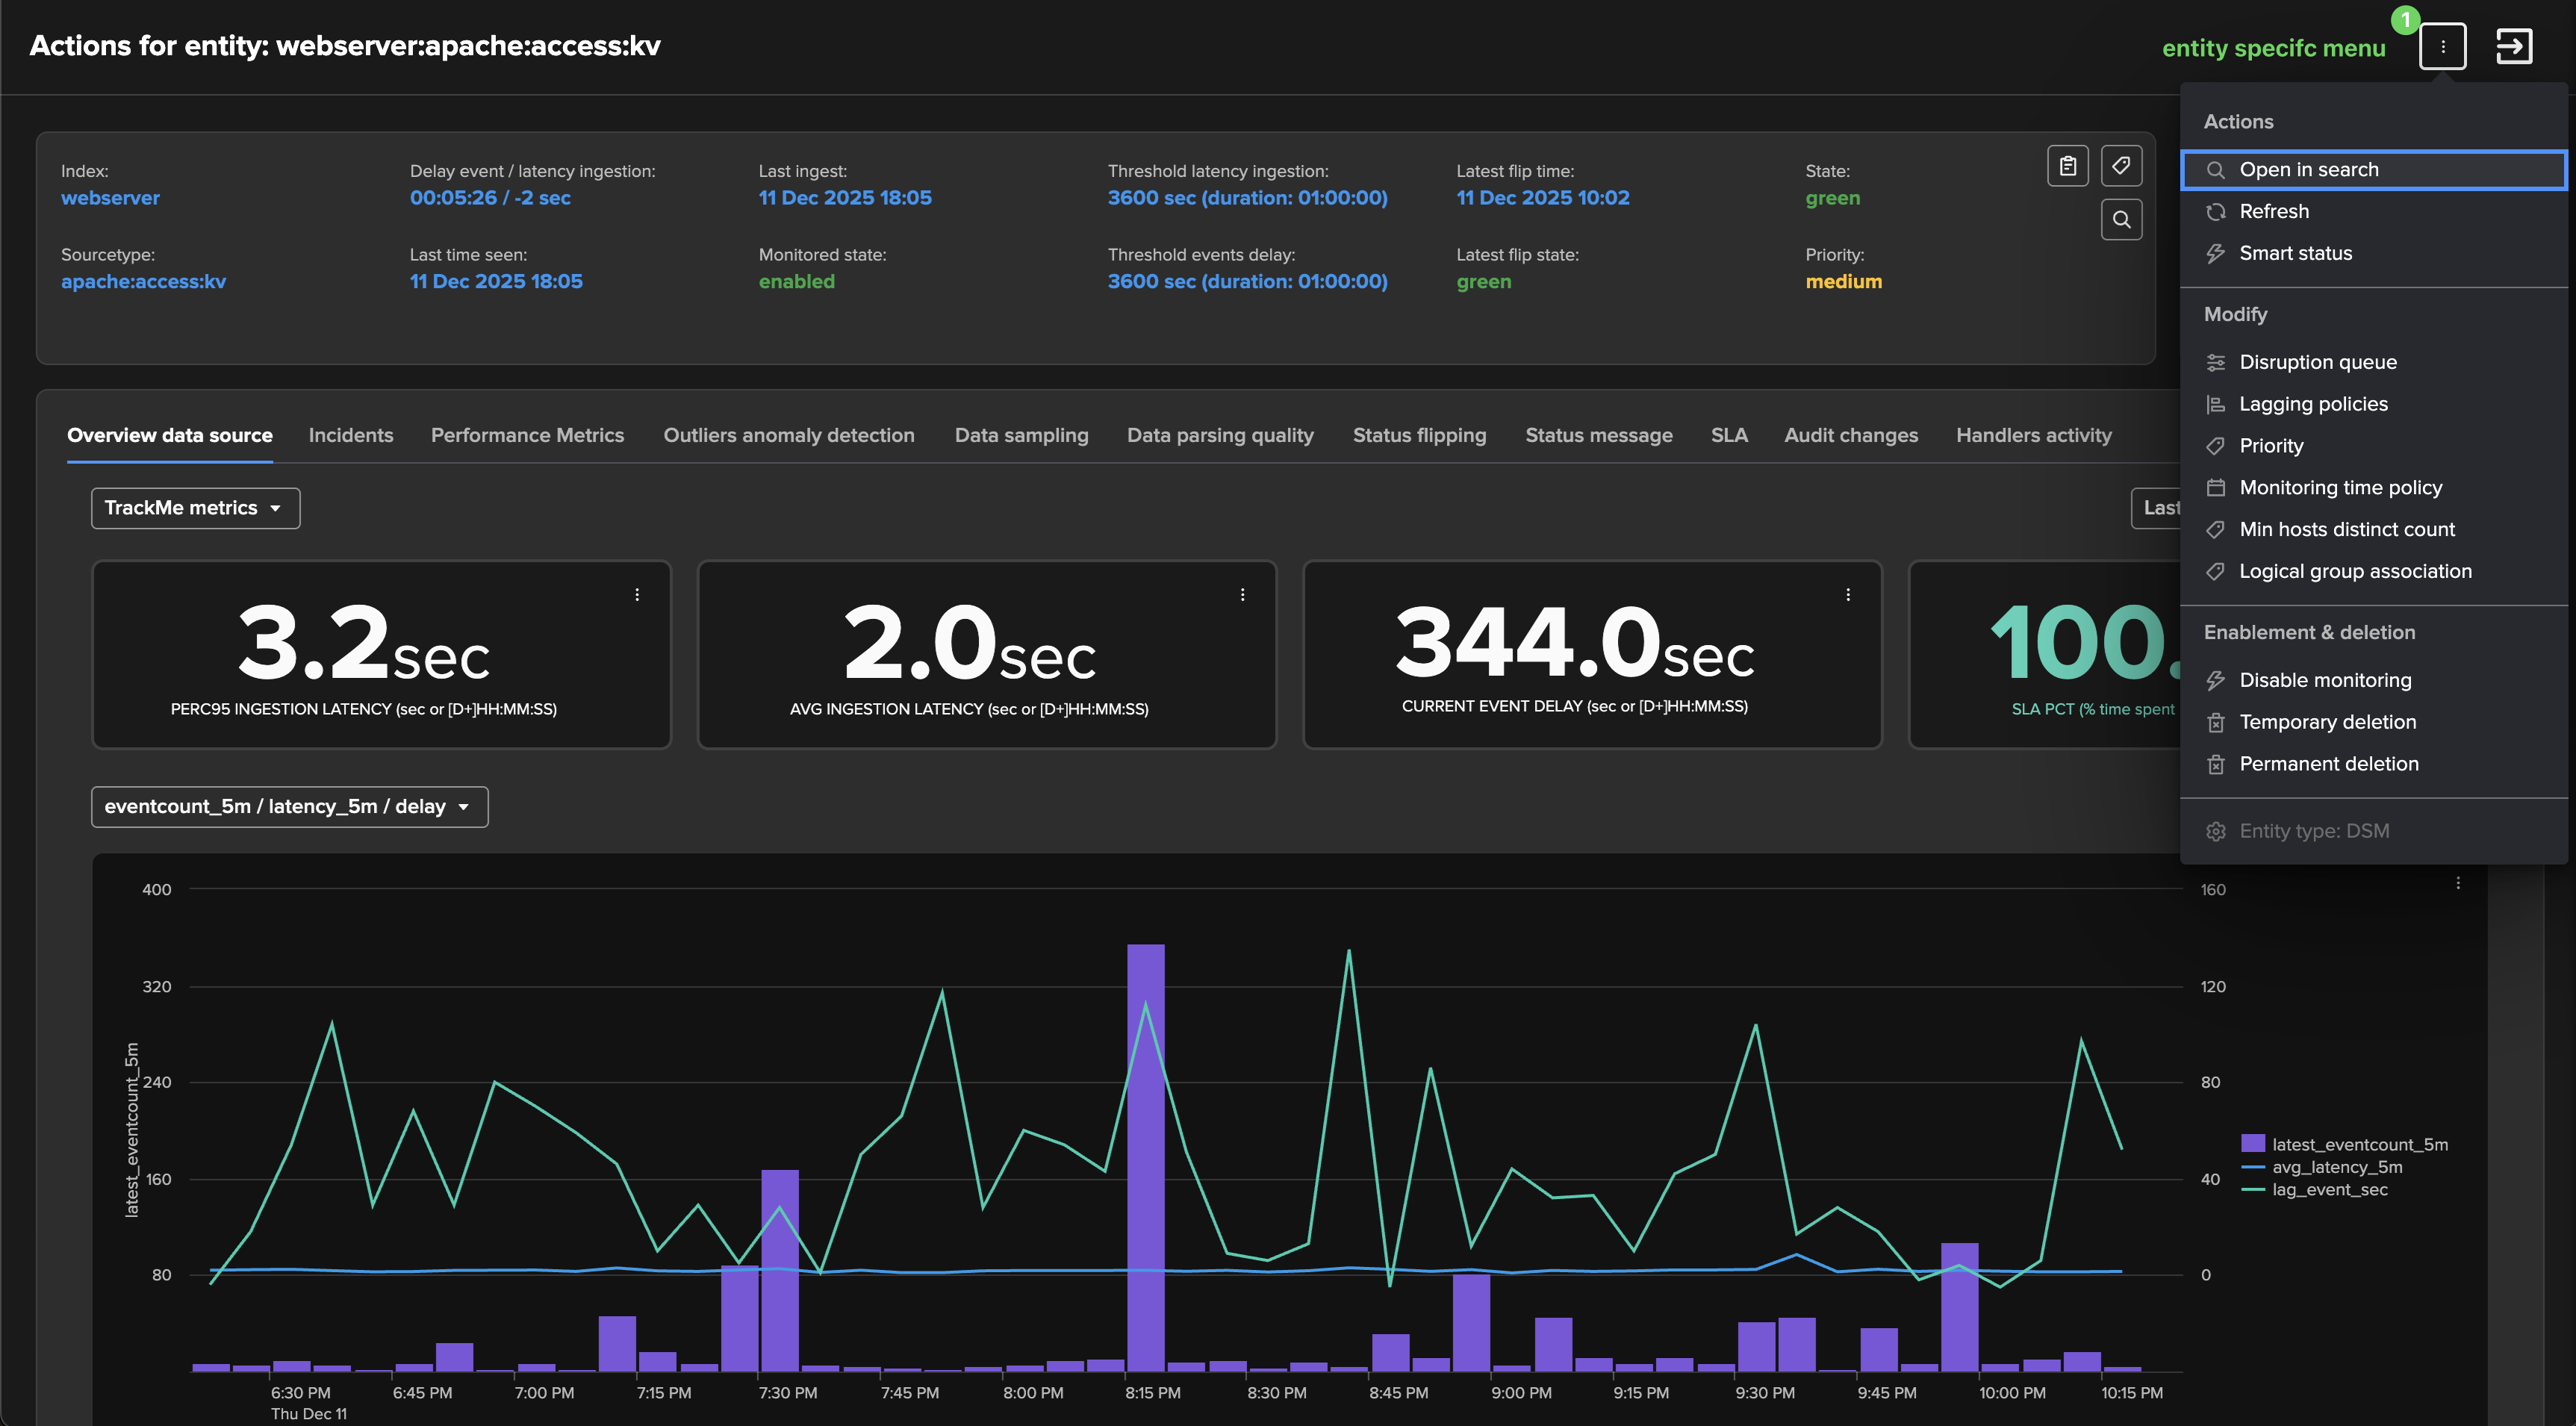
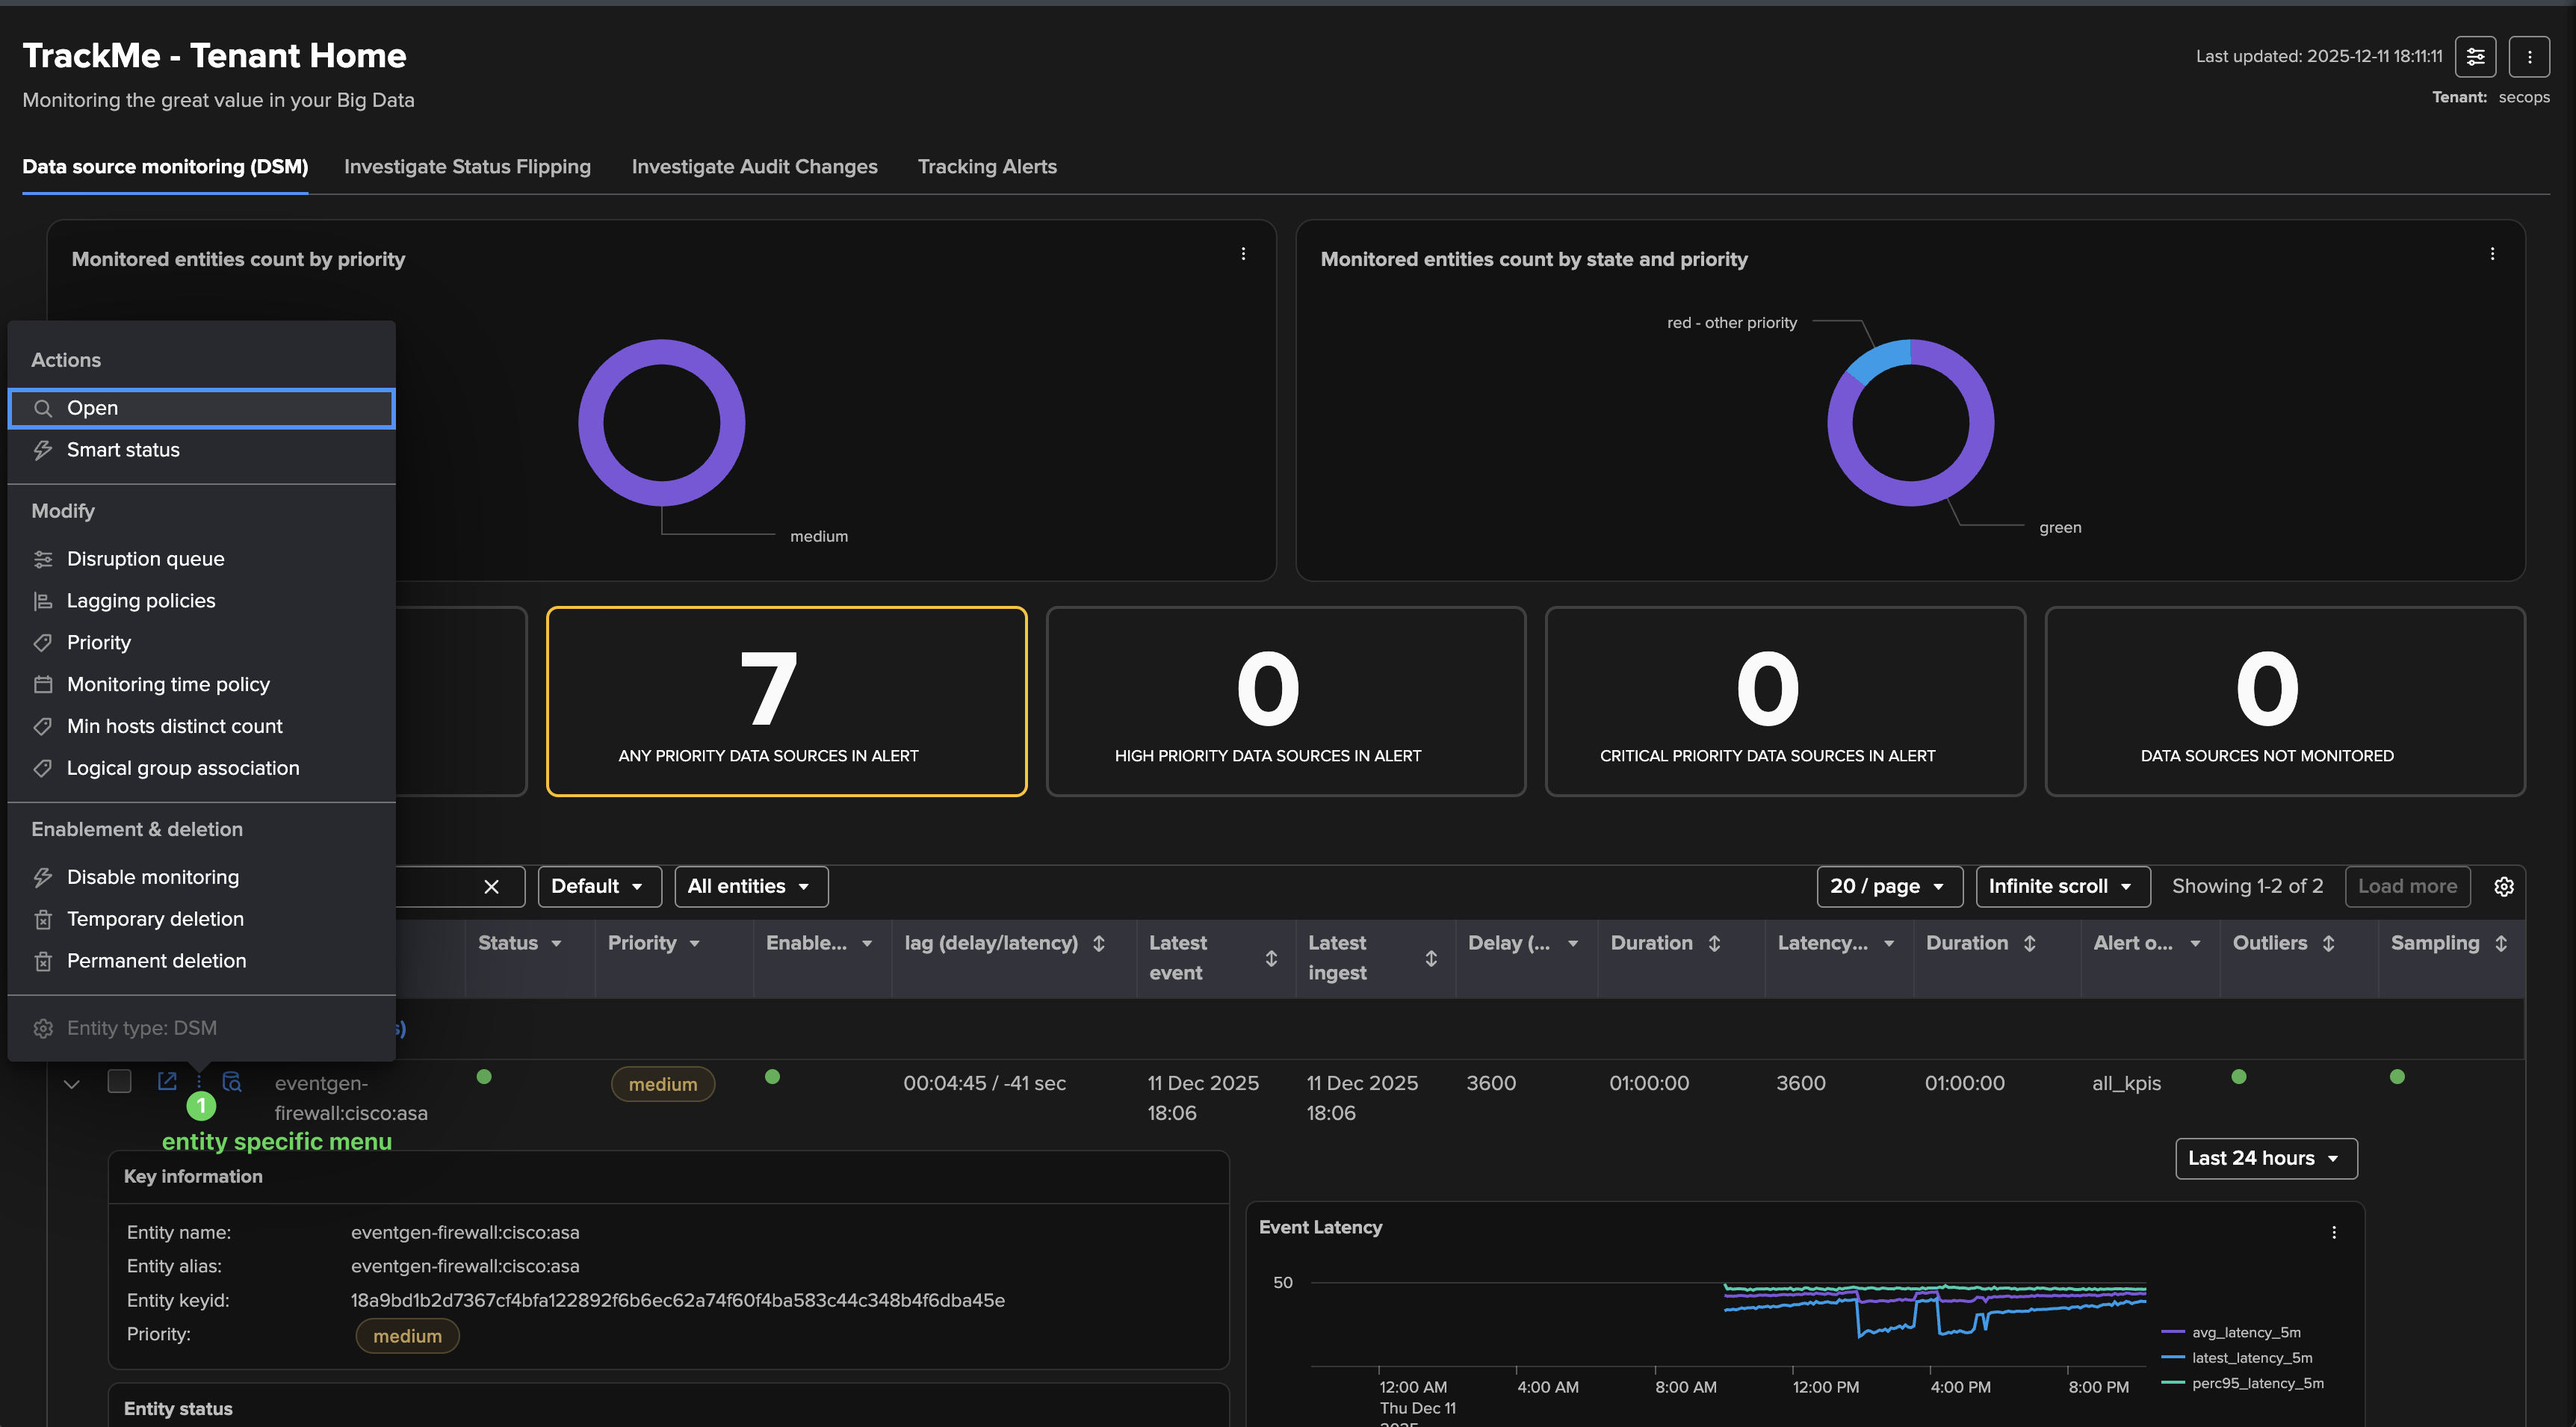
As everywhere in TrackMe, actions are reached through three-dot menus (the exact items depend on the component type):

the tenant menu:
img-005026@2x.png

the entity menu from the top selector:
img-005029@2x.png

the entity menu from the entity table:
img-005027@2x.png

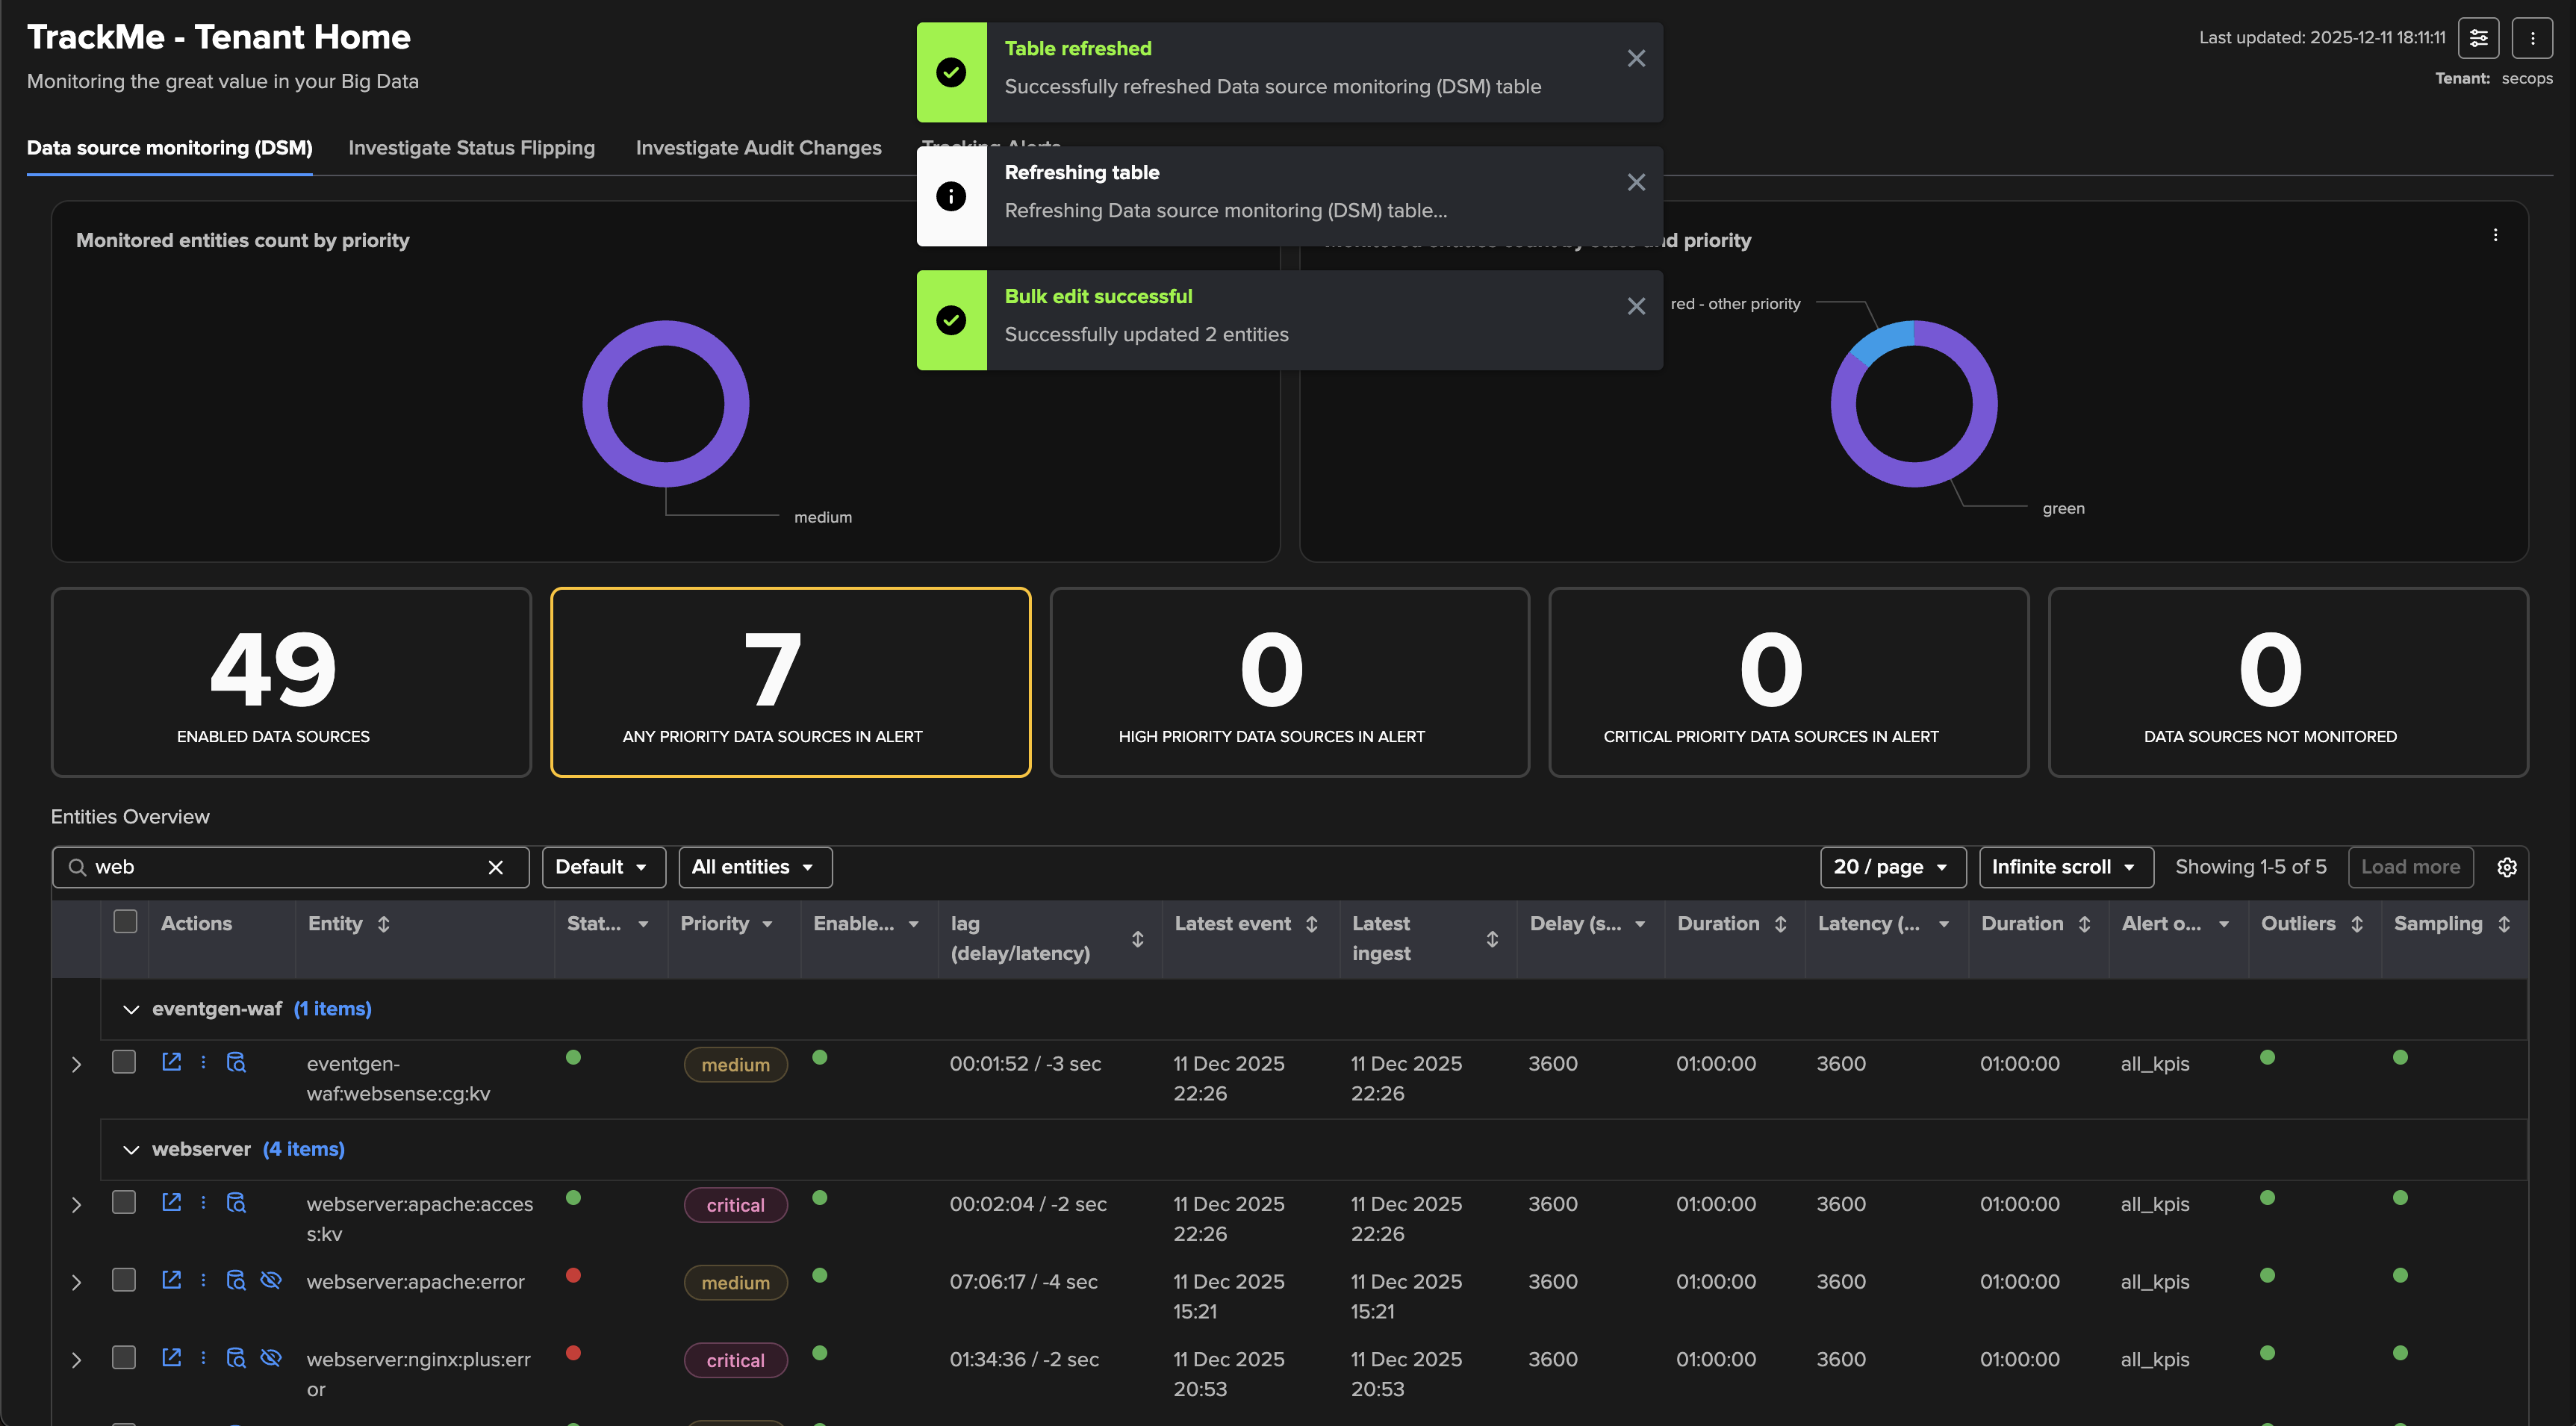
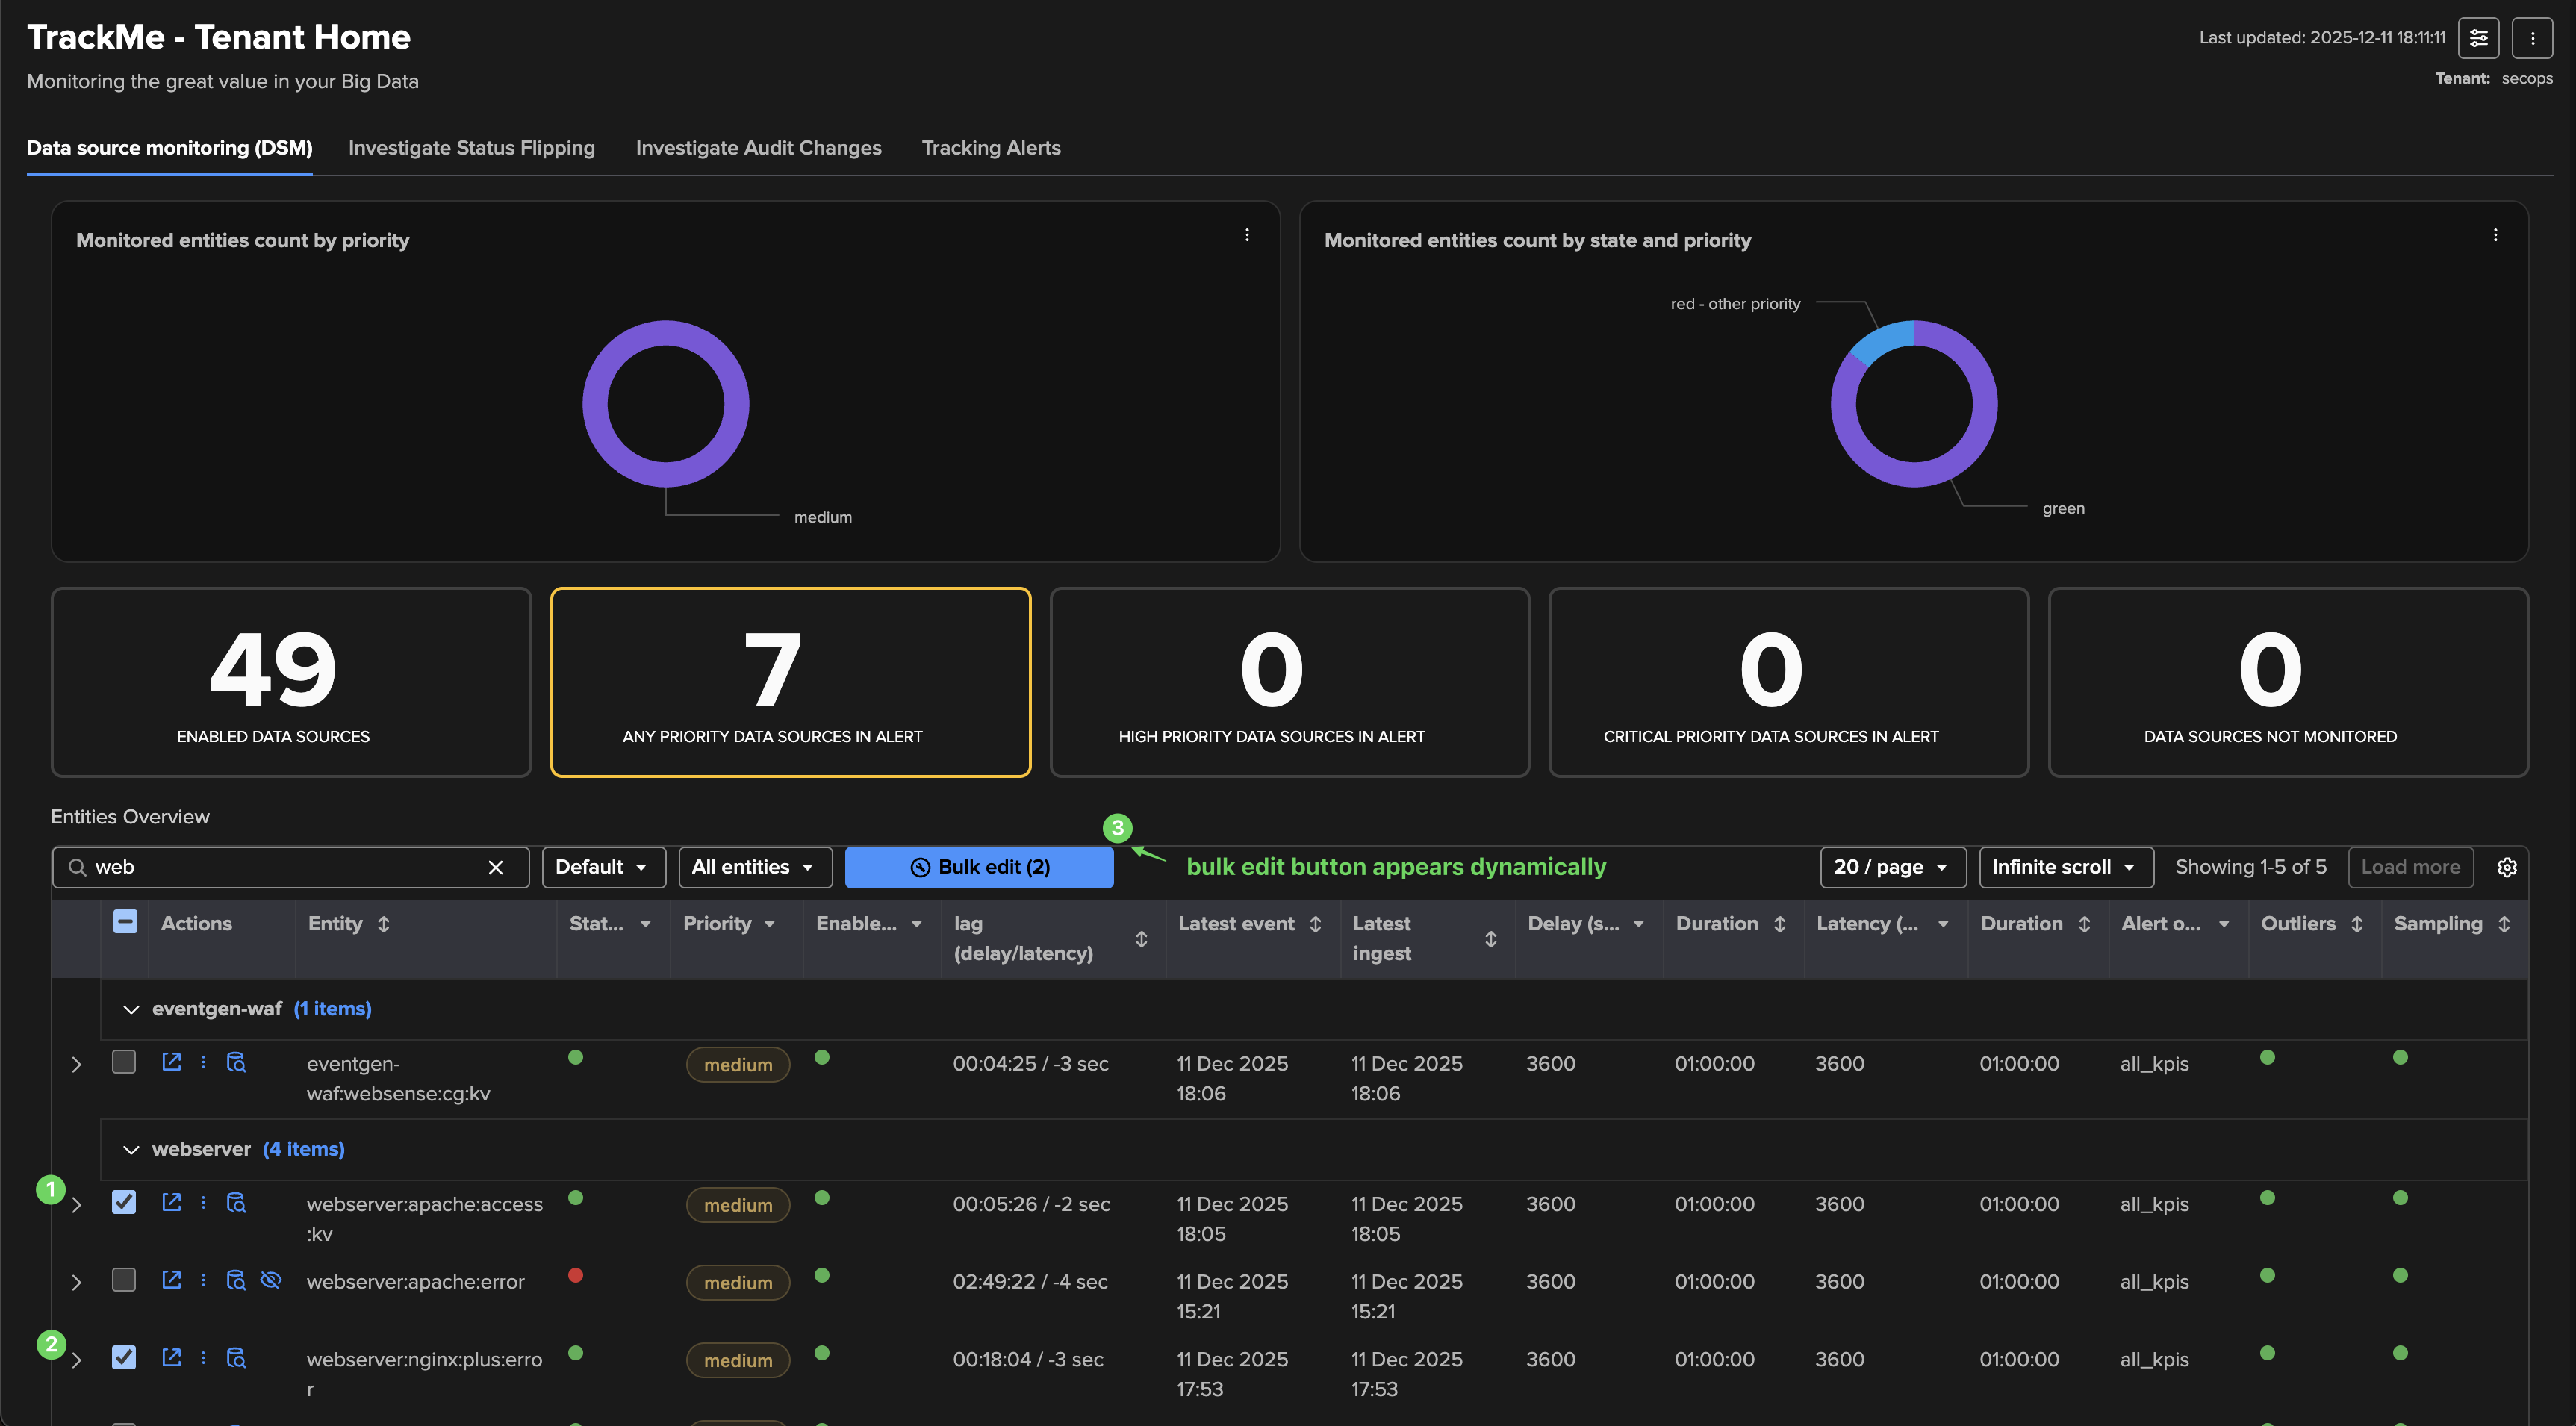
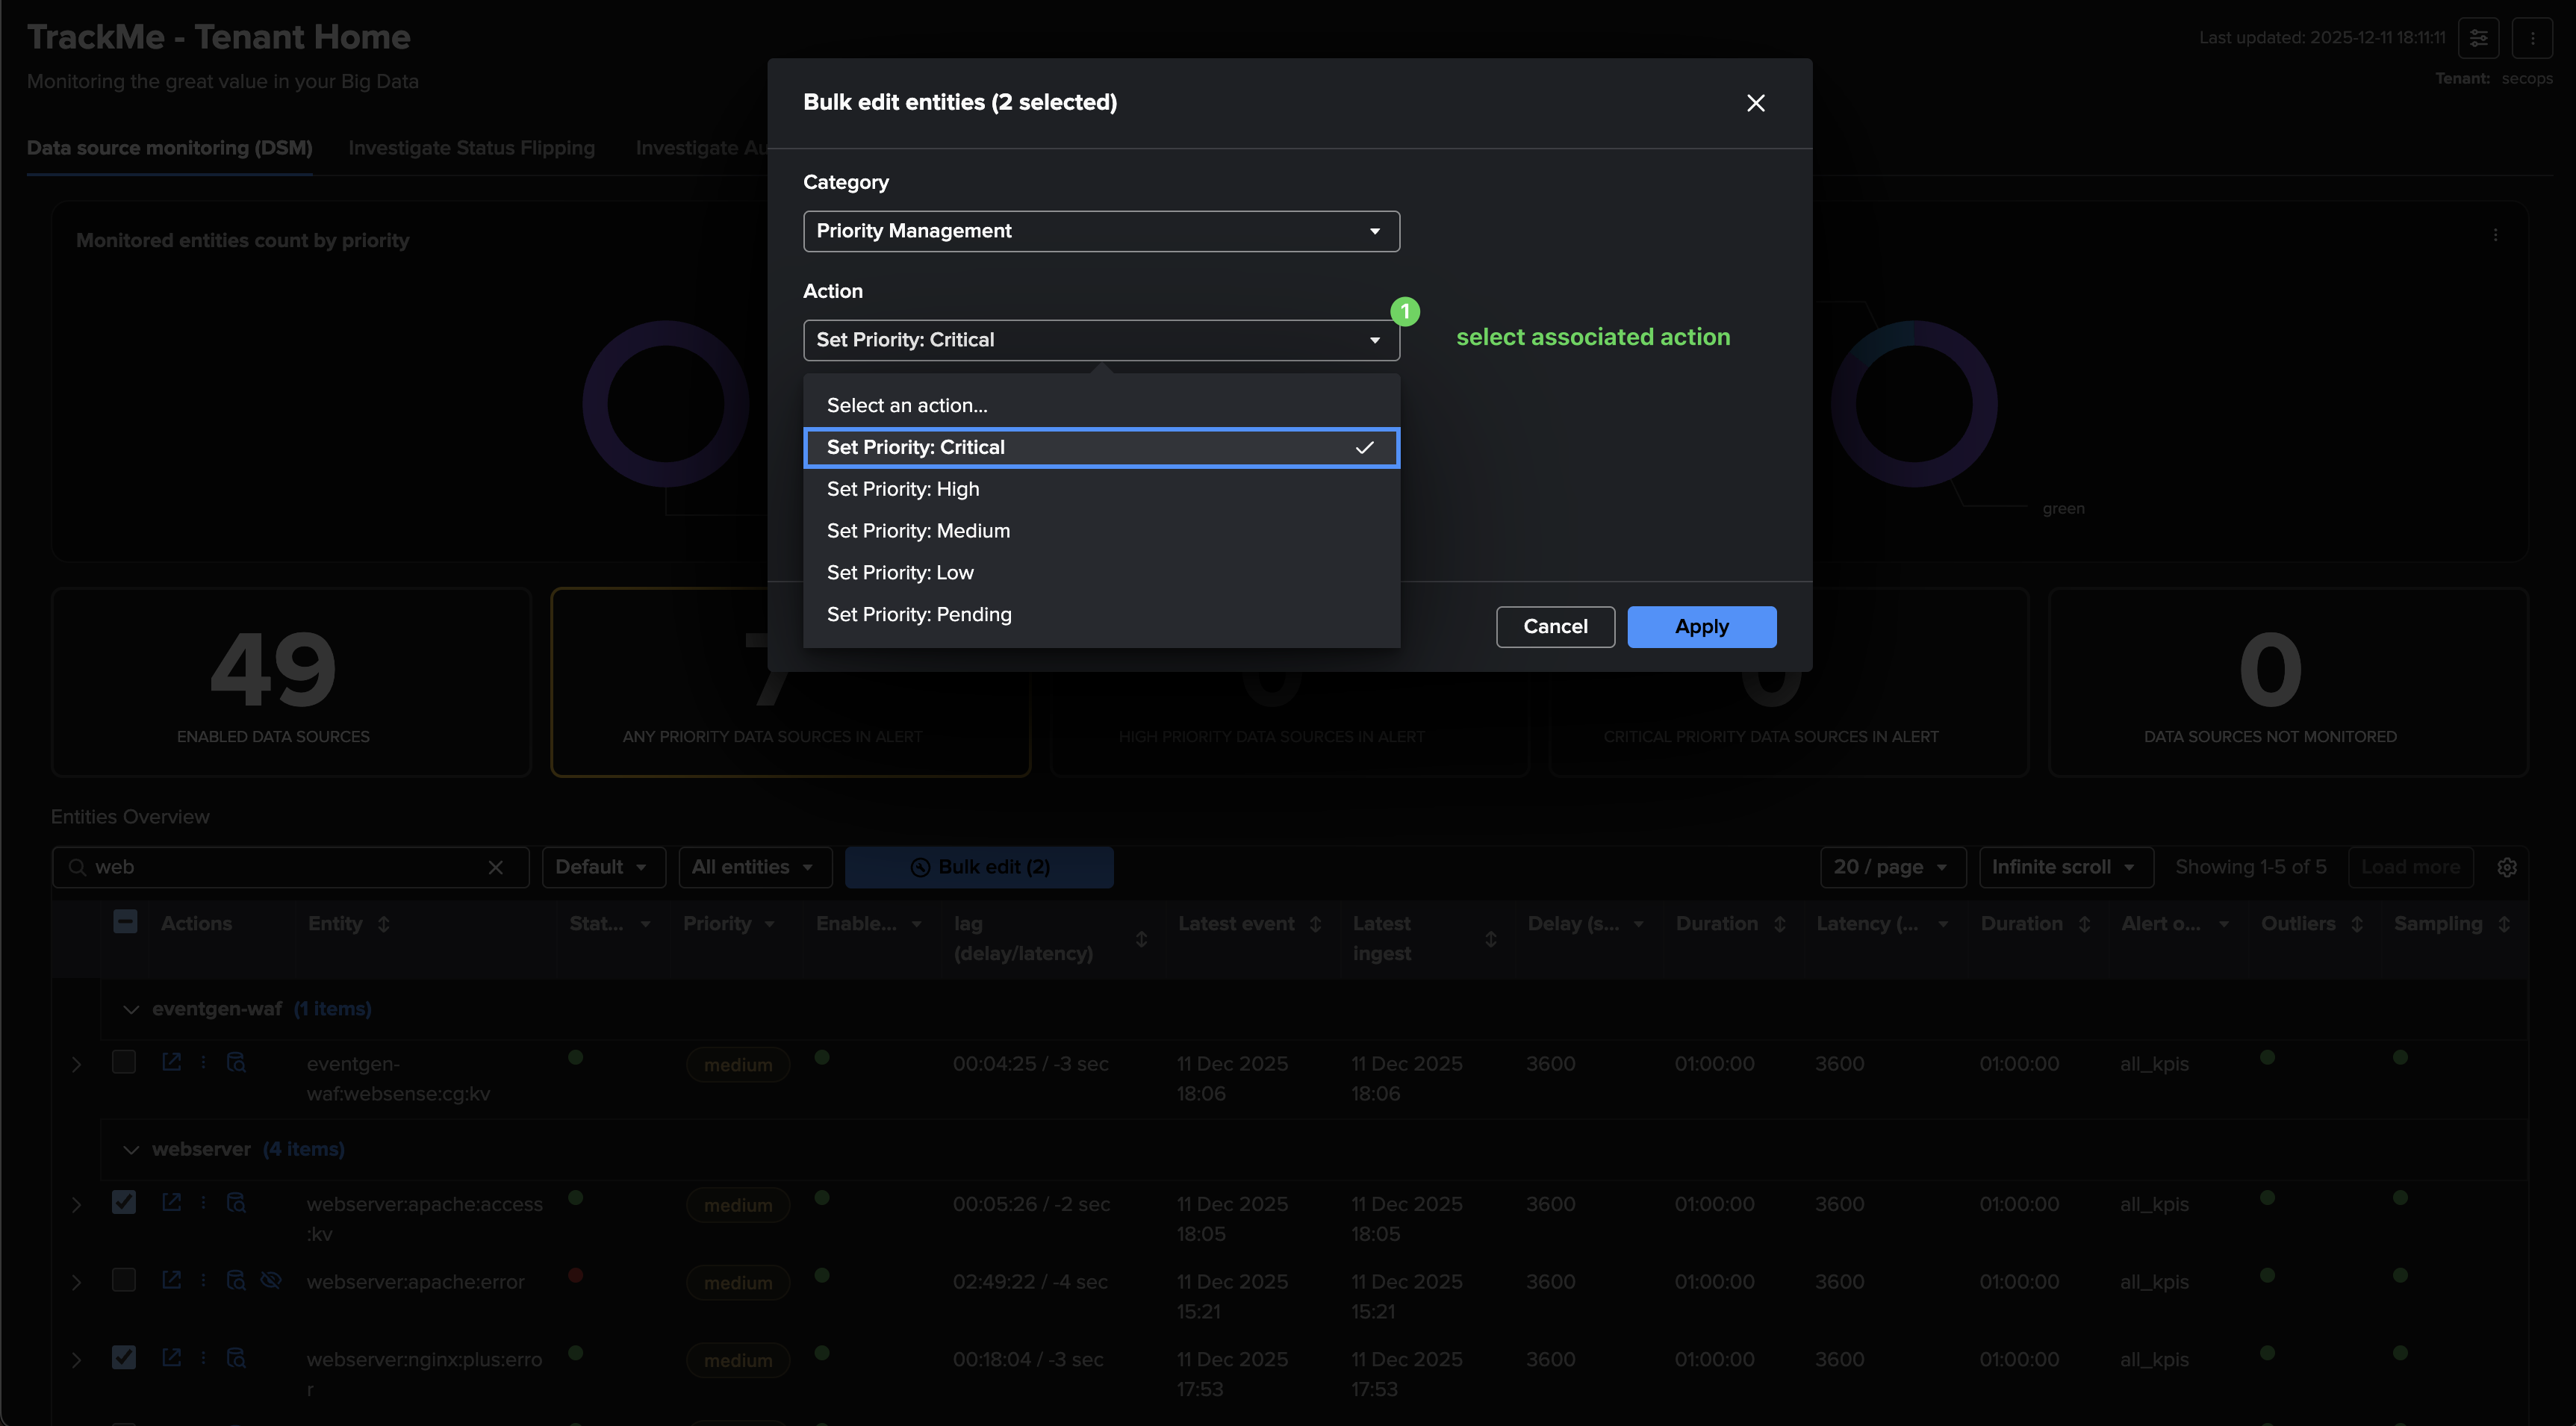
Bulk editing

The Tenant Home supports dynamic bulk editing: select one or more entities and the bulk action button appears automatically.
img-005030@2x.png img-005032@2x.png img-005033@2x.png

Themes & personal preferences

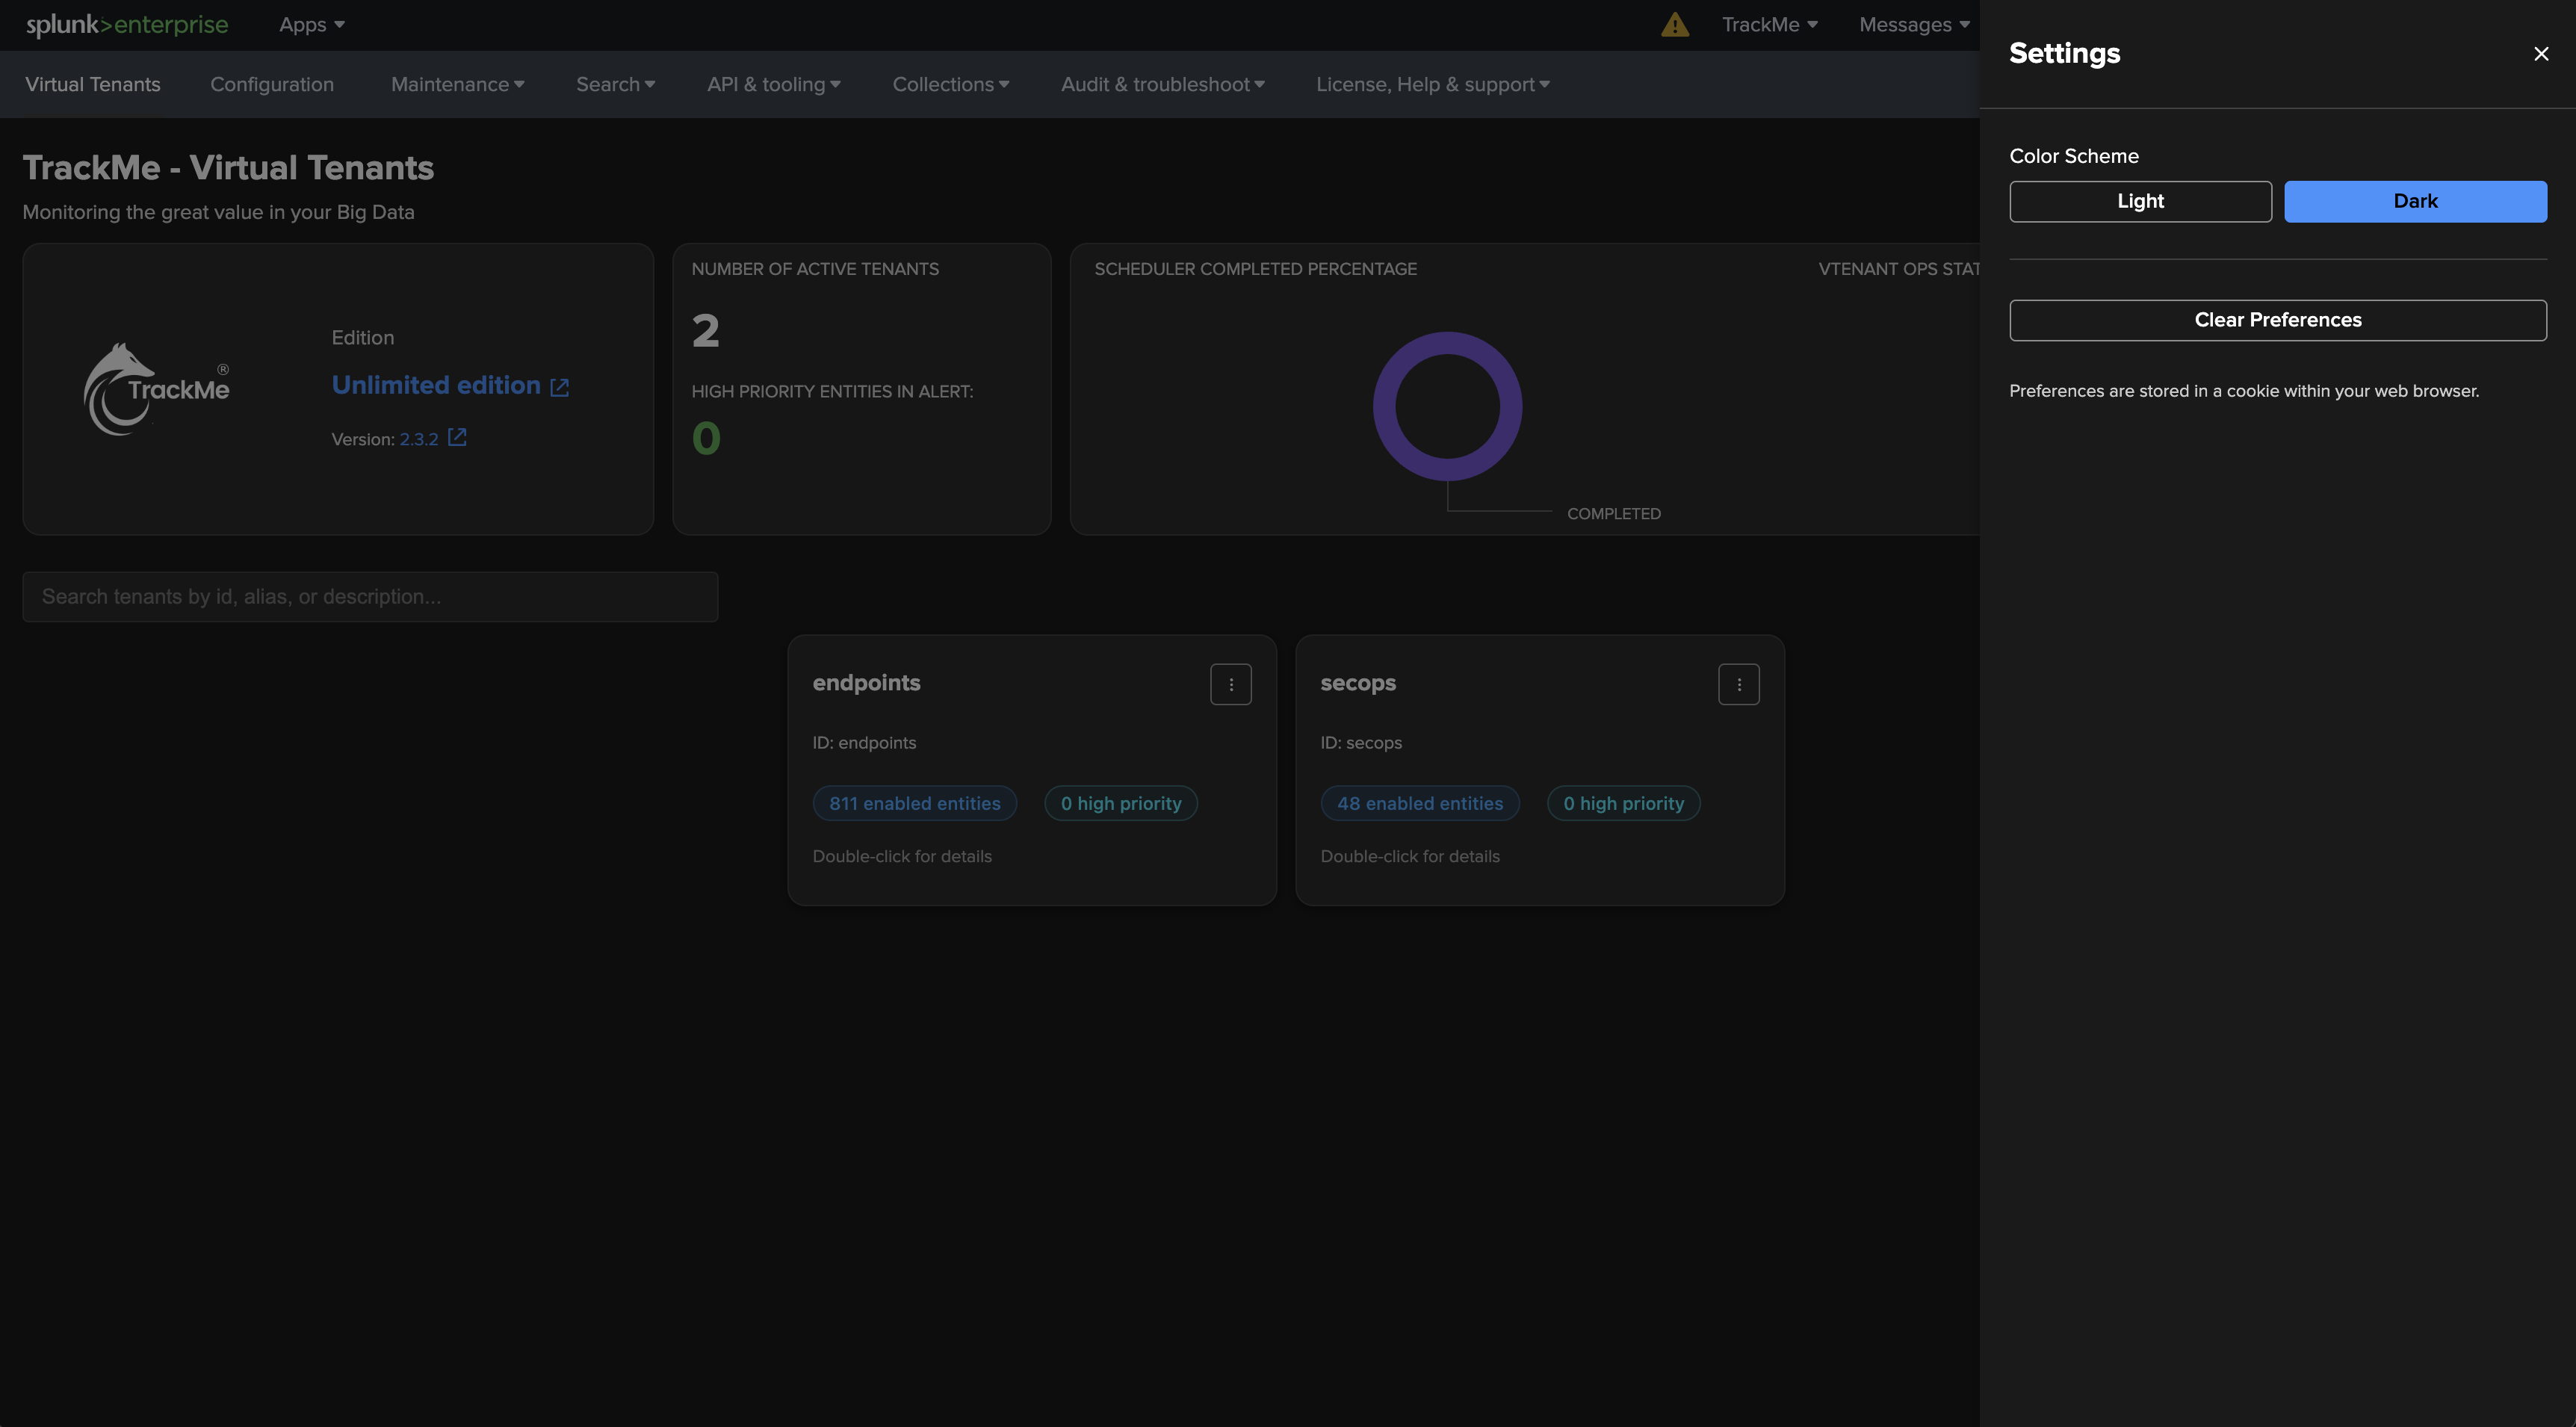
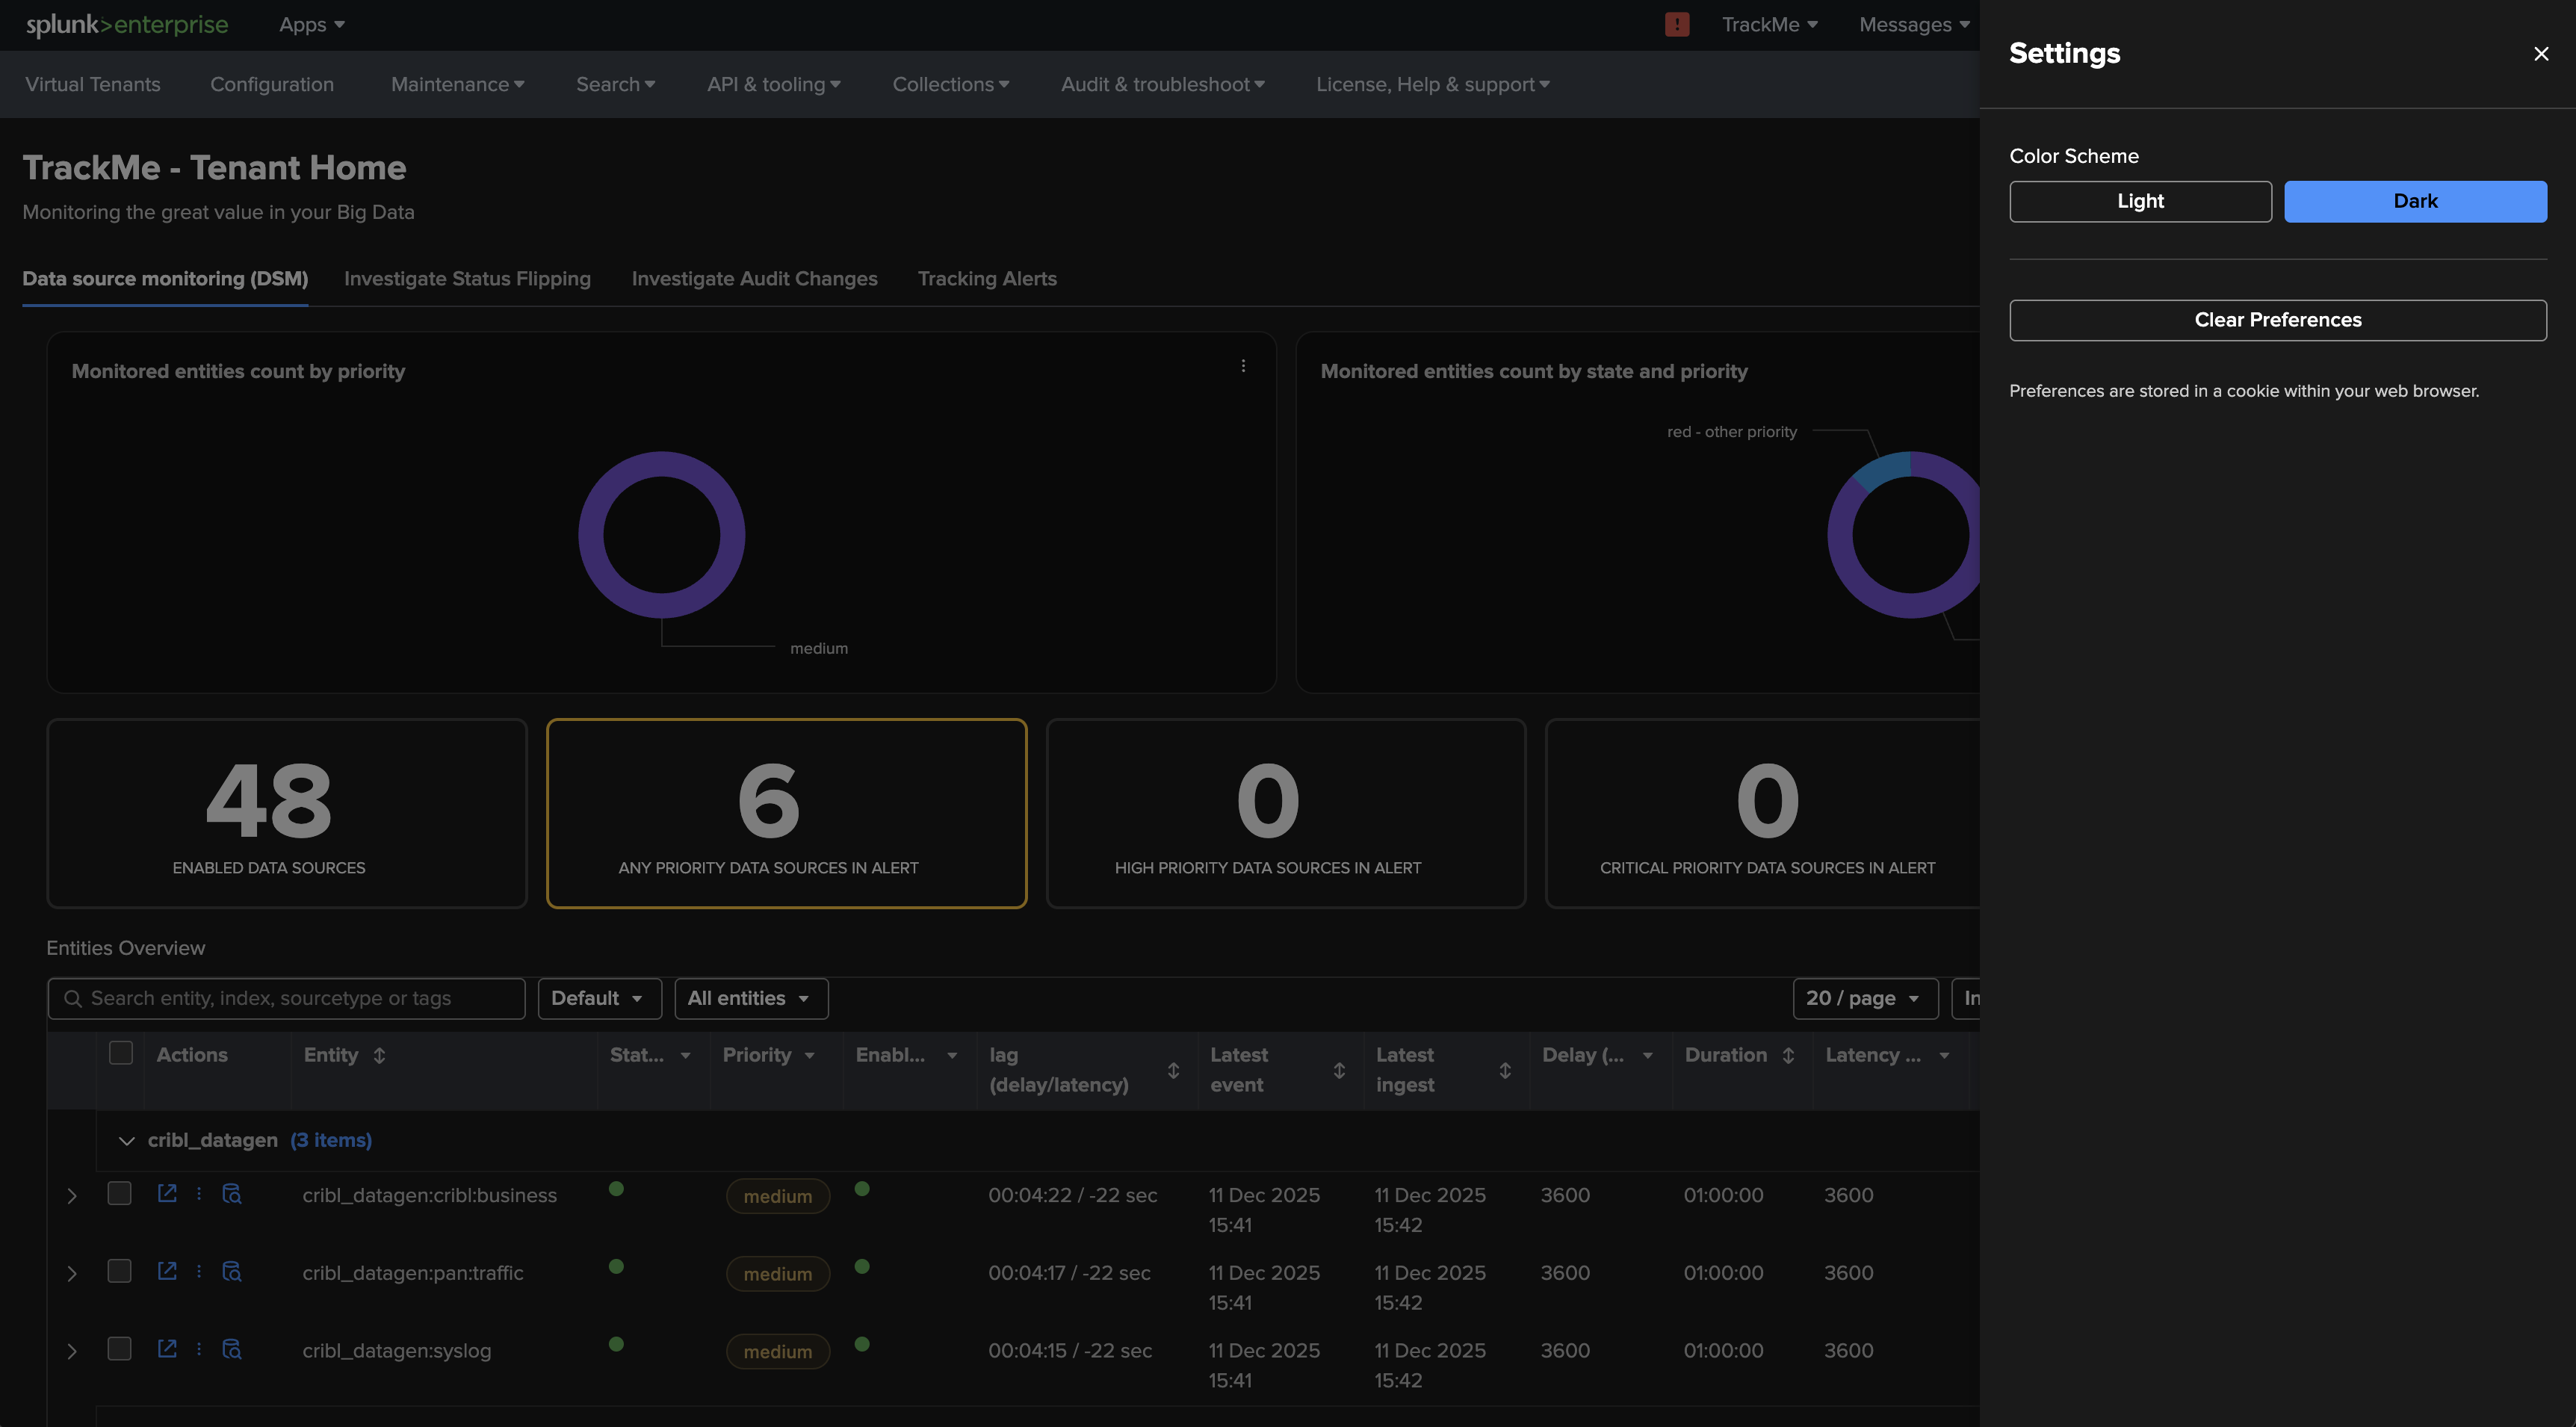
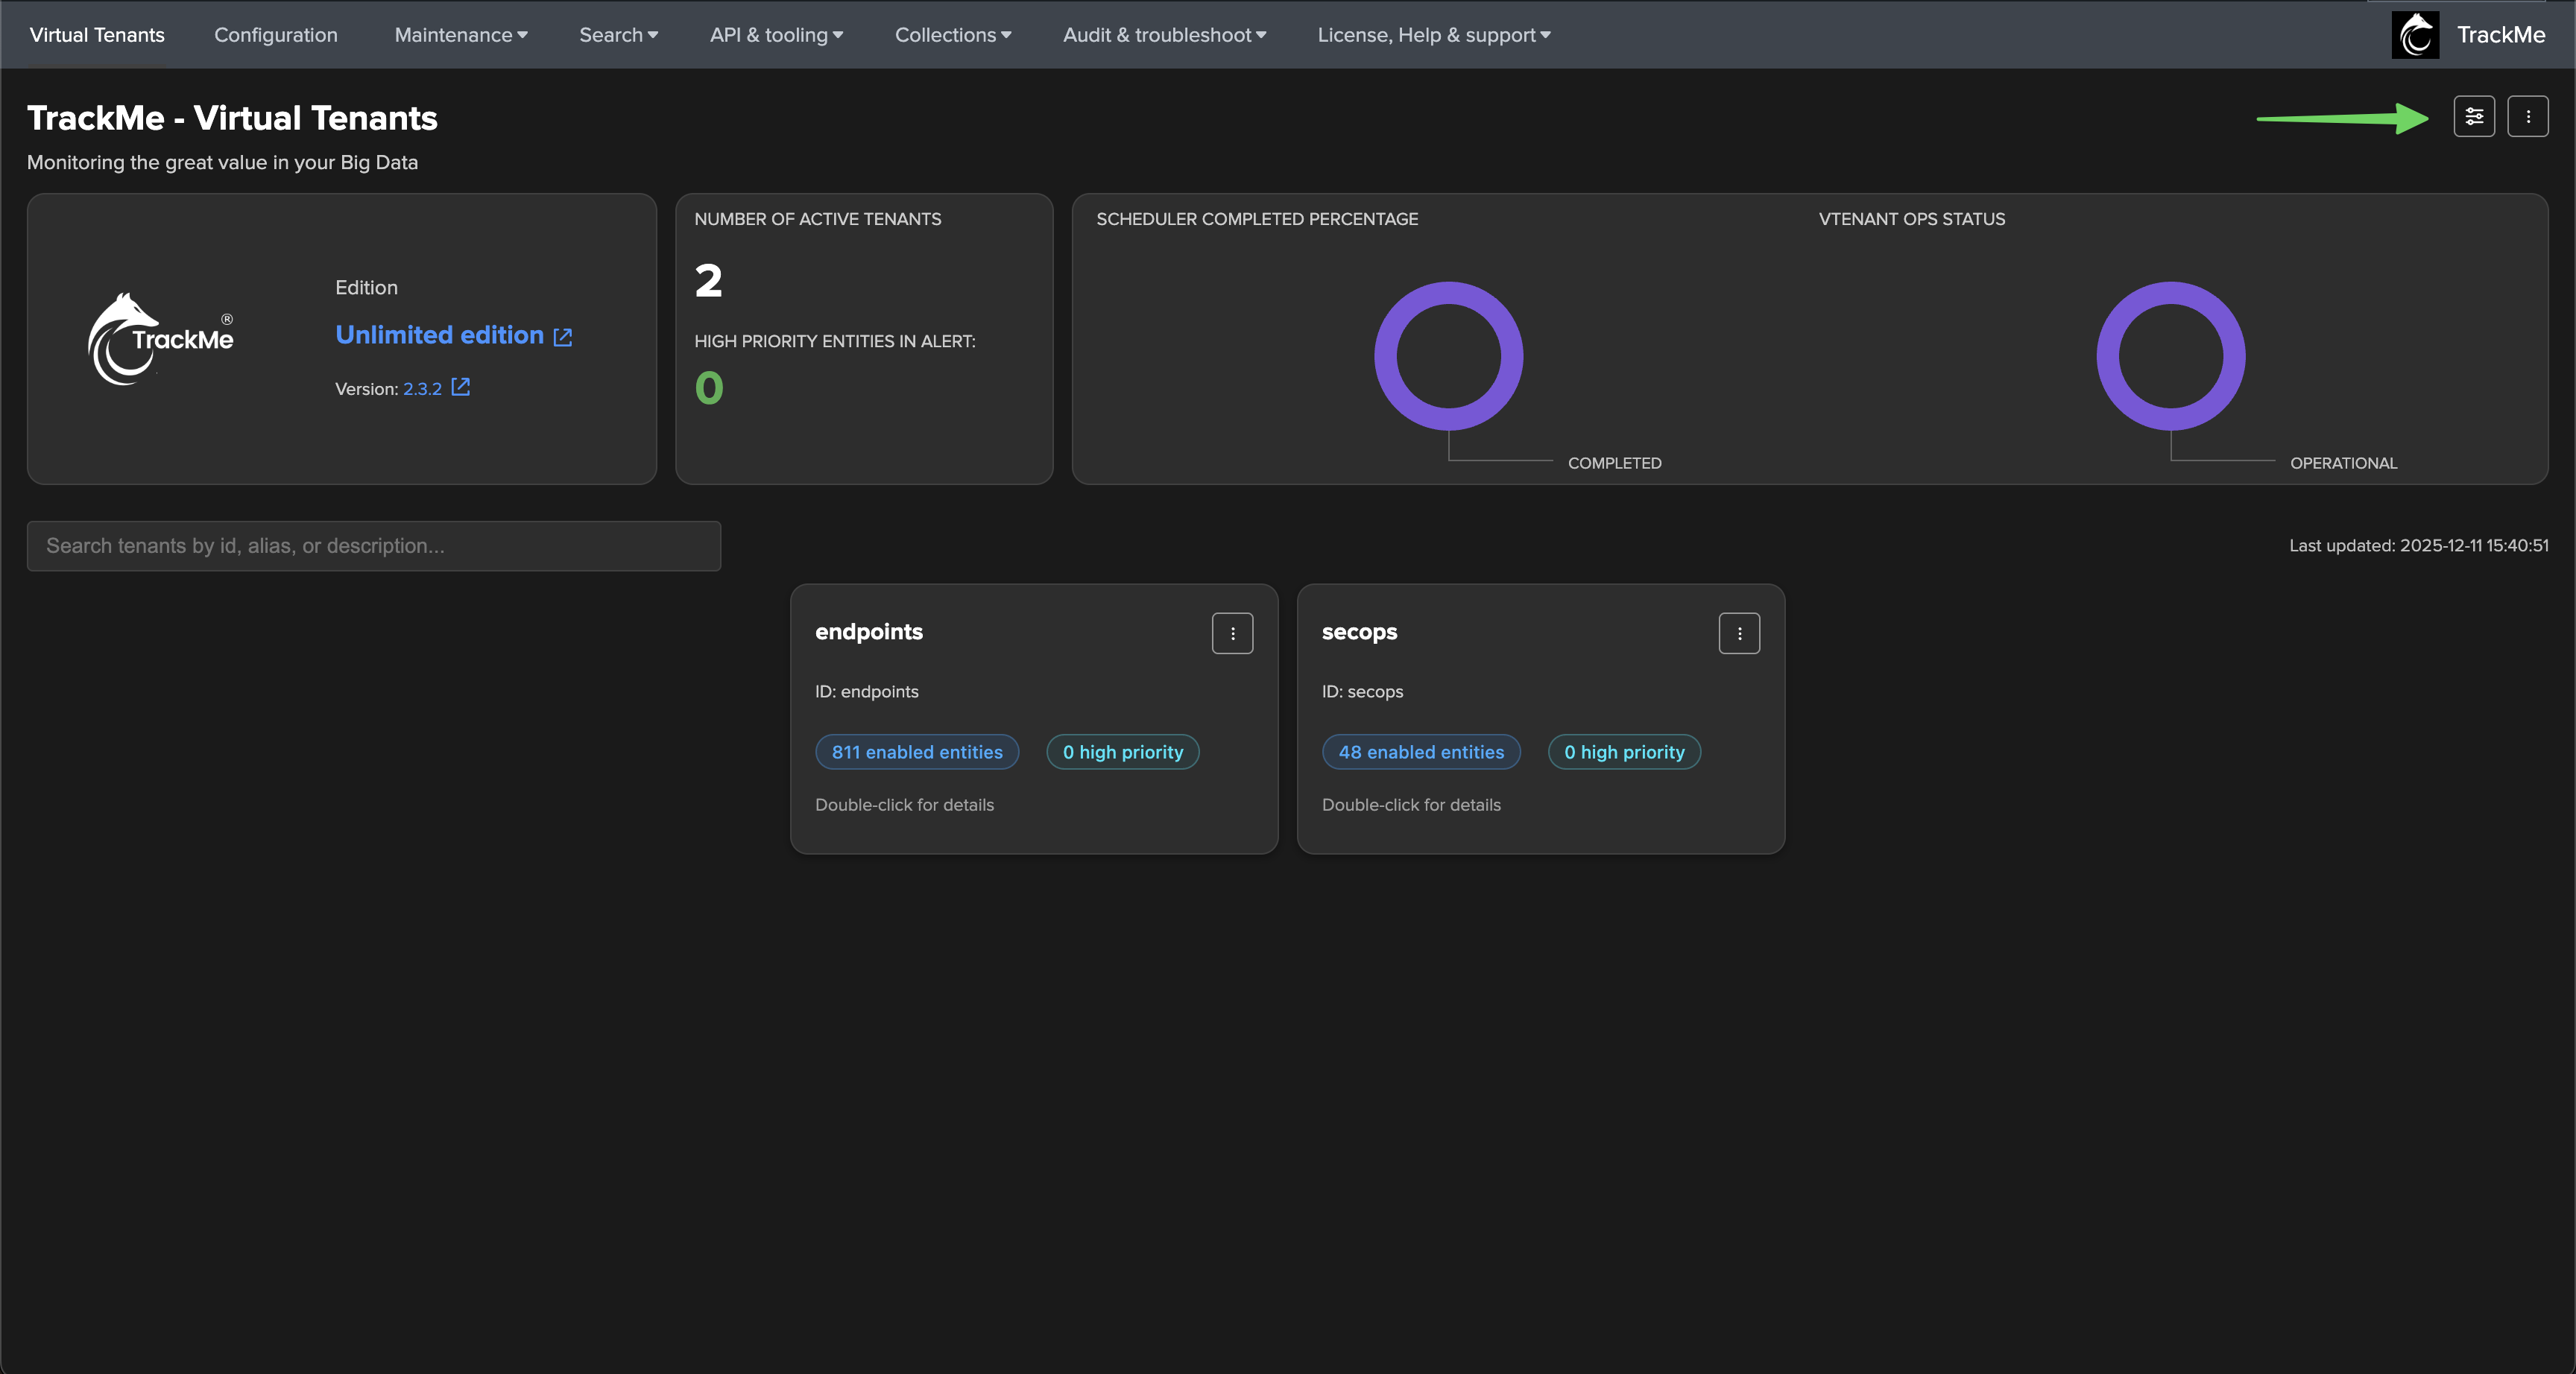
TrackMe supports two themes — Dark mode and Light mode — applied globally across all interfaces. Each user’s choice is stored persistently in a browser cookie. Administrators can set the default theme for users landing in TrackMe for the first time; after installation the default is dark mode.

Setting your theme

From either the Virtual Tenant interface or the Tenant Home, click the settings icon in the top right of the screen to open your preferences:

from the Virtual Tenant interface:
img-004995@2x.png img-004997@2x.png

from the Tenant Home interface:

img-004998@2x.png img-004999@2x.png

TrackMe in Light mode:

img-005000@2x.png img-005001@2x.png
img-005002@2x.png img-005003@2x.png

See also

  • What is TrackMe? and How TrackMe works — the conceptual introduction.

  • Virtual Tenants & Access — creating, managing, and securing Virtual Tenants.

  • Monitoring Components — the per-component views the Tenant Home adapts to.

Next
Virtual Tenants & Access
Previous
How TrackMe works
Copyright © 2022 - 2026. TrackMe Limited. All rights reserved. TRACKME® is a registered trade mark of TrackMe Limited, in both word and logo form. Any unauthorised use or reproduction of these marks is strictly prohibited and may result in legal action.
Made with Furo
On this page
  • Navigating the TrackMe UI — in depth
    • The Virtual Tenant interface
      • The home page at a glance
      • The three-dot menu
      • Opening a Virtual Tenant overview
      • The tenant actions menu
      • Reviewing entities (read-only)
      • Hiding a Virtual Tenant
    • The Tenant Home interface
      • Key interactions
      • Entity and tenant menus
      • Bulk editing
    • Themes & personal preferences
      • Setting your theme