Part 2 — Classify with policies
Two lookup-based policies — priority and tags — simulated before saving, and the same tenant now knows what matters and who owns it.
about 15 minutes · 12 slides. Each slide is followed by a description of what it shows — read top to bottom, this page is the walkthrough.
Overview
Part 2 of the hands-on walkthrough starts where Part 1 stopped: the secops tenant has its DSM entities, every one of them at medium priority and none tagged. A tenant where every entity is medium is not a monitoring posture — TrackMe cannot yet tell which feeds matter or who owns them.
This part covers step 4 of the cycle, CLASSIFY, done the way it scales: two lookup-based policies, priority and tags, driven by a CMDB-style lookup rather than set one entity at a time. Once applied, the same tenant knows what matters and which team to call. Captured on TrackMe 2.4.18.
Policy types and policy families
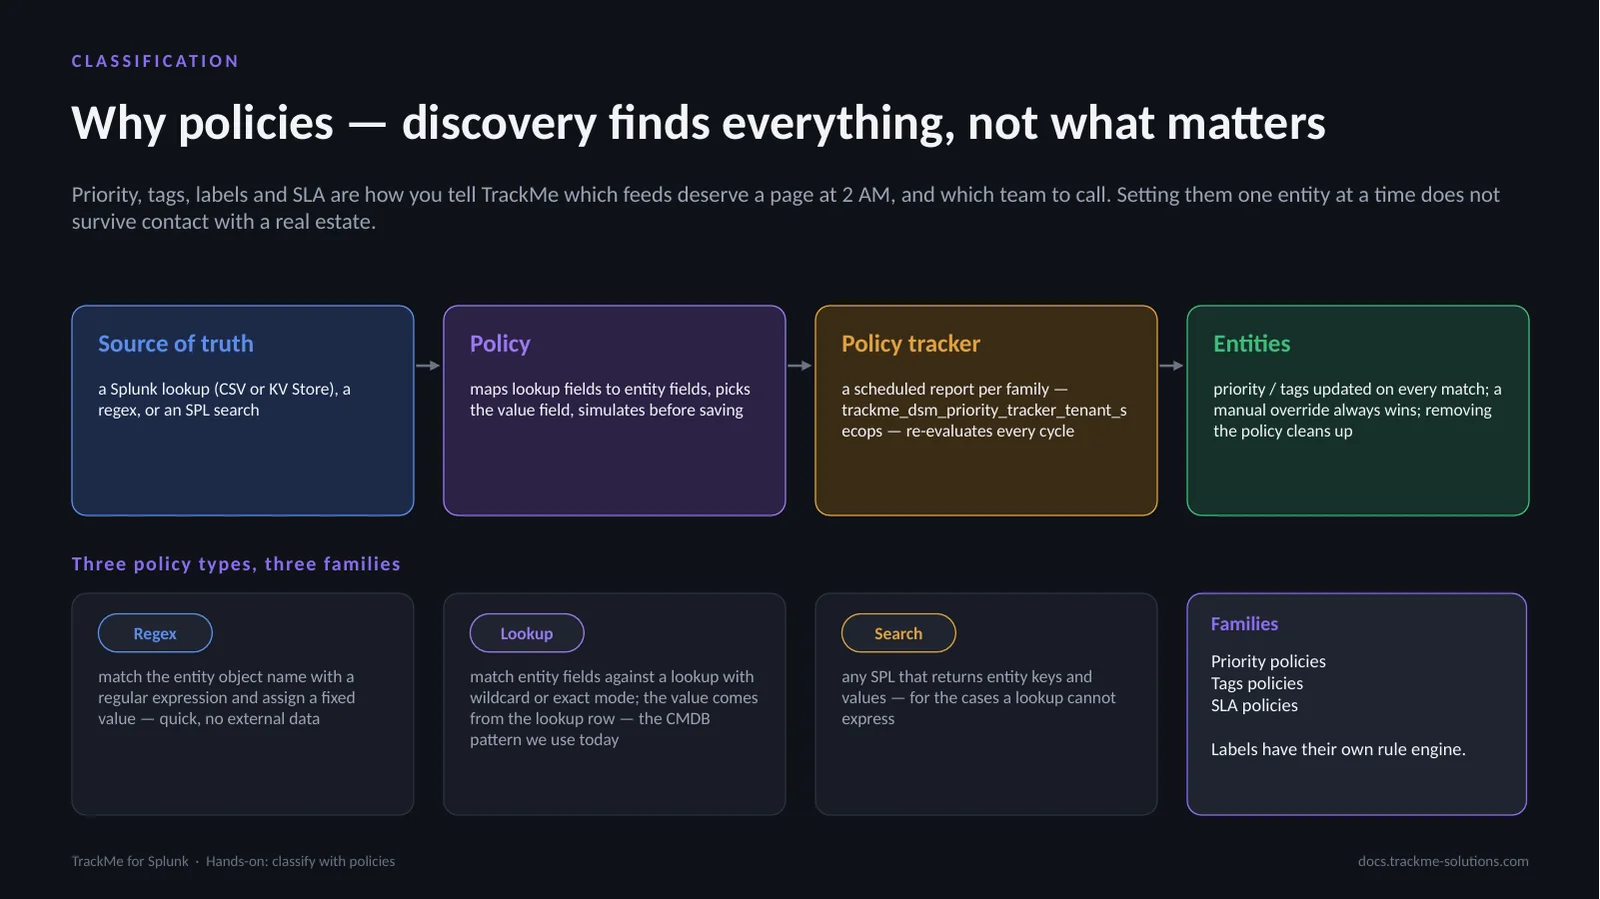
Priority, tags, labels and SLA tell TrackMe which feeds matter and which team to call; setting them one entity at a time does not scale. A policy assigns them by rule: a source of truth (a Splunk lookup in CSV or KV Store, a regex, or an SPL search) feeds a policy that maps lookup fields to entity fields, picks the value field and simulates before saving; a policy tracker, one scheduled report per family such as trackme_dsm_priority_tracker_tenant_secops, re-evaluates every cycle.
Three types (Regex, Lookup, Search) serve three families (Priority, Tags, SLA); labels have their own rule engine. A manual override always wins, removing a policy cleans up, and the higher priority wins when several match.
Locating the policies in Tenant Home
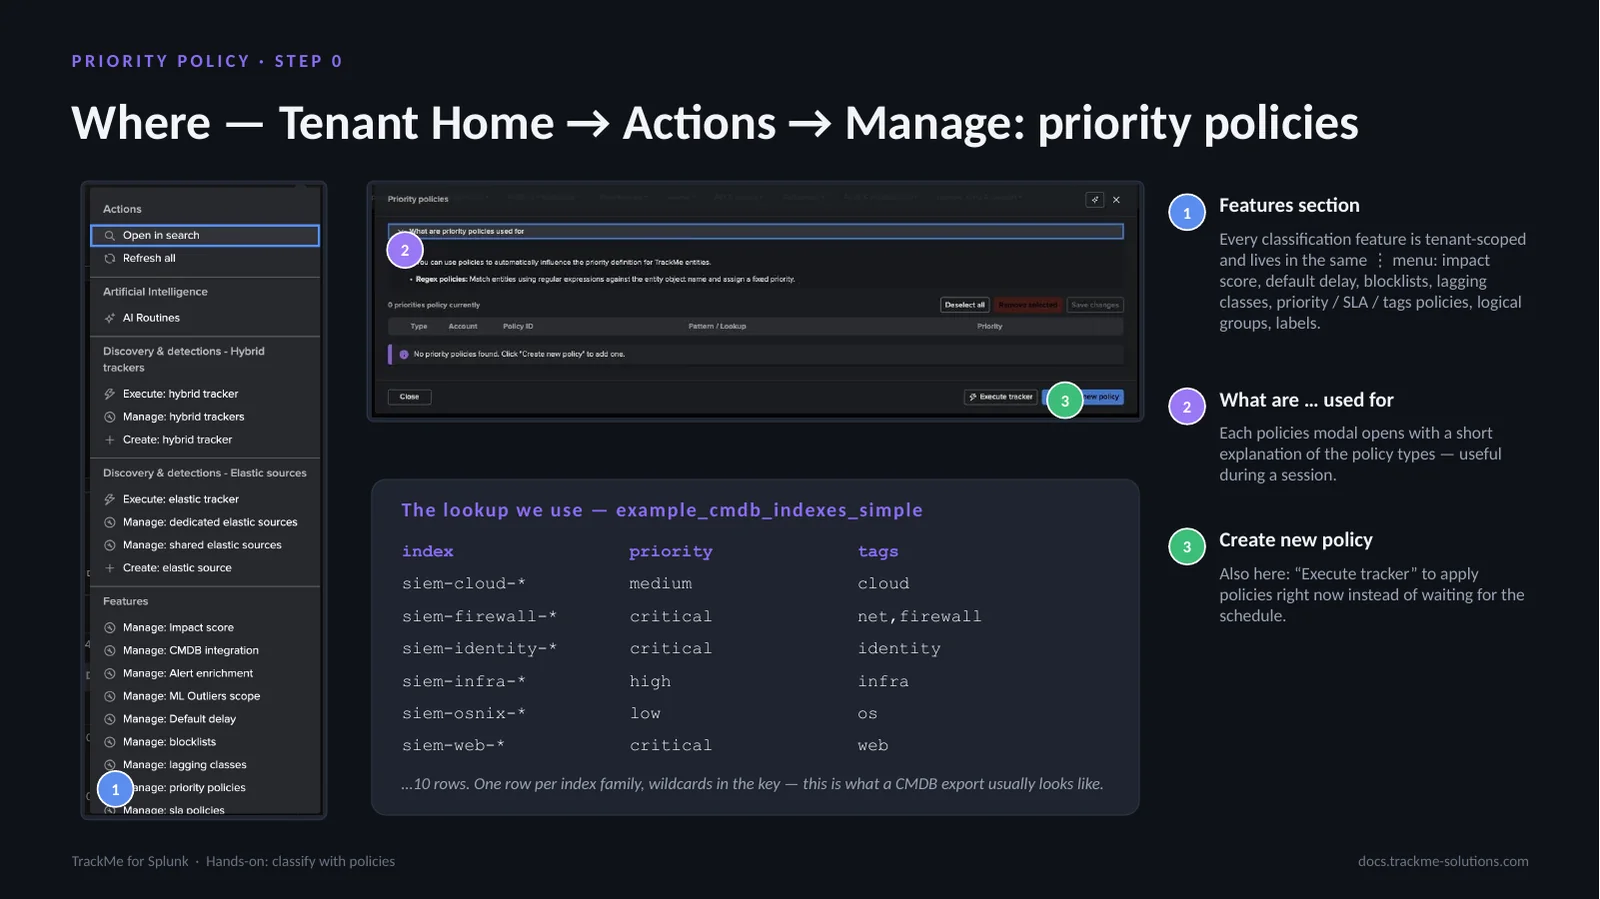
Every classification feature is tenant-scoped and sits in the Features section of the ⋮ Actions menu on Tenant Home (callout 1): impact score, default delay, blocklists, lagging classes, priority / SLA / tags policies, logical groups and labels. Each policies modal opens with a “What are … used for” explanation (callout 2). Create new policy starts the wizard; Execute tracker applies the policies immediately, without waiting for the schedule (callout 3).
The lookup used here, example_cmdb_indexes_simple, ships with TrackMe and is shaped like a CMDB export: an index pattern with wildcards, a priority and comma-separated tags. Ten rows, one per index family. A deployment replaces it with its own CSV or KV Store without changing the policy definition.
Choosing the lookup transform
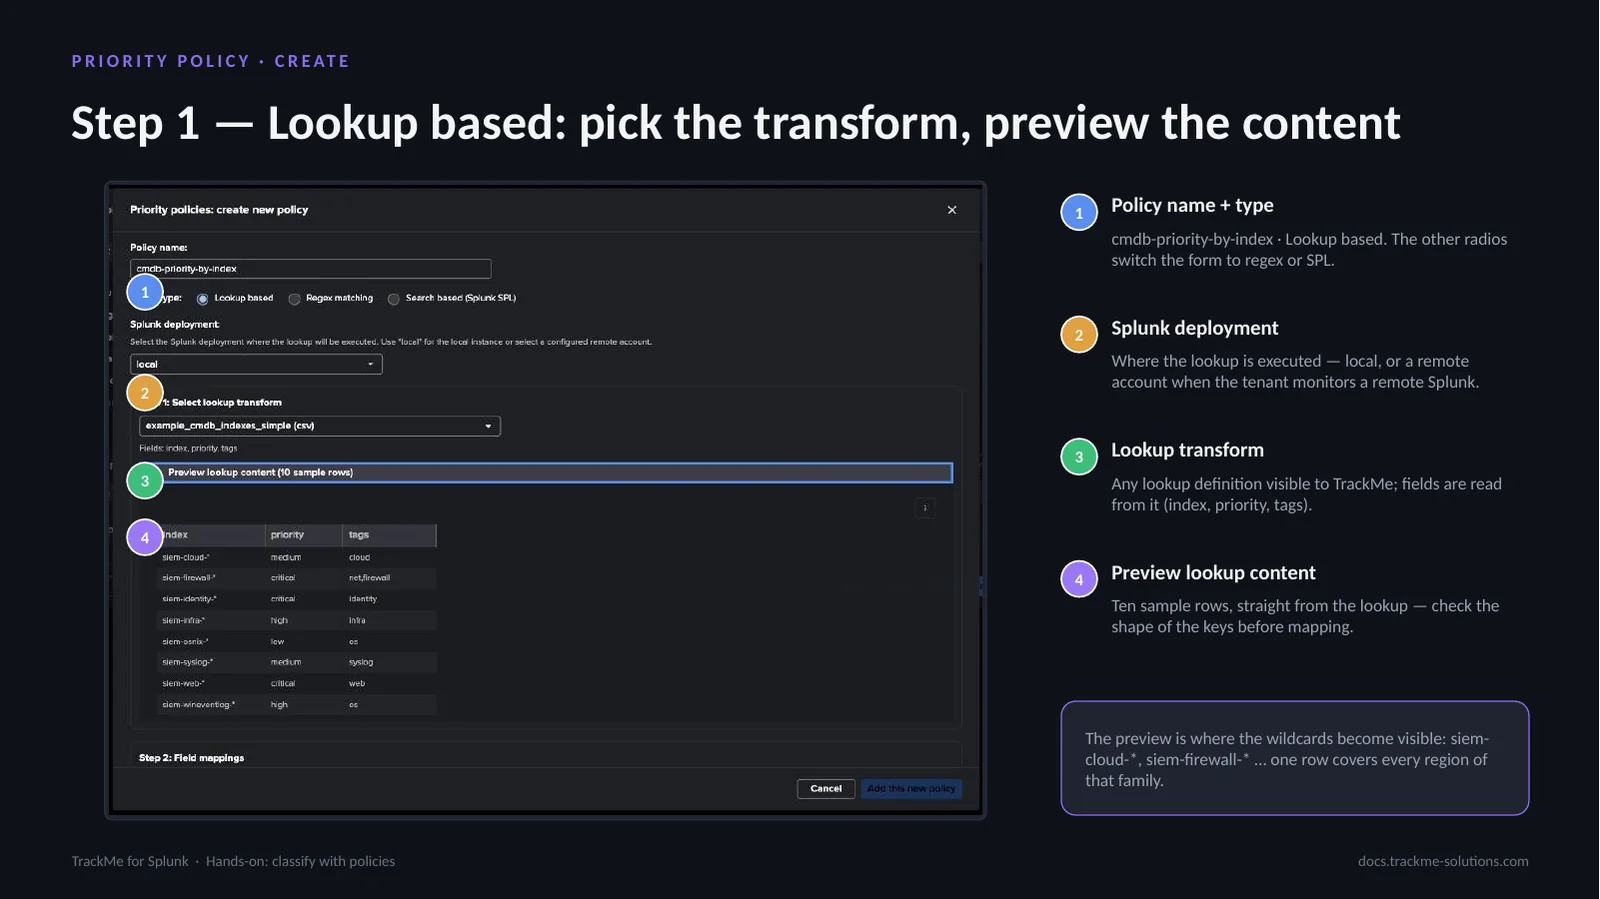
Step 1 of the wizard. Callout 1 names the policy, cmdb-priority-by-index, and selects the type, Lookup based; the other radio buttons switch the form to regex or SPL. Callout 2, Splunk deployment, sets where the lookup runs — local, or a remote account when the tenant monitors a remote Splunk. Callout 3, Lookup transform, lists every lookup definition visible to TrackMe and reads its fields (index, priority, tags); the filter box narrows a long list.
Callout 4, Preview lookup content, shows ten sample rows straight from the lookup. The preview reveals whether the key column contains wildcards such as siem-cloud-*, one row covering every region of a family, which decides the match mode on the next step.
Mapping lookup fields to entity fields
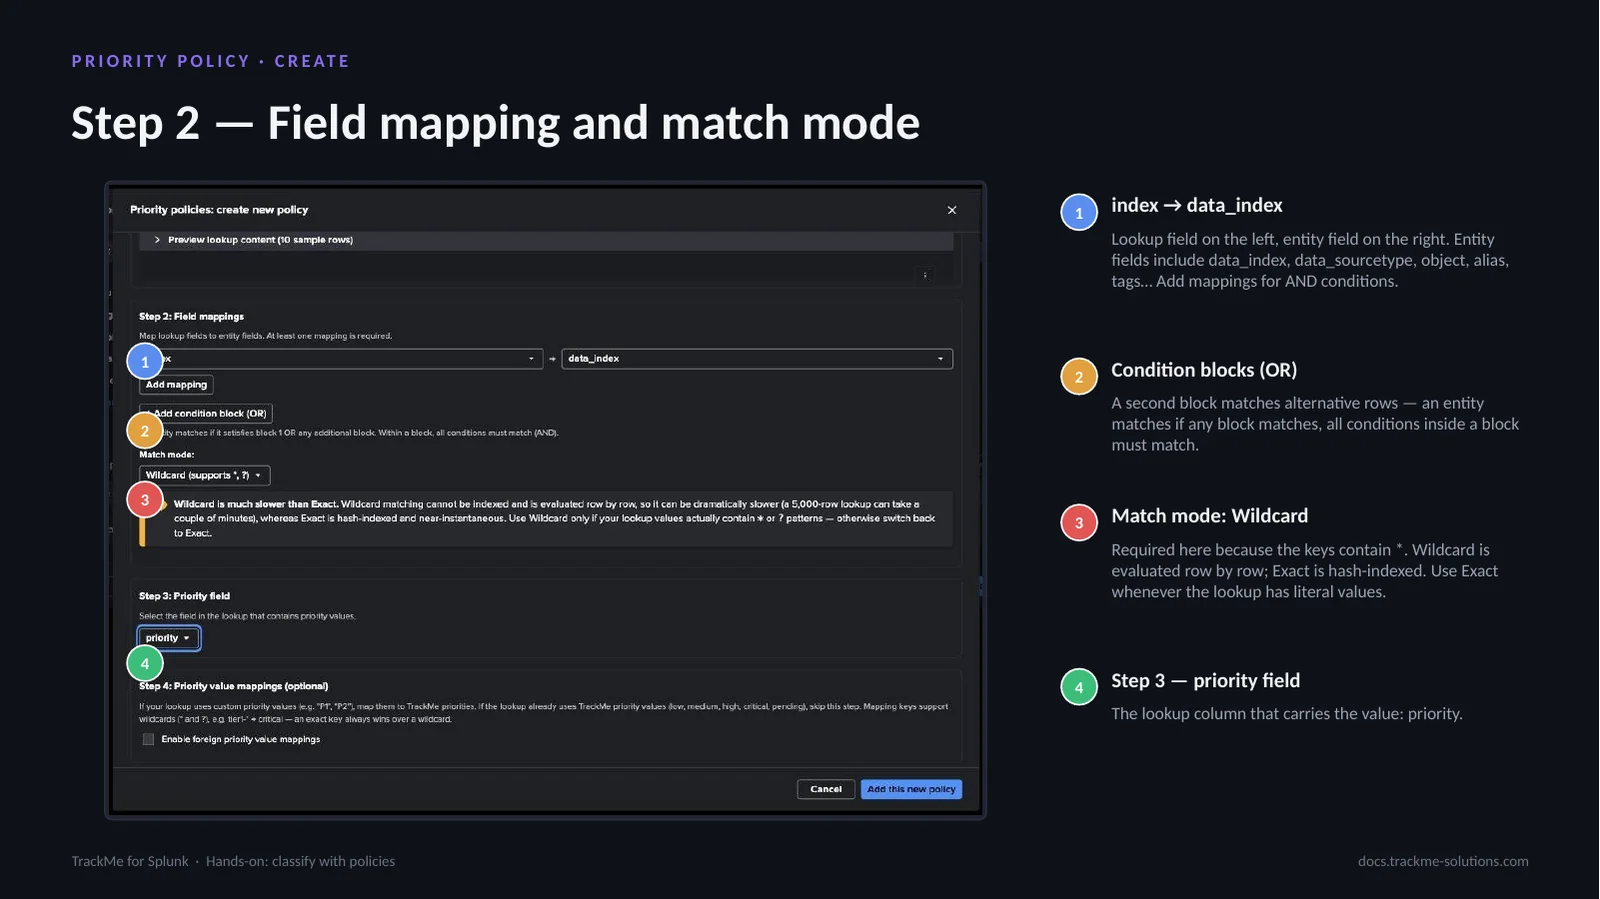
The mapping decides which lookup column is compared with which entity attribute. Callout 1 maps index → data_index; entity fields include data_index, data_sourcetype, object, alias and tags, and additional mappings form AND conditions. Callout 2, Condition blocks (OR), adds a block for alternative rows: an entity matches if any block matches, all conditions in a block must match.
Callout 3 sets Match mode: Wildcard, required because the keys contain *. Wildcard is evaluated row by row while Exact is hash-indexed; a 5,000-row lookup checked this way against tens of thousands of entities takes minutes, so Exact is preferred whenever the lookup holds literal values. Callout 4, Step 3, selects priority as the lookup column carrying the value.
Running the policy simulation
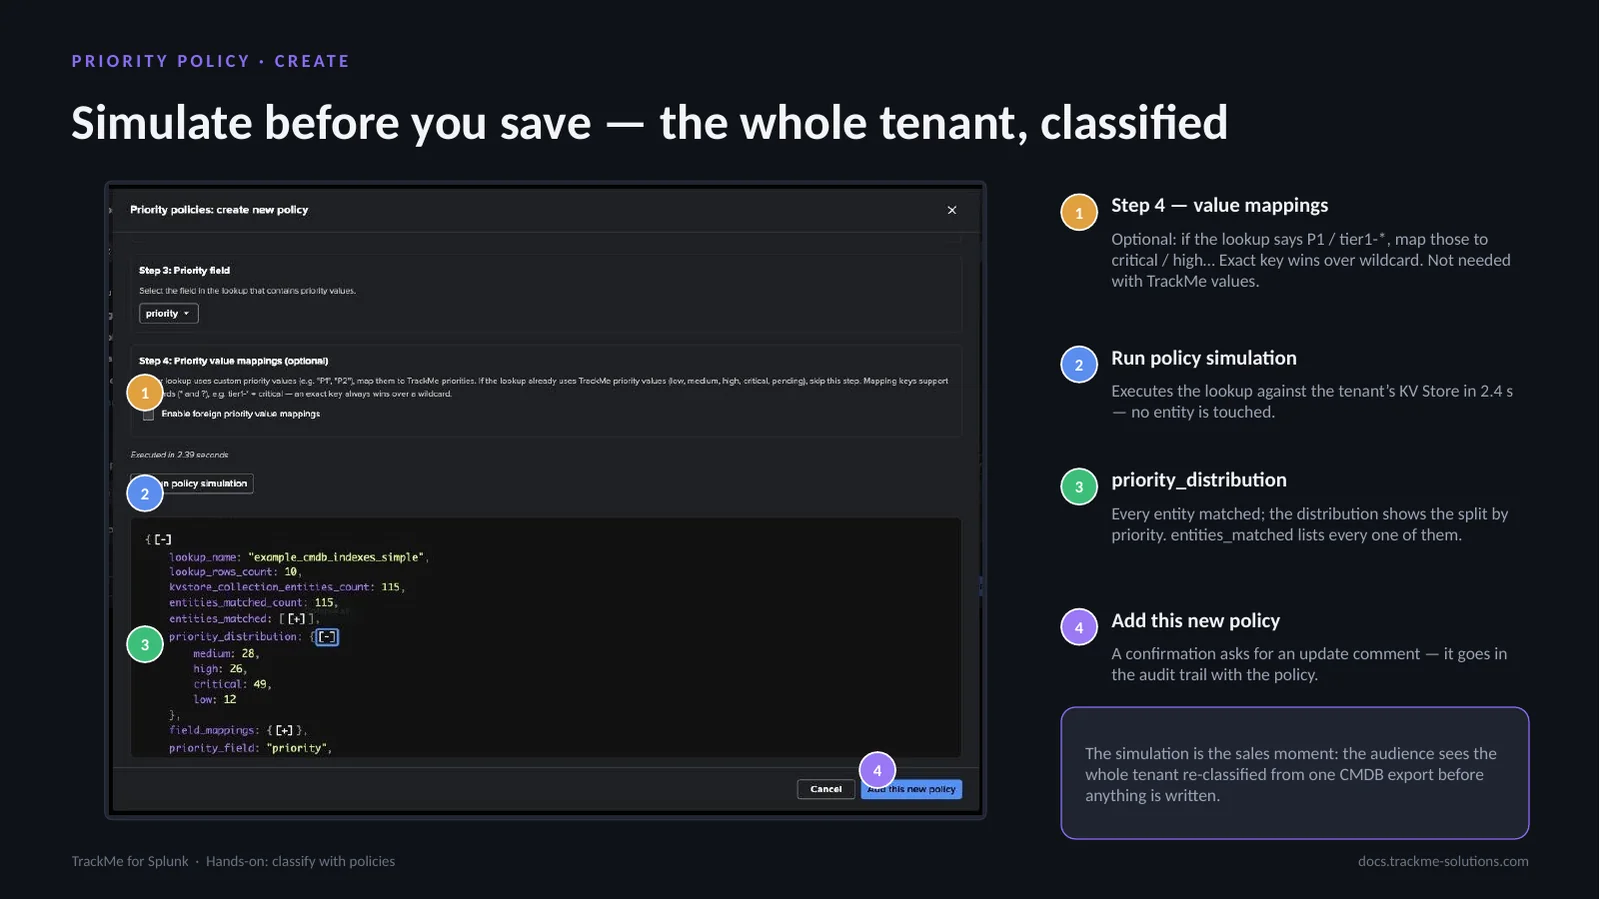
Step 4, value mappings (callout 1), is optional: foreign lookup values (P1, tier1-*) are mapped onto TrackMe priorities, an exact key winning over a wildcard; it is not needed with TrackMe values. Run policy simulation (callout 2) executes the lookup against the tenant’s KV Store — 2.4 s here — without touching any entity.
The result (callout 3) is the JSON structure the policy tracker applies: priority_distribution shows the split by priority and entities_matched lists every entity. Every entity matched; a split that looked wrong, such as everything medium, would point at the value field or the match mode. Add this new policy (callout 4) asks for an update comment, recorded in the audit trail with the policy.
Applying the policy with the tracker
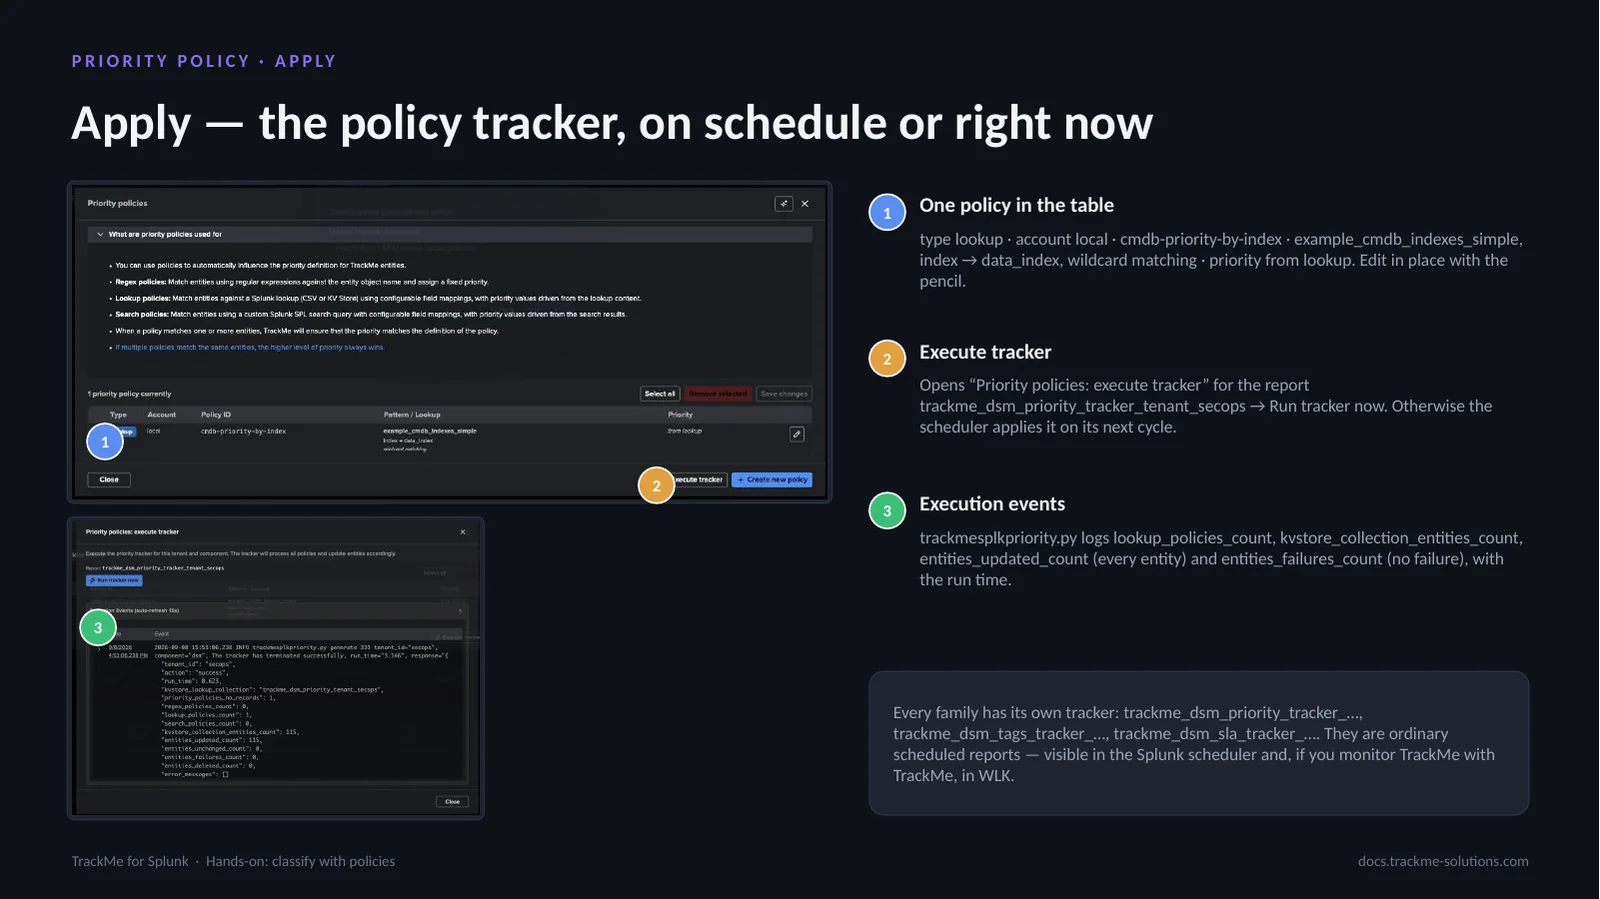
A policy changes nothing by itself; the policy tracker does, on its schedule. The policies table (callout 1) holds one row — type lookup, account local, cmdb-priority-by-index, example_cmdb_indexes_simple, index → data_index, wildcard matching, priority from lookup — editable in place with the pencil. Execute tracker (callout 2) opens “Priority policies: execute tracker” for the report trackme_dsm_priority_tracker_tenant_secops; Run tracker now applies it immediately rather than on the next scheduled cycle.
The execution events (callout 3) come from trackmesplkpriority.py: lookup_policies_count, kvstore_collection_entities_count, entities_updated_count (every entity), entities_failures_count (none) and the run time — the place to check when a policy seems not to apply. Each family has its own tracker; they are ordinary scheduled reports, visible in the Splunk scheduler and in WLK.
Creating the tags policy
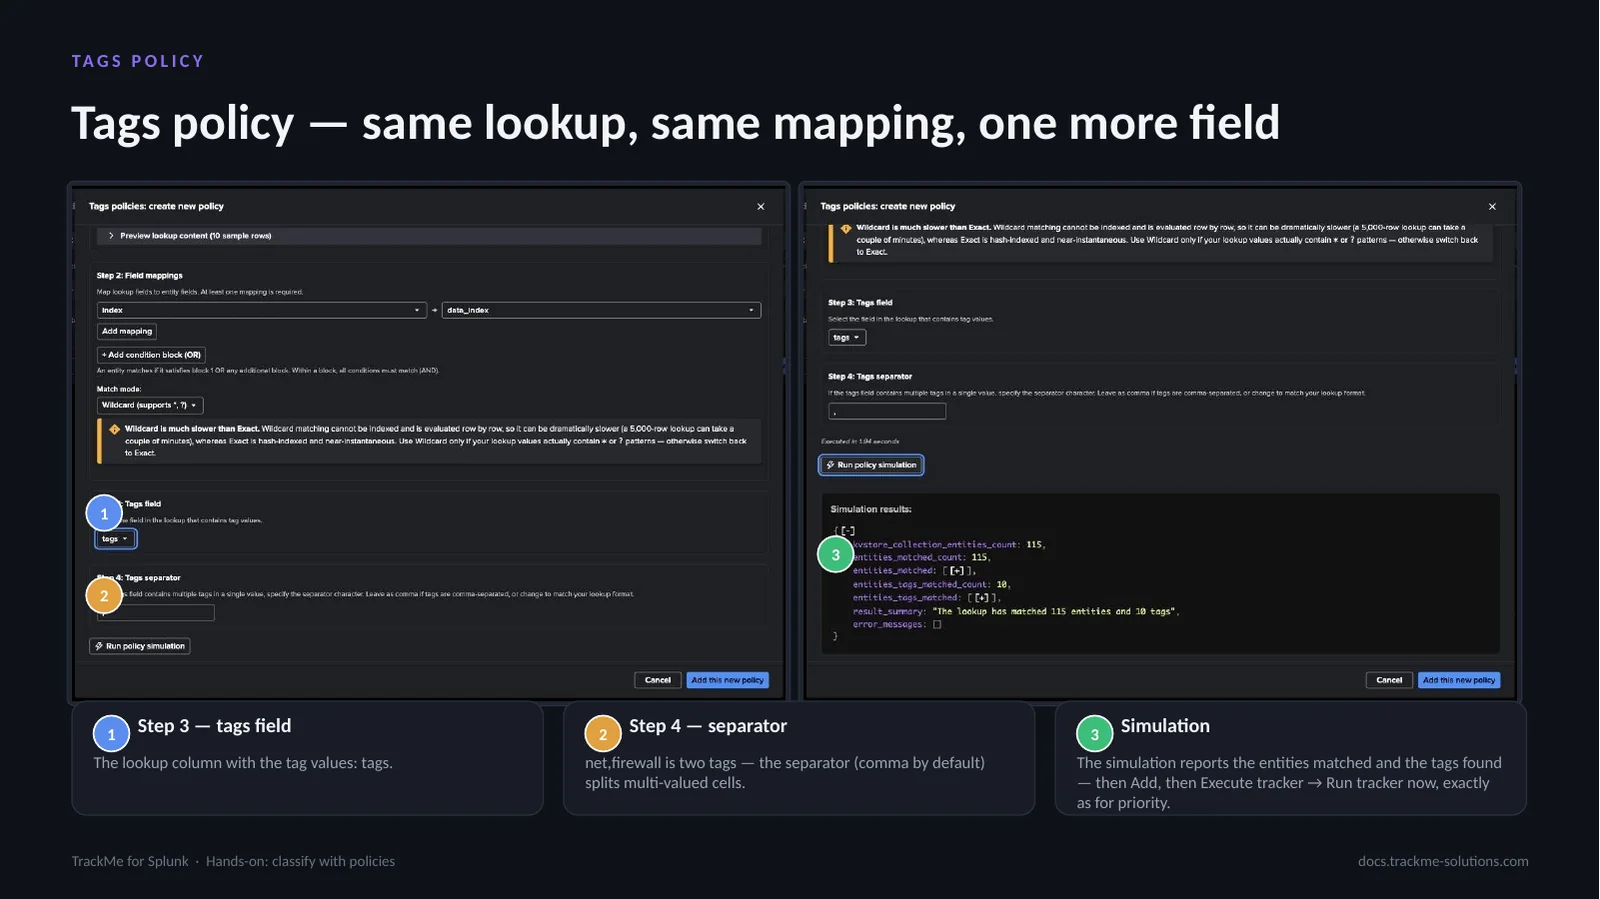
The tags policy is a copy of the priority one: same lookup, same index → data_index mapping, with two different choices. Step 3 (callout 1) selects tags as the lookup column carrying the values. Step 4 (callout 2) sets the separator, comma by default, which splits multi-valued cells — net,firewall becomes two tags. The simulation (callout 3) reports the entities matched and the tags found; then Add, then Execute tracker → Run tracker now, exactly as for priority.
Tags are free-form strings that become a filter and a grouping axis in the entities table, in Virtual Groups, in ML outlier scope filters and in Topology Studio aggregates. Labels are different: a managed, coloured catalogue with its own rule engine.
Priority across the tenant summary
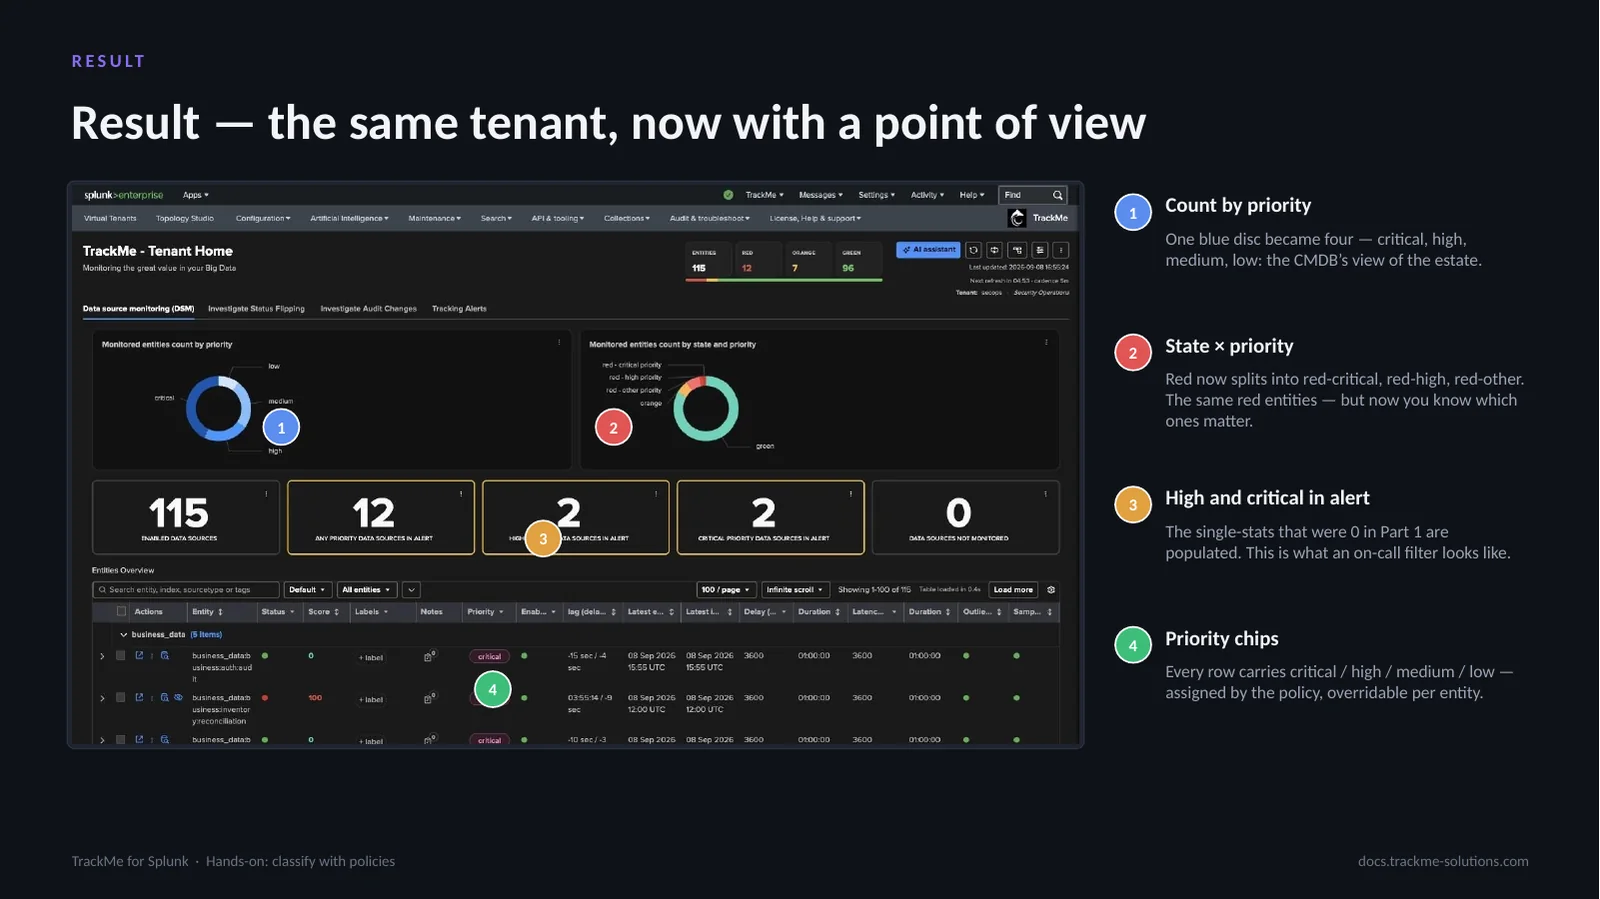
Same entities and the same red ones, but now ranked. Count by priority (callout 1) shows one blue disc turned into four — critical, high, medium, low — the CMDB’s view of the estate. State × priority (callout 2) splits red into red-critical, red-high and red-other, so the red entities that matter stand out. The single-stats for high and critical in alert (callout 3), which read 0 in Part 1, are populated: this is what an on-call filter looks like.
Every row of the entities table carries a priority chip (callout 4) — critical, high, medium or low — assigned by the policy and overridable per entity. Priority feeds the alerting model: alert on critical and high, watch the rest.
Grouping the entities table by priority
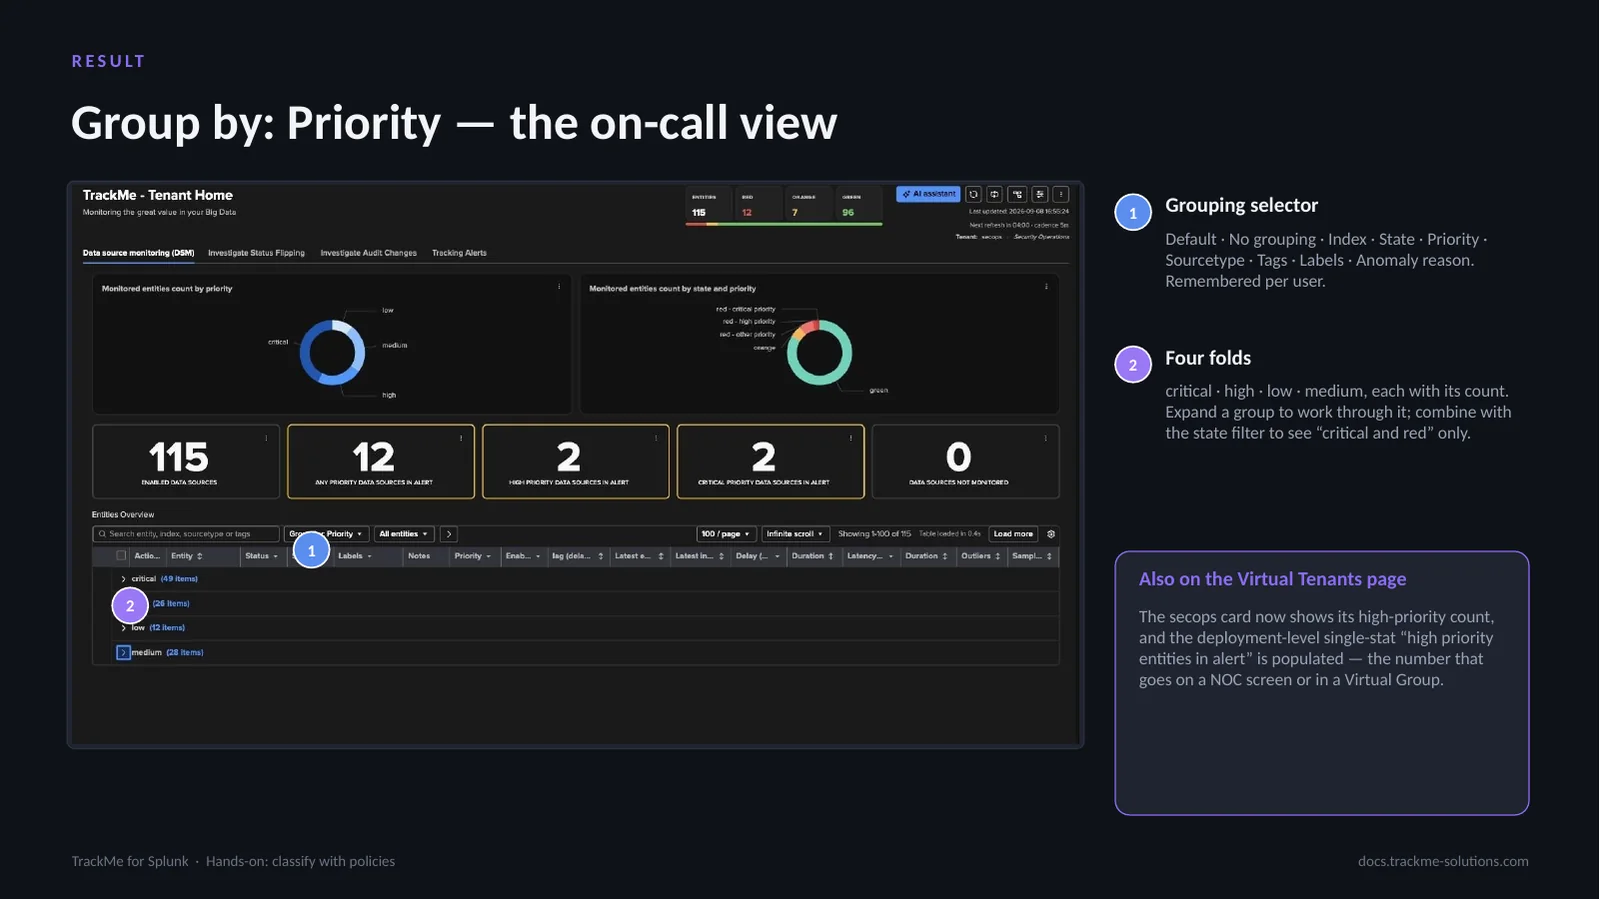
Group by is a per-user display setting on the entities table. The grouping selector (callout 1) offers Default, No grouping, Index, State, Priority, Sourcetype, Tags, Labels and Anomaly reason. Grouped by Priority, the table shows four folds (callout 2) — critical, high, low, medium — each with its count; combined with the state filter it shows “critical and red” only. The critical group contains the business_data inventory feed from Part 1, now critical because business_data is critical in the CMDB.
The Virtual Tenants page reflects the change too: the secops card shows its high-priority count, and the deployment-level single-stat “high priority entities in alert” is populated — the number for a NOC screen or a Virtual Group.
Grouping the entities table by tag
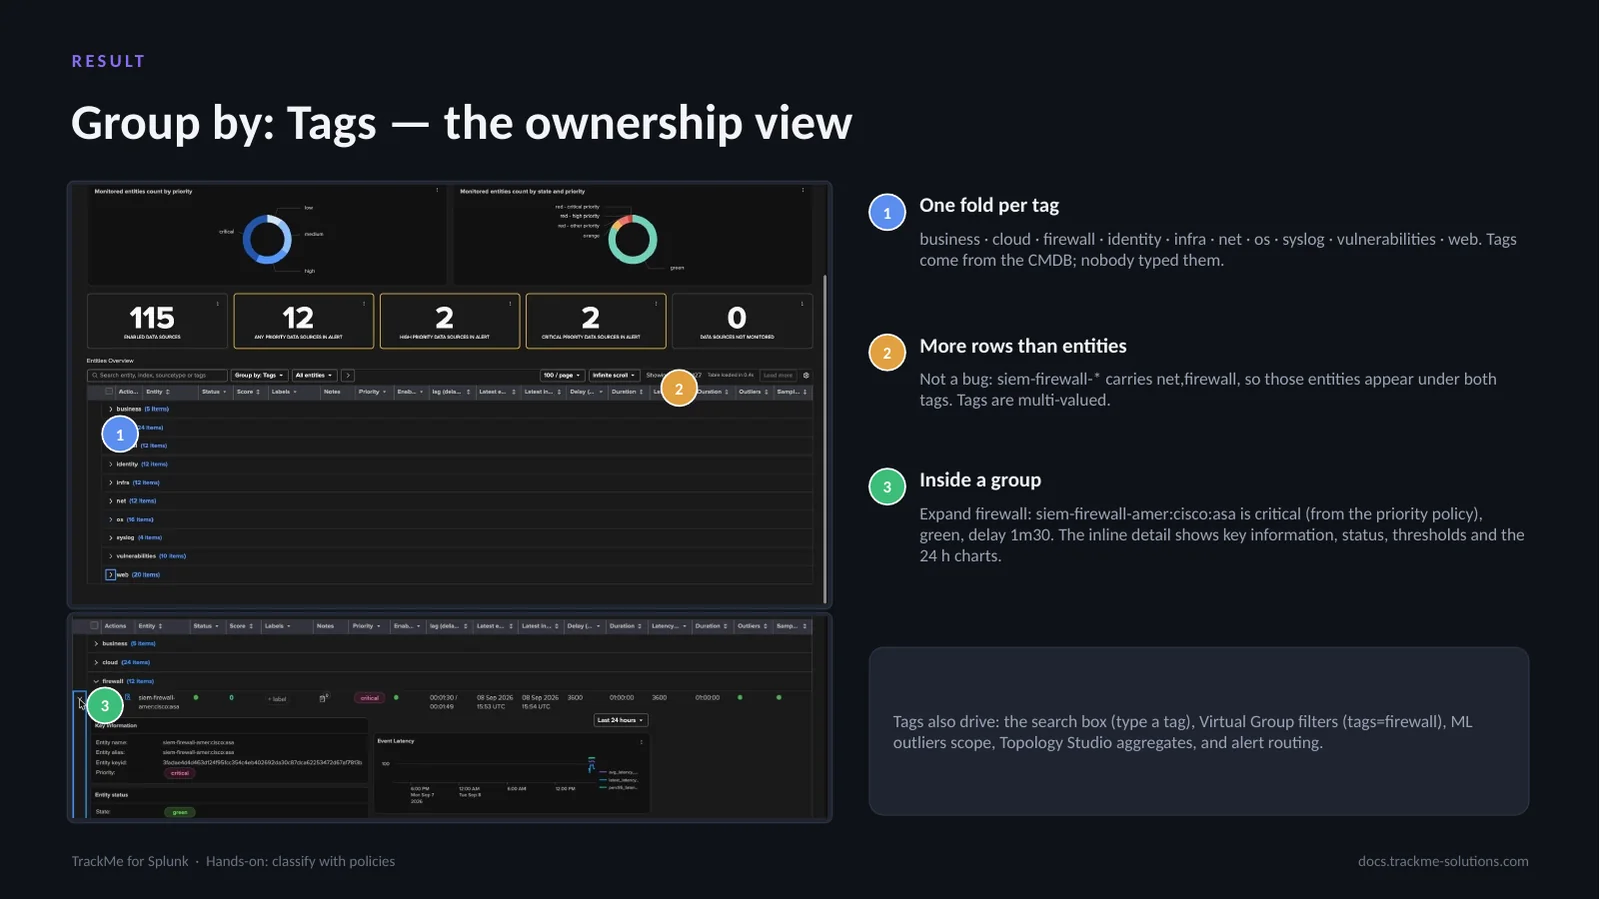
Grouped by Tags, the table shows one fold per tag (callout 1): business, cloud, firewall, identity, infra, net, os, syslog, vulnerabilities, web — all from the CMDB. The table has more rows than entities (callout 2); expected, since siem-firewall-* carries net,firewall and those entities appear under both tags. Tags are multi-valued.
Inside the firewall group (callout 3), siem-firewall-amer:cisco:asa is critical from the priority policy, green, delay 1m30; the inline detail shows key information, status, thresholds and the 24 h charts. Tags are the ownership axis — the firewall team sees firewall, the identity team sees identity — and also drive the search box, Virtual Group filters (tags=firewall), ML outliers scope, Topology Studio aggregates and alert routing.
Where we are
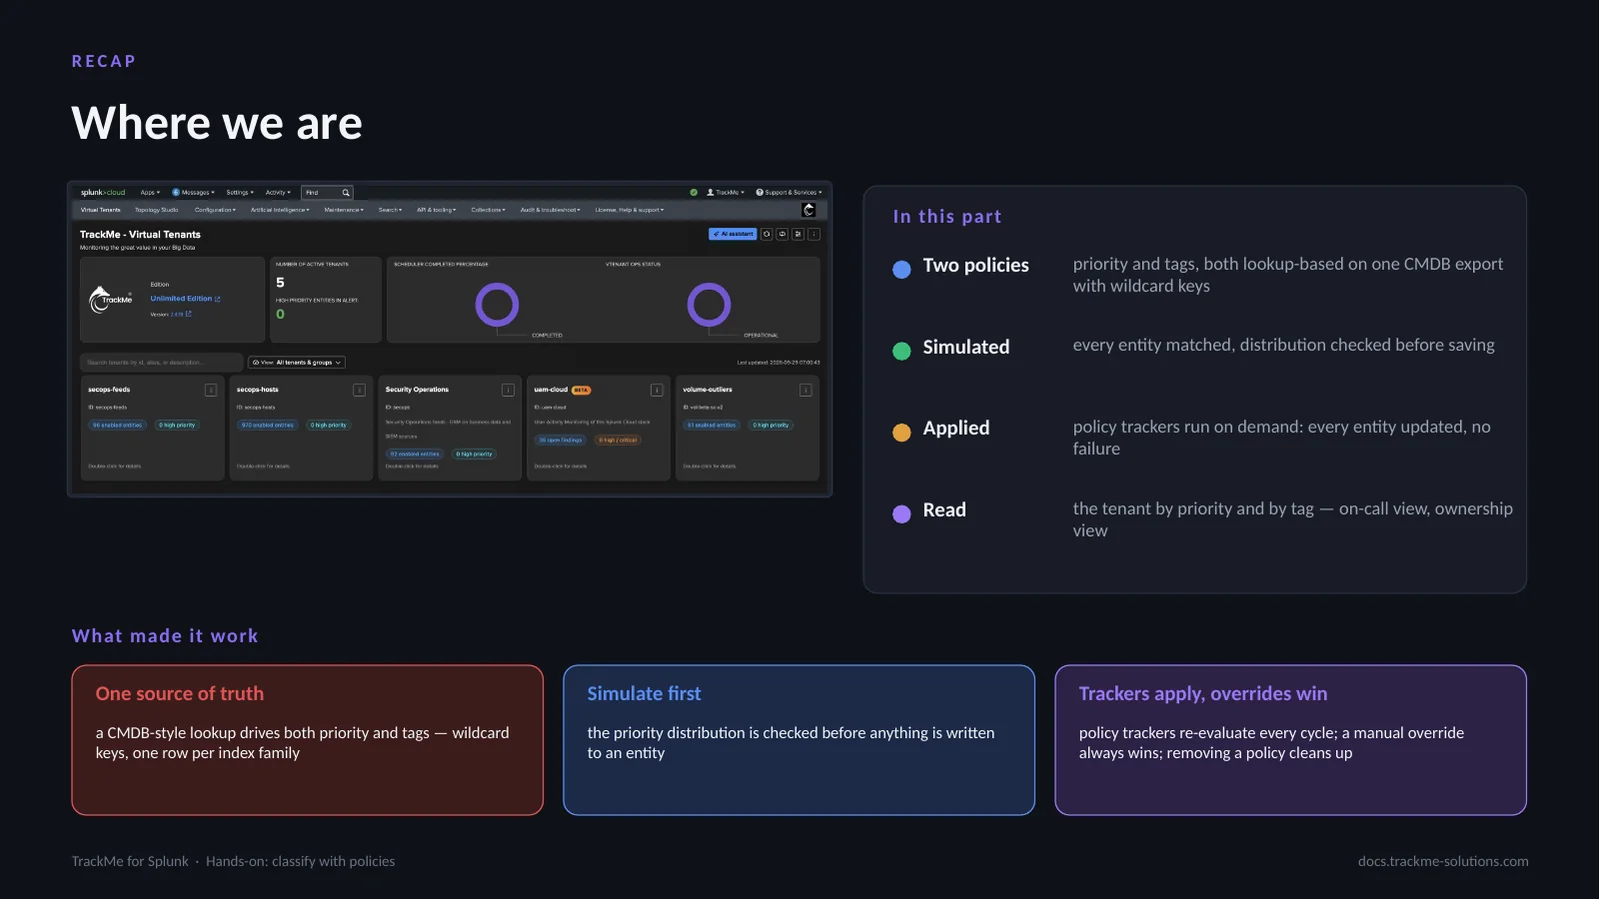
Classification, step 4 of the cycle, is a policy problem, not a data-entry problem. Two lookup-based policies, priority and tags, run on one CMDB export with wildcard keys. Both were simulated first, the distribution checked before anything was written, then applied by the policy trackers on demand: every entity updated, no failure. The tenant now reads by priority (on-call view) and tag (ownership view).
What makes it work: one source of truth for both families, simulation before saving, and trackers that re-evaluate every cycle while a manual override always wins and a removed policy cleans up. Alert scoping relies on priority: an alert restricted to critical and high pages for the firewall and identity feeds, not the low-priority ones.