Upgrade procedure
This page is the runbook. It is organised in four steps: step 0 is done once per estate (or once, for a single deployment), steps 1 to 3 run on every TrackMe deployment, and step 4 applies only if a rollback is decided. Each step ends with a checkpoint.
In every search of this page, replace <component> with the component acronym (dsm, dhm, mhm,
flx, fqm, wlk) and <tenant_id> with the Virtual Tenant identifier. Screenshots come from a
two-tenant lab; replace tenant and entity names with your own.
Step 0 — Inventory and readiness
Deployment inventory
One record per TrackMe deployment. It is the input of the planning and the header of the validation record (see Validating after an upgrade).
Field |
Where it comes from / notes |
|---|---|
Deployment name |
Your internal reference |
Splunk topology |
Standalone search head, distributed (search head + indexers), search head cluster (with deployer), or Splunk Cloud |
Splunk version |
From the search head; see Compatibility for the supported range |
TrackMe version and schema |
Virtual Tenants header, and the Tenants Update statuses screen behind the version number (step 1.4) |
Tenants and components |
Number of Virtual Tenants; components enabled per tenant |
ML Outliers in use? |
Yes / no per tenant (the search of step 1.3 returns rows). Decides whether steps 1.3 and 3.3 apply |
Alert actions and integrations |
Stateful alerts, notables, email delivery accounts, free-style REST actions, SOAR: what your downstream tooling consumes (the target of the step 3.2 test) |
Custom knowledge objects |
Your own saved searches, dashboards or lookups built on TrackMe data |
Change window and contact |
Agreed window; the person who confirms the downstream side of the step 3.2 test |
Platform readiness
Splunk version within the supported range for the target release; a splunkd restart is possible in the change window (Splunk Enterprise).
KVstore healthy on the search head, or on every search head cluster member:
| rest /services/kvstore/statusreports ready.The four TrackMe indexes exist on the indexers:
trackme_summary,trackme_metrics(metric index),trackme_audit,trackme_notable(see Installation of TrackMe).Free disk on the search head for the application (2.4.x packages bundle Python libraries and are larger than 2.1.x) and for the KVstore backups.
The target package downloaded from https://downloads.trackme-solutions.com/ and checksummed; the same file is used for every deployment of a programme.
The licence key at hand for step 2.4, if the deployment is not registered yet.
Hint
Search head clusters
In a search head cluster the application is upgraded through the deployer (step 2.1). The members’ own
local/ configuration is preserved by the bundle push; do not remove the application from the deployer’s
shcluster/apps and re-add it, that would reset it. Migrations run once per tenant, on whichever member
runs the tenant’s health tracker; the KVstore is replicated, so every member sees the result.
Step 1 — Before the upgrade
Per deployment. Prerequisites, backups, baseline. About 30 minutes.
1.1 Confirm TrackMe is operational and no tenant is degraded
Open Virtual Tenants. Every tenant card must be free of the degraded badge and the tenant operations status must be fully OPERATIONAL. A degraded tenant means at least one of its scheduled reports failed on its last run.
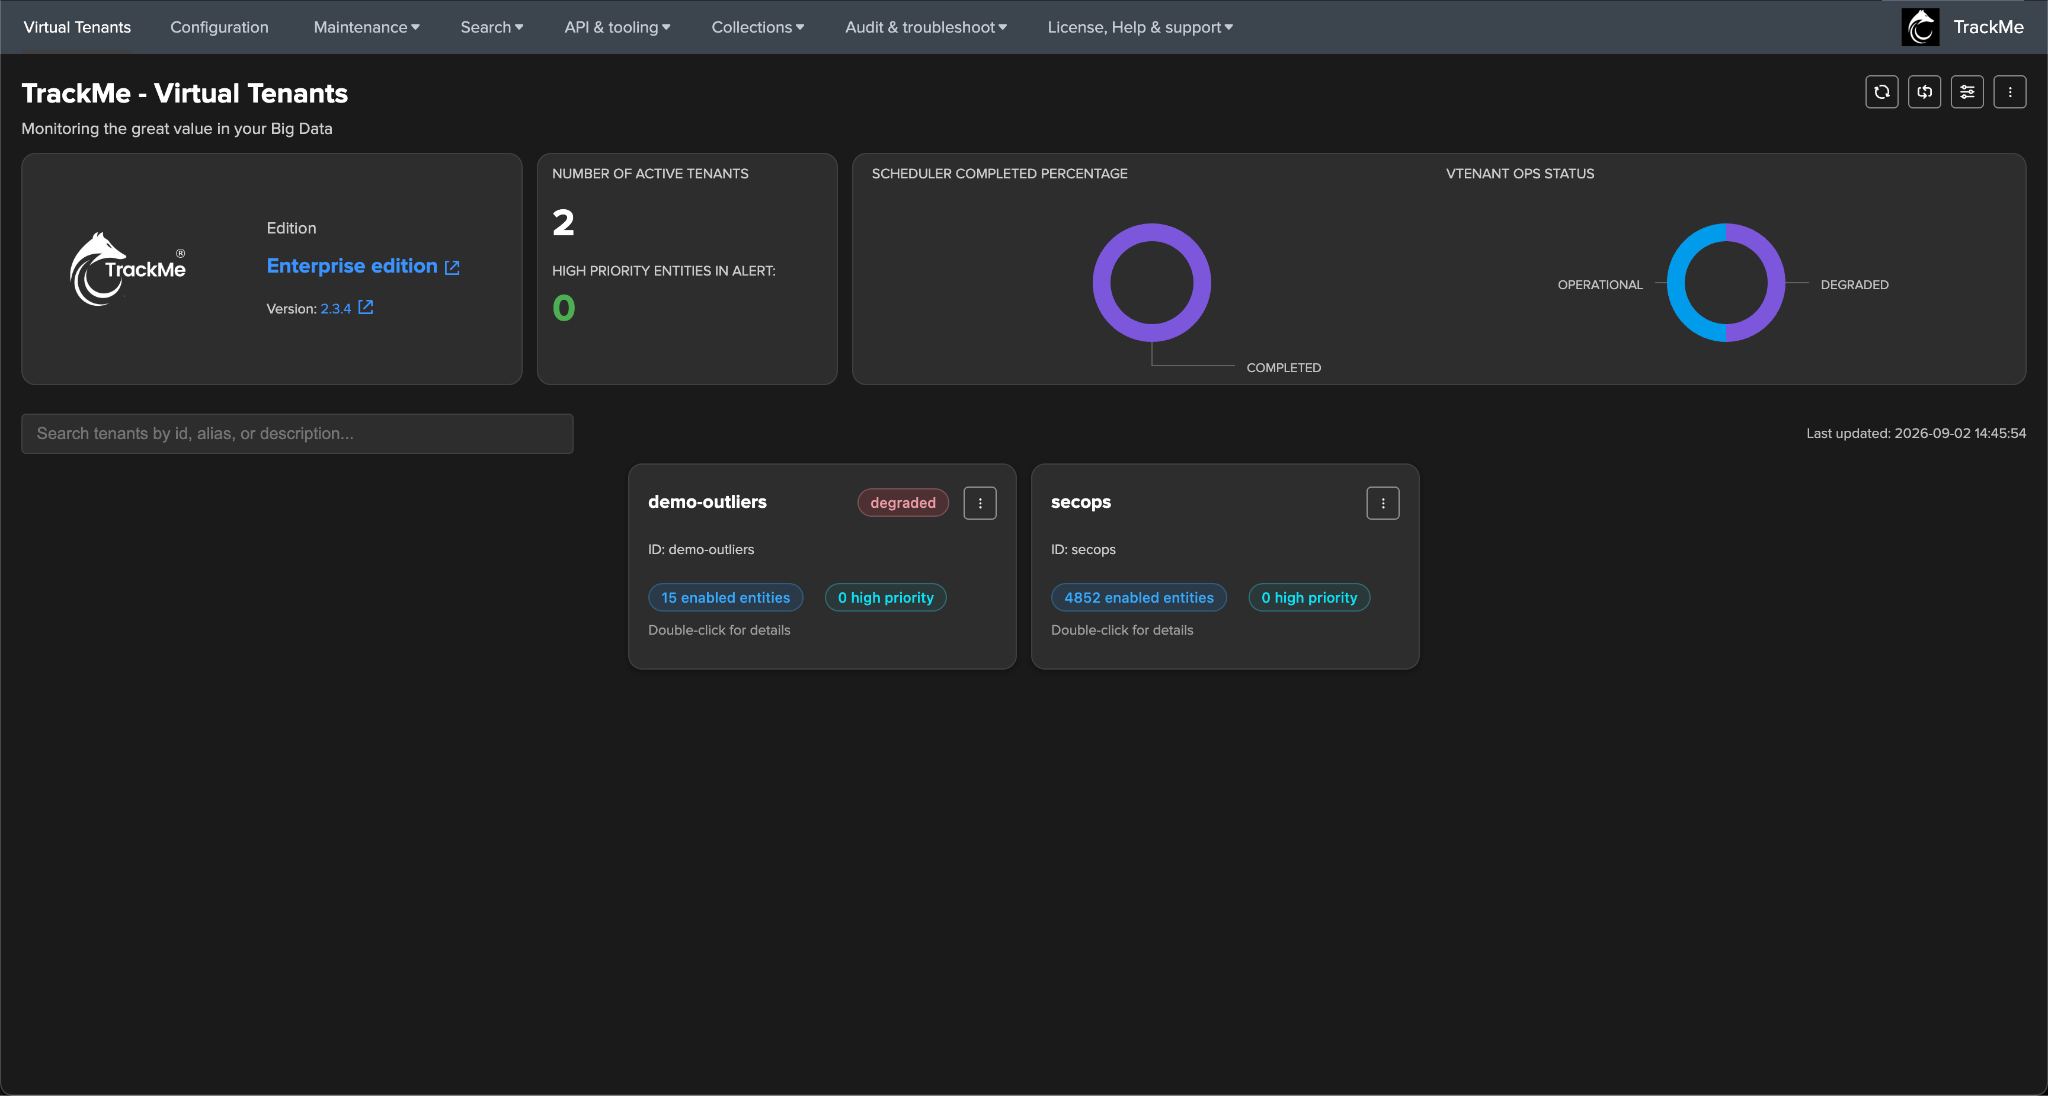
The same check from a search, for the record:
| savedsearch trackme_ops_status
Warning
If a tenant is degraded
Identify the failing report (header → Ops Status, filter on failure) and address the root cause before the upgrade. Migrating a tenant whose trackers already fail makes the post-upgrade picture impossible to read: you will not know whether a failure is old or new.
1.2 Take the backups
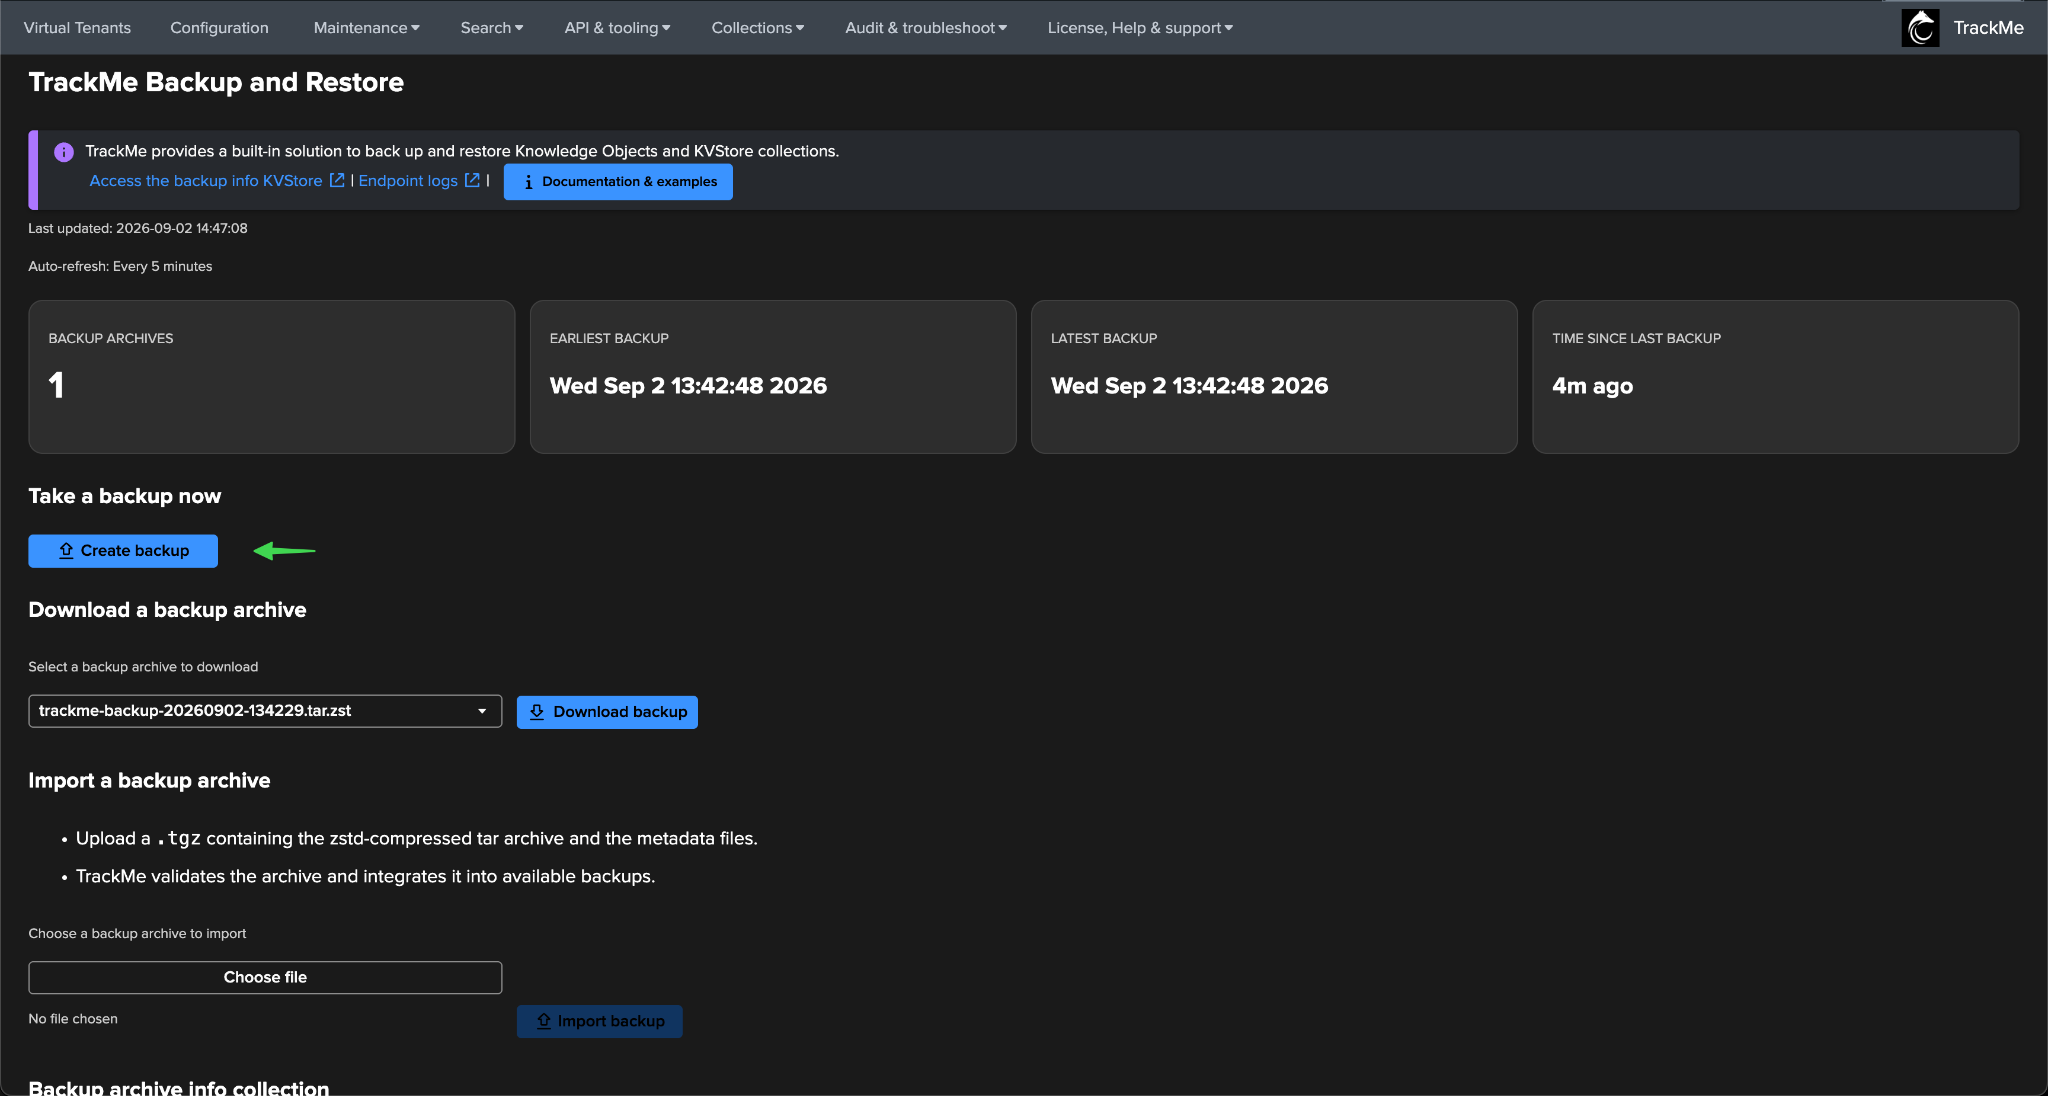
TrackMe backup. Open API & tooling → Backup & Restore and click Create backup. The archive (knowledge objects and KVstore collections) is listed on the same page and can be restored from there. See Backup & restore.
File-system and KVstore backup (Splunk Enterprise). On-premises, also take a copy of the application directory and a KVstore backup; together they are the fastest restore path if anything goes wrong:
tar -czf /tmp/trackme-app-$(date +%Y%m%d).tgz -C $SPLUNK_HOME/etc/apps trackme
$SPLUNK_HOME/bin/splunk backup kvstore -archiveName trackme-pre-upgrade-$(date +%Y%m%d)
Run both on the search head (on every search head cluster member for the application directory; the KVstore
backup once, on the captain). The KVstore archive lands in $SPLUNK_HOME/var/lib/splunk/kvstorebackup/.
Keep both copies outside the search head.
Note
On Splunk Cloud the file system is not accessible; the TrackMe backup is the restore path, and Splunk Cloud’s own platform backups are a last resort to be requested from Splunk.
1.3 ML Outliers baseline — only where ML Outliers are in use
When upgrading from a release earlier than 2.3.15, every Outliers model refers to the Splunk AI Toolkit
algorithm DensityFunction. The upgrade migrates the models to TrackMe’s native engine
(TrackMeNativeDensityFunction) and they are retrained automatically afterwards (step 3.3). Record the
pre-migration state per tenant and component:
| inputlookup trackme_<component>_outliers_entity_rules_tenant_<tenant_id>
| where match(entities_outliers, "\"algorithm\": \"DensityFunction\"")
| stats count
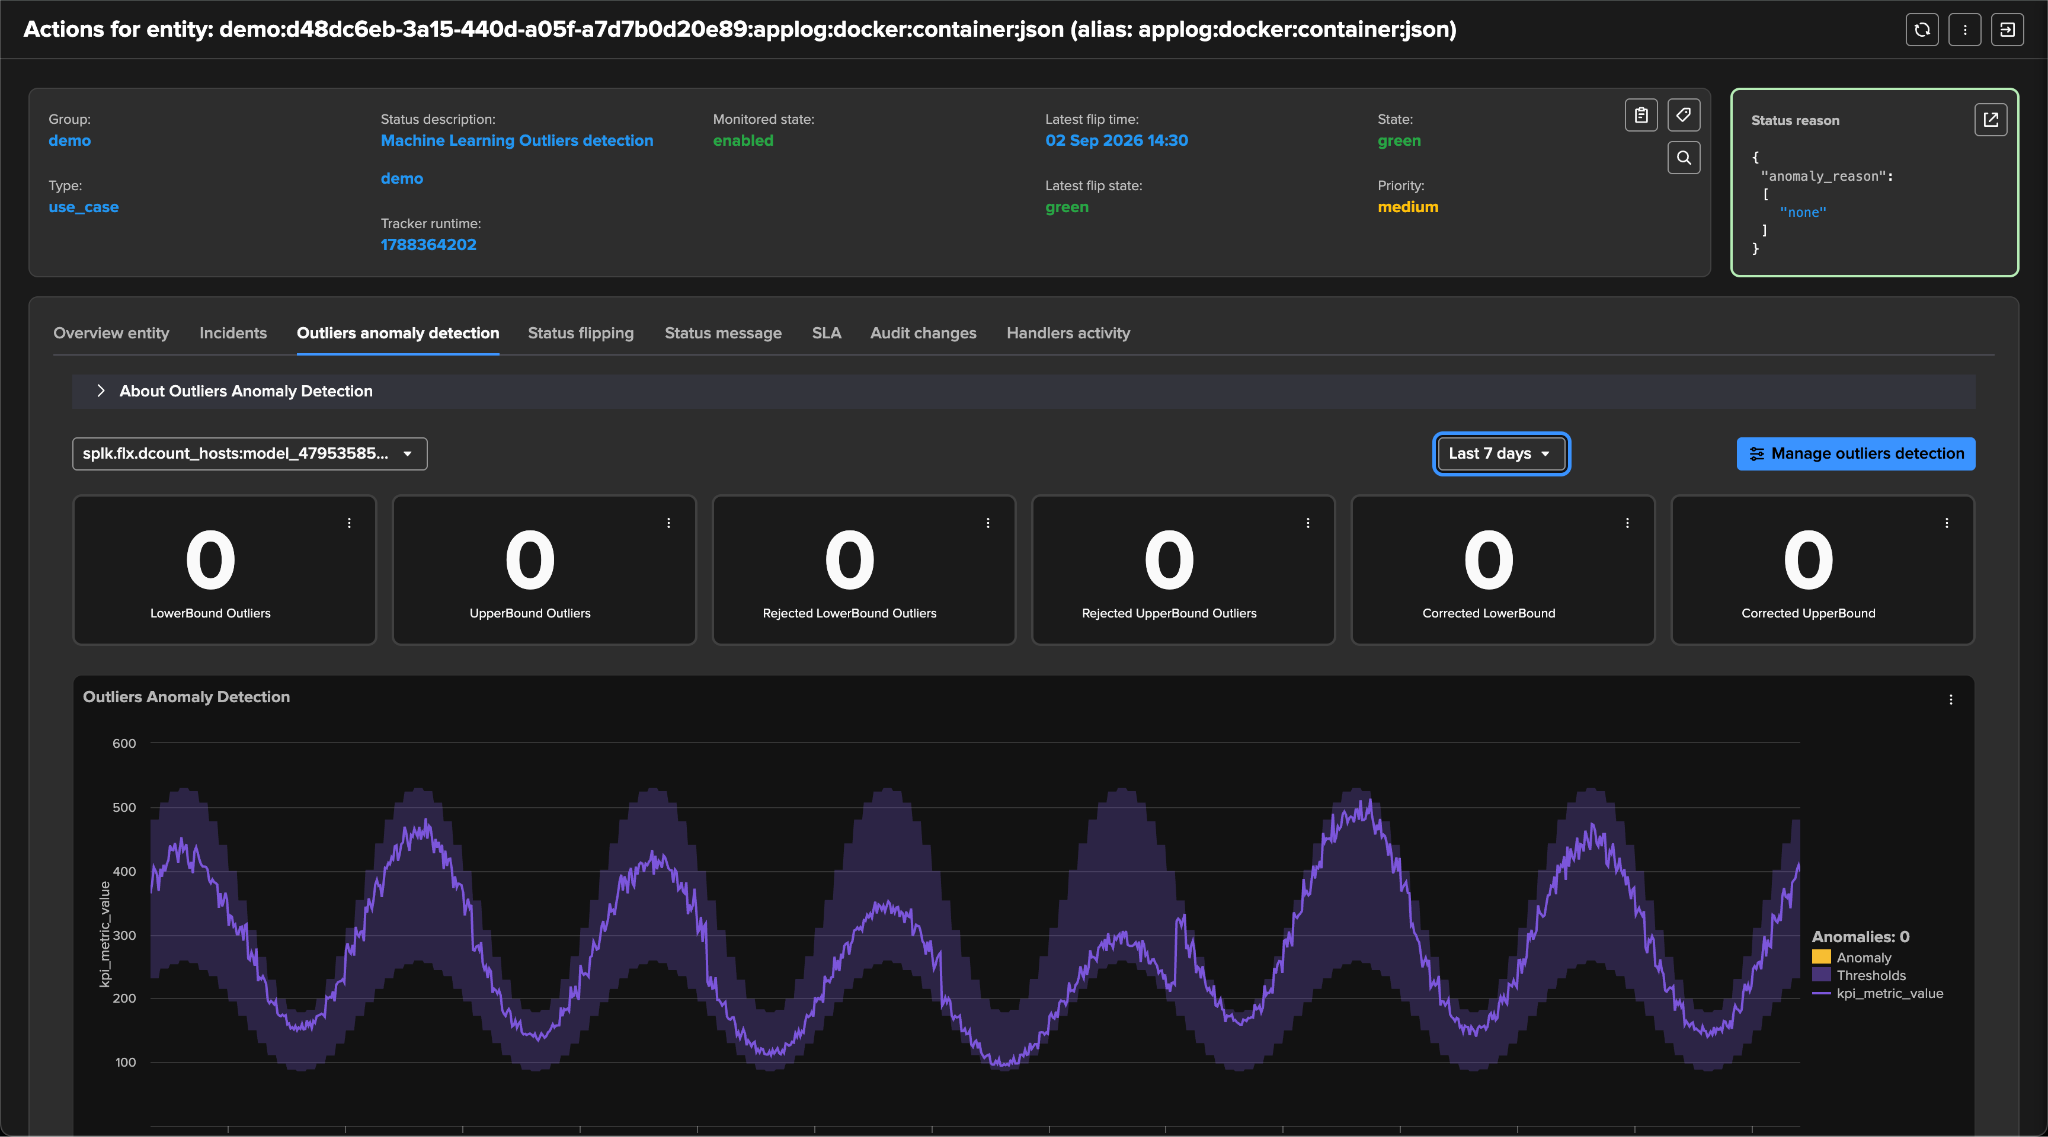
Then pick one well-behaved entity per component as the witness (trained model, normal confidence, no current outlier, green state), open it in Tenant Home and screenshot its Outliers anomaly detection tab:
| inputlookup trackme_<component>_outliers_entity_rules_tenant_<tenant_id> where confidence="normal"
| lookup trackme_<component>_outliers_entity_data_tenant_<tenant_id> object OUTPUT models_summary, isOutlier
| where isOutlier=0
| lookup trackme_<component>_tenant_<tenant_id> object OUTPUT object_state
| where object_state="green"
1.4 Record the running version and schema state
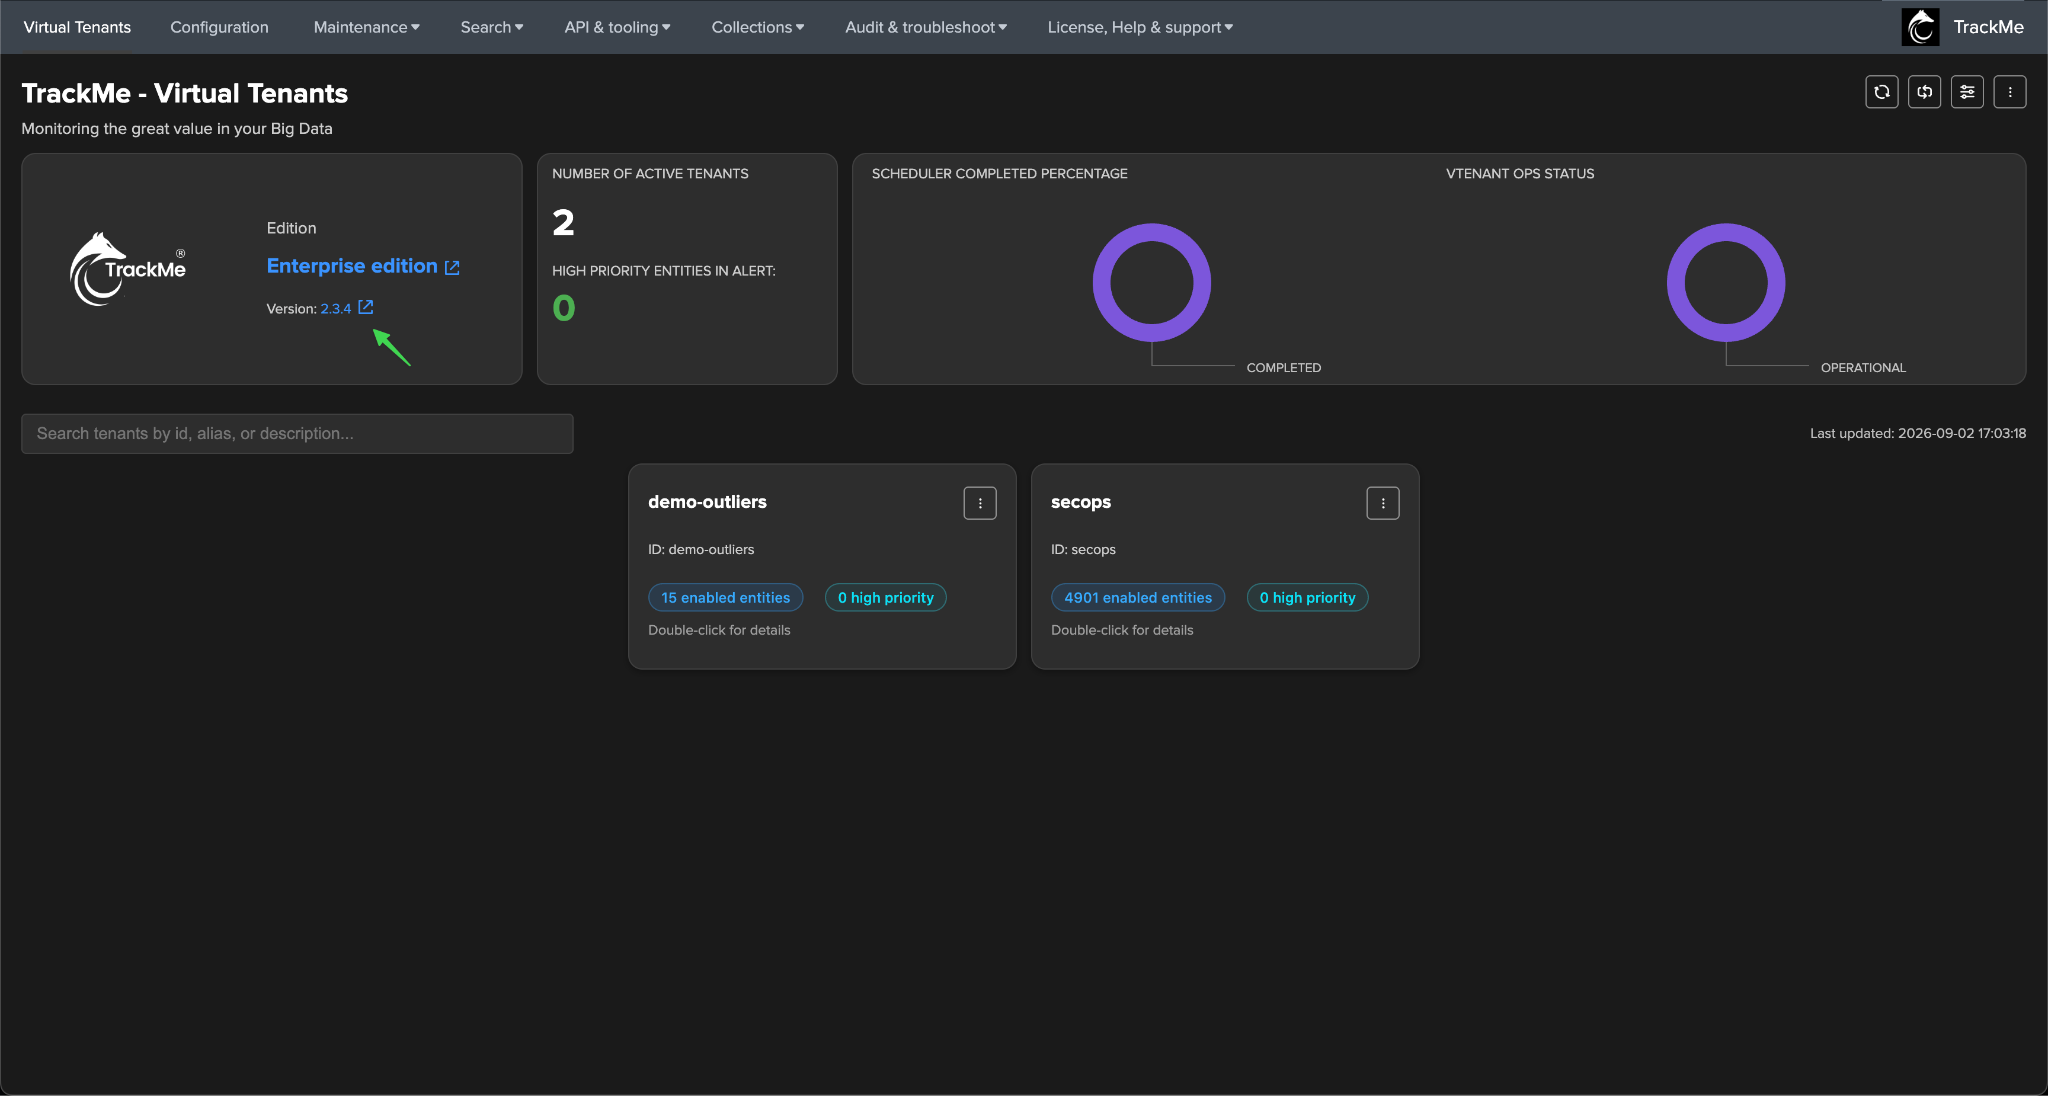
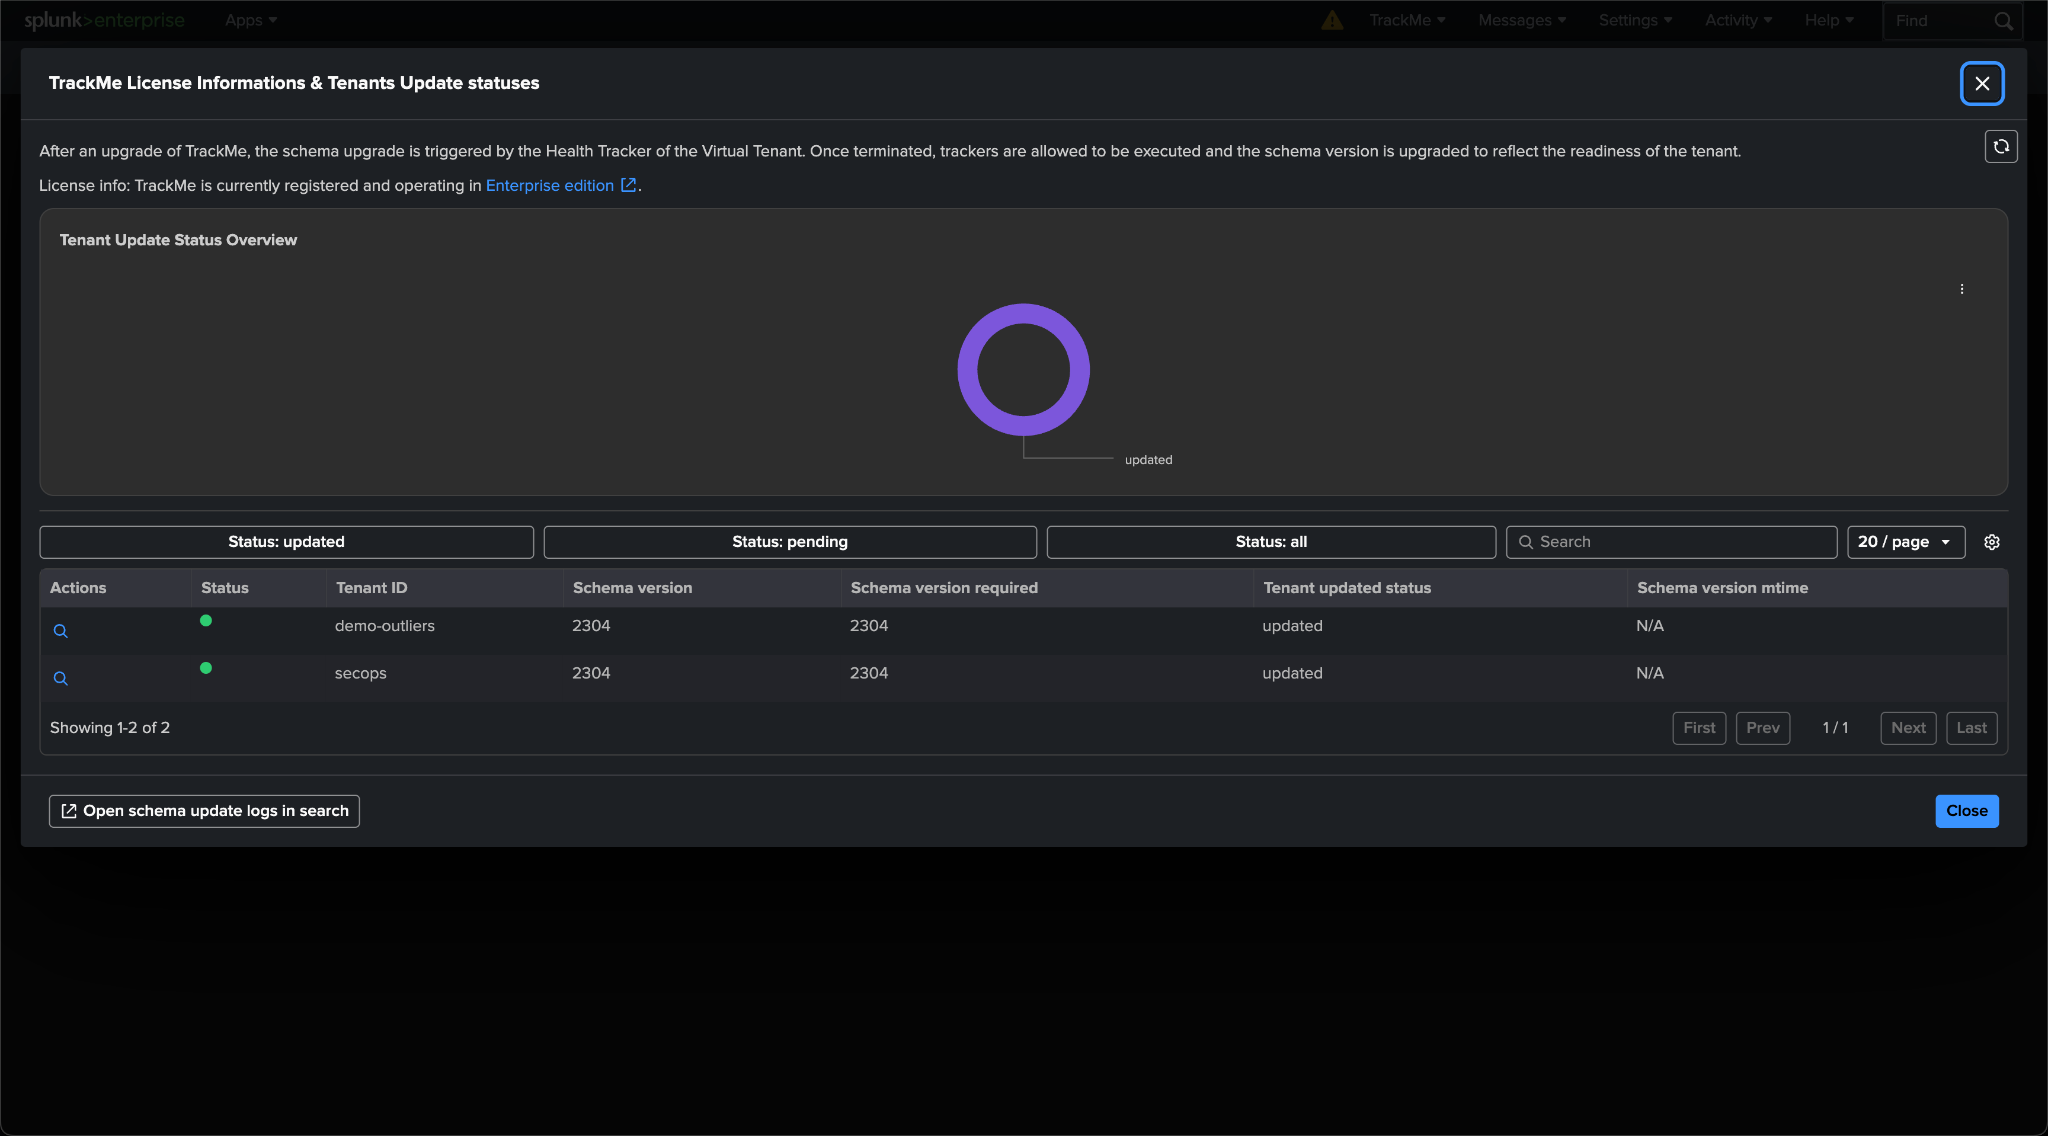
On Virtual Tenants, note the version in the header card, then click the version number. The Tenants Update statuses screen must show every tenant with Schema version equal to Schema version required, status updated. Screenshot it; you will compare it with the same screen in step 2.
Step 1 checkpoint — go / no-go
All tenants OPERATIONAL, none degraded (1.1)
TrackMe backup taken minutes before the change window, status success (1.2)
On Splunk Enterprise: application directory and KVstore backups taken and stored off the search head (1.2)
Where Outliers are used: model count exported and witness entity screenshot captured (1.3)
Update-status screen captured: every tenant updated (1.4)
Target release confirmed (never 2.3.22 to 2.4.1; one release for the whole estate)
Step 2 — Upgrade day
Install in place, follow the migration, register the licence, restart.
2.1 Install the package in place
The upgrade is a standard Splunk application upgrade: the new package replaces default/, bin/ and
lib/, and leaves local/, the KVstore and the indexes untouched. Never remove the application
directory first.
Topology |
Procedure |
|---|---|
Standalone or distributed search head |
Splunk Web → Apps → Manage Apps → Install app from file, choose the package, tick Upgrade app,
install. Or from the CLI: |
Search head cluster |
On the deployer, replace the application under |
Splunk Cloud |
When the release has been vetted, it appears as upgradable in the application management interface; follow the self-service process. There is usually a delay between the request and the installation, so by the time you connect to TrackMe the upgrade has often already happened. |
Indexers |
Nothing to do beyond the index definitions already in place (step 0). |
2.2 Read the new version and open the update-status screen
Once splunkd is back, reload Virtual Tenants. The header shows the new version. Click it.
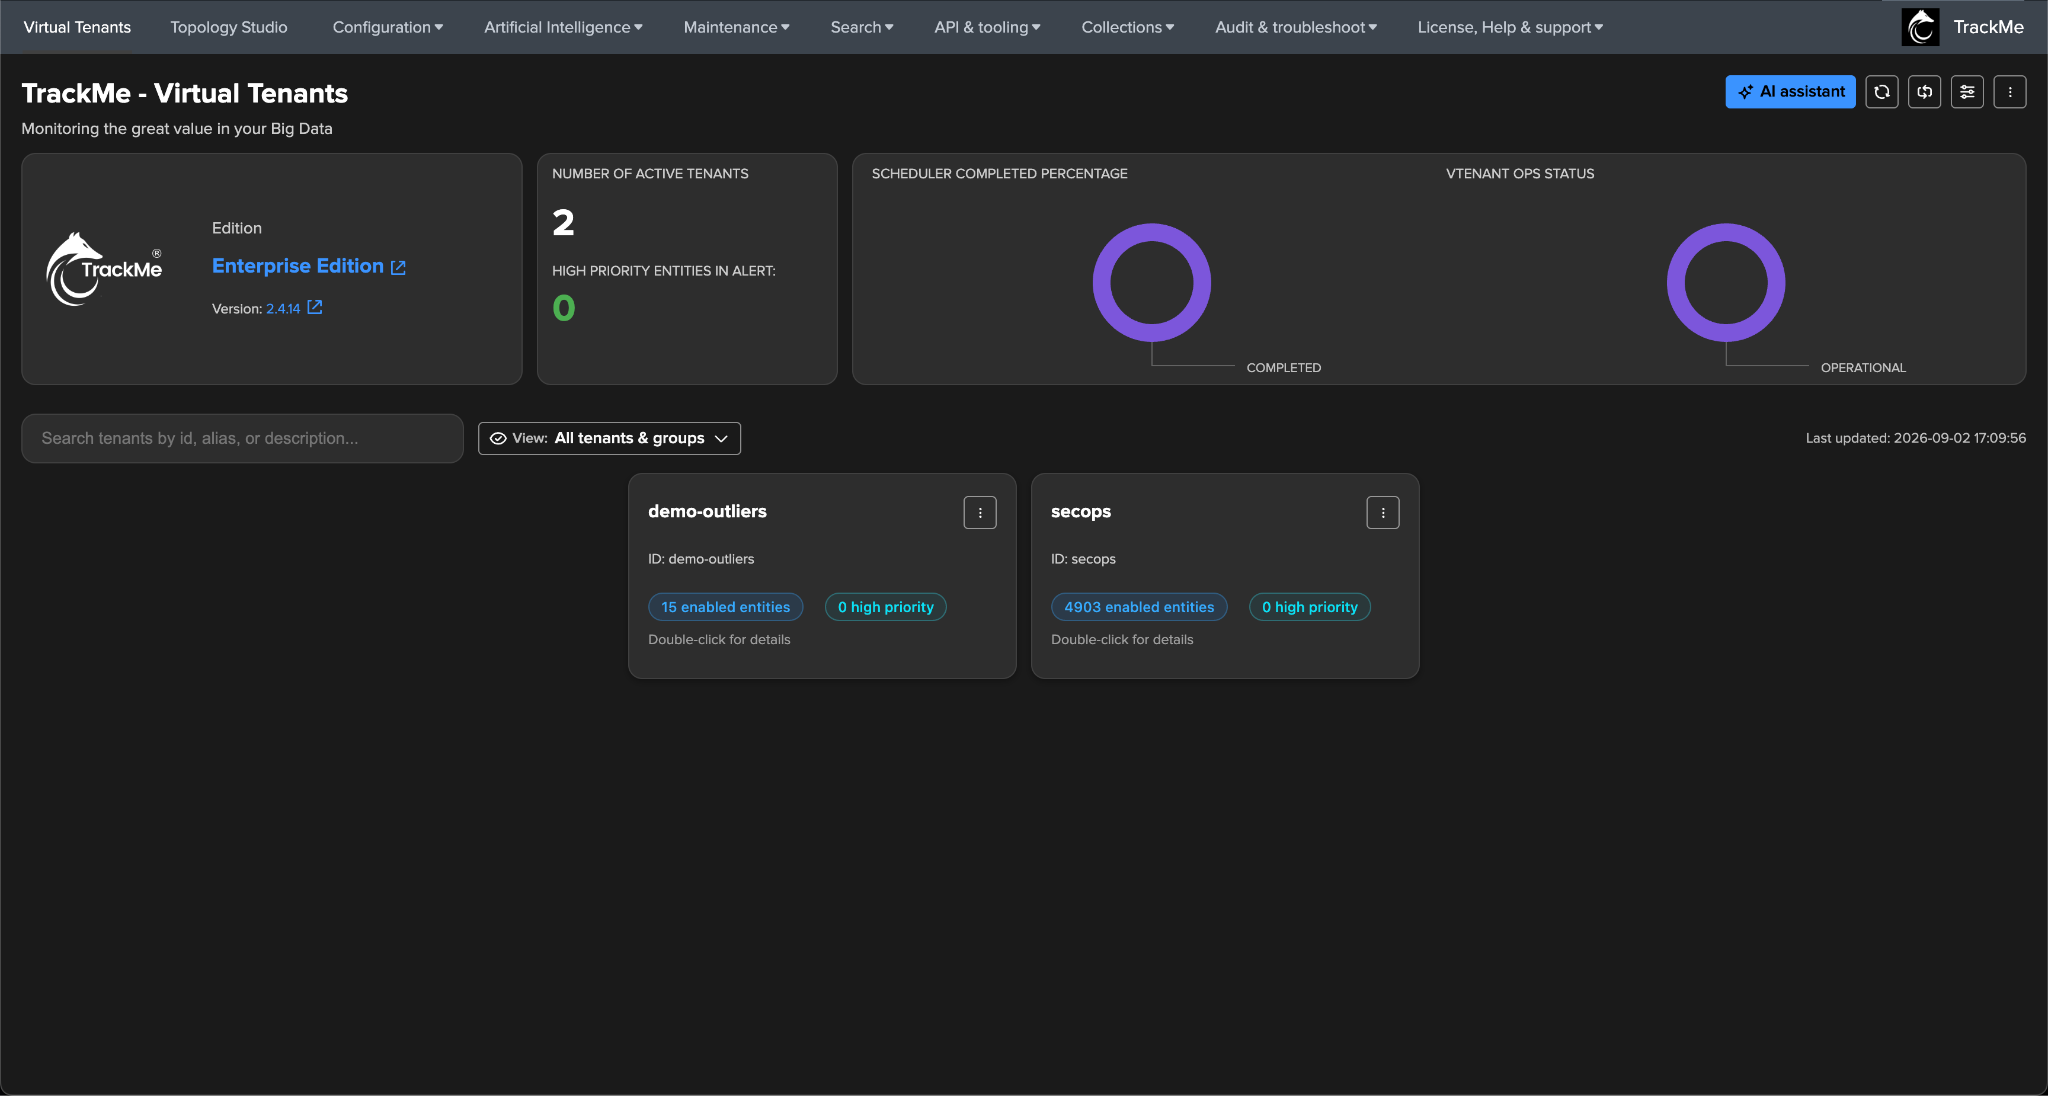
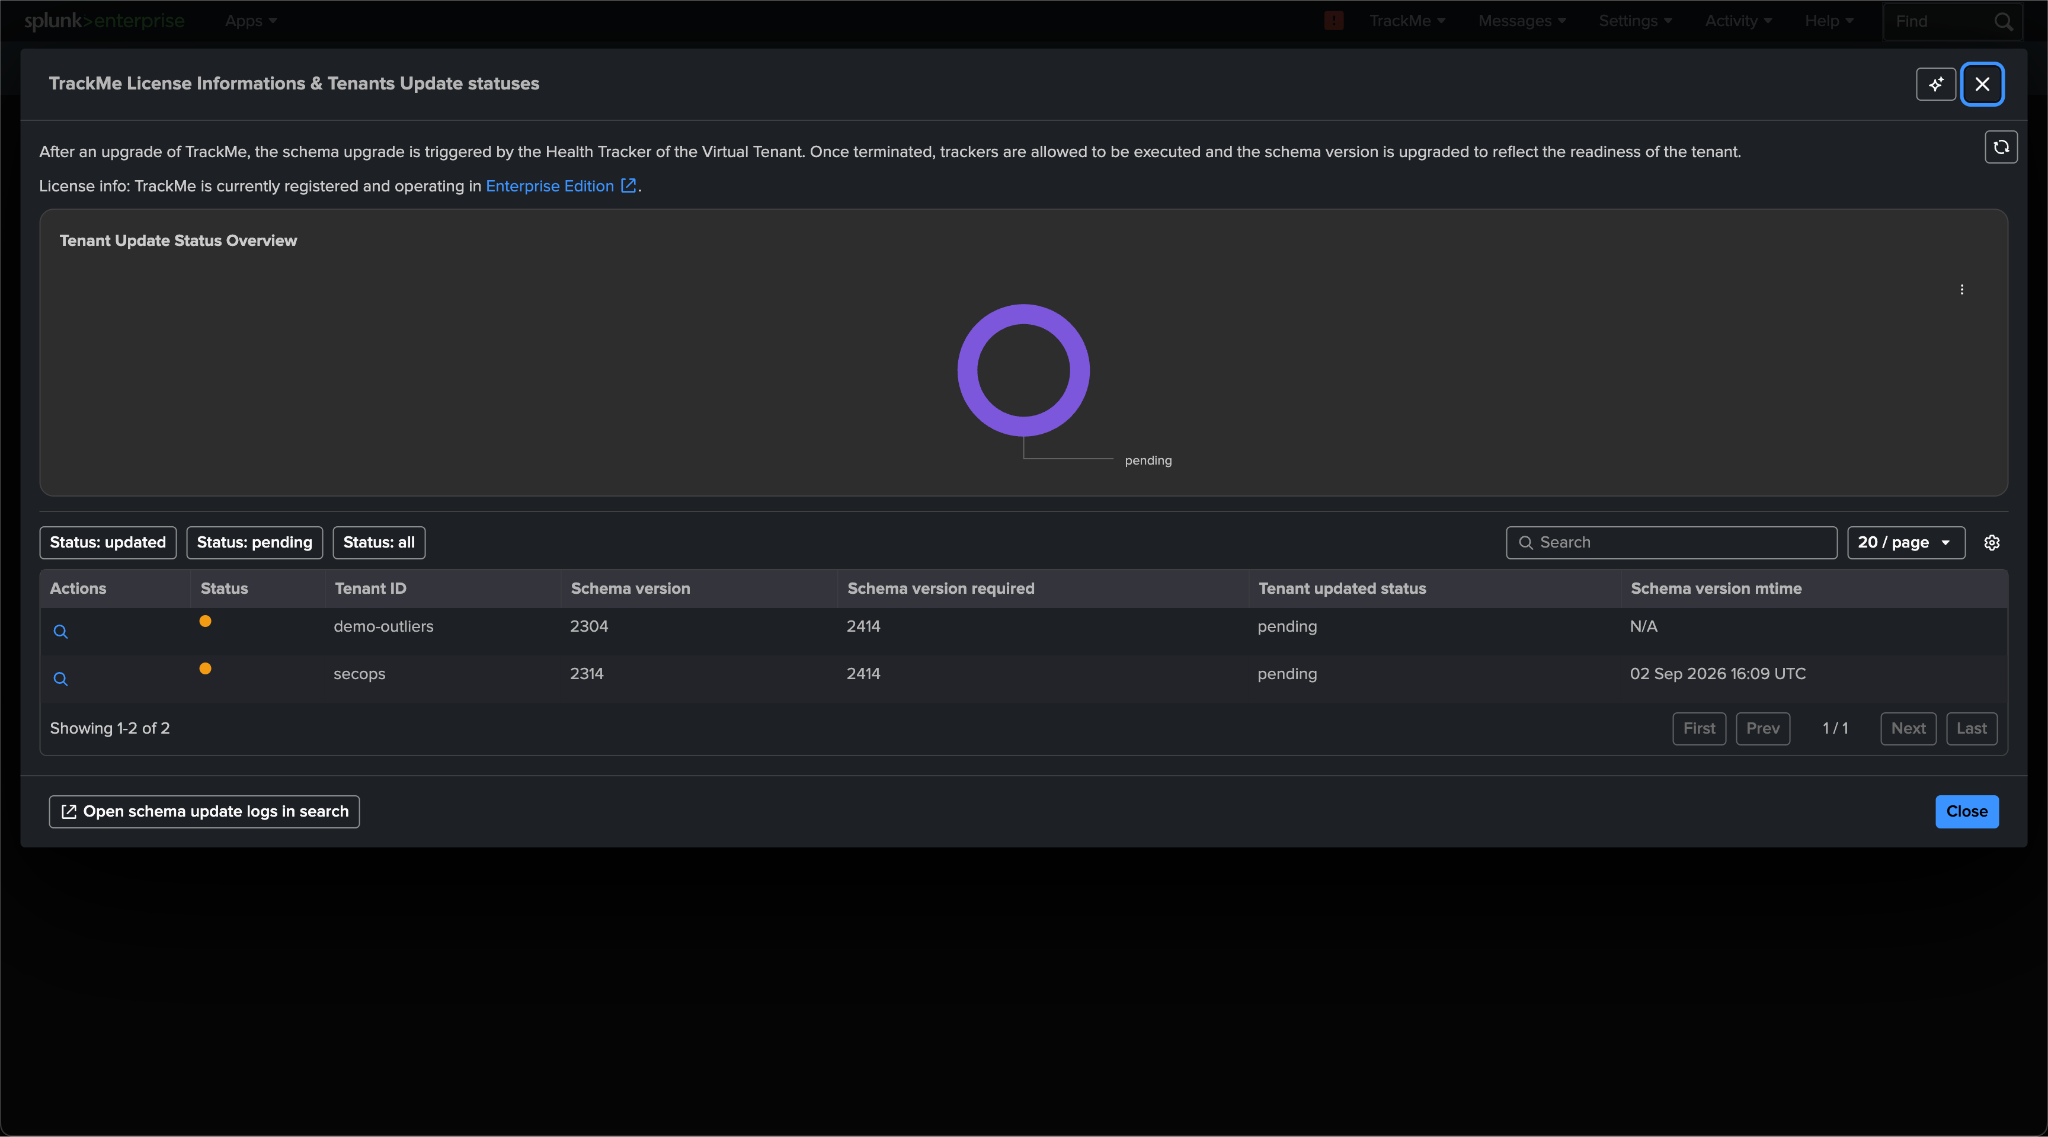
The screen explains what happens next: the schema upgrade is triggered by the Health Tracker of the Virtual Tenant; once terminated, trackers are allowed to run and the schema version is updated to reflect the readiness of the tenant. Immediately after the installation, every tenant is pending with the new required schema.
2.3 Follow the migration
Each tenant’s health tracker runs the migration chain on its next cycle (every 5 minutes): every migration from the tenant’s stored schema up to the required one, in order, after an automatic safety backup. Refresh the screen with the icon at the top right; enabled tenants move from pending to updated one by one. A large version jump means a long chain; allow two to three cycles per tenant, and more on large tenants, since some migrations touch every entity record.
Note
Disabled Virtual Tenants stay pending. A disabled tenant’s health tracker does not run, so the tenant is not migrated and keeps showing pending until it is re-enabled (its migration then runs within the next 5 minutes). Either re-enable such tenants during the change window so that they migrate with the others, or record them explicitly as excluded from the completion criteria; the checkpoint below counts enabled tenants only.
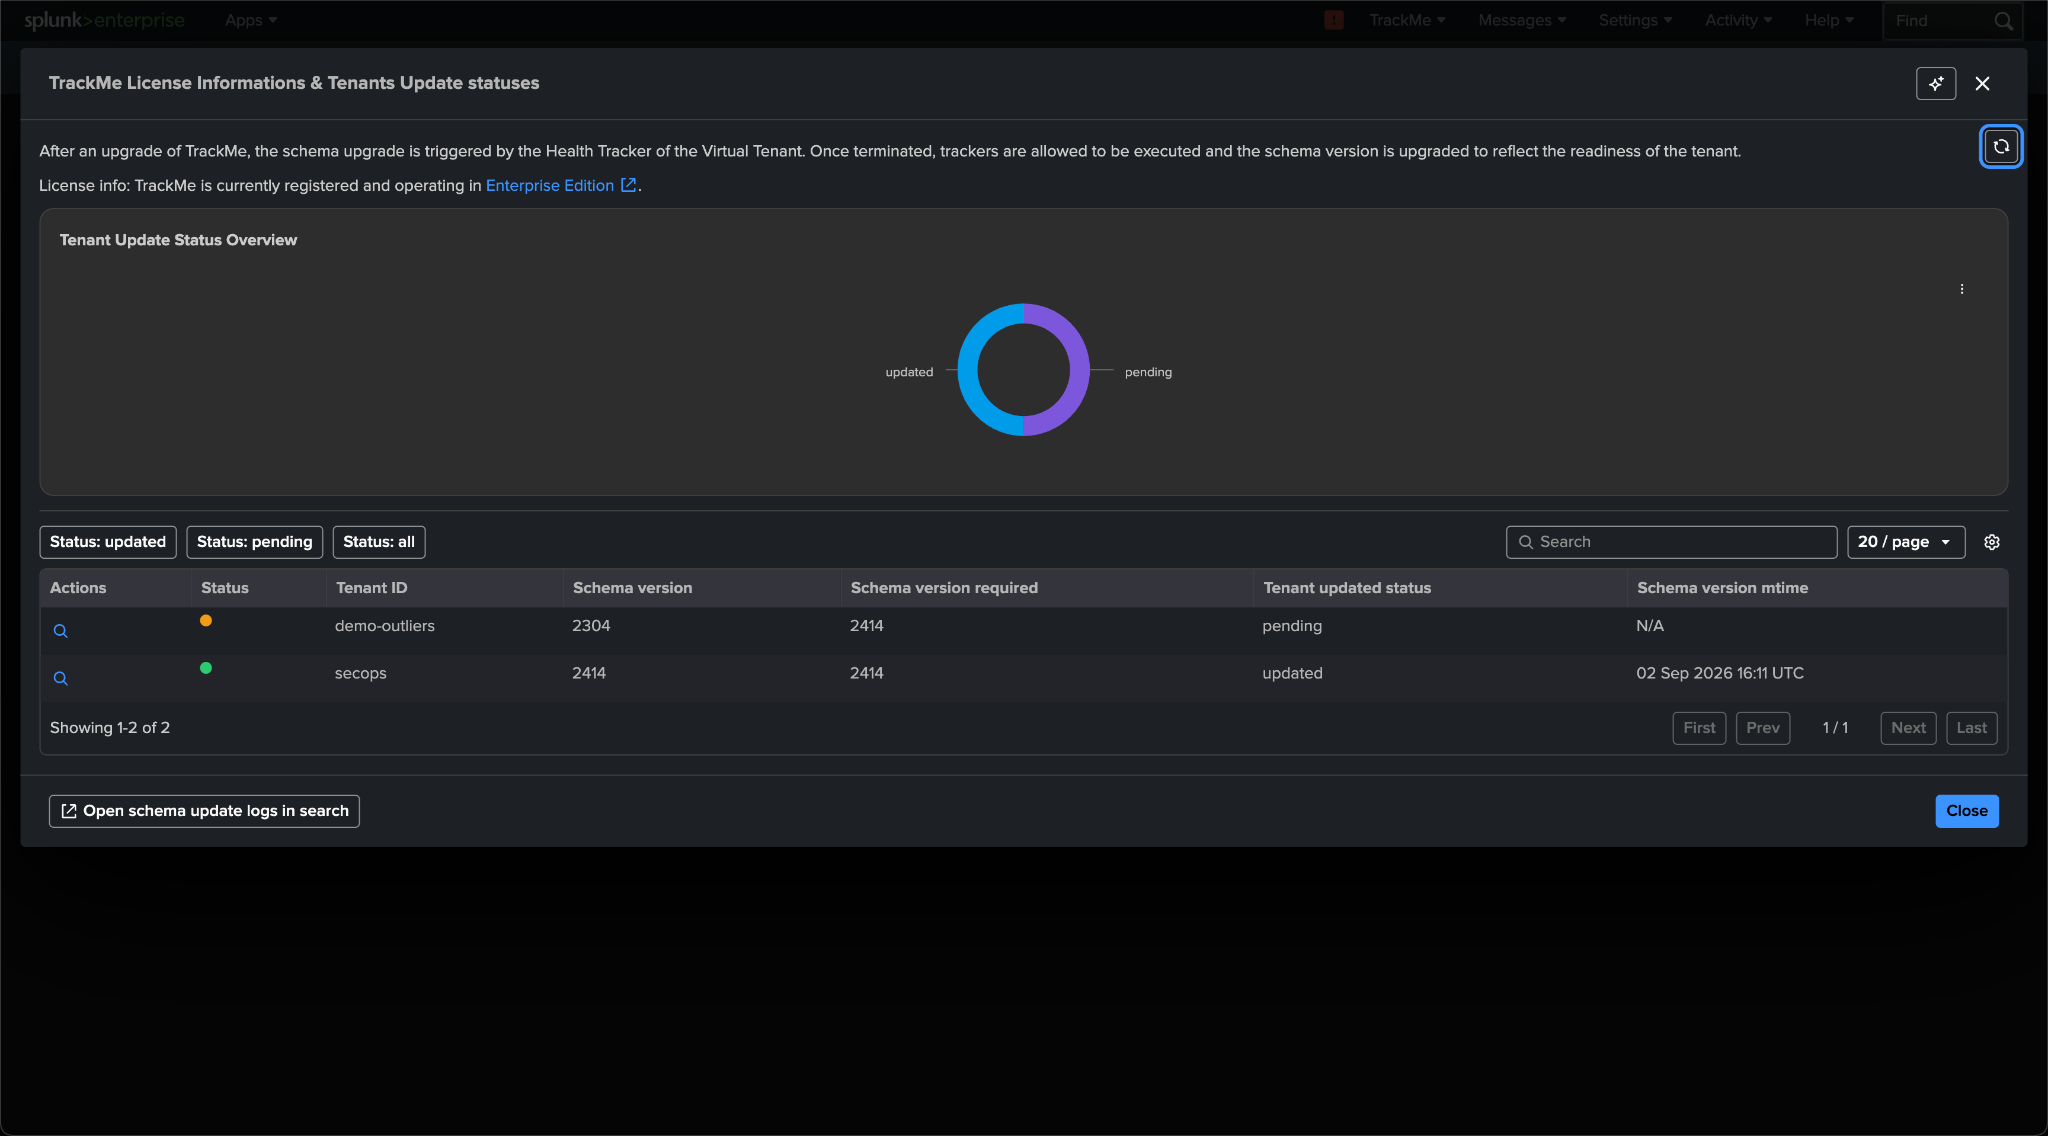
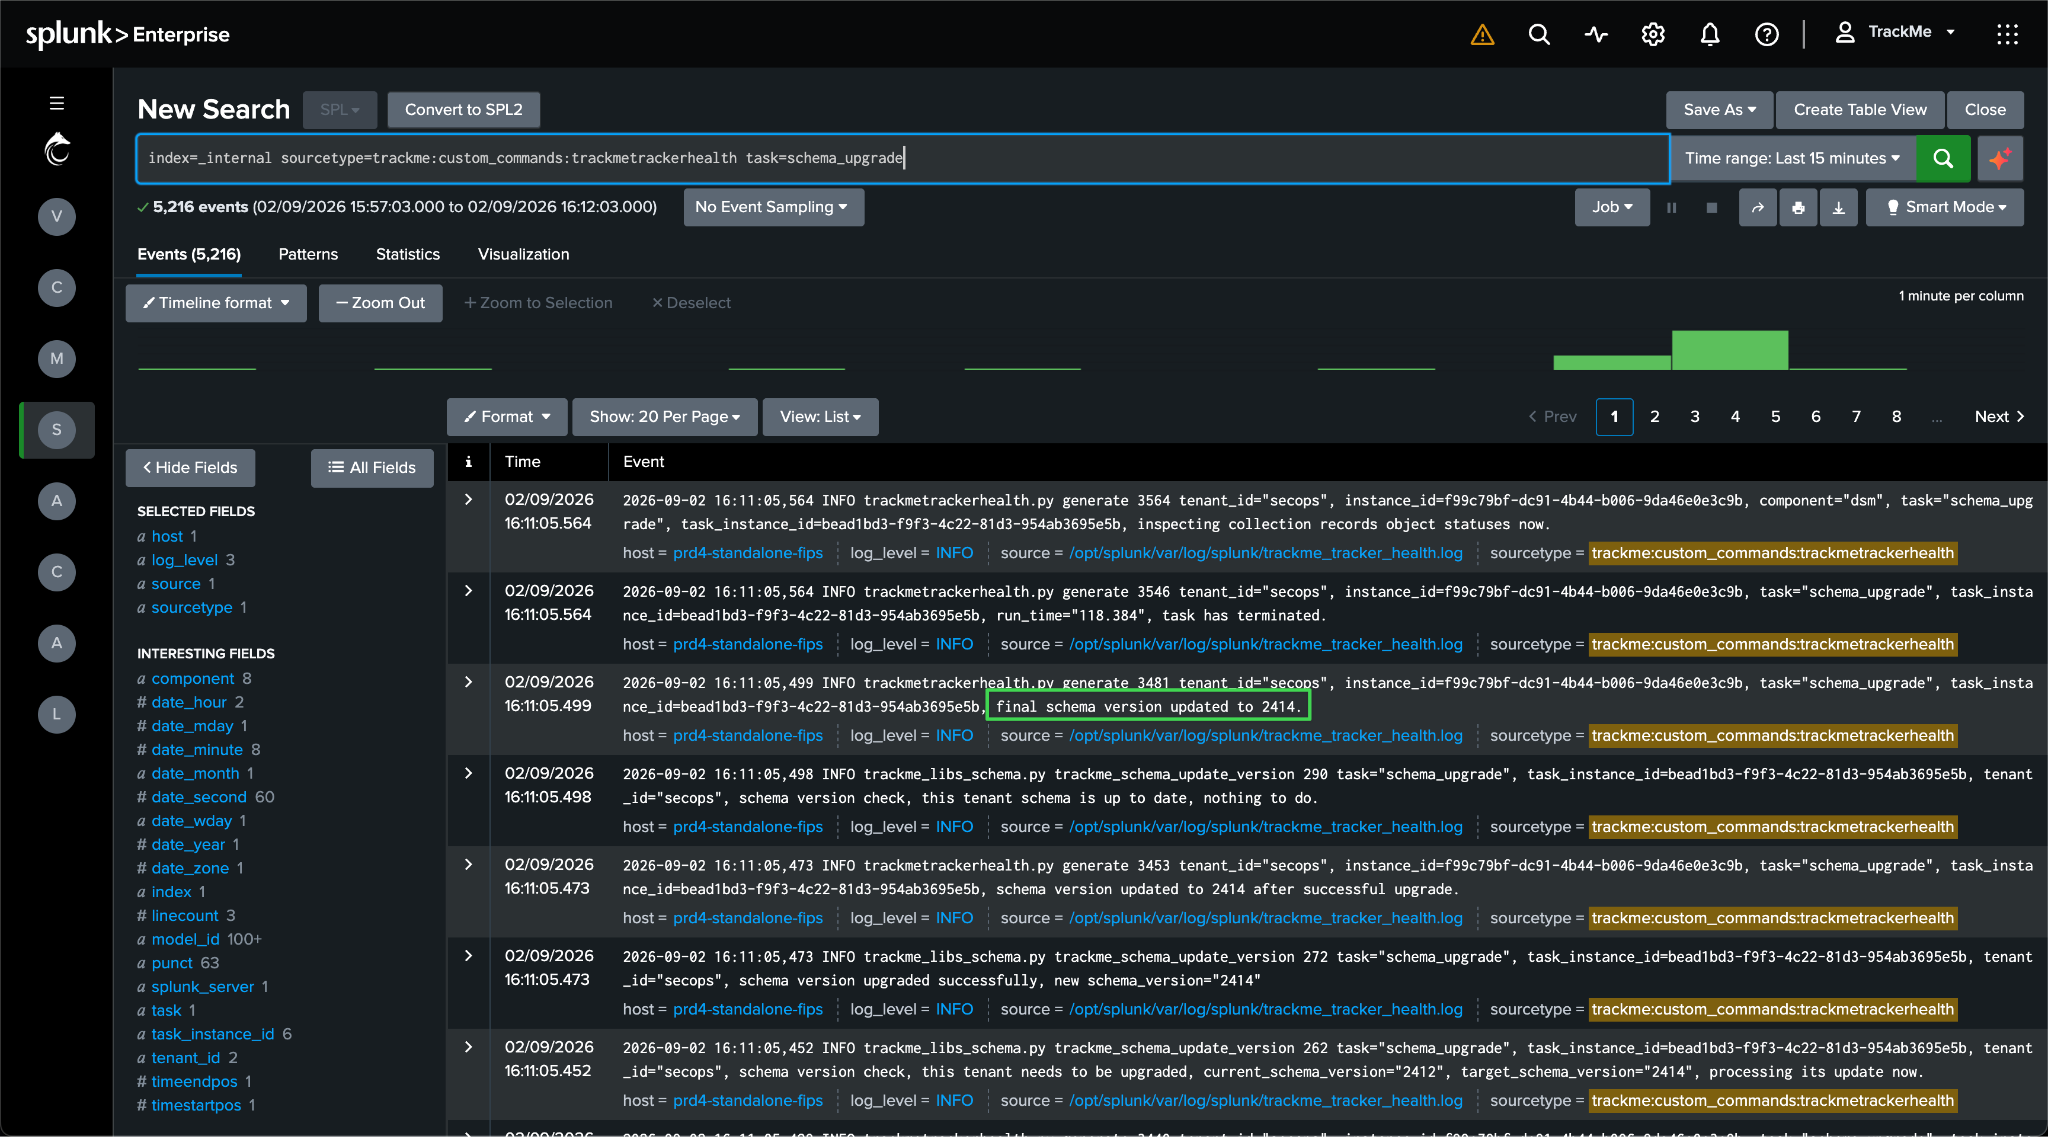
The migration log is one click away, Open schema update logs in search, or per tenant through the magnifier in the Actions column. Manually:
index=_internal sourcetype=trackme:custom_commands:trackmetrackerhealth task=schema_upgrade
Each migration logs its start and its outcome; the tenant’s chain ends with final schema version updated to <required>. See Schema migrations for the meaning of every line.
Then filter on errors:
index=_internal sourcetype=trackme:custom_commands:trackmetrackerhealth task=schema_upgrade log_level=error
Migrations are fail-soft: a failing item is logged and skipped, the chain continues, and the schema version still advances. TrackMe also runs reconciliation logic on regular cycles (the longest every 24 hours) that repairs the vast majority of such conditions on its own. An error here is therefore rarely a concern for the upgrade itself. Do share the errors with TrackMe Support (see Support) so that each one can be confirmed. Do not judge anything before the update-status donut is fully updated: that screen is the authoritative progress view.
2.4 Register the licence key
If the deployment is not registered yet (for example a former Community Edition install), open License, Help & support → License, register the licence key and confirm the page shows the edition registered with its expiry date. See License registration. Licensed deployments keep their licence through the upgrade; verify the page anyway and record the edition and expiry in the deployment record.
2.5 Restart Splunk once every tenant is migrated
On a standalone or distributed search head, for a large version jump we recommend one more restart of
splunkd after the update-status screen shows every tenant updated and the licence is registered. The
migration chain refreshes many per-tenant knowledge objects (transforms, lookup definitions, saved searches)
in local/; a restart guarantees that every search process and scheduled report starts from the final,
fully reloaded configuration. Run splunk restart in the change window.
This step is exempt on the other topologies:
Search head cluster: no restart after the migration. The members already restarted during the bundle push (2.1), and the knowledge objects the migration refreshes are written through the REST API, replicated and reloaded on every member without a restart.
Splunk Cloud: not applicable.
Where the restart applies, wait until the health trackers have run once more (about 5 minutes) before starting step 3.
Step 2 checkpoint
Header shows the target version (2.2)
Update-status screen: every enabled tenant at the required schema, status updated (2.3)
Migration log shows final schema version updated for every tenant; errors captured and sent to Support (2.3)
Licence page shows the edition registered, with its expiry date (2.4)
Standalone or distributed search head only: splunkd restarted after the migration; health trackers have run once since (2.5). Search head cluster and Splunk Cloud: recorded as exempt
Step 3 — After the upgrade
Platform, alerting chain, ML Outliers, hand-over.
3.1 Every tenant and every component loads without error
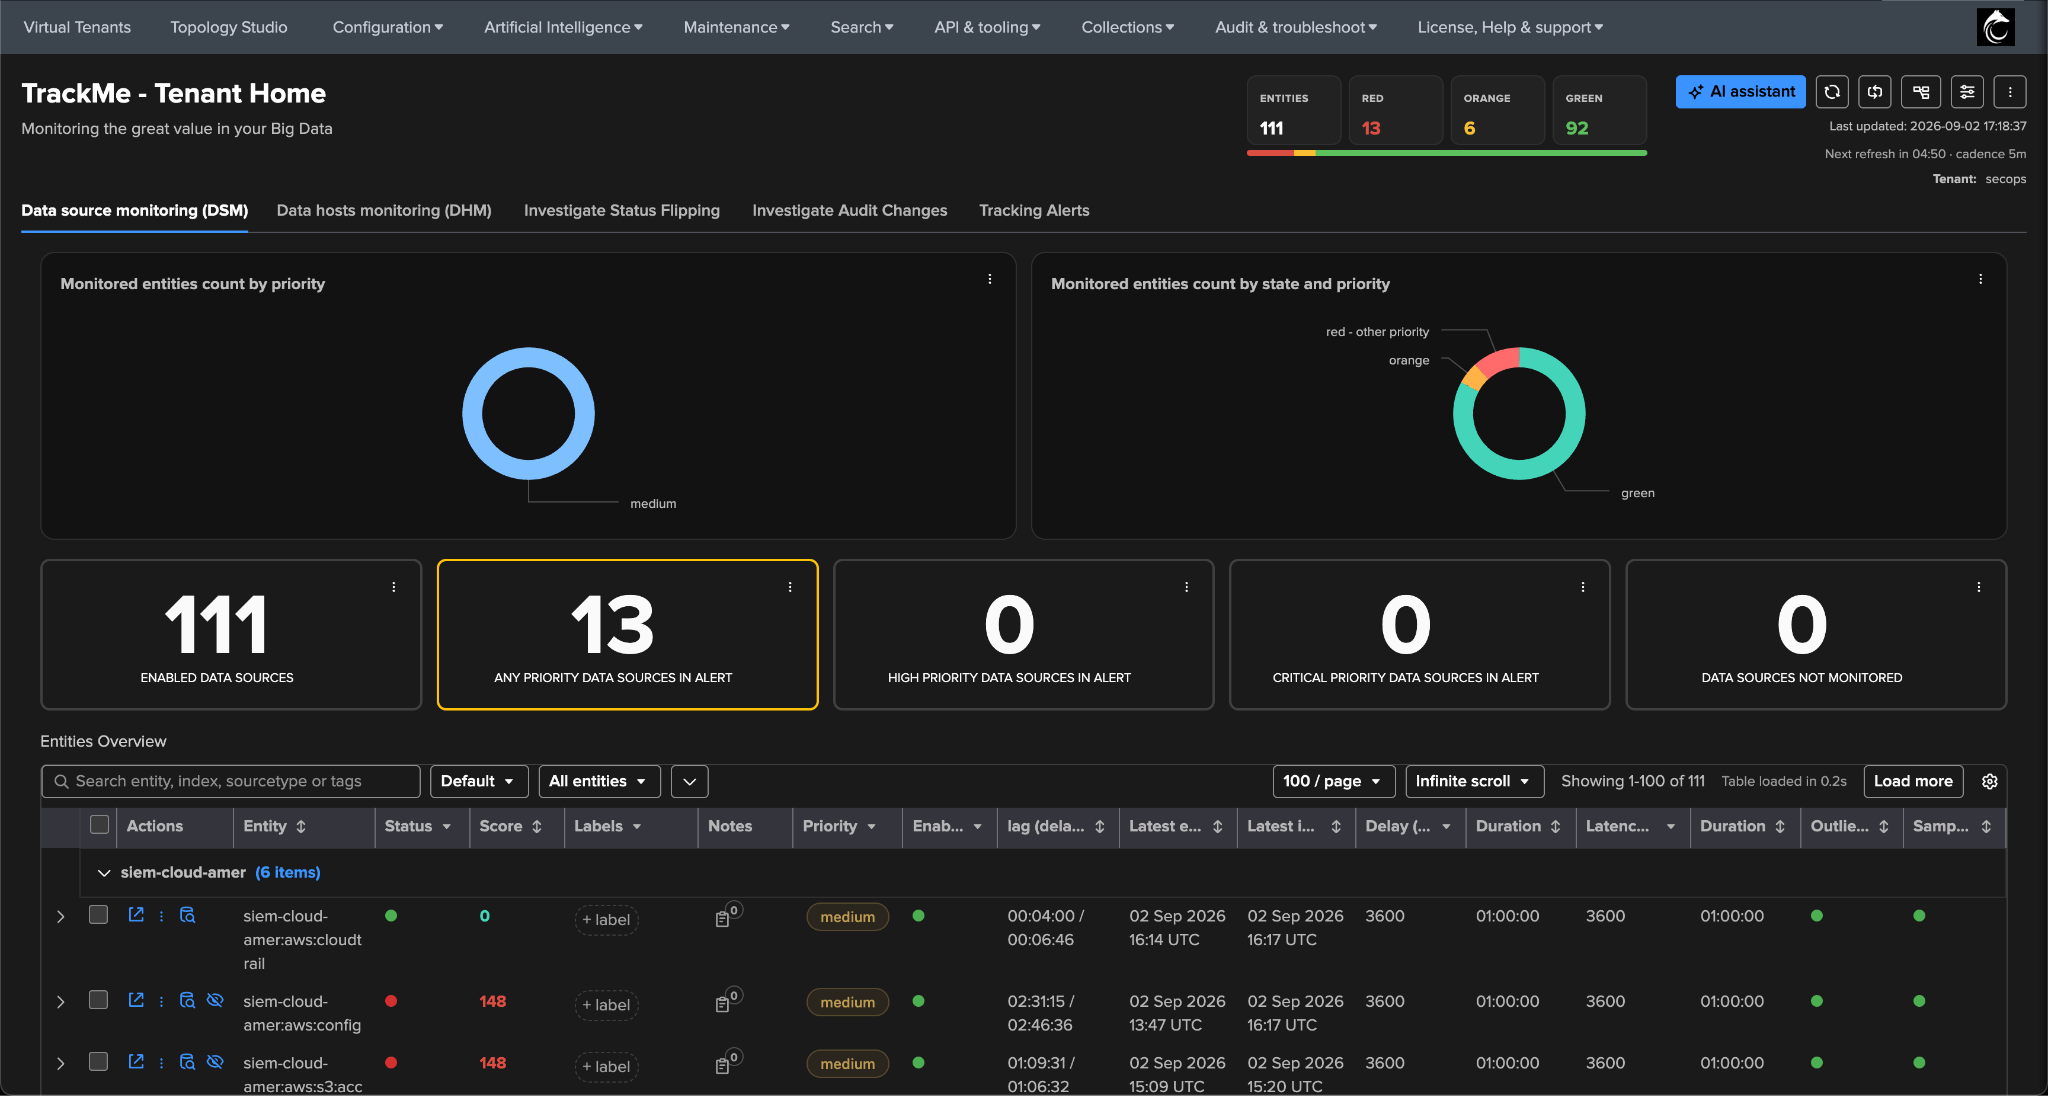
Wait about 15 minutes after the post-migration restart (or, where step 2.5 is exempt, after the last tenant reached updated): the health tracker also reschedules trackers and reconciles feature gates during the first cycles. Then open Virtual Tenants: the page loads, no error toast, every tenant OPERATIONAL. Open each tenant (Tenant Home) and click through its enabled component tabs: entity tables load, counters are populated, no error toast. Finally open Configuration → Configuration Guardian: it lists misconfigurations with remediation steps; anything raised must have a documented cause (see Configuration Guardian).
3.2 Validate the full alerting chain with a manual score influence
An entity’s colour is driven by an impact score (0 = green, below 100 = orange, 100 and above = red; see Impact scoring & thresholds). The score can be influenced manually, which gives a clean, reversible way to force a healthy entity into alert and exercise everything downstream: notable creation, stateful alerts and emails, and your own tooling (ticketing, paging).
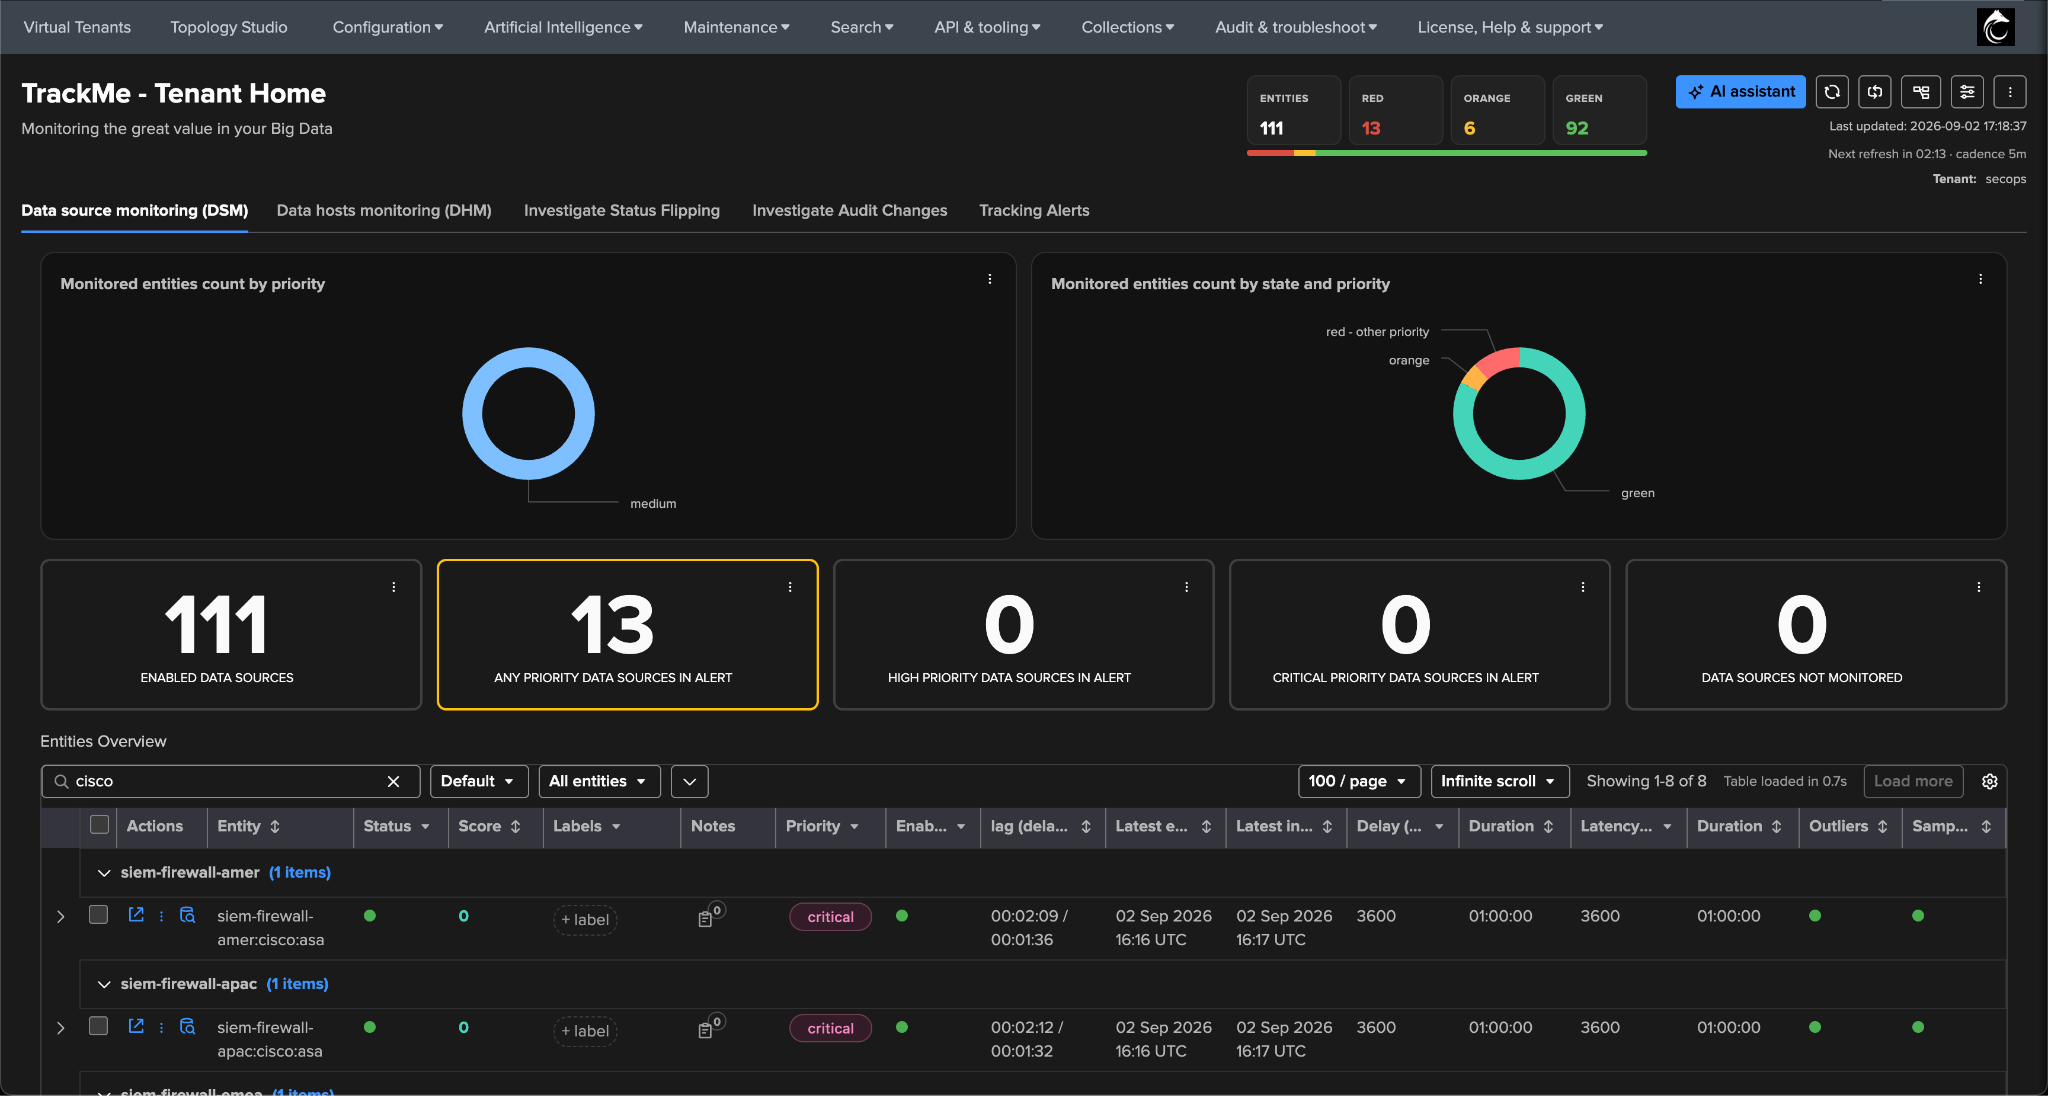
a. Pick a healthy, high-priority entity. In Tenant Home, search for a critical or high-priority entity that is green with a score of 0.
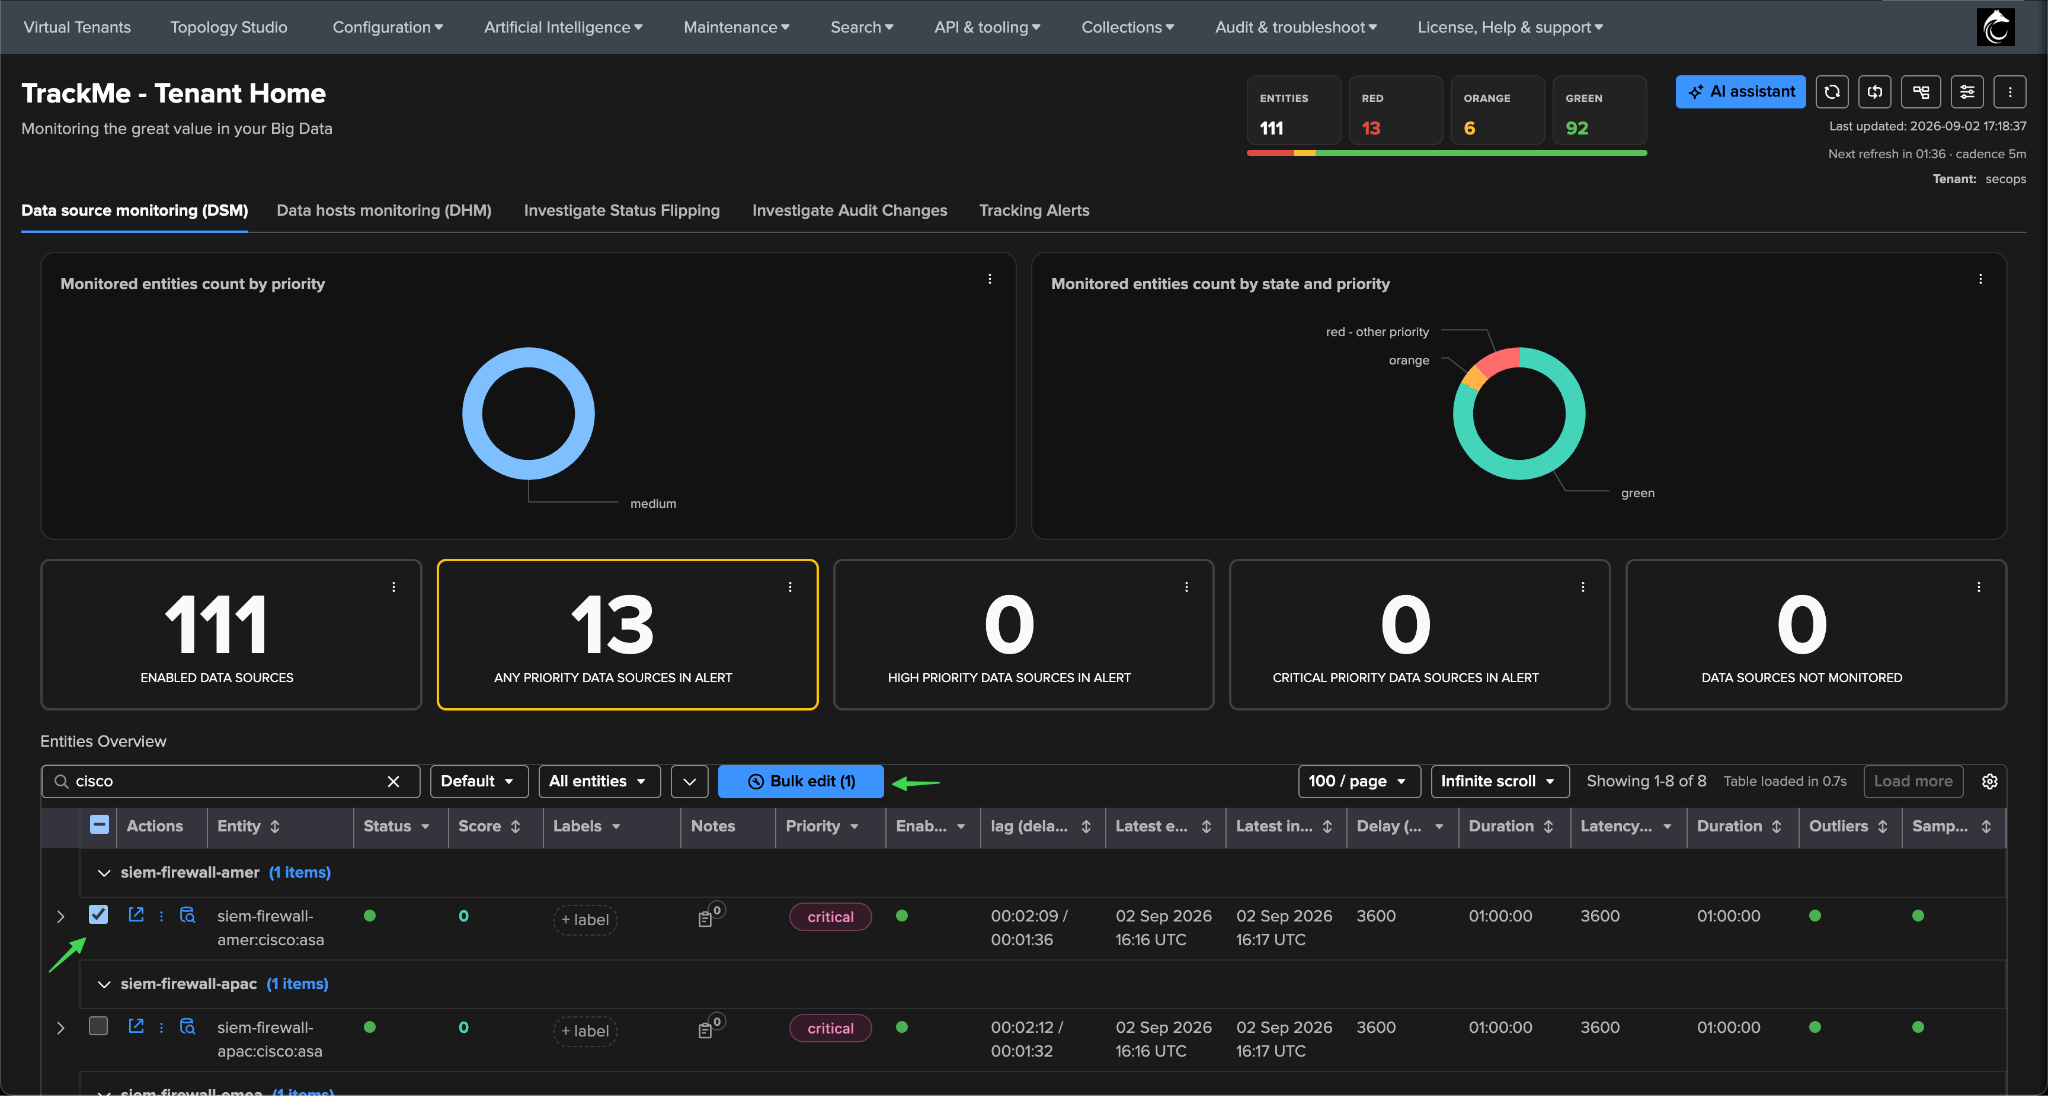
b. Select it and open Bulk edit. Tick the entity’s checkbox; the Bulk edit (1) button appears above the table.
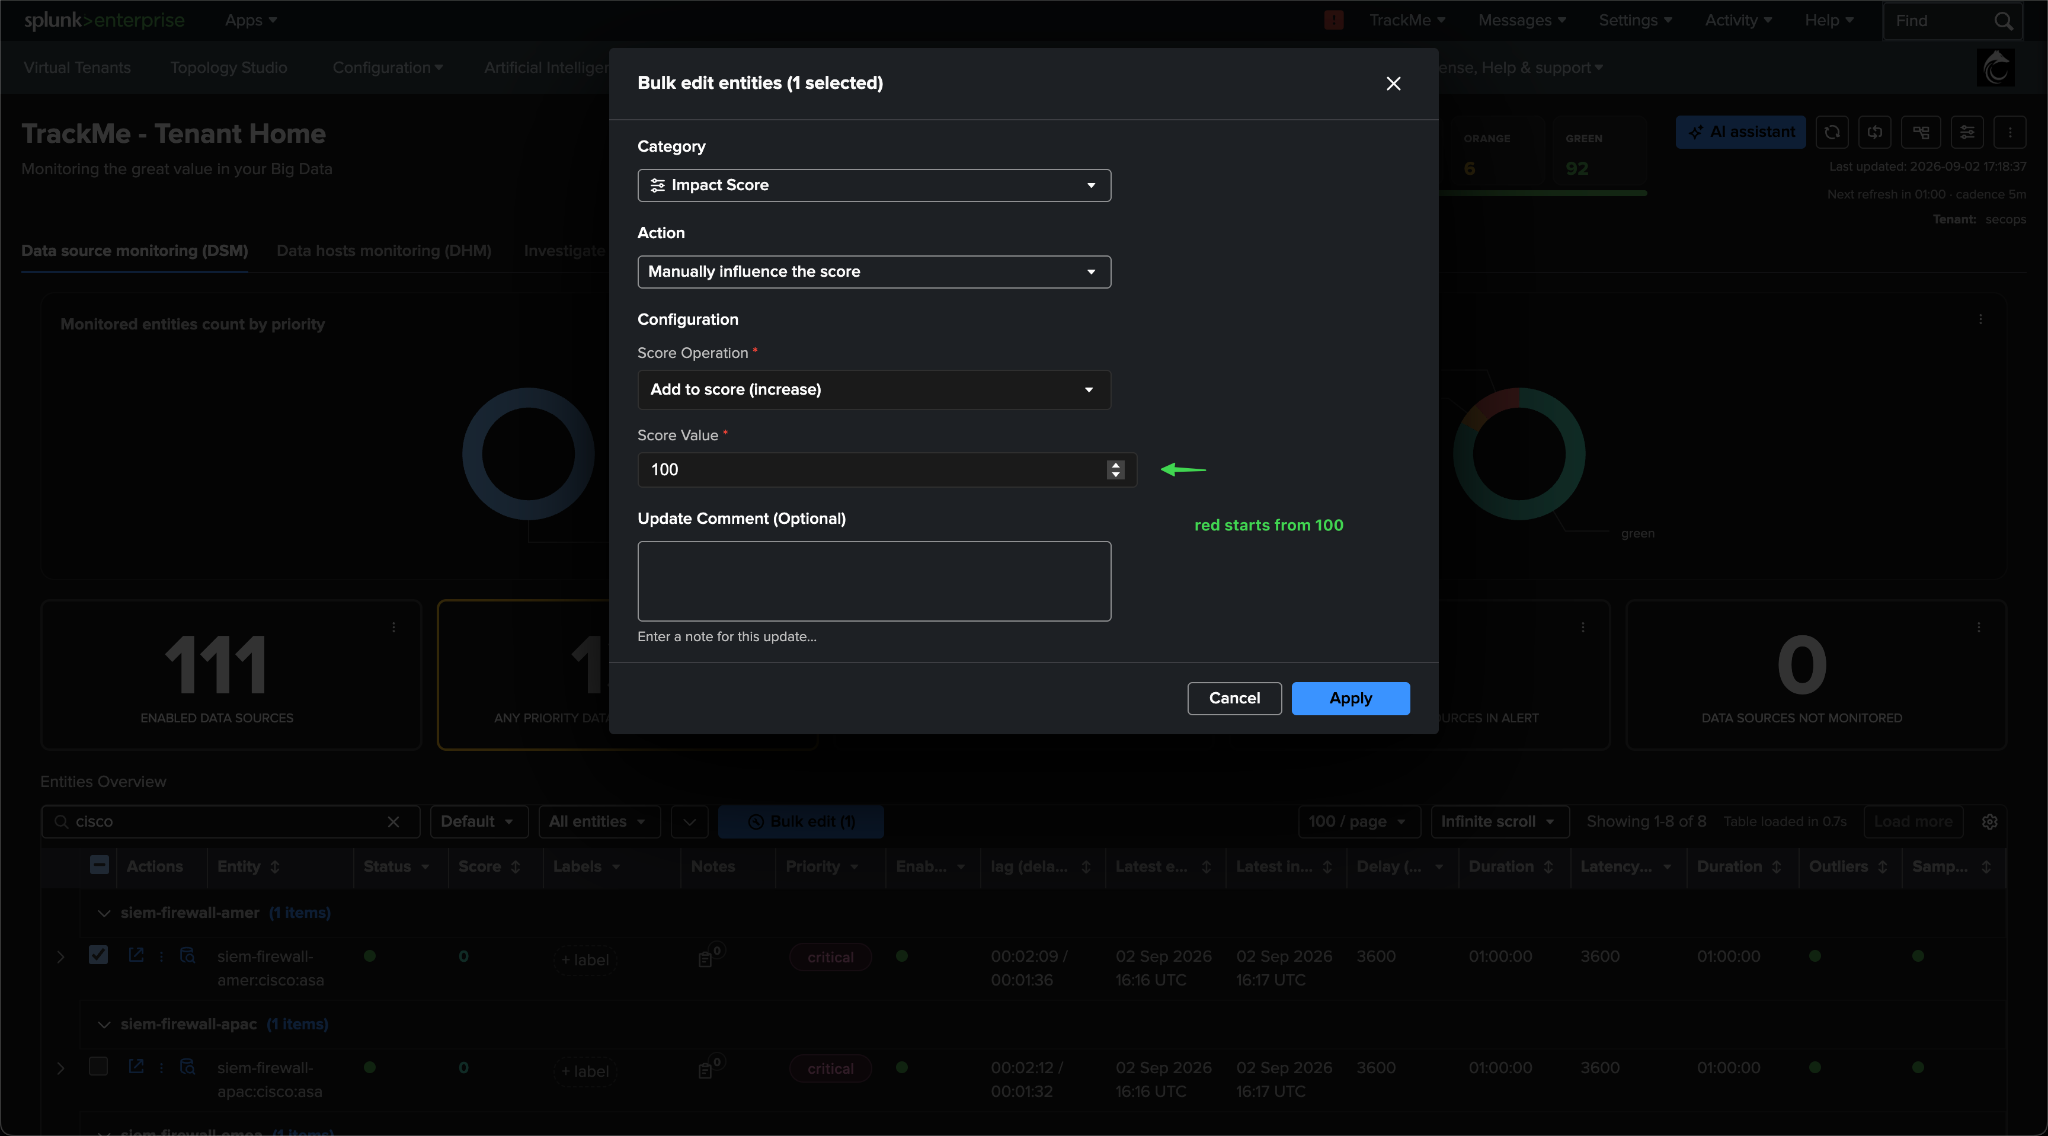
c. Add 100 to the score. Category Impact Score, action Manually influence the score, operation Add to score (increase), value 100 (red starts from 100). Enter a comment such as “post-upgrade alerting chain test” and apply. The same action exists on a single entity from its Actions menu.
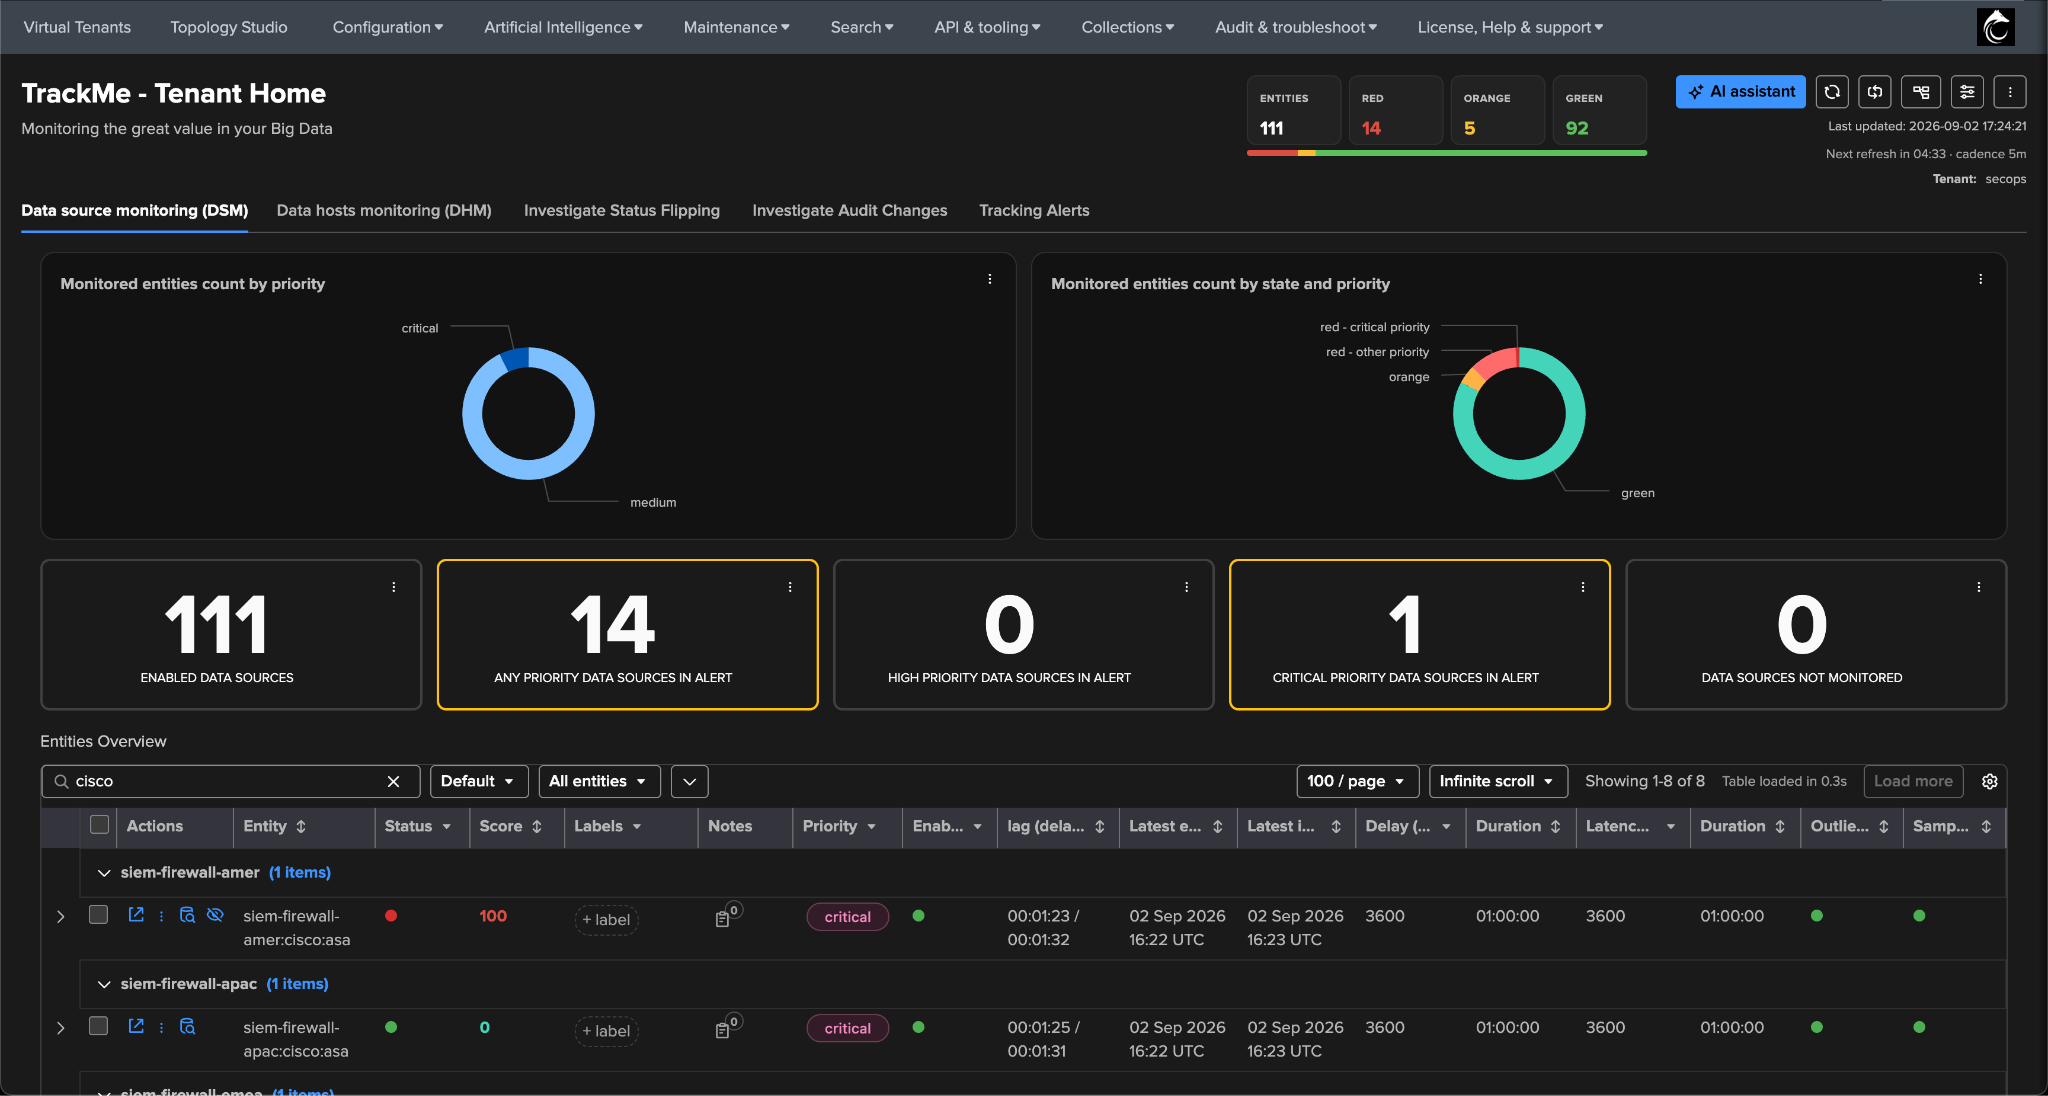
d. Watch the entity turn red. On the next evaluation the entity shows a score of 100 and a red state, with
the anomaly reason score_breached. This can take a few minutes.
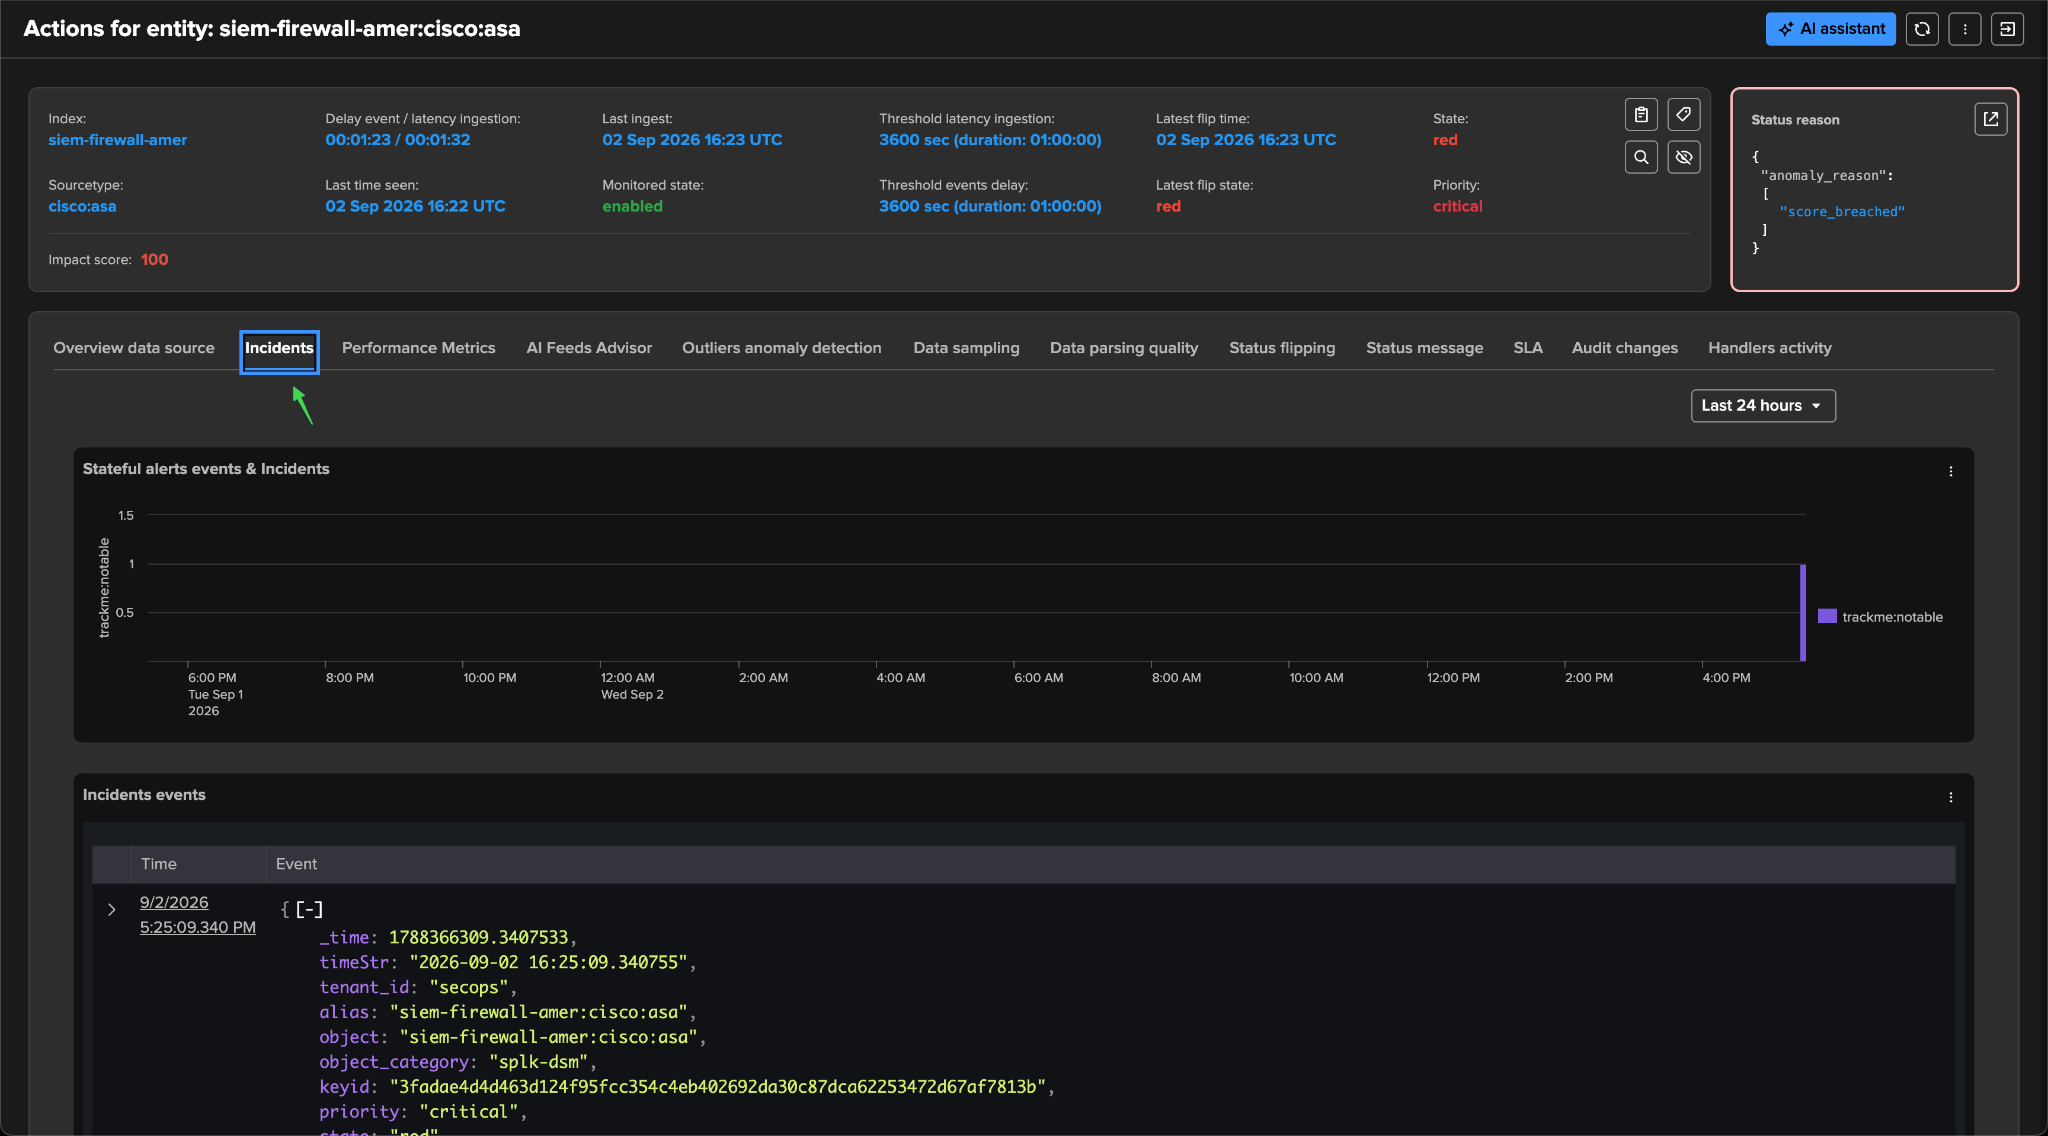
e. Confirm the incident. Alerts run on their own schedule, so the incident typically appears 5 to 10
minutes later. Open the entity’s Incidents tab: the trackme:notable event is listed with the entity’s
fields. This is the payload your downstream tooling consumes; verify that the ticket, page or email arrived.
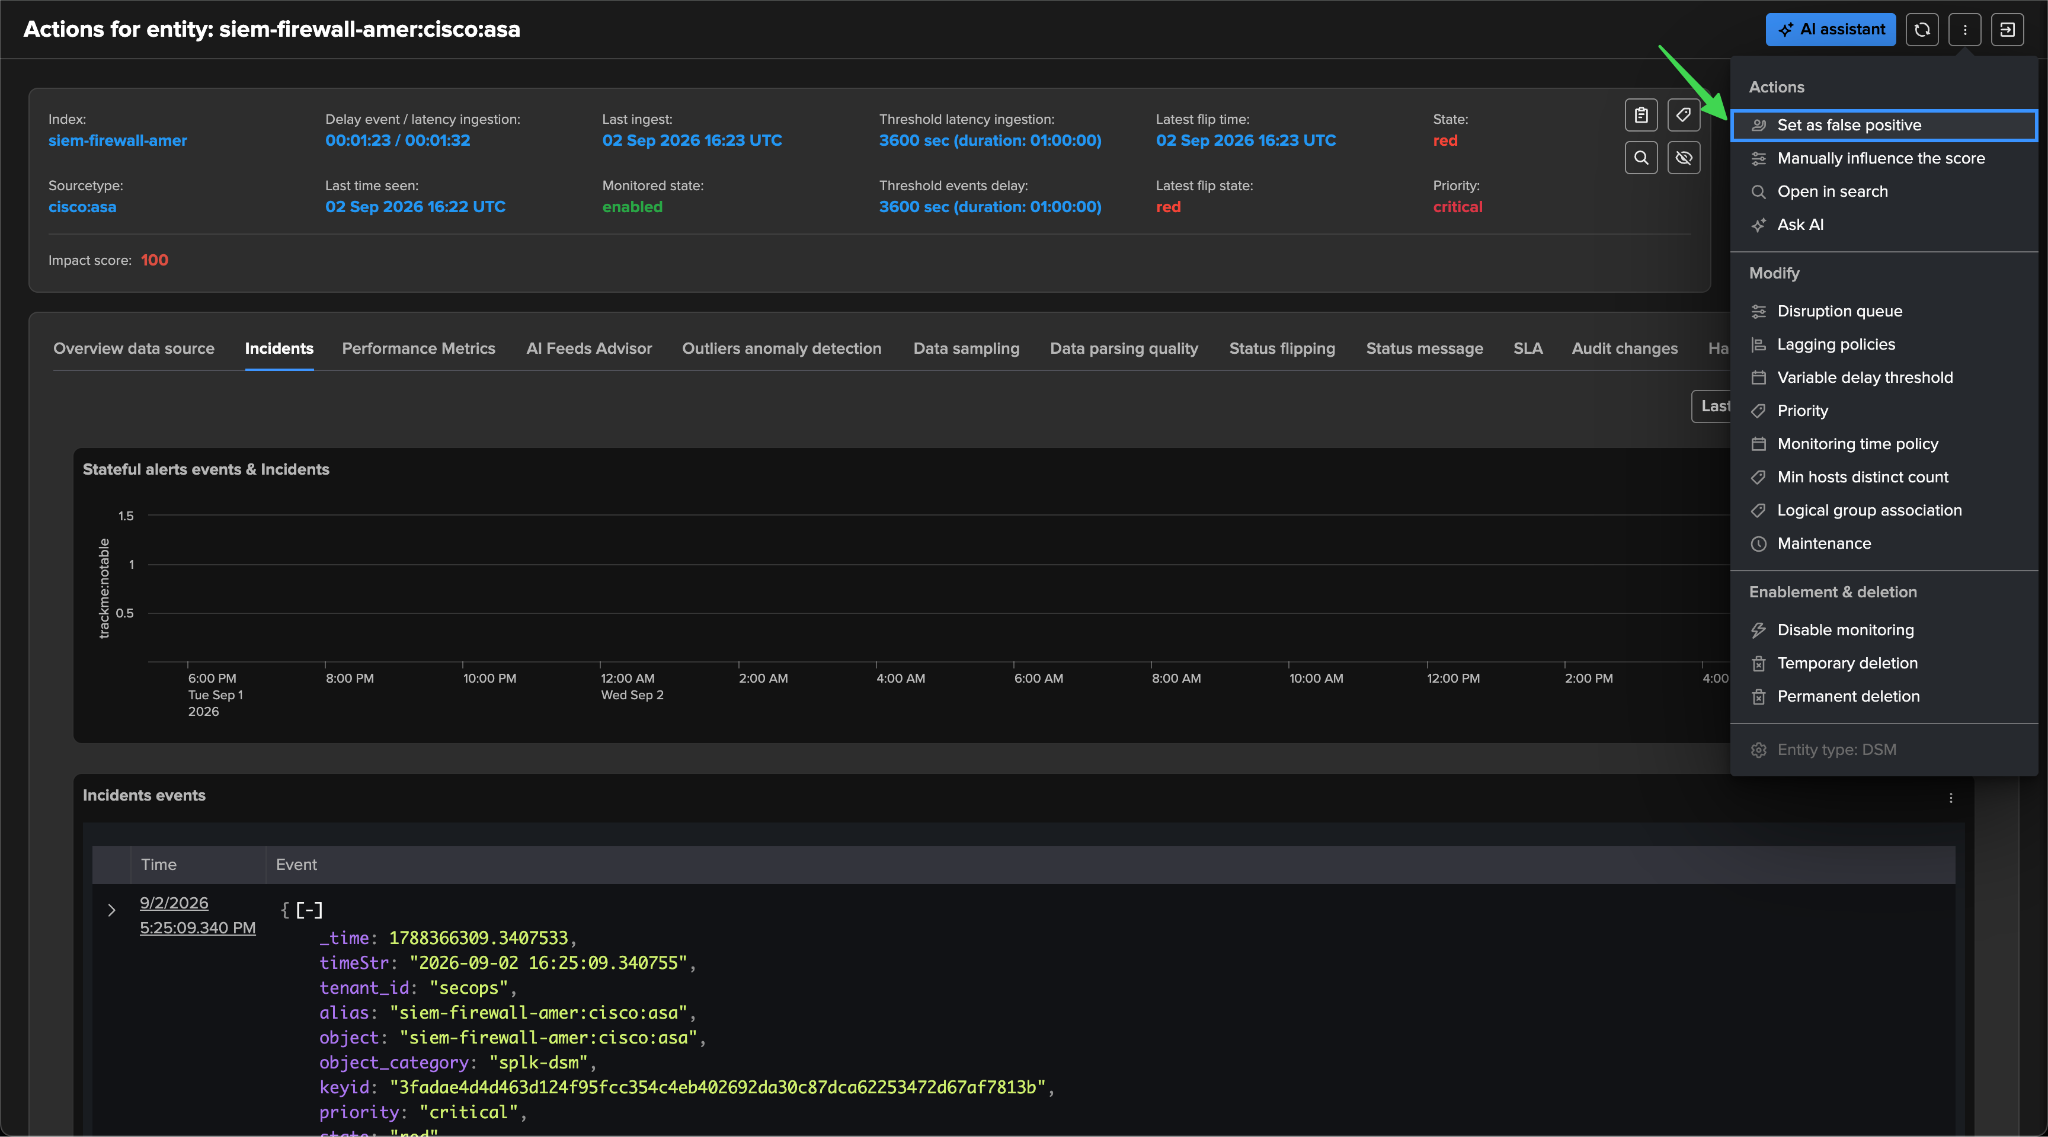
f. Clear the test. From the entity’s Actions menu choose Set as false positive and enter a comment. This records a negative score that cancels the manual influence; the entity returns to green on the next evaluation and the stateful alert, if any, closes on its own.
Hint
What this proves
Score evaluation, state flip, notable emission and your downstream chain all work on the new release, with one reversible action and no synthetic data. Repeat it once per class of tenants if they feed different downstream pipelines.
3.3 ML Outliers — only where they are in use
When the upgrade crosses the native ML engine migration (release 2.3.15), every model definition is rewritten
to TrackMeNativeDensityFunction and reset for retraining (last_exec=0). The migration does not train
the new models: until a model is trained its Outliers chart is empty and it produces no detection. Training runs
automatically through the per-tenant, per-component report
trackme_<component>_outliers_mltrain_tracker_tenant_<tenant_id>, which processes the backlog in batches
over its scheduled runs. Three checks:
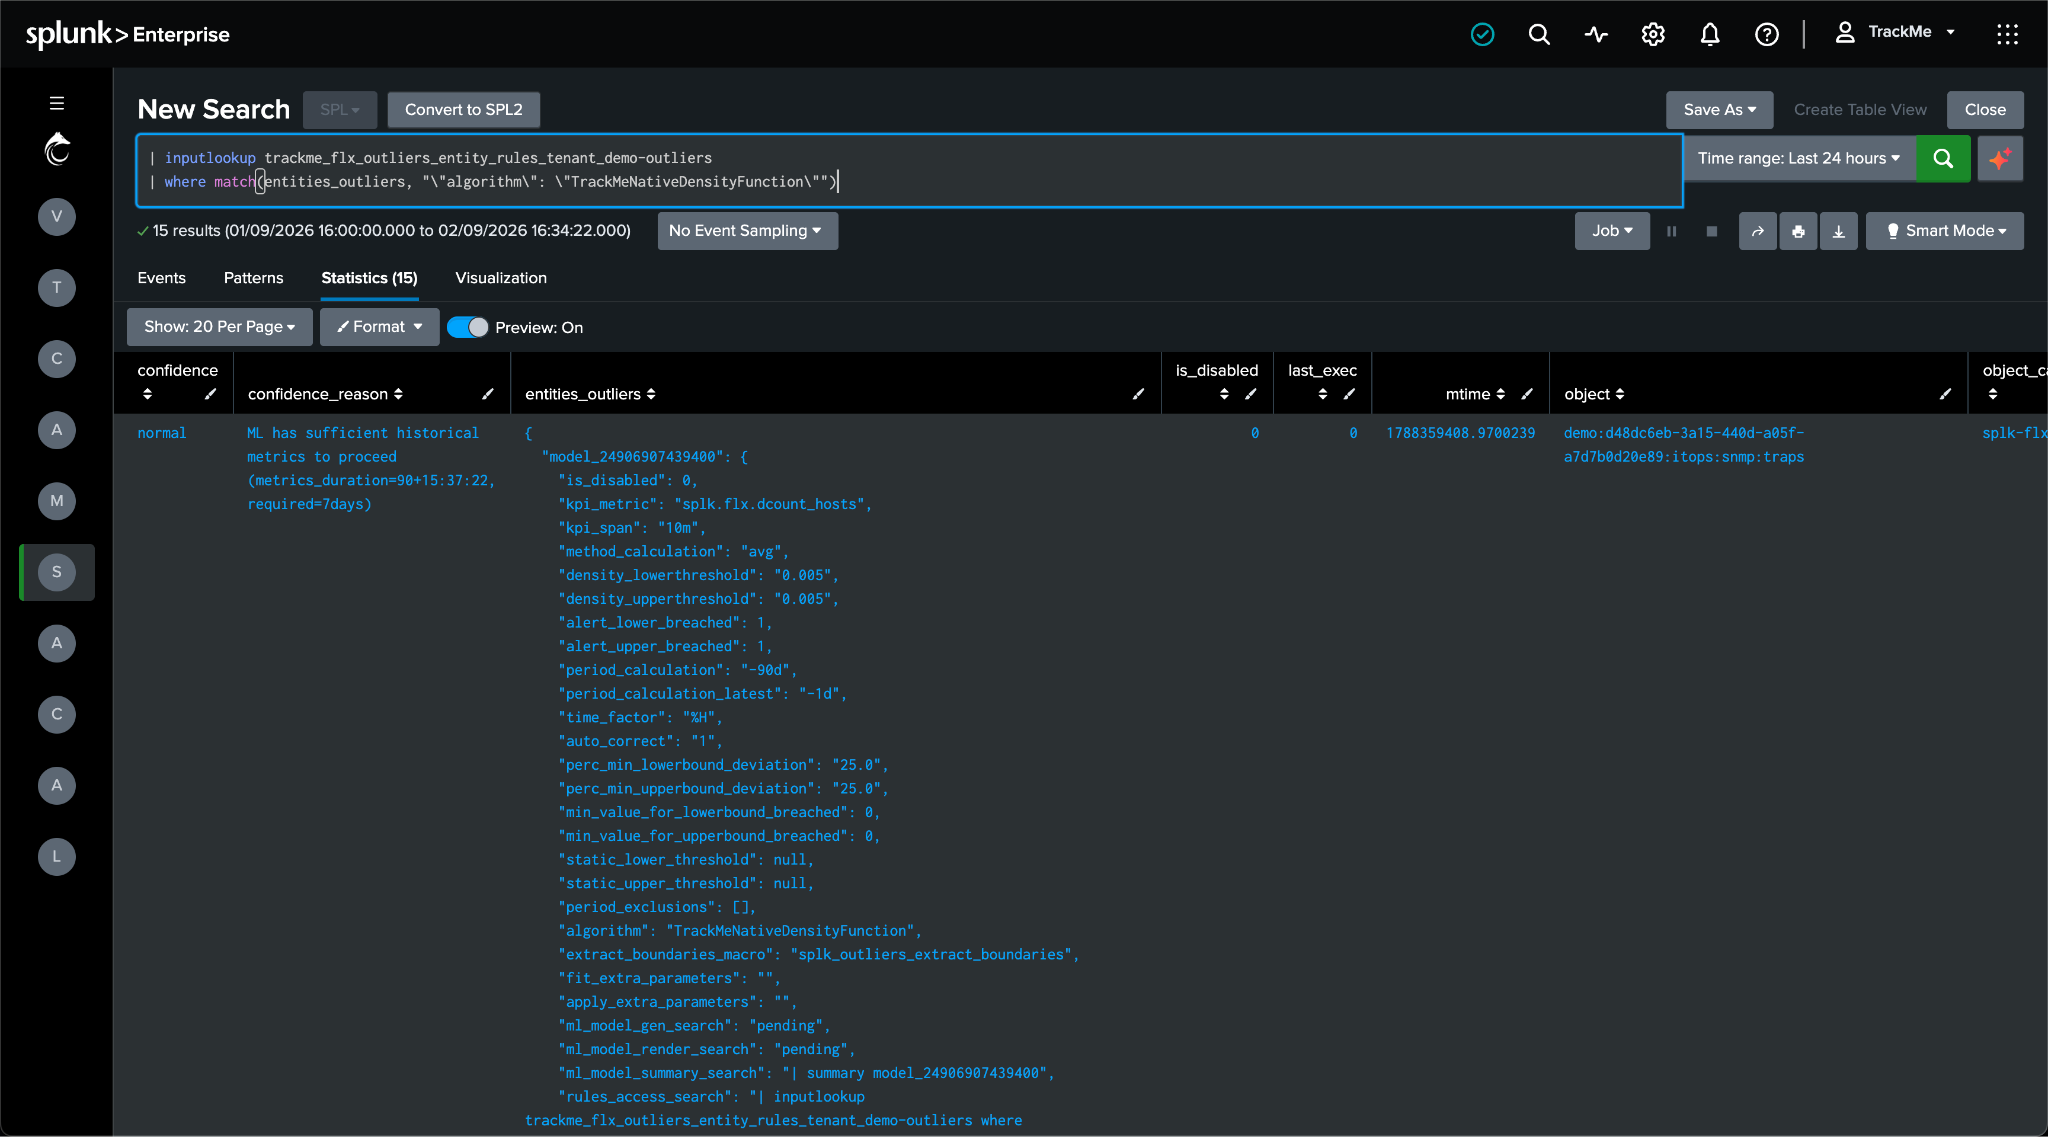
a. Definitions migrated. The step 1.3 count search now returns 0; the positive form shows the migrated
records: algorithm is TrackMeNativeDensityFunction, the stored searches read pending and the
record’s last_exec is 0. That reset is the instruction to the training job.
| inputlookup trackme_<component>_outliers_entity_rules_tenant_<tenant_id>
| where match(entities_outliers, "\"algorithm\": \"TrackMeNativeDensityFunction\"")
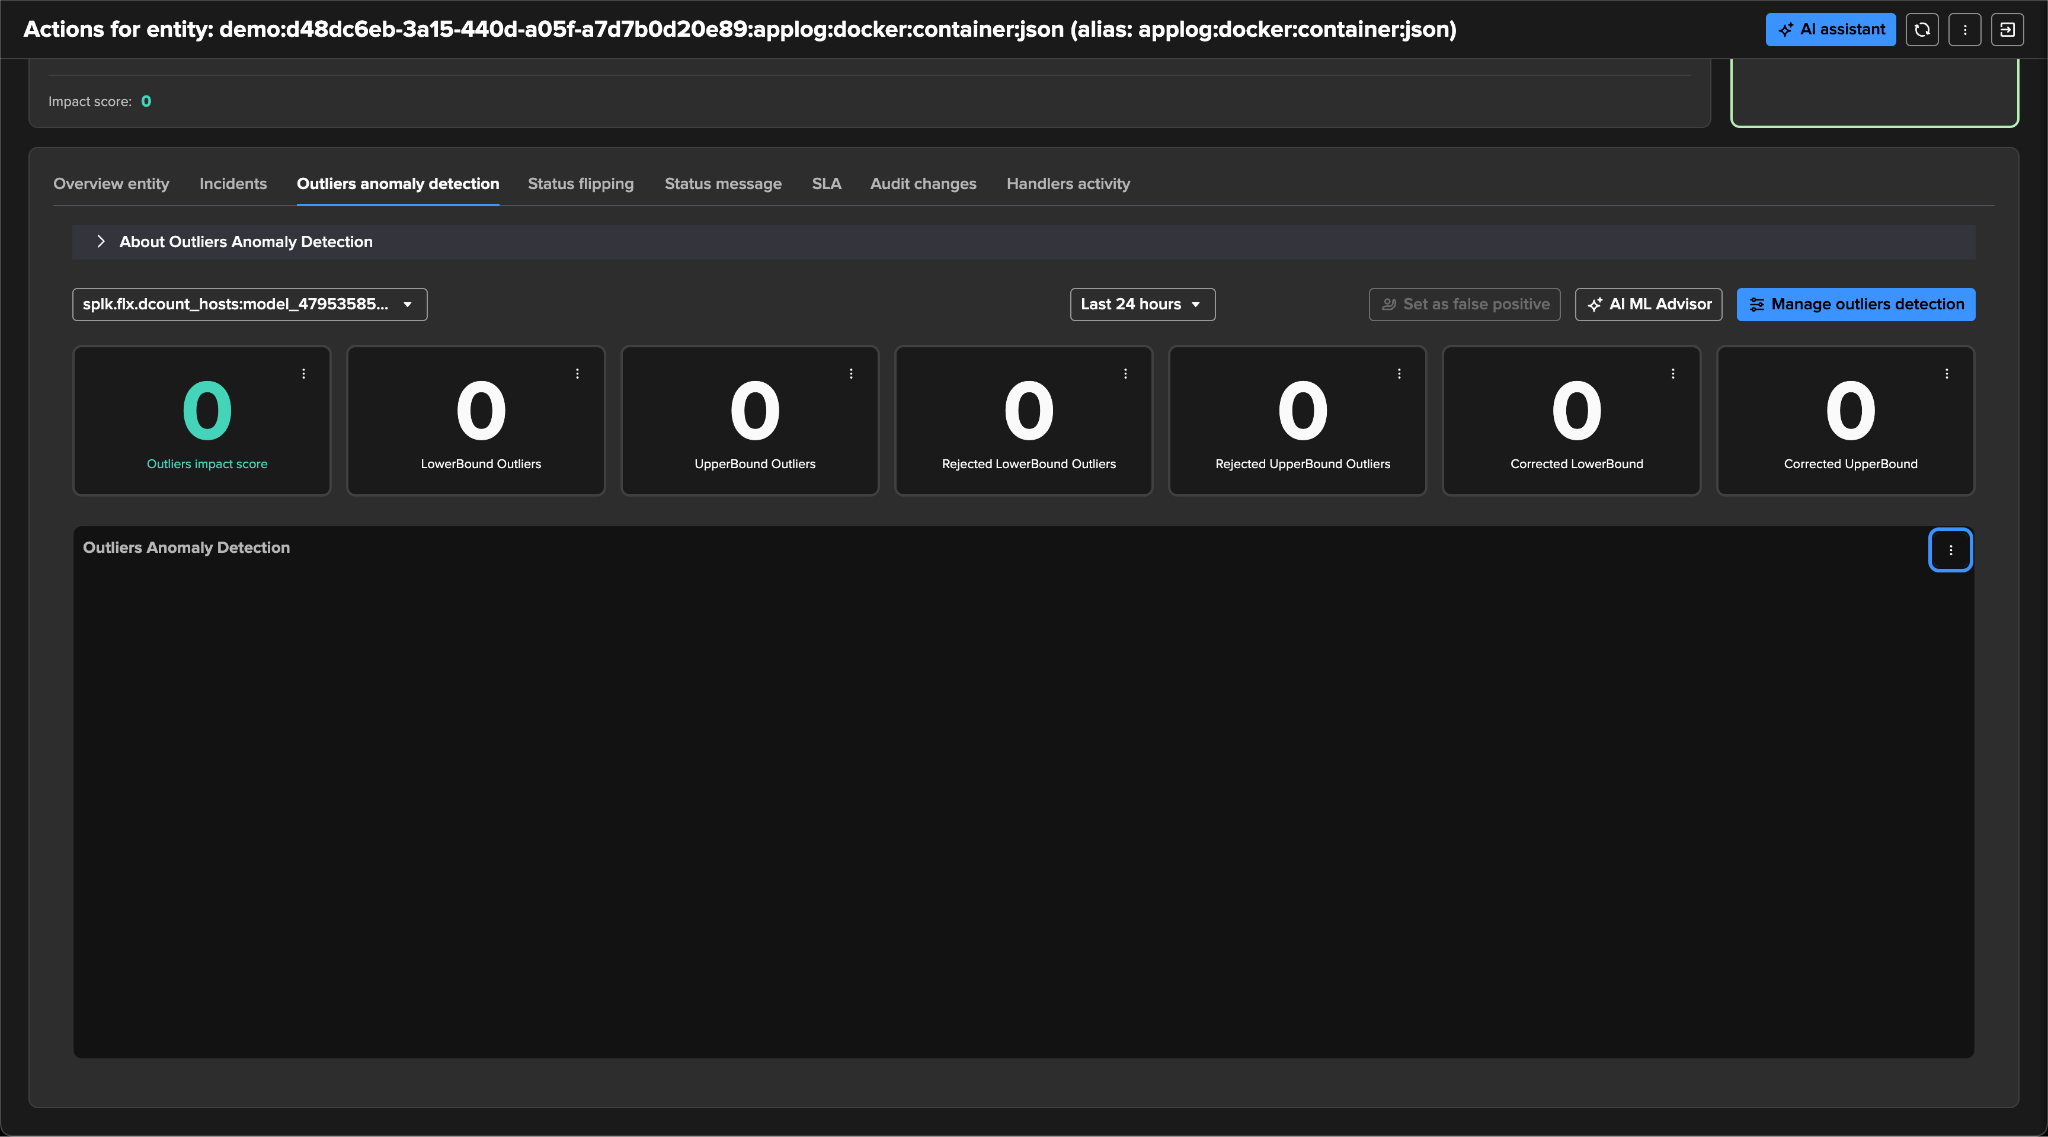
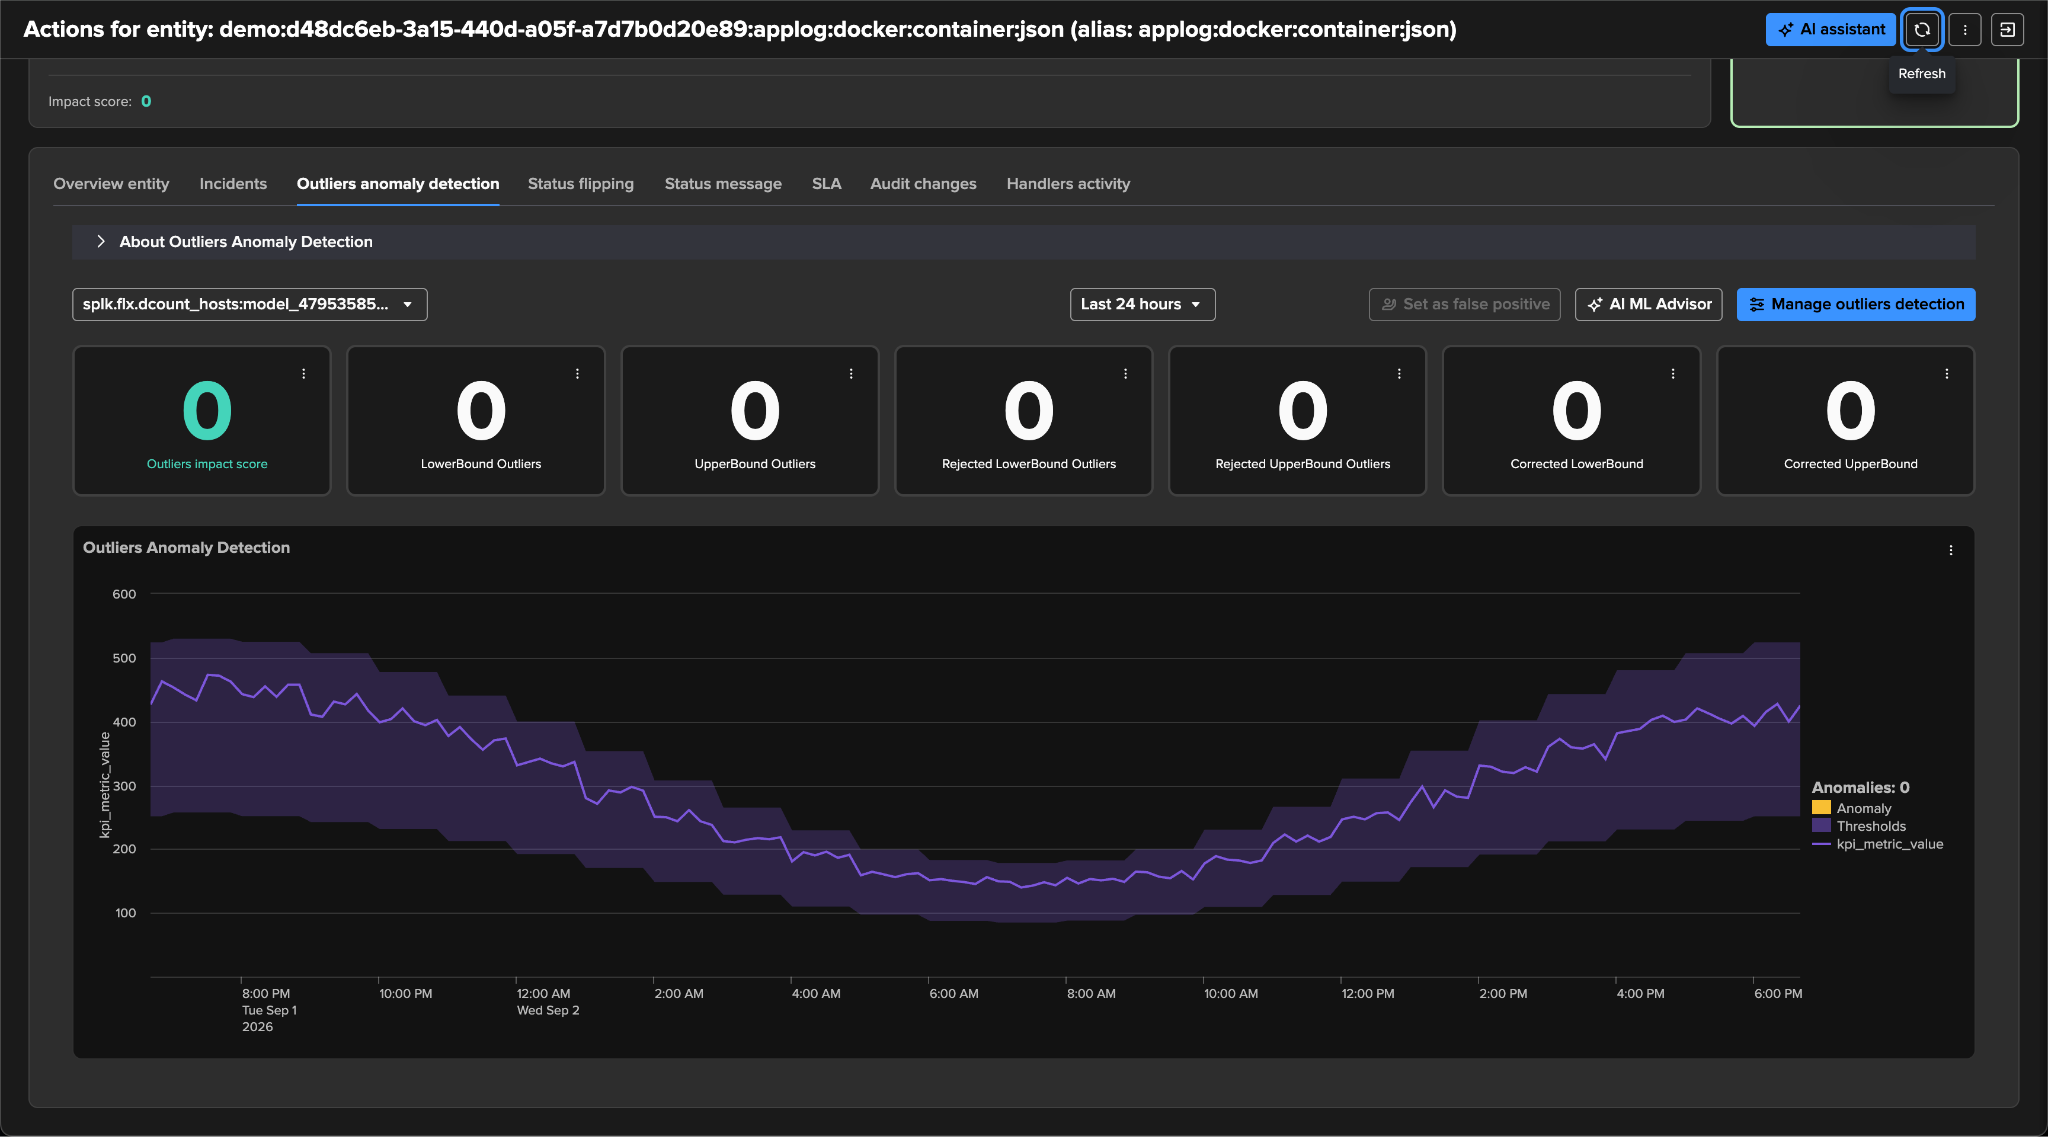
Until retraining, the witness entity’s Outliers tab shows the model in the selector, the counters at zero and an empty chart. This is expected at this point, not a fault.
b. Backlog draining. The following search drains to 0 rows as training progresses:
| inputlookup trackme_<component>_outliers_entity_rules_tenant_<tenant_id>
| where is_disabled=0 AND last_exec=0
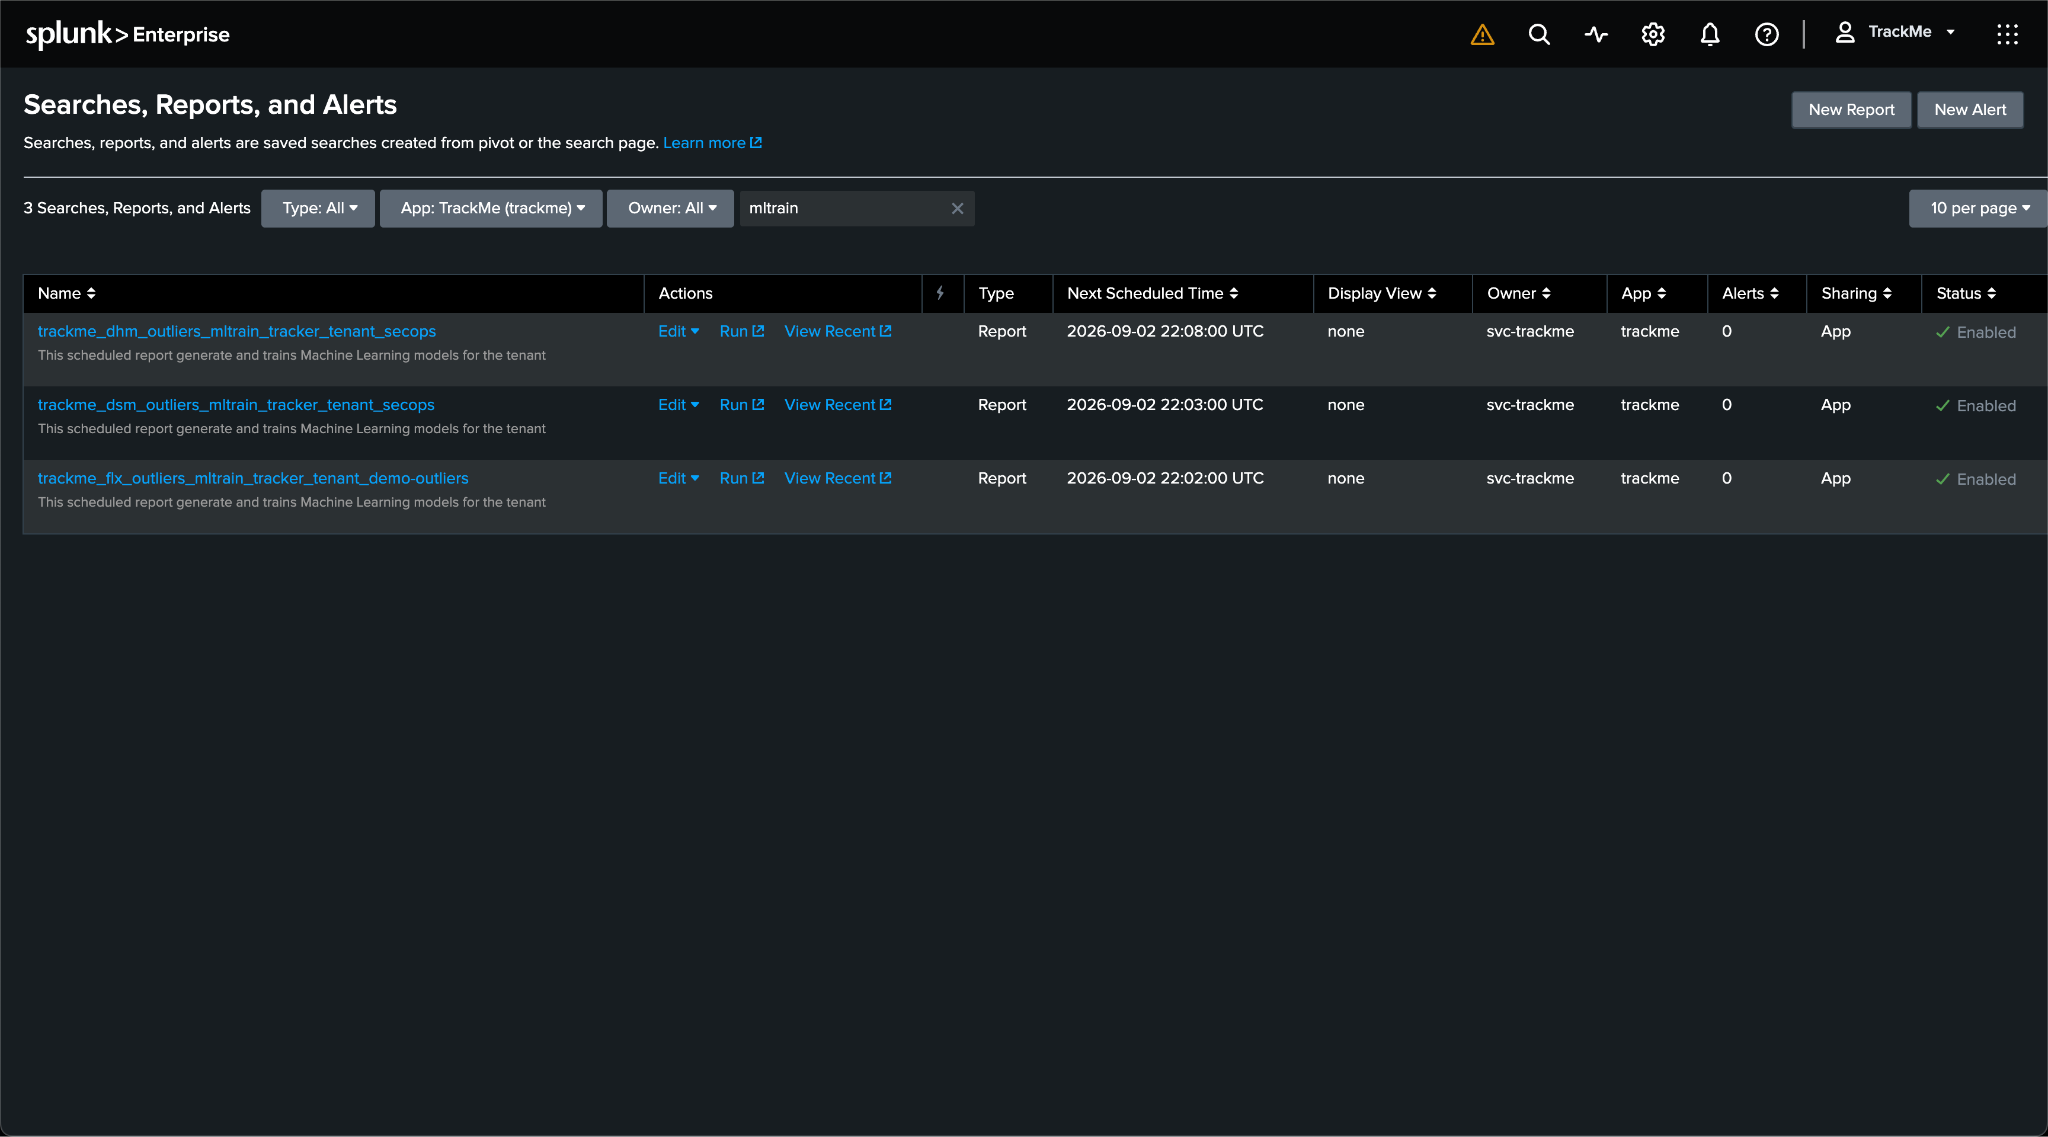
To accelerate, run the mltrain report from Splunk’s Searches, Reports, and Alerts page (application
TrackMe, filter mltrain) with the Run action, once per tenant and component, repeated until the backlog is
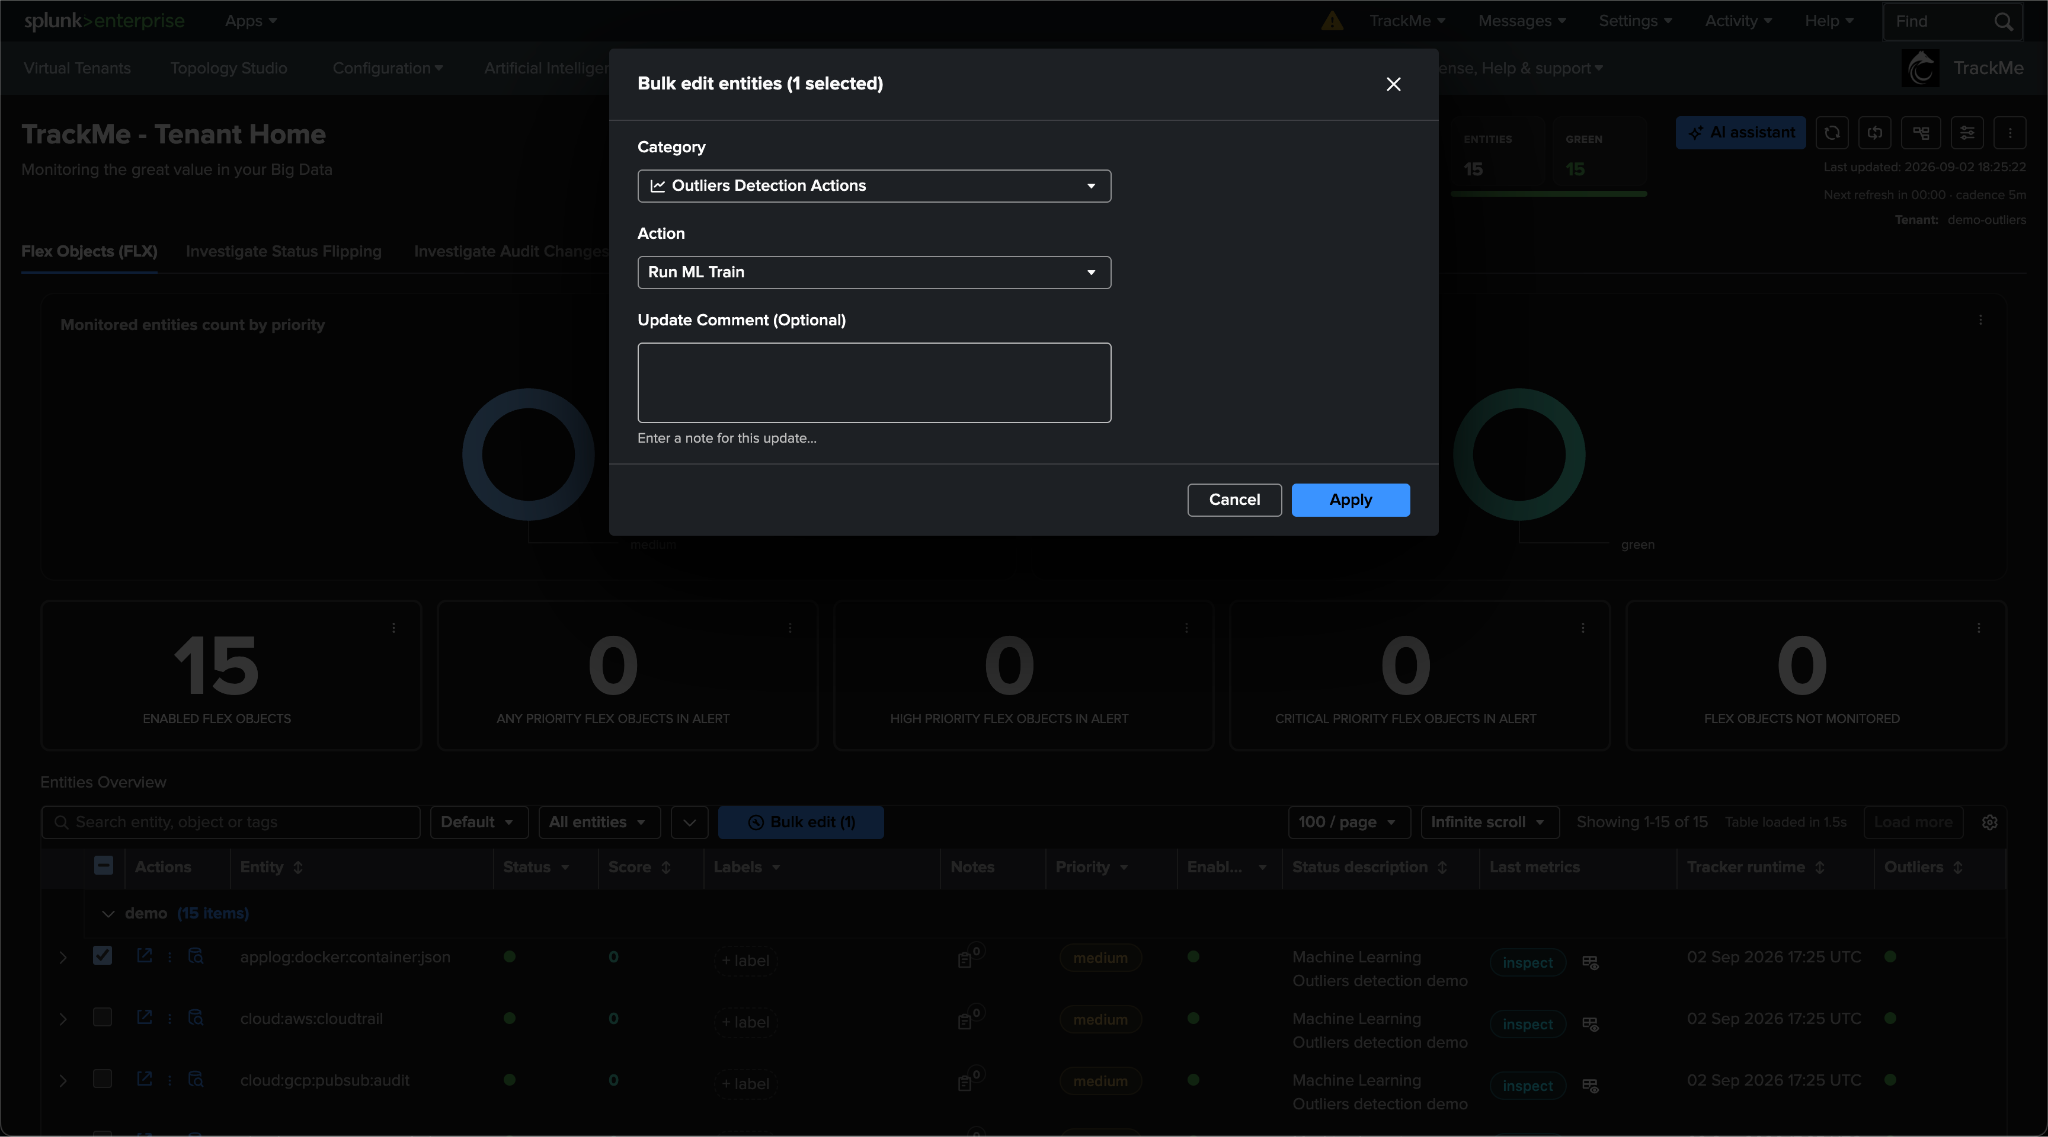
empty; or select entities in Tenant Home and use Bulk edit → Outliers Detection Actions → Run ML Train.
Opening an entity whose native model is missing also triggers an automatic first training (expect a slow first
render rather than an error).
c. Witness entity renders again. Reopen the step 1.3 witness: once trained, its Outliers tab shows the chart again on the native engine. The band may differ slightly from the step 1.3 screenshot, the model having been refitted on the current rolling window. See Outlier detection for the model tuning reference.
3.4 Close the deployment record and hand over
Complete the validation record for the deployment (template in Validating after an upgrade), archive the step 1 screenshots and exports next to it, and inform the operators that the upgrade is complete and that the alerting test has been cleared. Brief them on the behaviour changes of the new release (see Validating after an upgrade).
Step 3 checkpoint
Virtual Tenants, every tenant / component and the Configuration Guardian page load with no unexplained item (3.1)
Forced alert turned the test entity red; notable created; downstream incident confirmed; test cleared as false positive (3.2)
Where Outliers are used: no legacy-engine model left; backlog drained; witness entity renders again (3.3)
Validation record completed and archived; operators informed (3.4)
Step 4 — Only if a rollback is decided
Danger
A rollback is a restore, not an un-install.
Schema migrations are forward-only: reinstalling the previous package reverts the code and none of the migrated data, and the update-status screen would even report updated. The reliable rollback is to restore the step 1.2 backups on the reinstalled package. When the driver is alerting behaviour (impact-score weights, outlier score, policy cadence, threshold locks), tune first: those are configurable on the current release. Changes that are not configurable (the native ML engine, the schema shape, the rebuilt interface) are the only ones a rollback reverts; if the decision stands, follow Rollback.
The runbook in four lines
Upgrade path: in place, one release for the whole estate.
Progress view: click the version number.
Proof of health: force one alert and clear it.
Rollback model: restore the backups.