Backing up and Restoring TrackMe
Hint
TrackMe React native new UI in TrackMe 2.1.32, exporting, importing and transparent Search Head Cluster (SHC) support
TrackMe 2.1.32 introduces a brand new React native UI built on top on the Splunk UI framework, as well as import, export and Search Head Cluster transparent support.
This notably marks a significant milestone in TrackMe with the first React native UI.
Since TrackMe 2.1.32, you can export and import TrackMe backups through the user interface.
This allows you to easily migrate or clone TrackMe deployments, or to backup and restore TrackMe Knowledge Objects and KVstore collections.
This feature is available in the TrackMe Backup and Restore dashboard, and is accessible via the menu API & Tooling.
In you are running in a Search Head Cluster (SHC), TrackMe will automatically retrieve the backup file from the member actually owning the backup file.
This feature is also available for restore operations, so you do not need to manually handle where the backup file is located.
Note
About TrackMe backup and restore functionalities:
TrackMe performs automated backups of Knowledge Objects and KVstore collections.
This means that you can easily restore TrackMe to its initial state, which includes all TrackMe logics (Virtual Tenants, trackers, alerts, etc) as well as the content of the KVstore collections, which are the core data pieces of TrackMe.
You can also do partial restore operations, such as restoring a certain KVstore collection, a certain Knowledge Object, an entire Virtual Tenant, etc.
Note
Limitations:
Disabled Virtual Tenants are not backed up, and therefore not restorables, when performing a restore operation, TrackMe will automatically force purge a Virtual Tenant if it was disabled when the backup was performed.
Alert actions restoration: TrackMe can restore any alert that was created with TrackMe, however only TrackMe built-in alerts actions and Splunk Email alert actions are restored. (external alert actions will need to be re-configured manually once restored)
Accessing the TrackMe Backup and Restore user interface
Menu API & Tooling / Backup & Restore:
Introduction to backup and restore
TrackMe is a complex Splunk application, backing up and restoring means that the following need to be taken into account:
In TrackMe, Splunk Knowledge Objects are created on the fly, this includes KVstore definitions, transforms, macros, reports, and alerts.
TrackMe heavily relies on KVstores, the application stores various states, as well as its own data and configuration in KVstores.
When backing up and restoring TrackMe, both aspects have to be managed together, you cannot restore TrackMe configuration files without restoring the KVstore data and vice versa.
TrackMe provides builtin advanced capabilities to backup and restore its Knowledge Objects and resilient data stores. (KVstores)
Backing up TrackMe
Automated backups in TrackMe
TrackMe automatically performs backups on the following circumstances:
Every days, the scheduled report
trackme_backup_schedulerexecutes during the night and performs a full backup of TrackMe.When TrackMe is upgraded to a new release, TrackMe performs a backup when the first Virtual Tenant is upgraded through a process called
schema upgrade.
TrackMe backups location:
TrackMe backups are stored in the backup directory at the root of the TrackMe application directory.
The backup directory is located at:
$SPLUNK_HOME/etc/apps/trackme/backup/The format of the files are compressed tarballs, with the following naming convention:
trackme-backup-YYYYMMDD-HHMMSS.tgz
Reviewing TrackMe backups
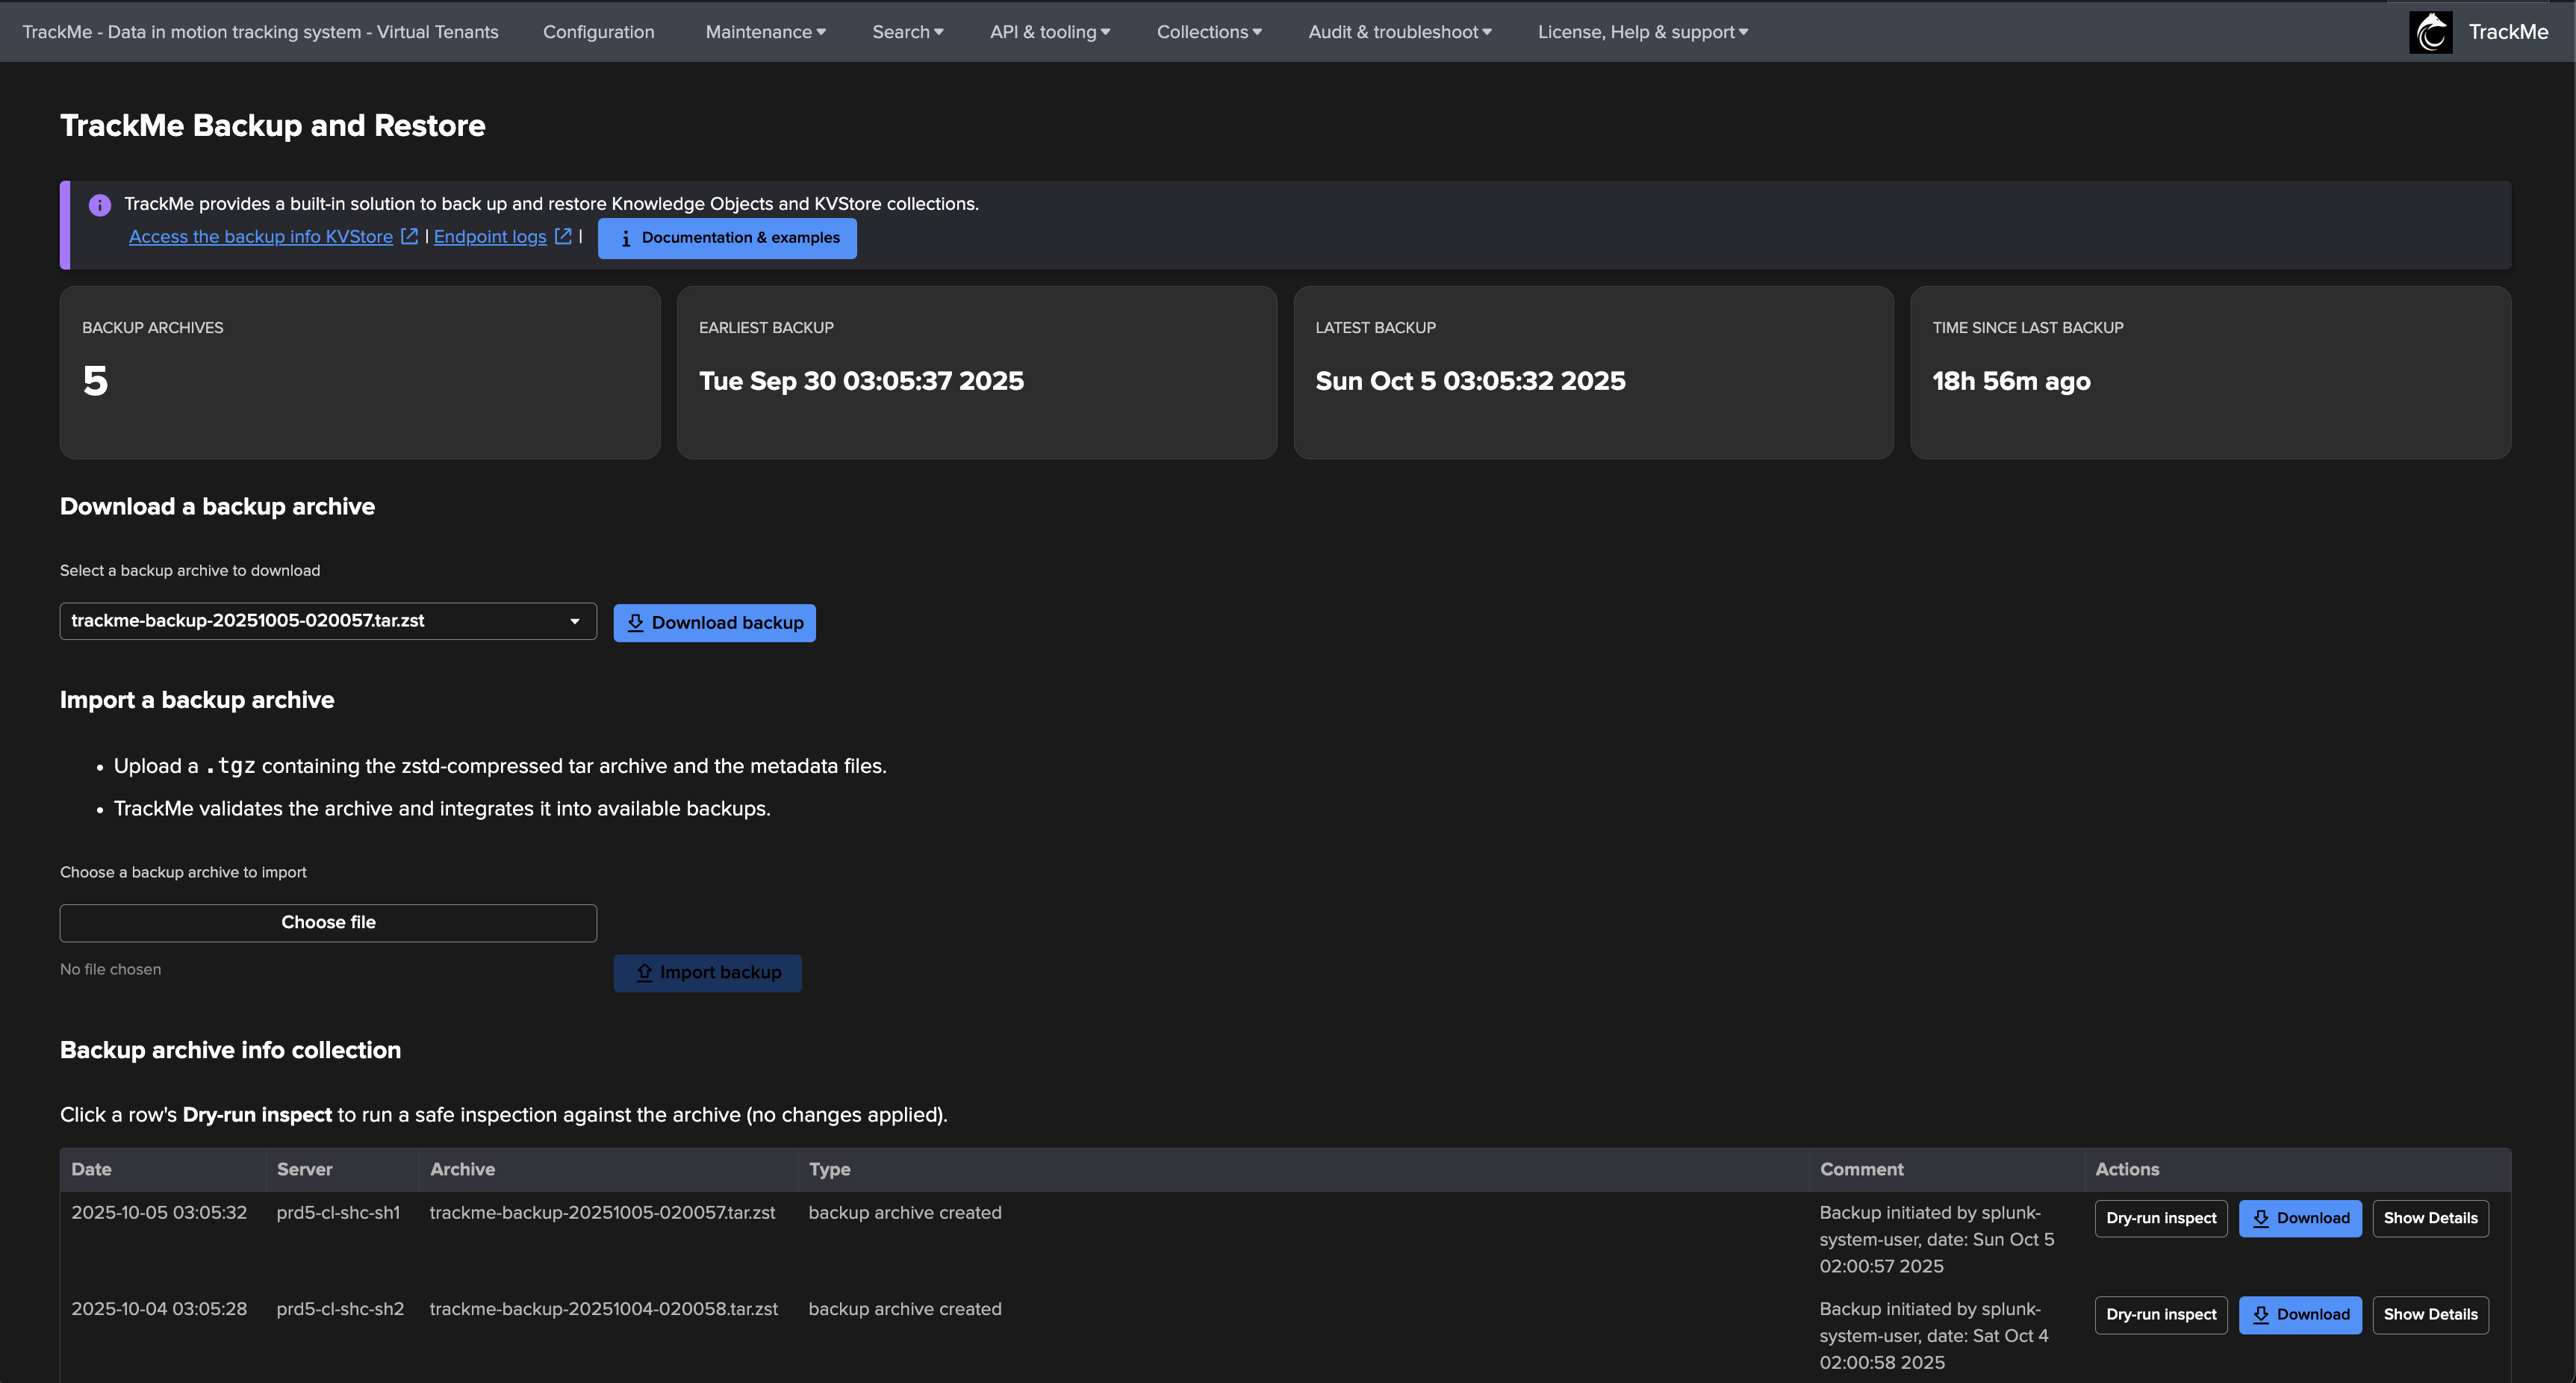
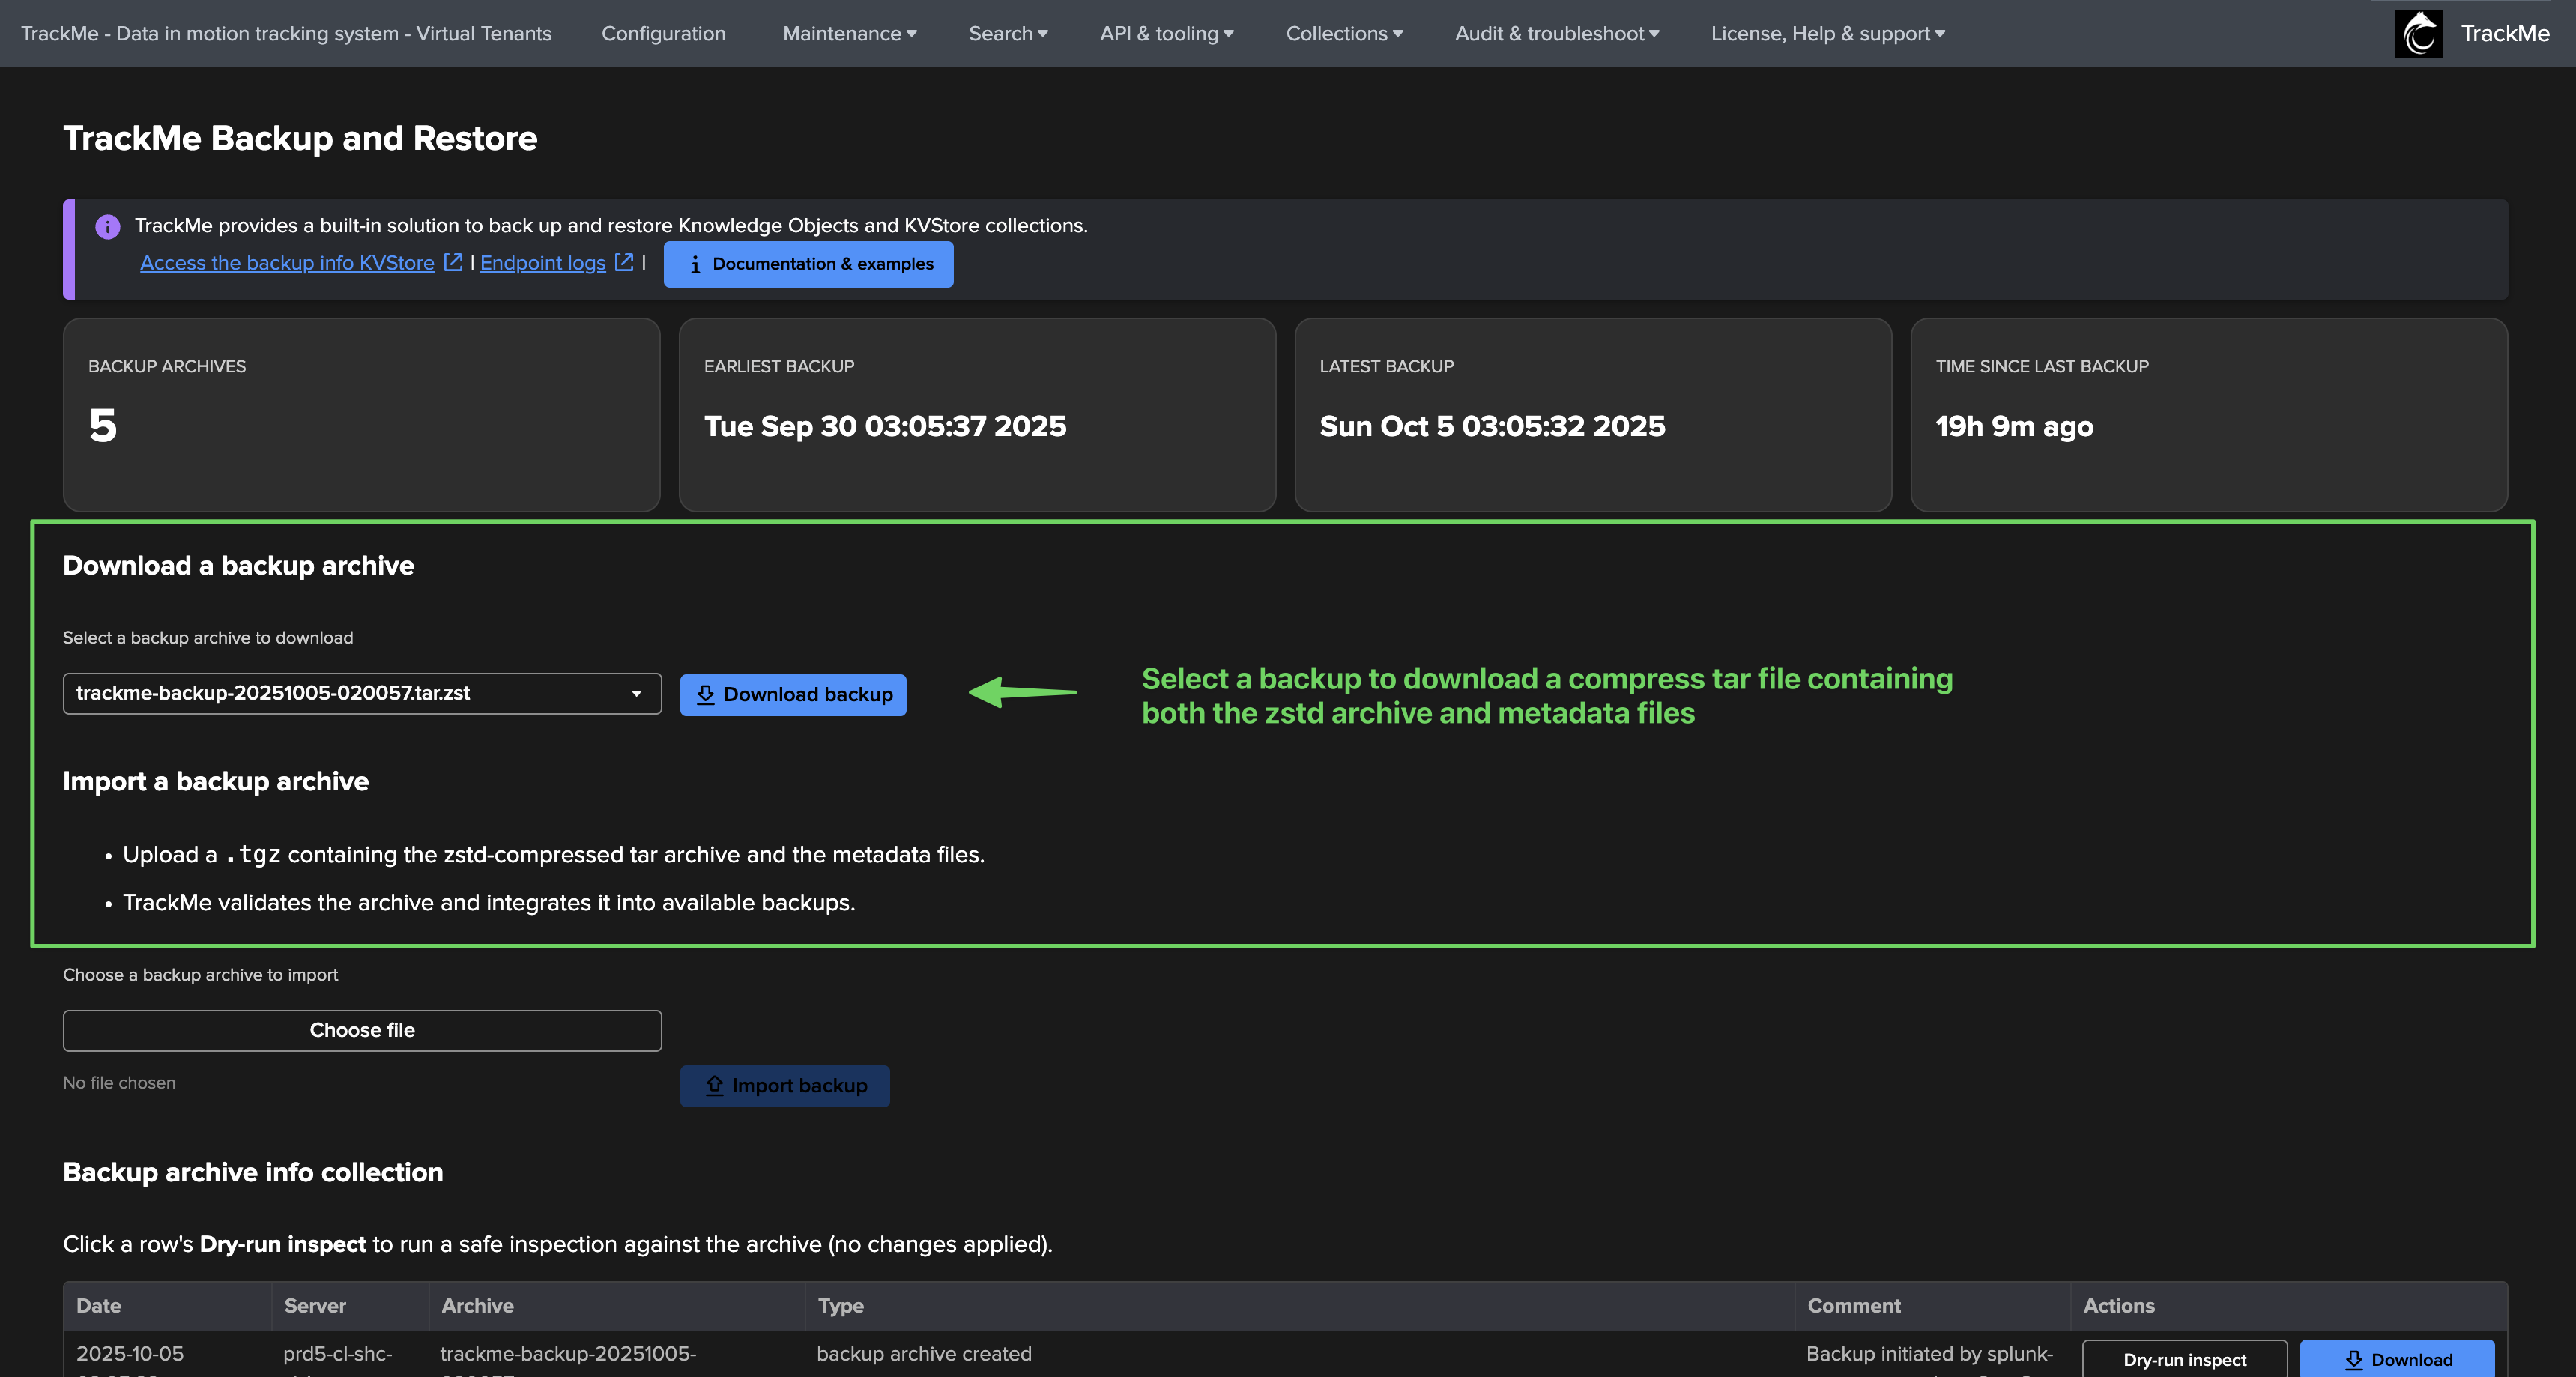
To review the available backups, you can use the builtin dashboard “TrackMe Backup and Restore” available in the menu API & Tooling:
The first part of the dashboard shows export and import capabilities:
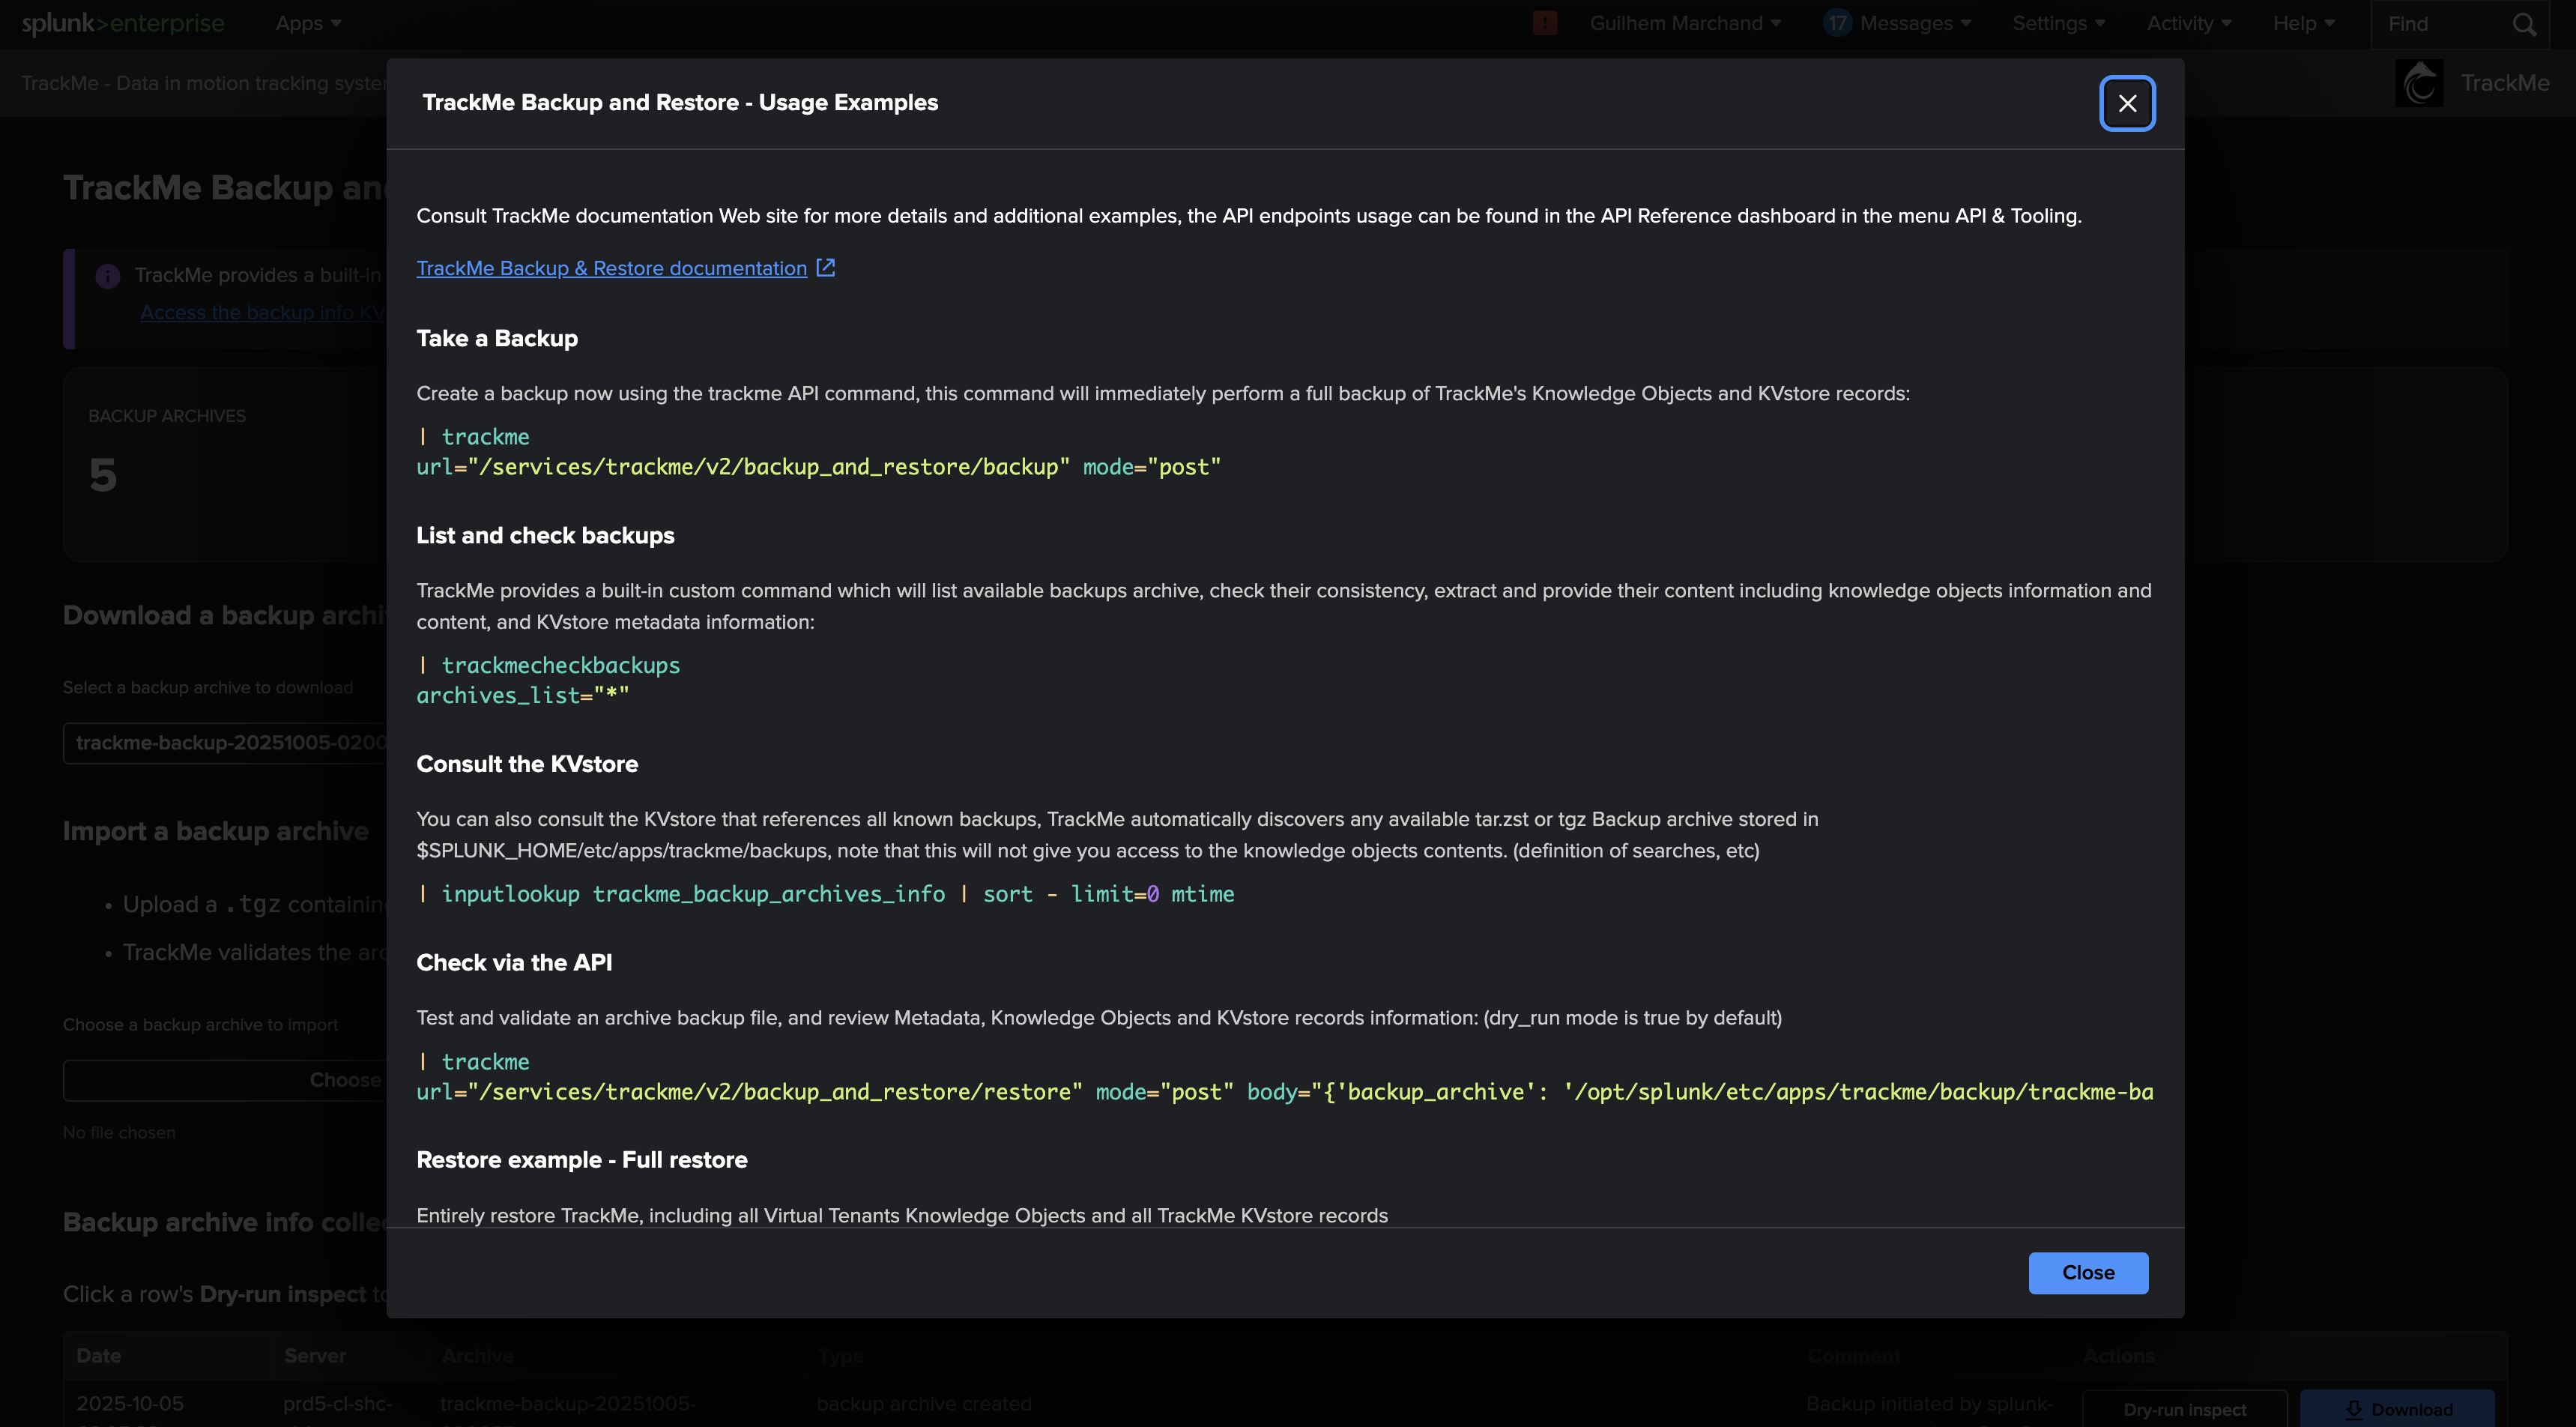
Click on the Documentation & Example button to access command examples:
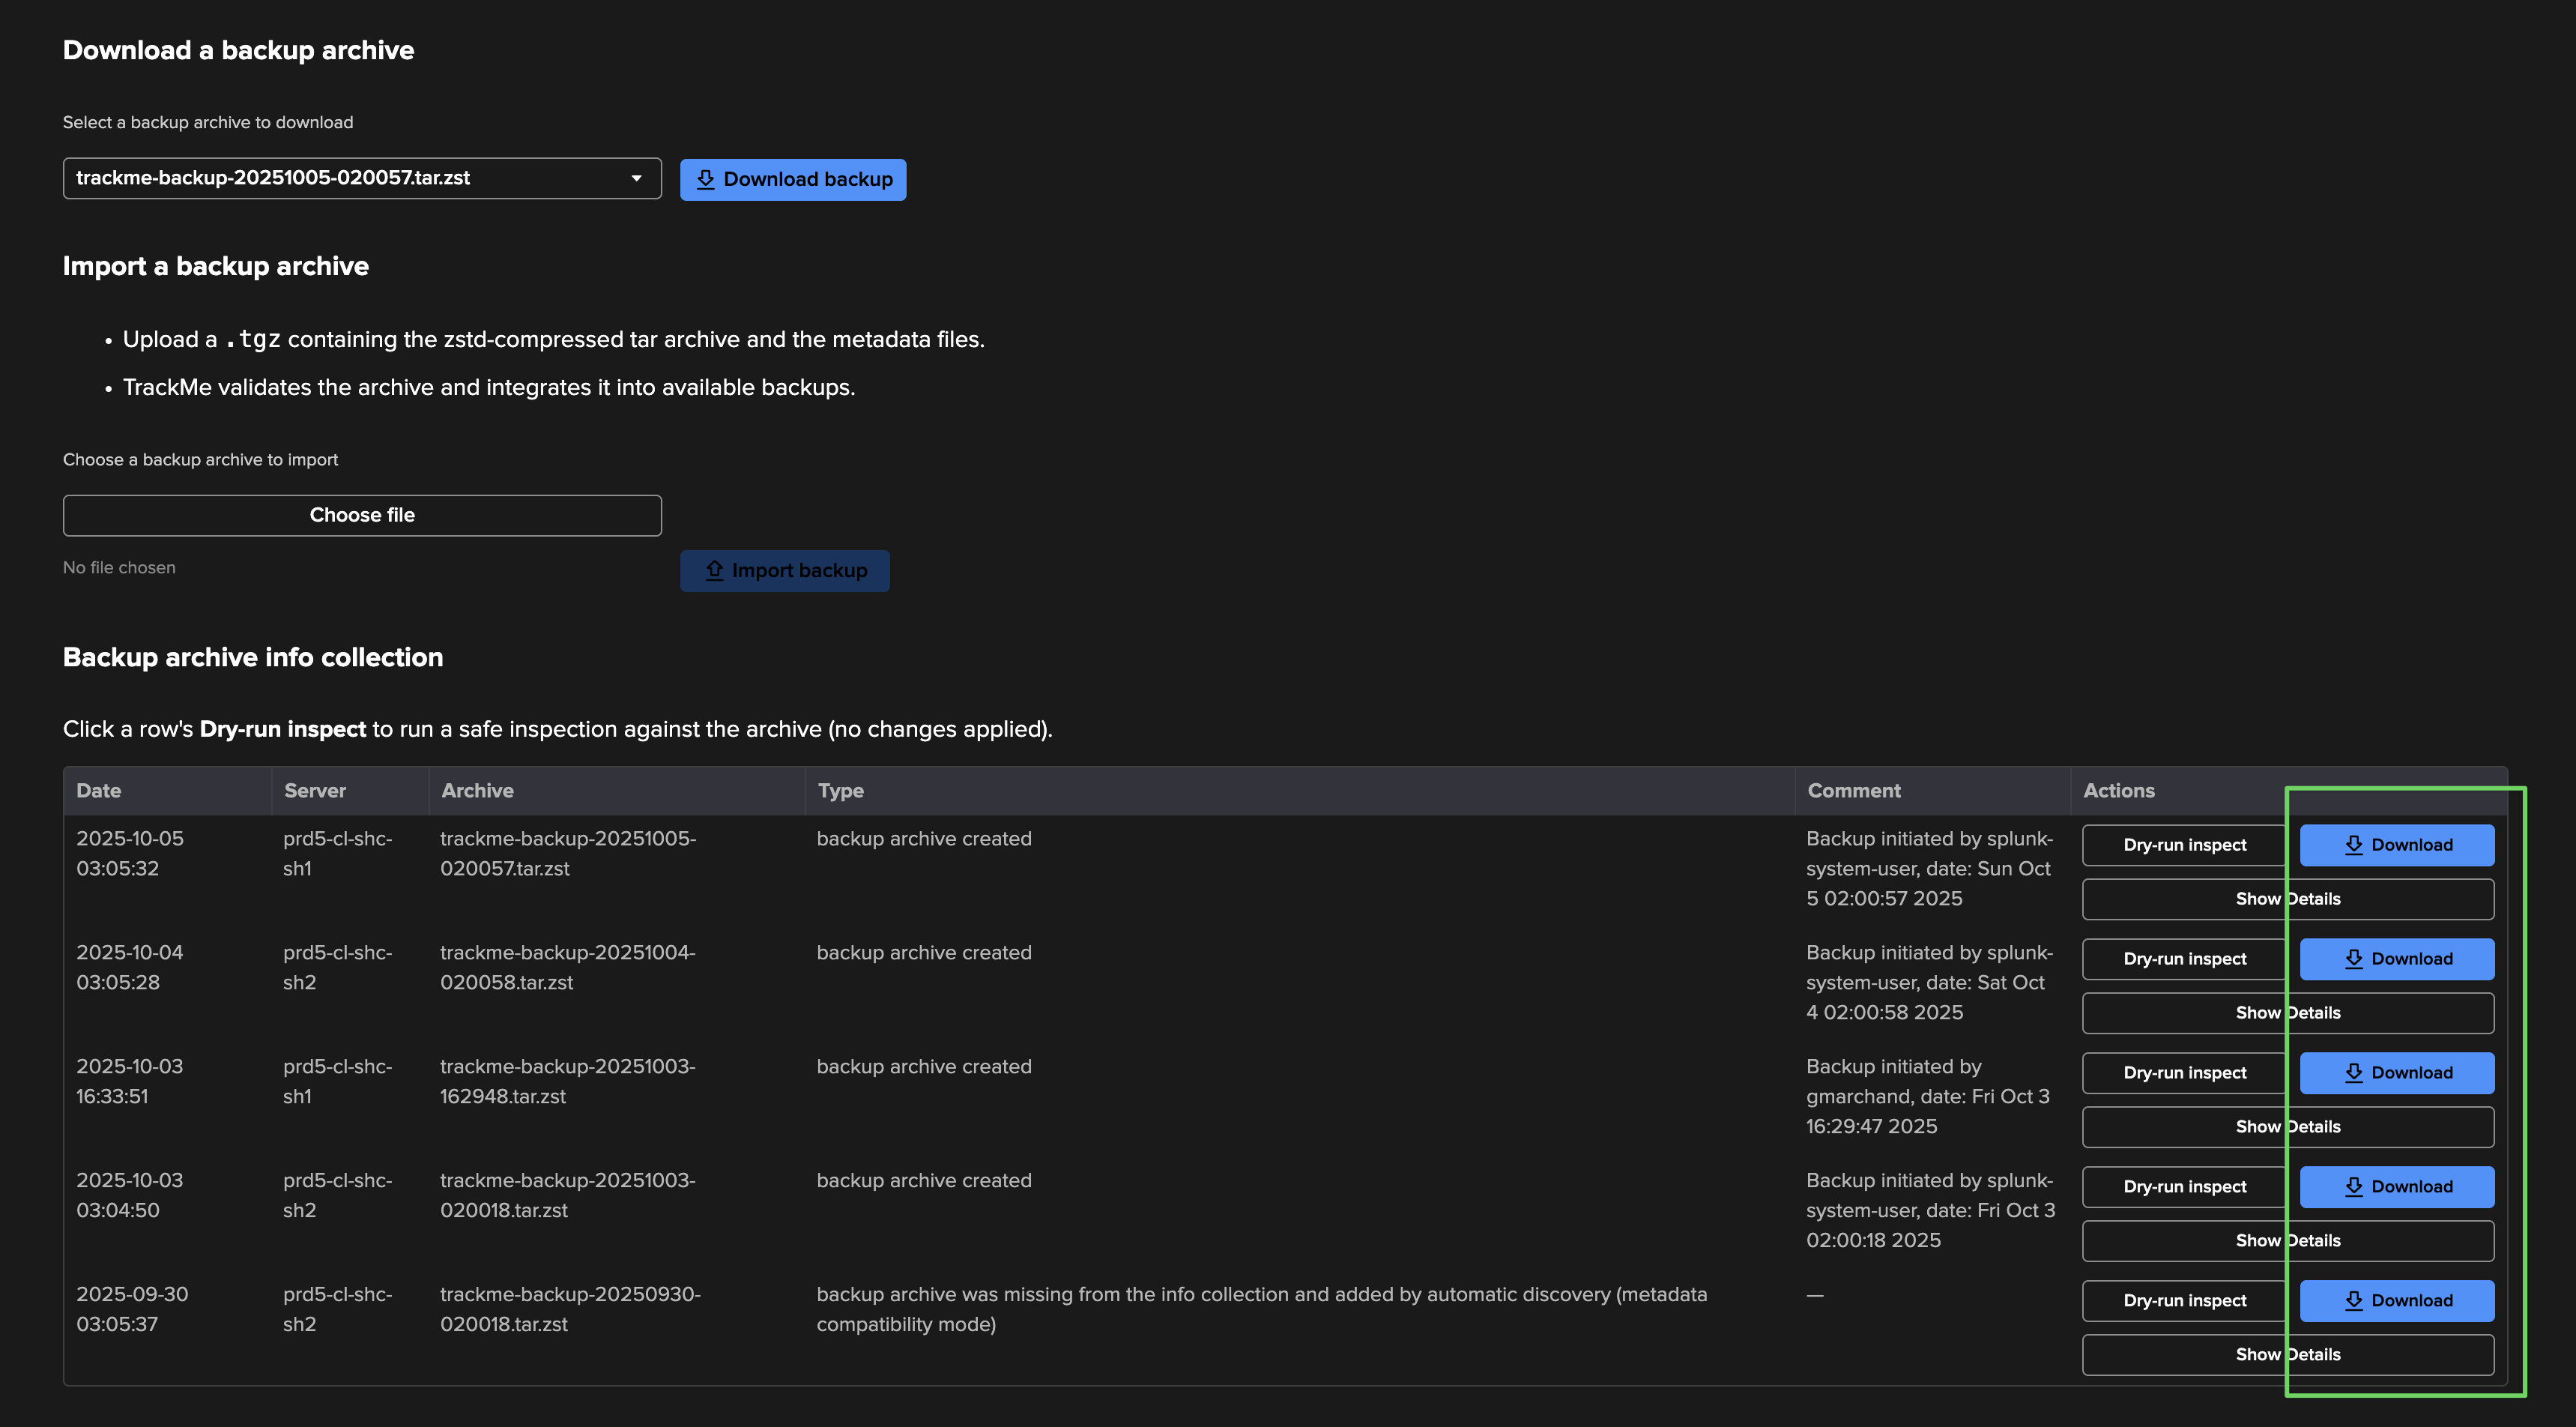
Scroll down in the user interface to see detailed information about the availablebackups, as well as direct actions for these backups:
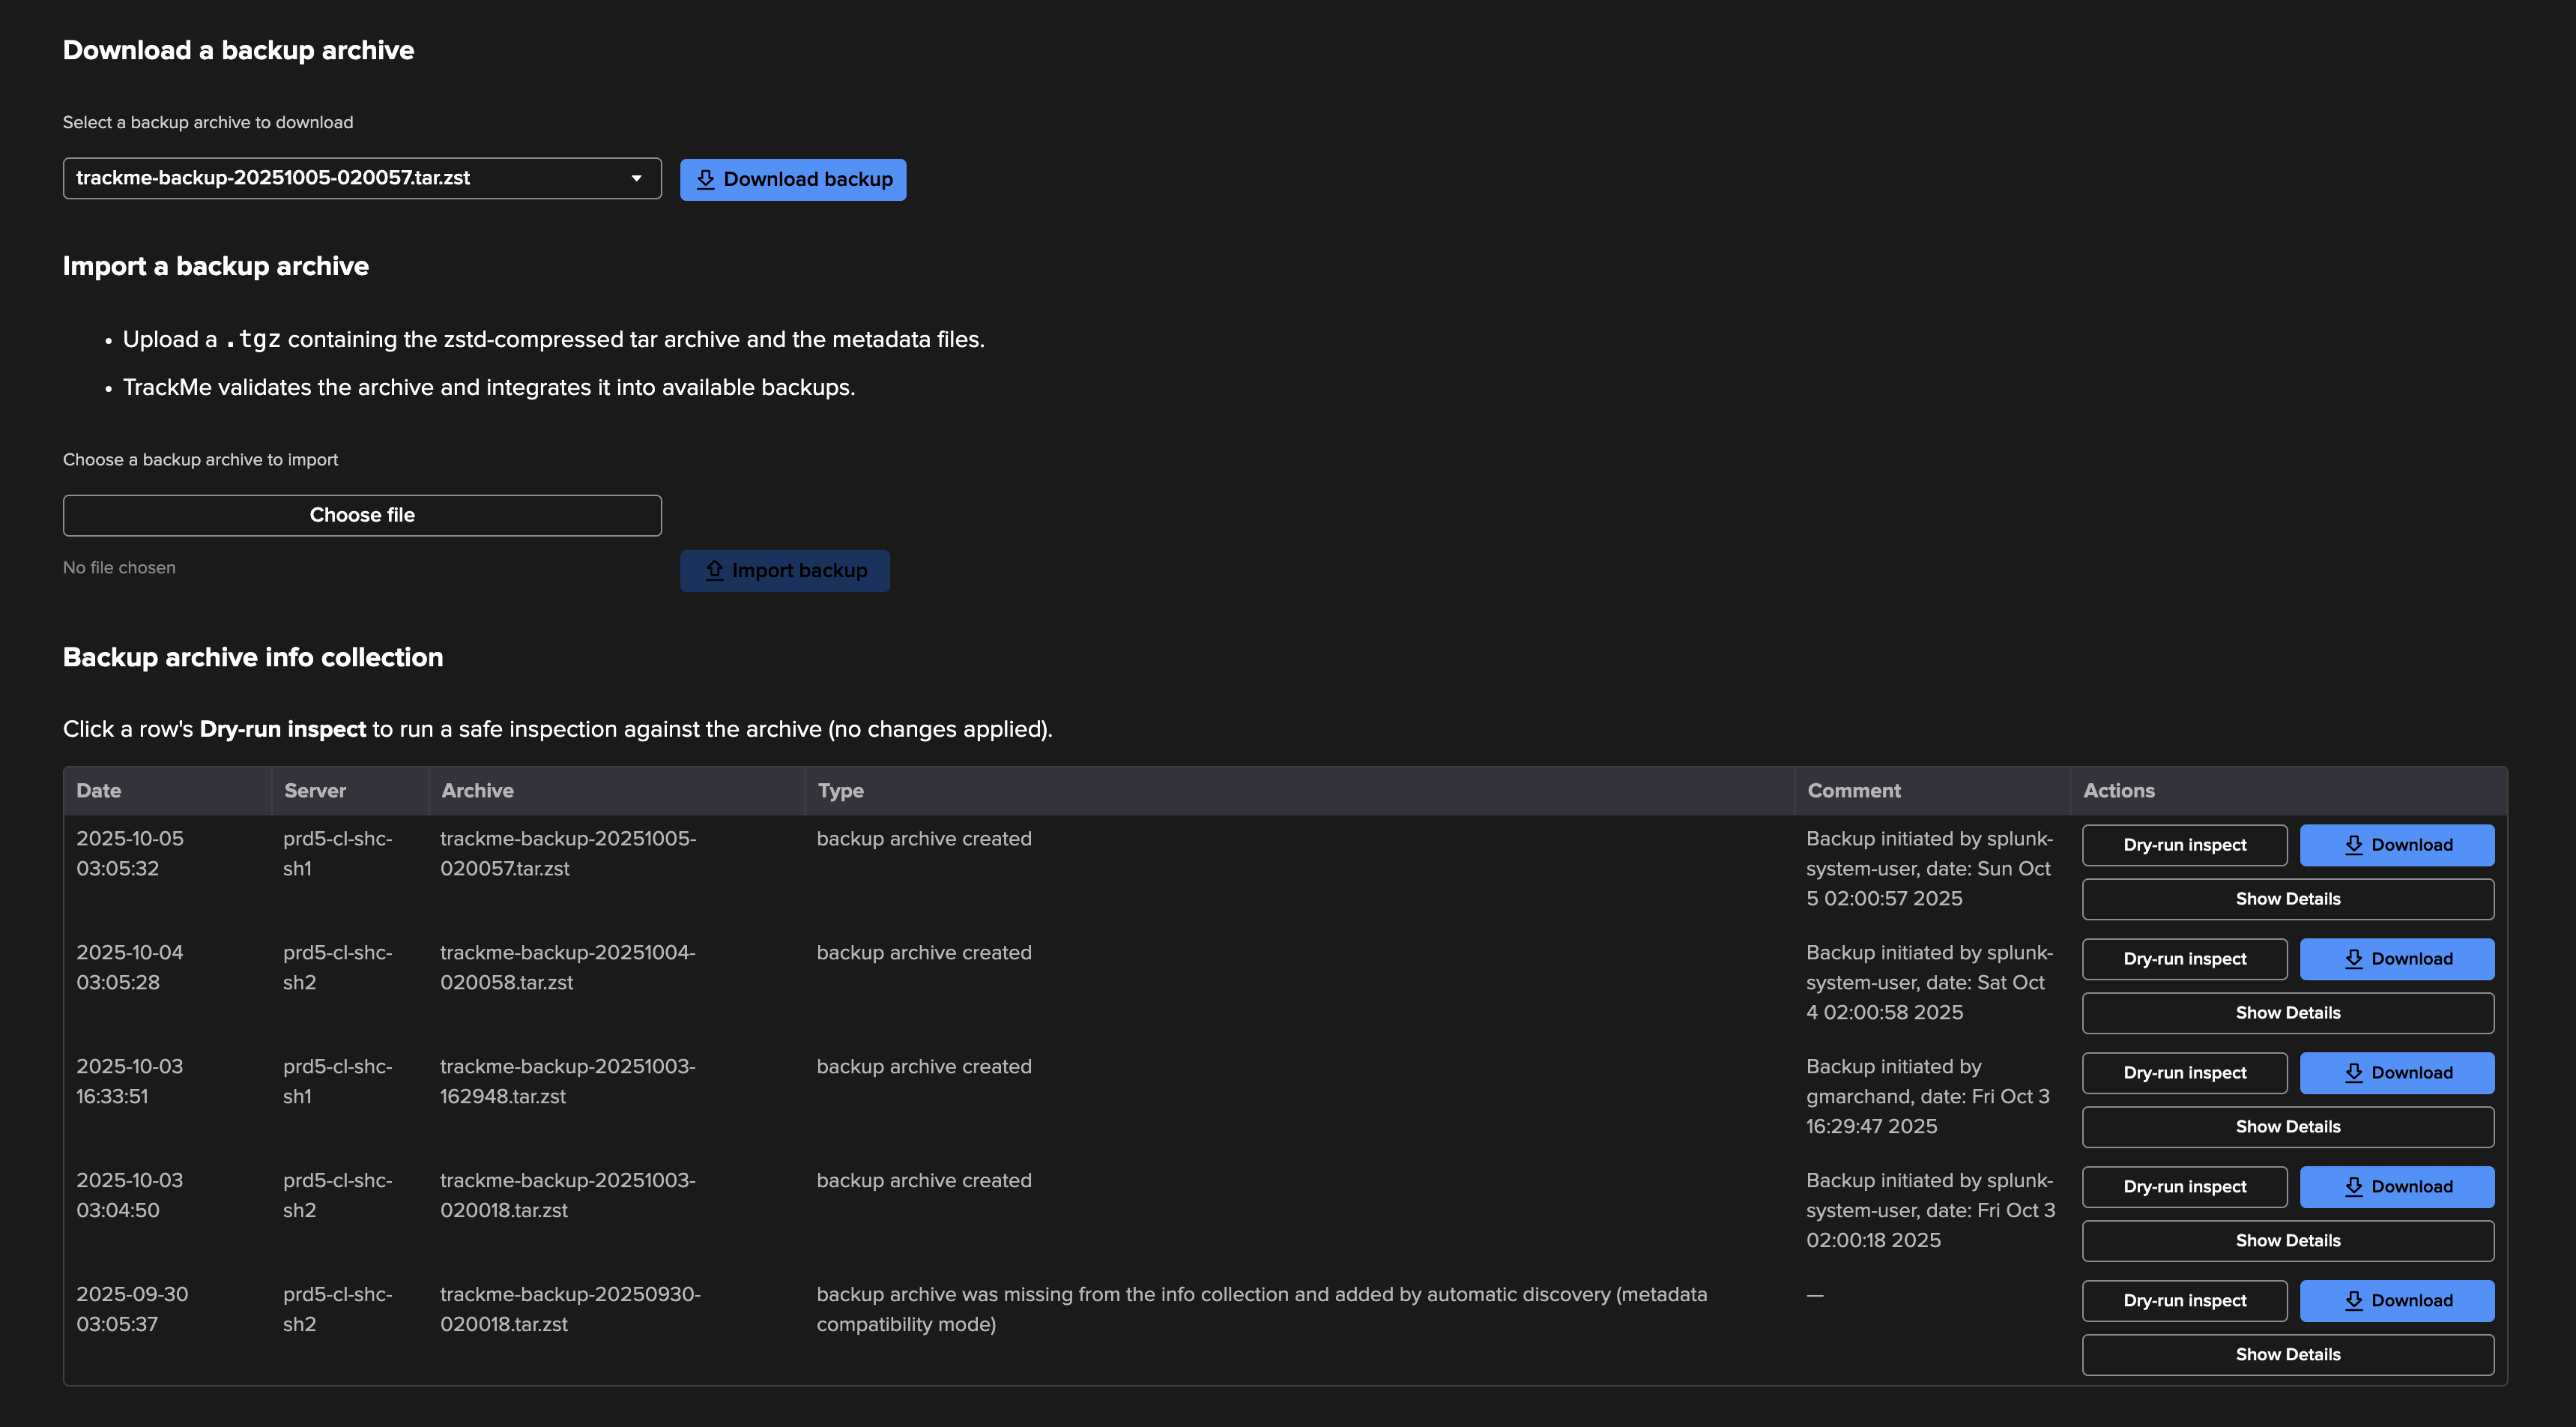
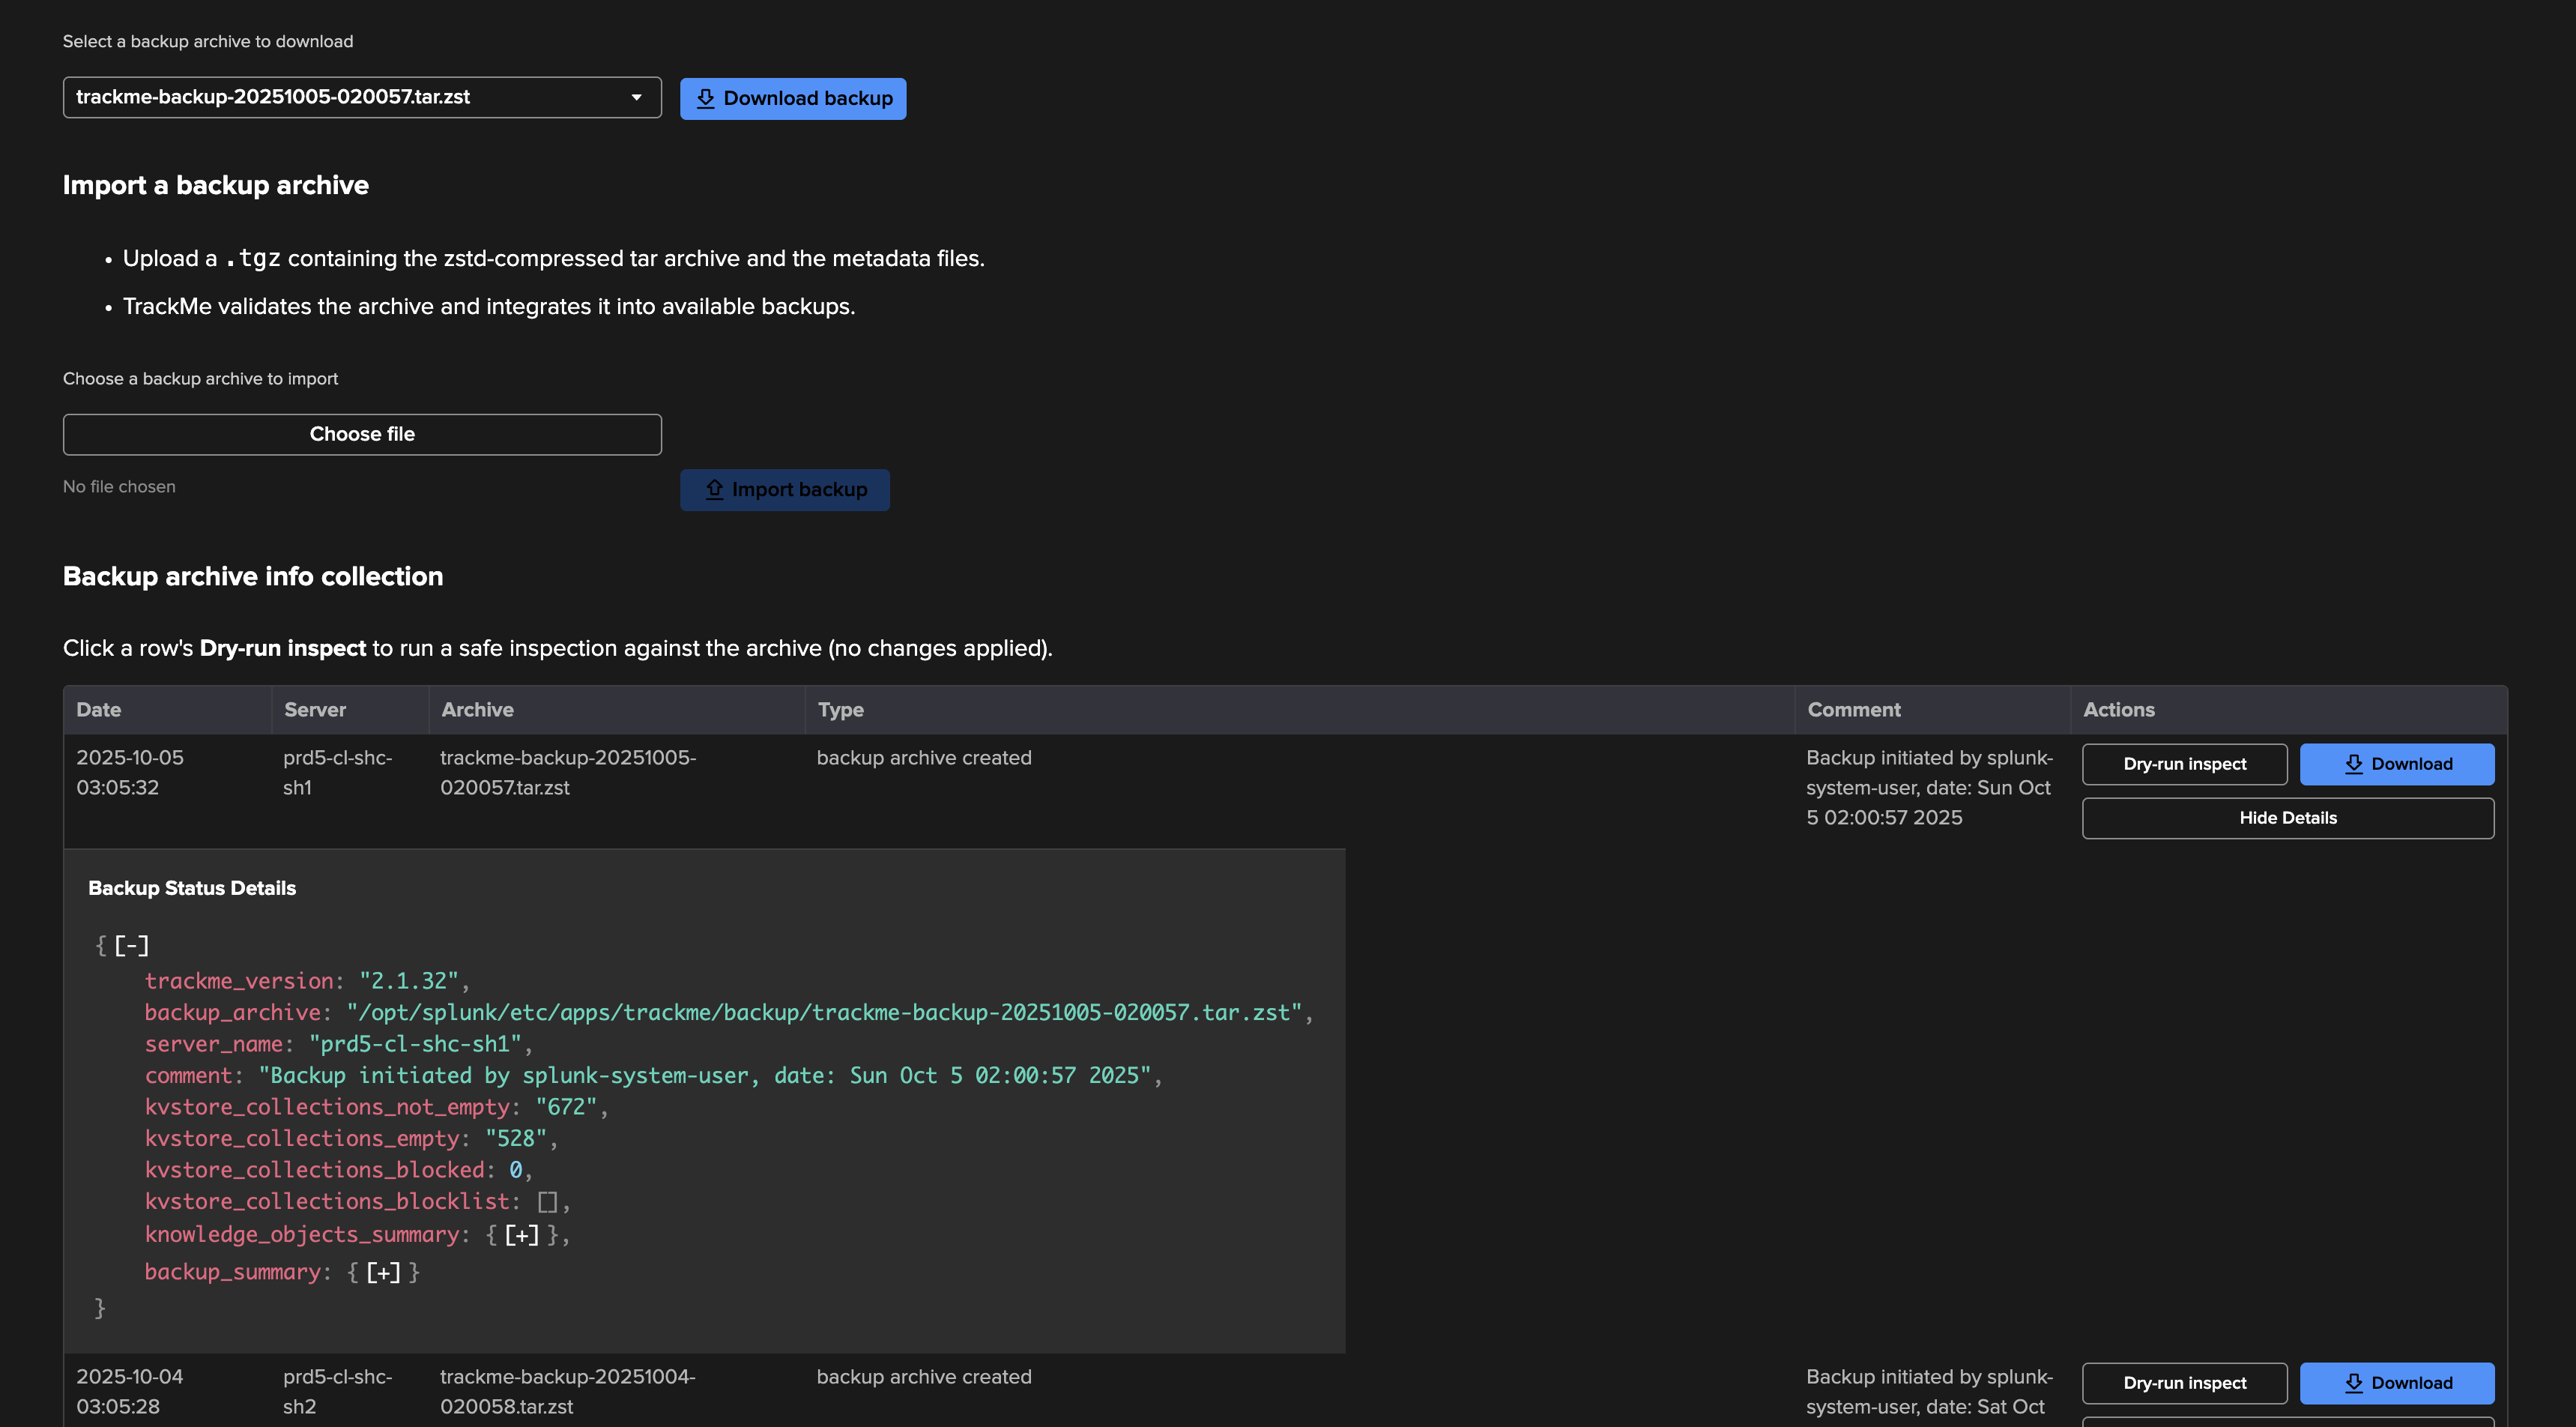
TrackMe logs the backup context in the comment metadata, if the backup is executed during the context of the release upgrade, the comment mentions this and the schema version upgrade information.
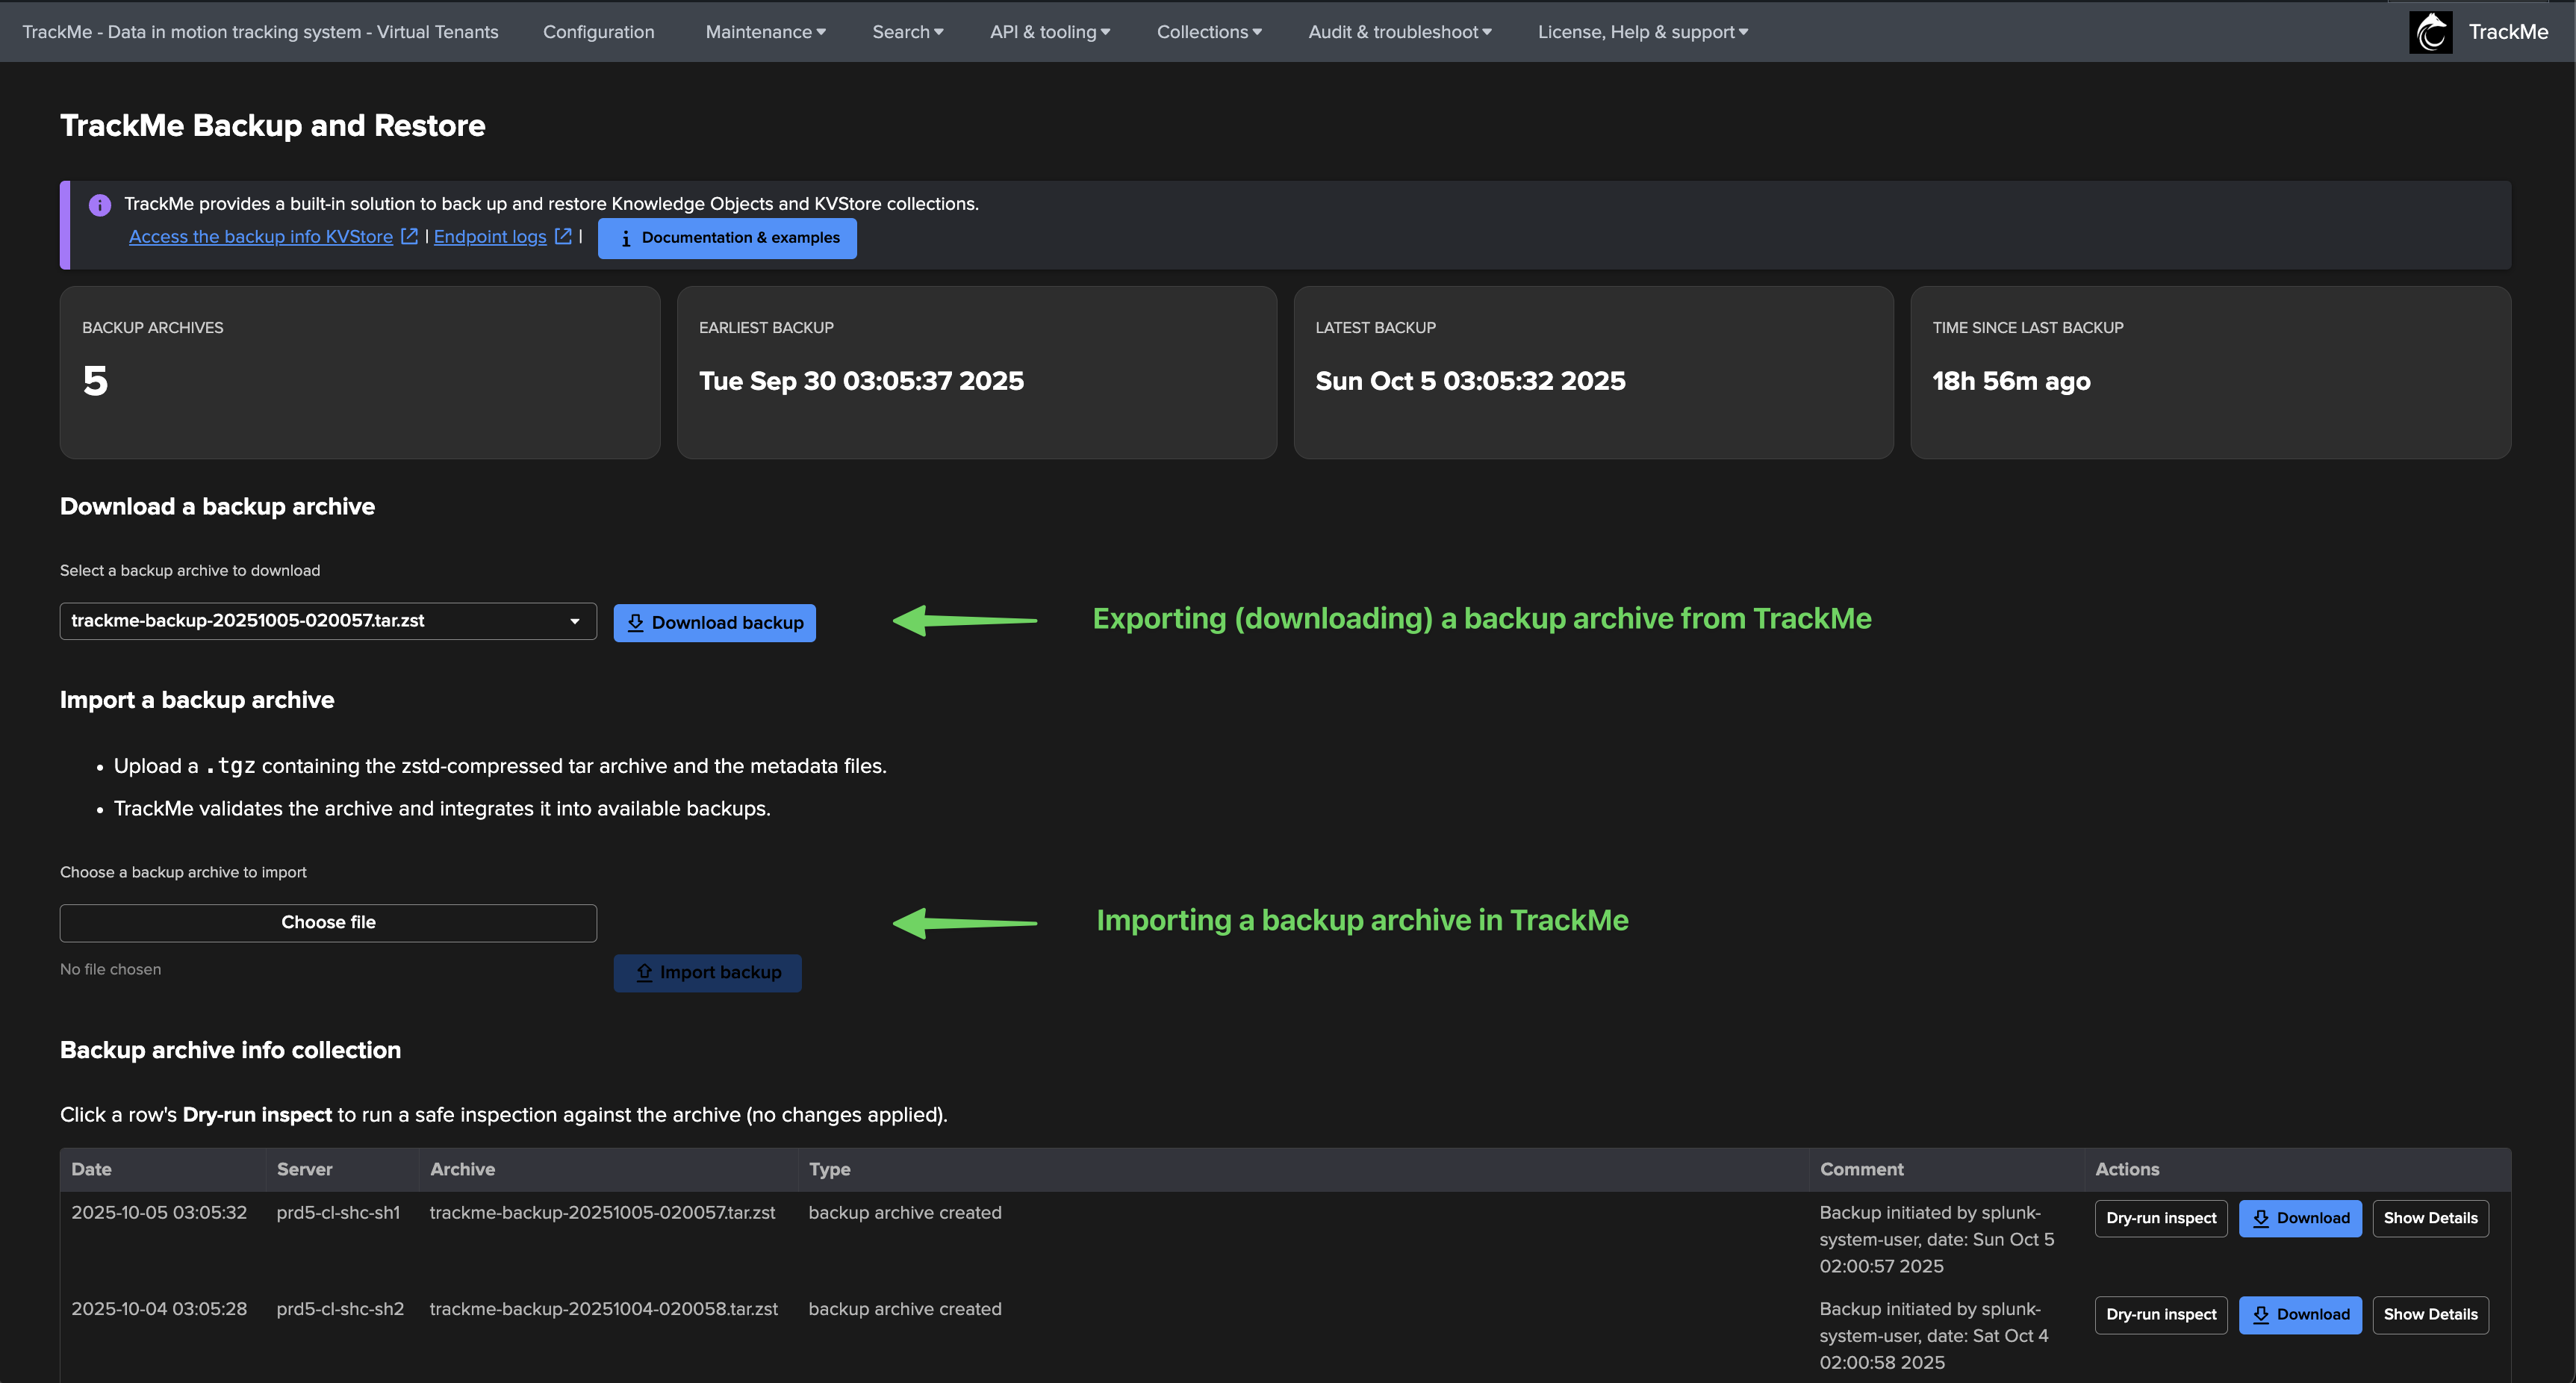
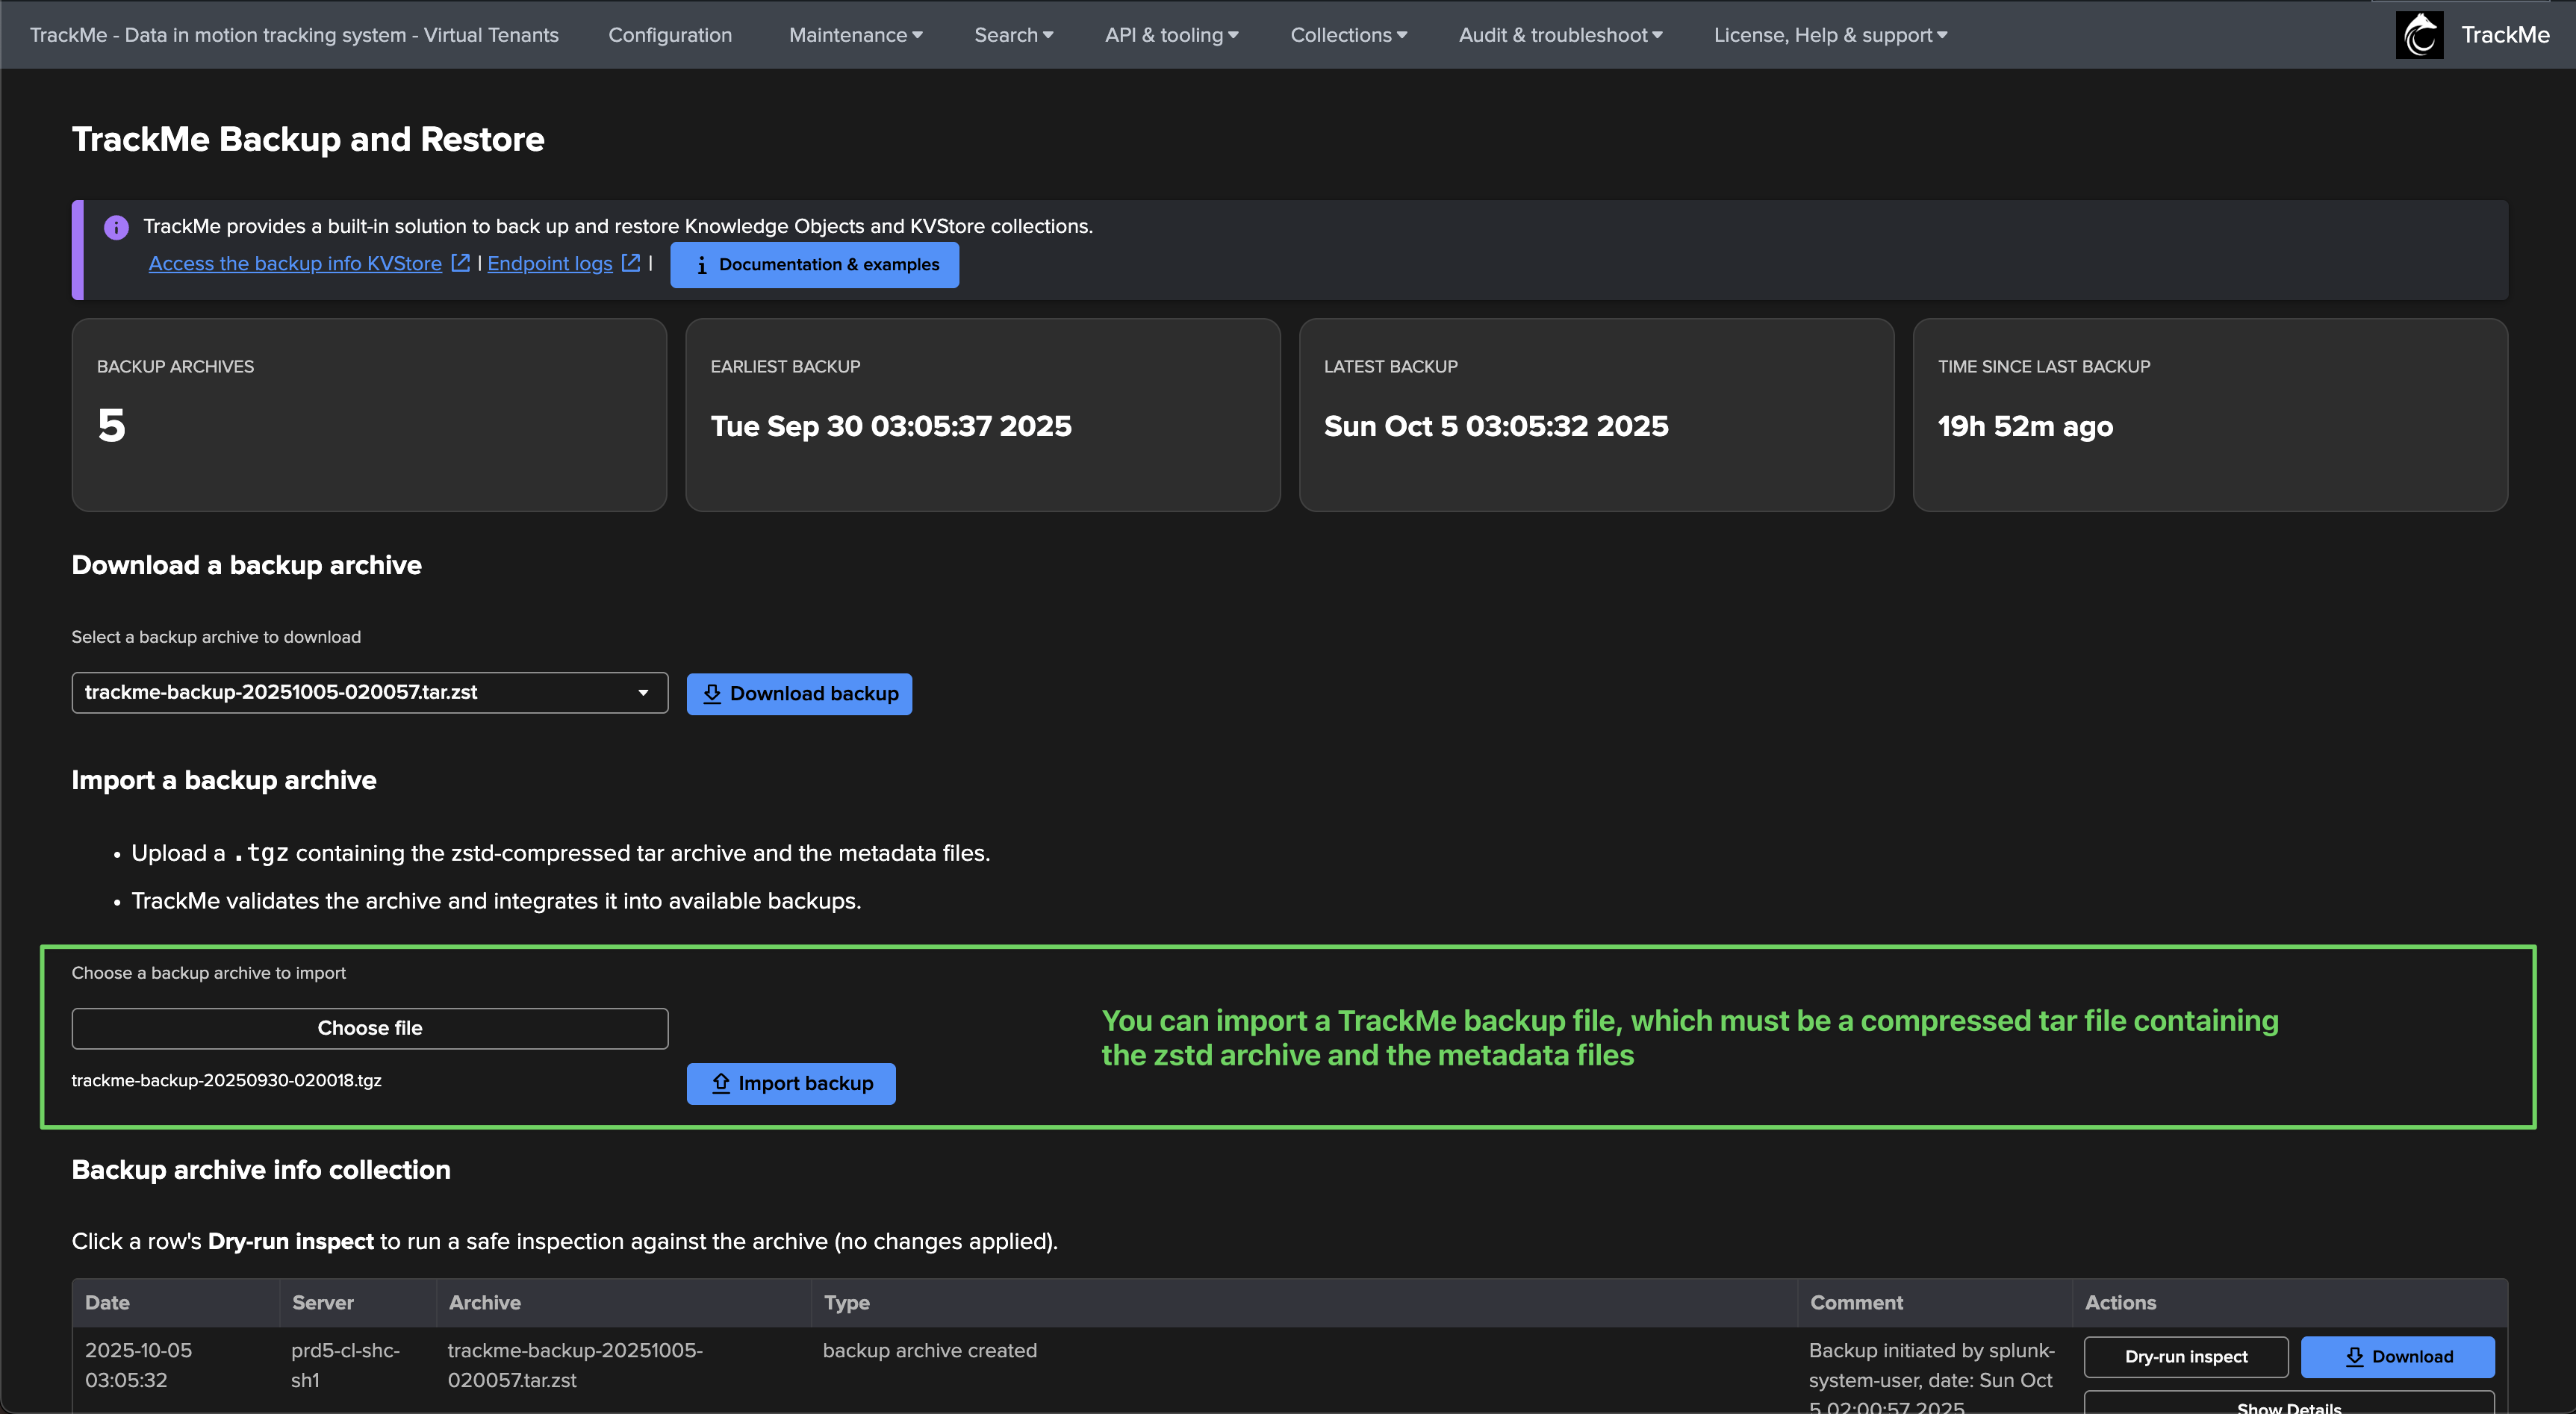
Exporting and Importing TrackMe backups through the user interface
Since TrackMe 2.1.32, you can export and import TrackMe backups through the user interface.
This feature is available in the TrackMe Backup and Restore dashboard, and is accessible via the menu API & Tooling.
Checking, Inspecting and Reviewing TrackMe backups
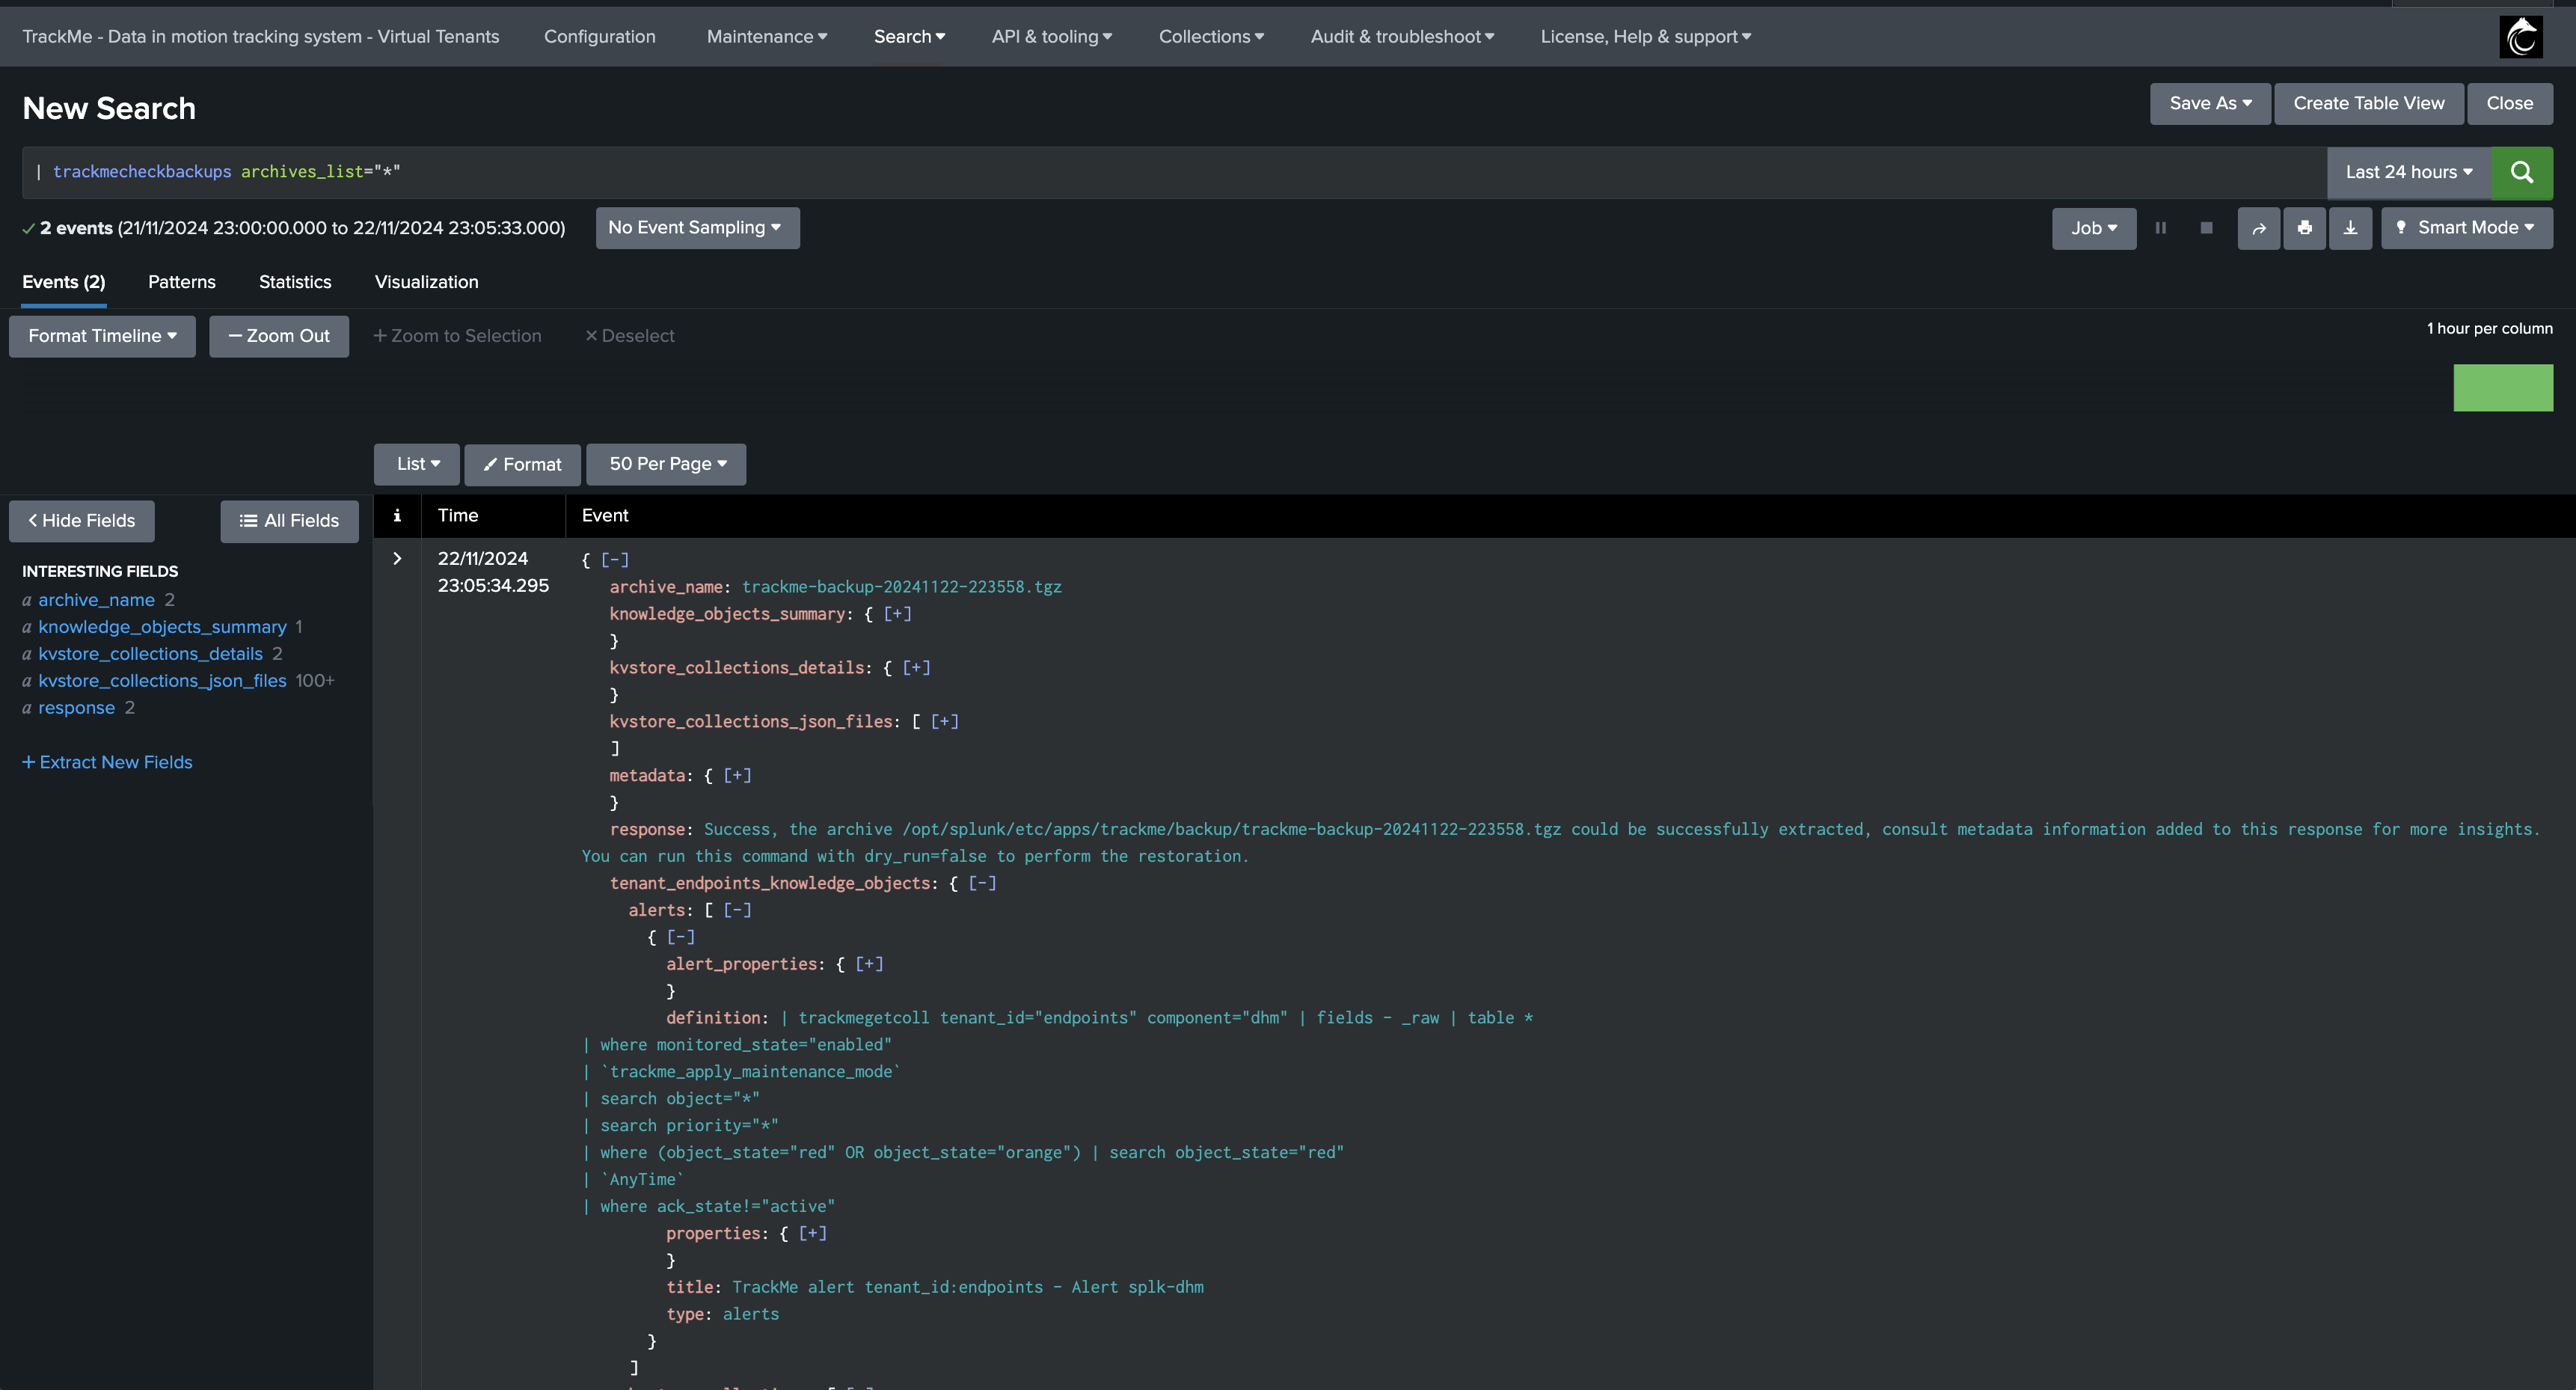
The most practical way to easily check, inspect and review TrackMe’s backups, including Knowledge Objects and their definition, is to use a built-in command called trackmecheckbackups:
| trackmecheckbackups archives_list="*"
What this backend does:
Lists and iterates over all available TrackMe backups.
Verifies that the backup archives can successfully be extracted.
Access and iterate through the archives metadata.
Render the archives contents and metadata in pure SPL and on a per archive basis.
Notes:
The command does not give access to the KVstore records themselves, but gives detailed metadata for each kvstore collection. (number of records, etc)
Knowledge Objects can be fully accessed, and you can for instance review the definition of a given search, alert or macro at some points in time via the archive.
Accessing the Backup metadata KVstore
TrackMe stores the metadata of the backups in a dedicated KVstore collection, you can access this collection using the following SPL command:
| inputlookup trackme_backup_archives_info | sort - limit=0 mtime
The KVstore is used in the dashboard to provide high-level information about the backups, such as the number of archives, the size of the archives, the creation date, etc… This KVstore is also used by the schema upgrade process to determine the latest backup available.
Finally, note that TrackMe does not restore the KVstore records for this specific KVstore, the reason is that TrackMe automatically discovers available backups, and will re-create any missing records for a backup which would not be currently known to the system.
Anatomy of a TrackMe backup
A TrackMe backup archive contains the following elements:
The backup archive itself, a compressed tarball containing all the files and directories of the backup.
A full metadata file, containing the metadata of the backup, such as the creation date, the size of the archive, etc.
A light metadata file, containing a summary of the backup, such as the number of Knowledge Objects, the number of KVstore collections, etc.
Light metadata content example:
{
"trackme_version": "2.1.5",
"backup_archive": "/opt/splunk/etc/apps/trackme/backup/trackme-backup-20241123-020021.tgz",
"server_name": "xxxxxxxxxxx",
"comment": "Backup initiated by splunk-system-user, date: Sat Nov 23 02:00:21 2024",
"kvstore_collections_not_empty": "199",
"kvstore_collections_empty": "148",
"knowledge_objects_summary": {
        "tenants_enabled_count": 9,
        "total": 522,
        "kvstore_collections": 191,
        "transforms": 191,
        "reports": 120,
        "alerts": 9,
        "macros": 11
    }
}
Example:
cd $SPLUNK_HOME/etc/apps/trackme/backup/
-rw------- 1 splunk splunk 713476 Nov 22 22:36 trackme-backup-20241122-223558.tgz
-rw------- 1 splunk splunk  45149 Nov 22 22:36 trackme-backup-20241122-223558.tgz.full.meta
-rw------- 1 splunk splunk    518 Nov 22 22:36 trackme-backup-20241122-223558.tgz.light.meta
The content of the archive itself:
One JSON file per KVstore collection, containing the records of the collection. (Note: the file will be empty if the collection is empty)
One JSON file per Virtual Tenant containing the Knowledge Objects of the Virtual Tenant.
One JSON file per Virtual Tenant containing the Virtual Tenant account information.
kv_<kvstore_transform_reference>.json
... <repeated for each KVstore>
tenant_<tenant_id>_knowledge_objects.json
tenant_<tenant_id>_vtenant_account.json
Restoring TrackMe
The next steps will guide you through the restoration process based on these different scenarios.
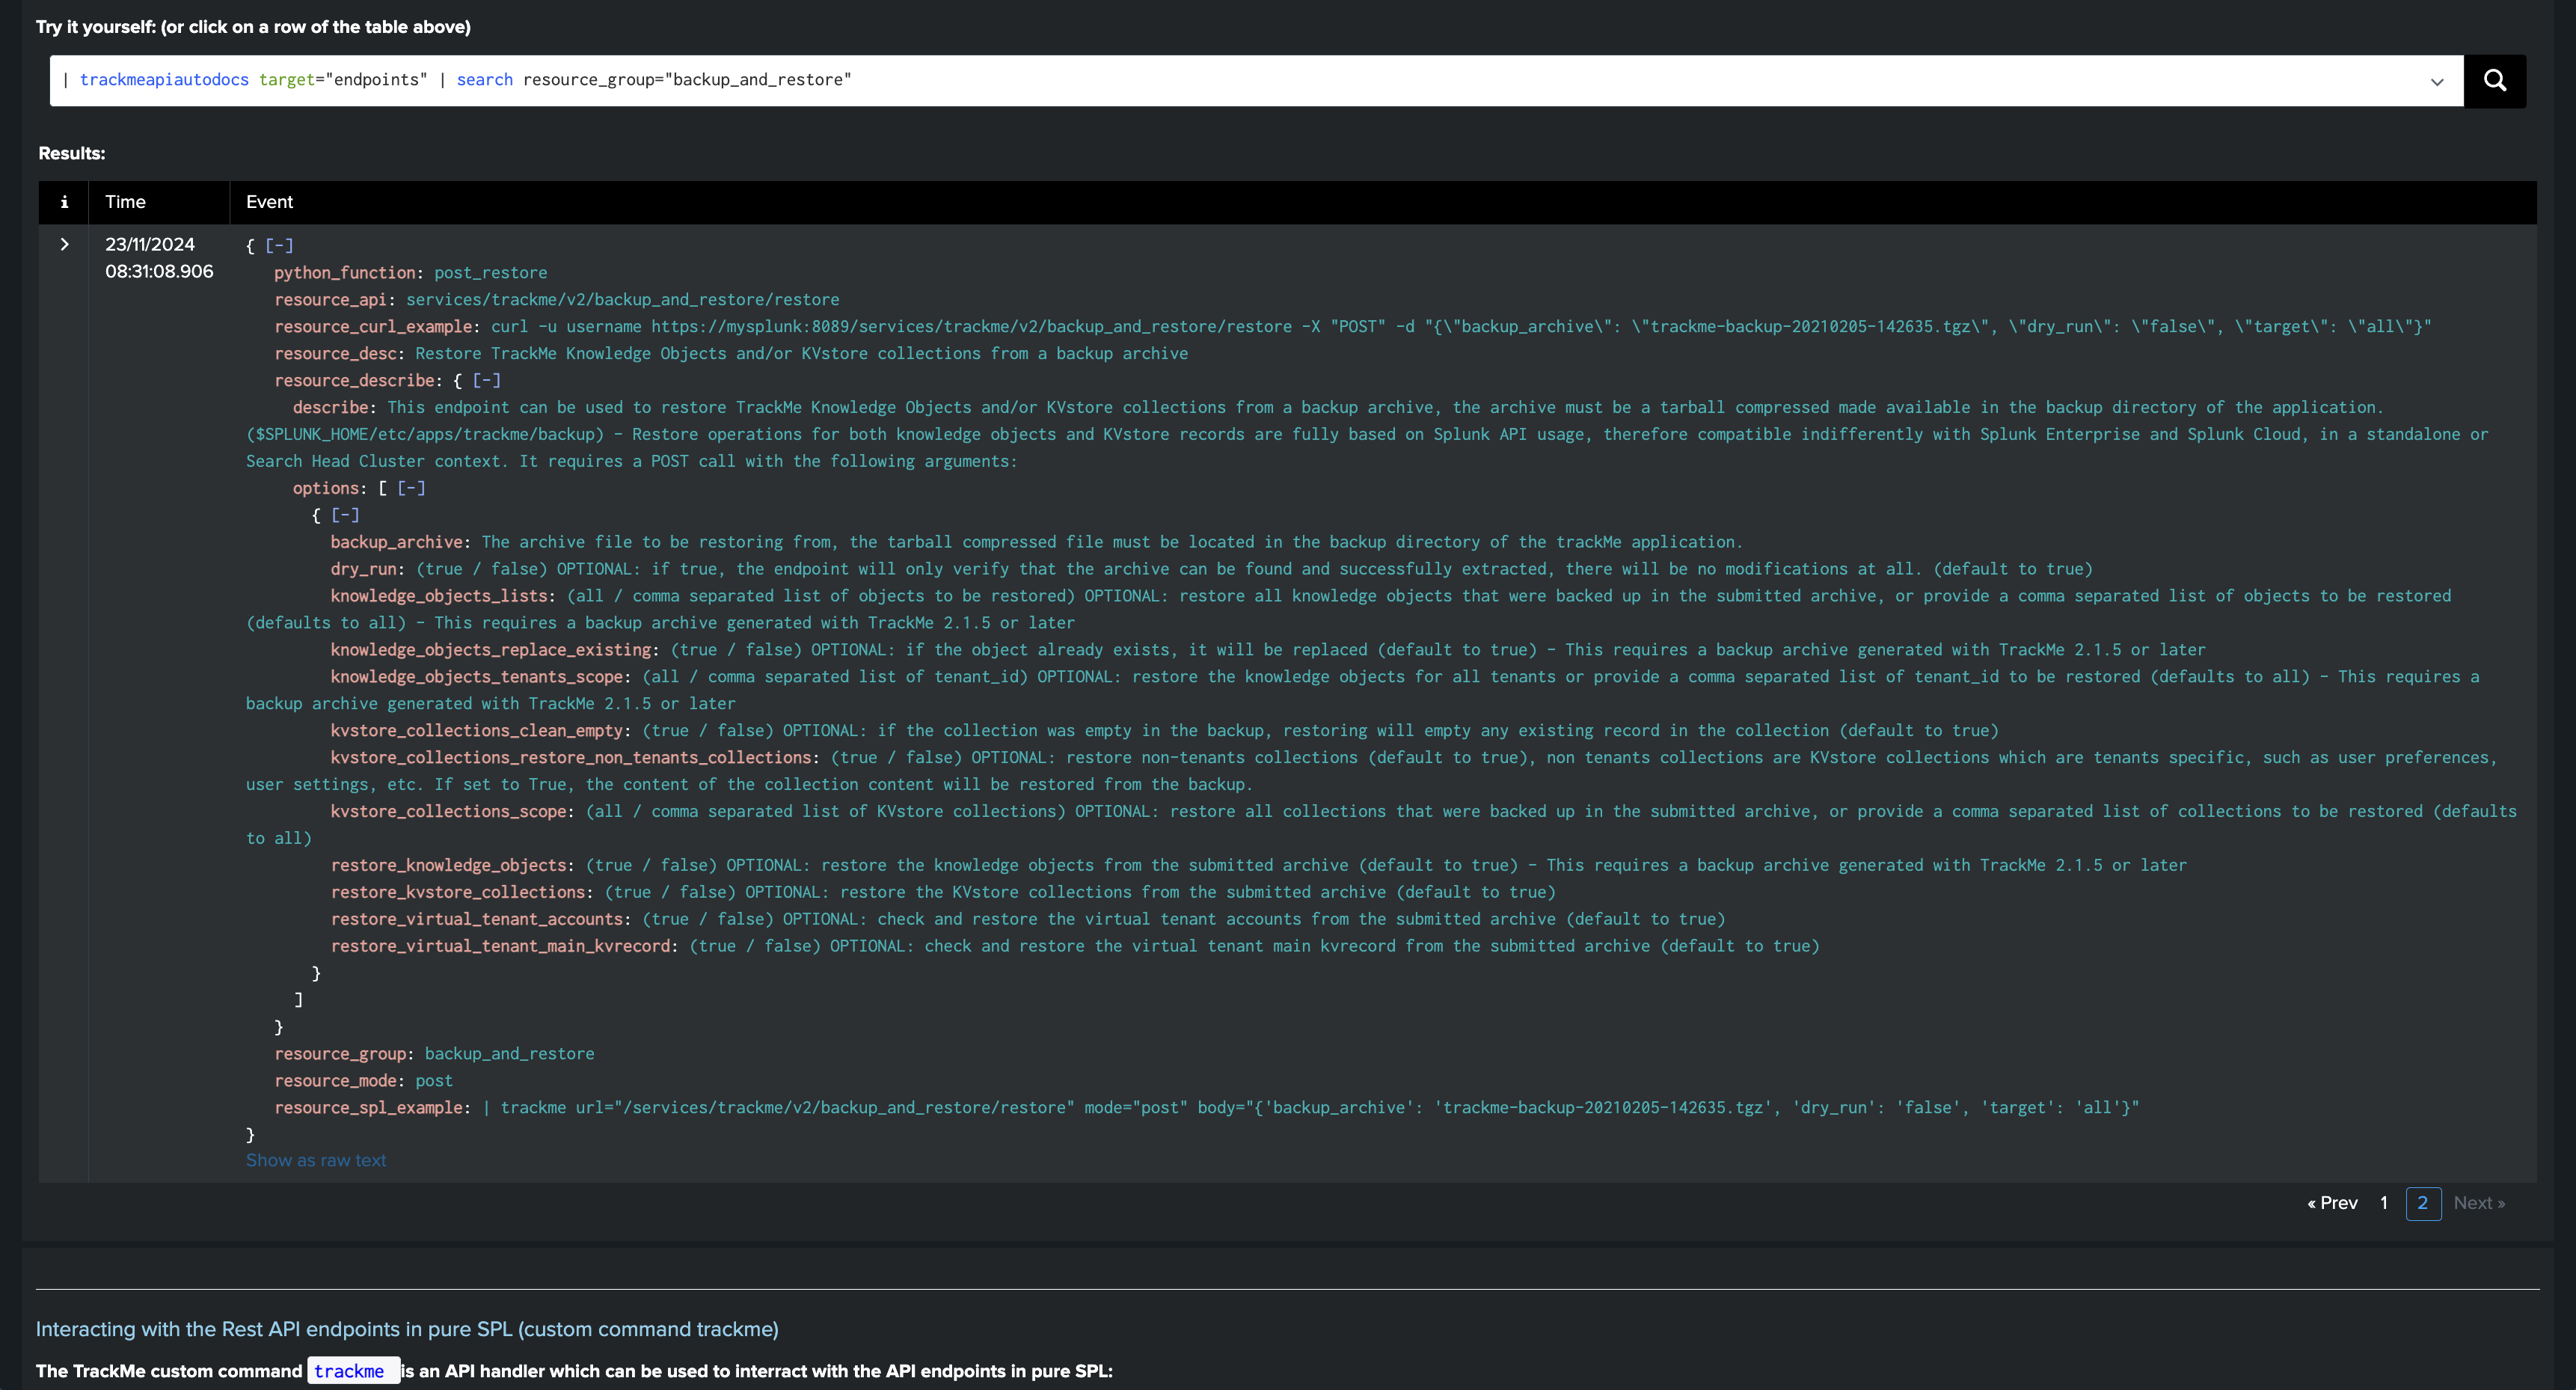
Restore endpoint API and its options
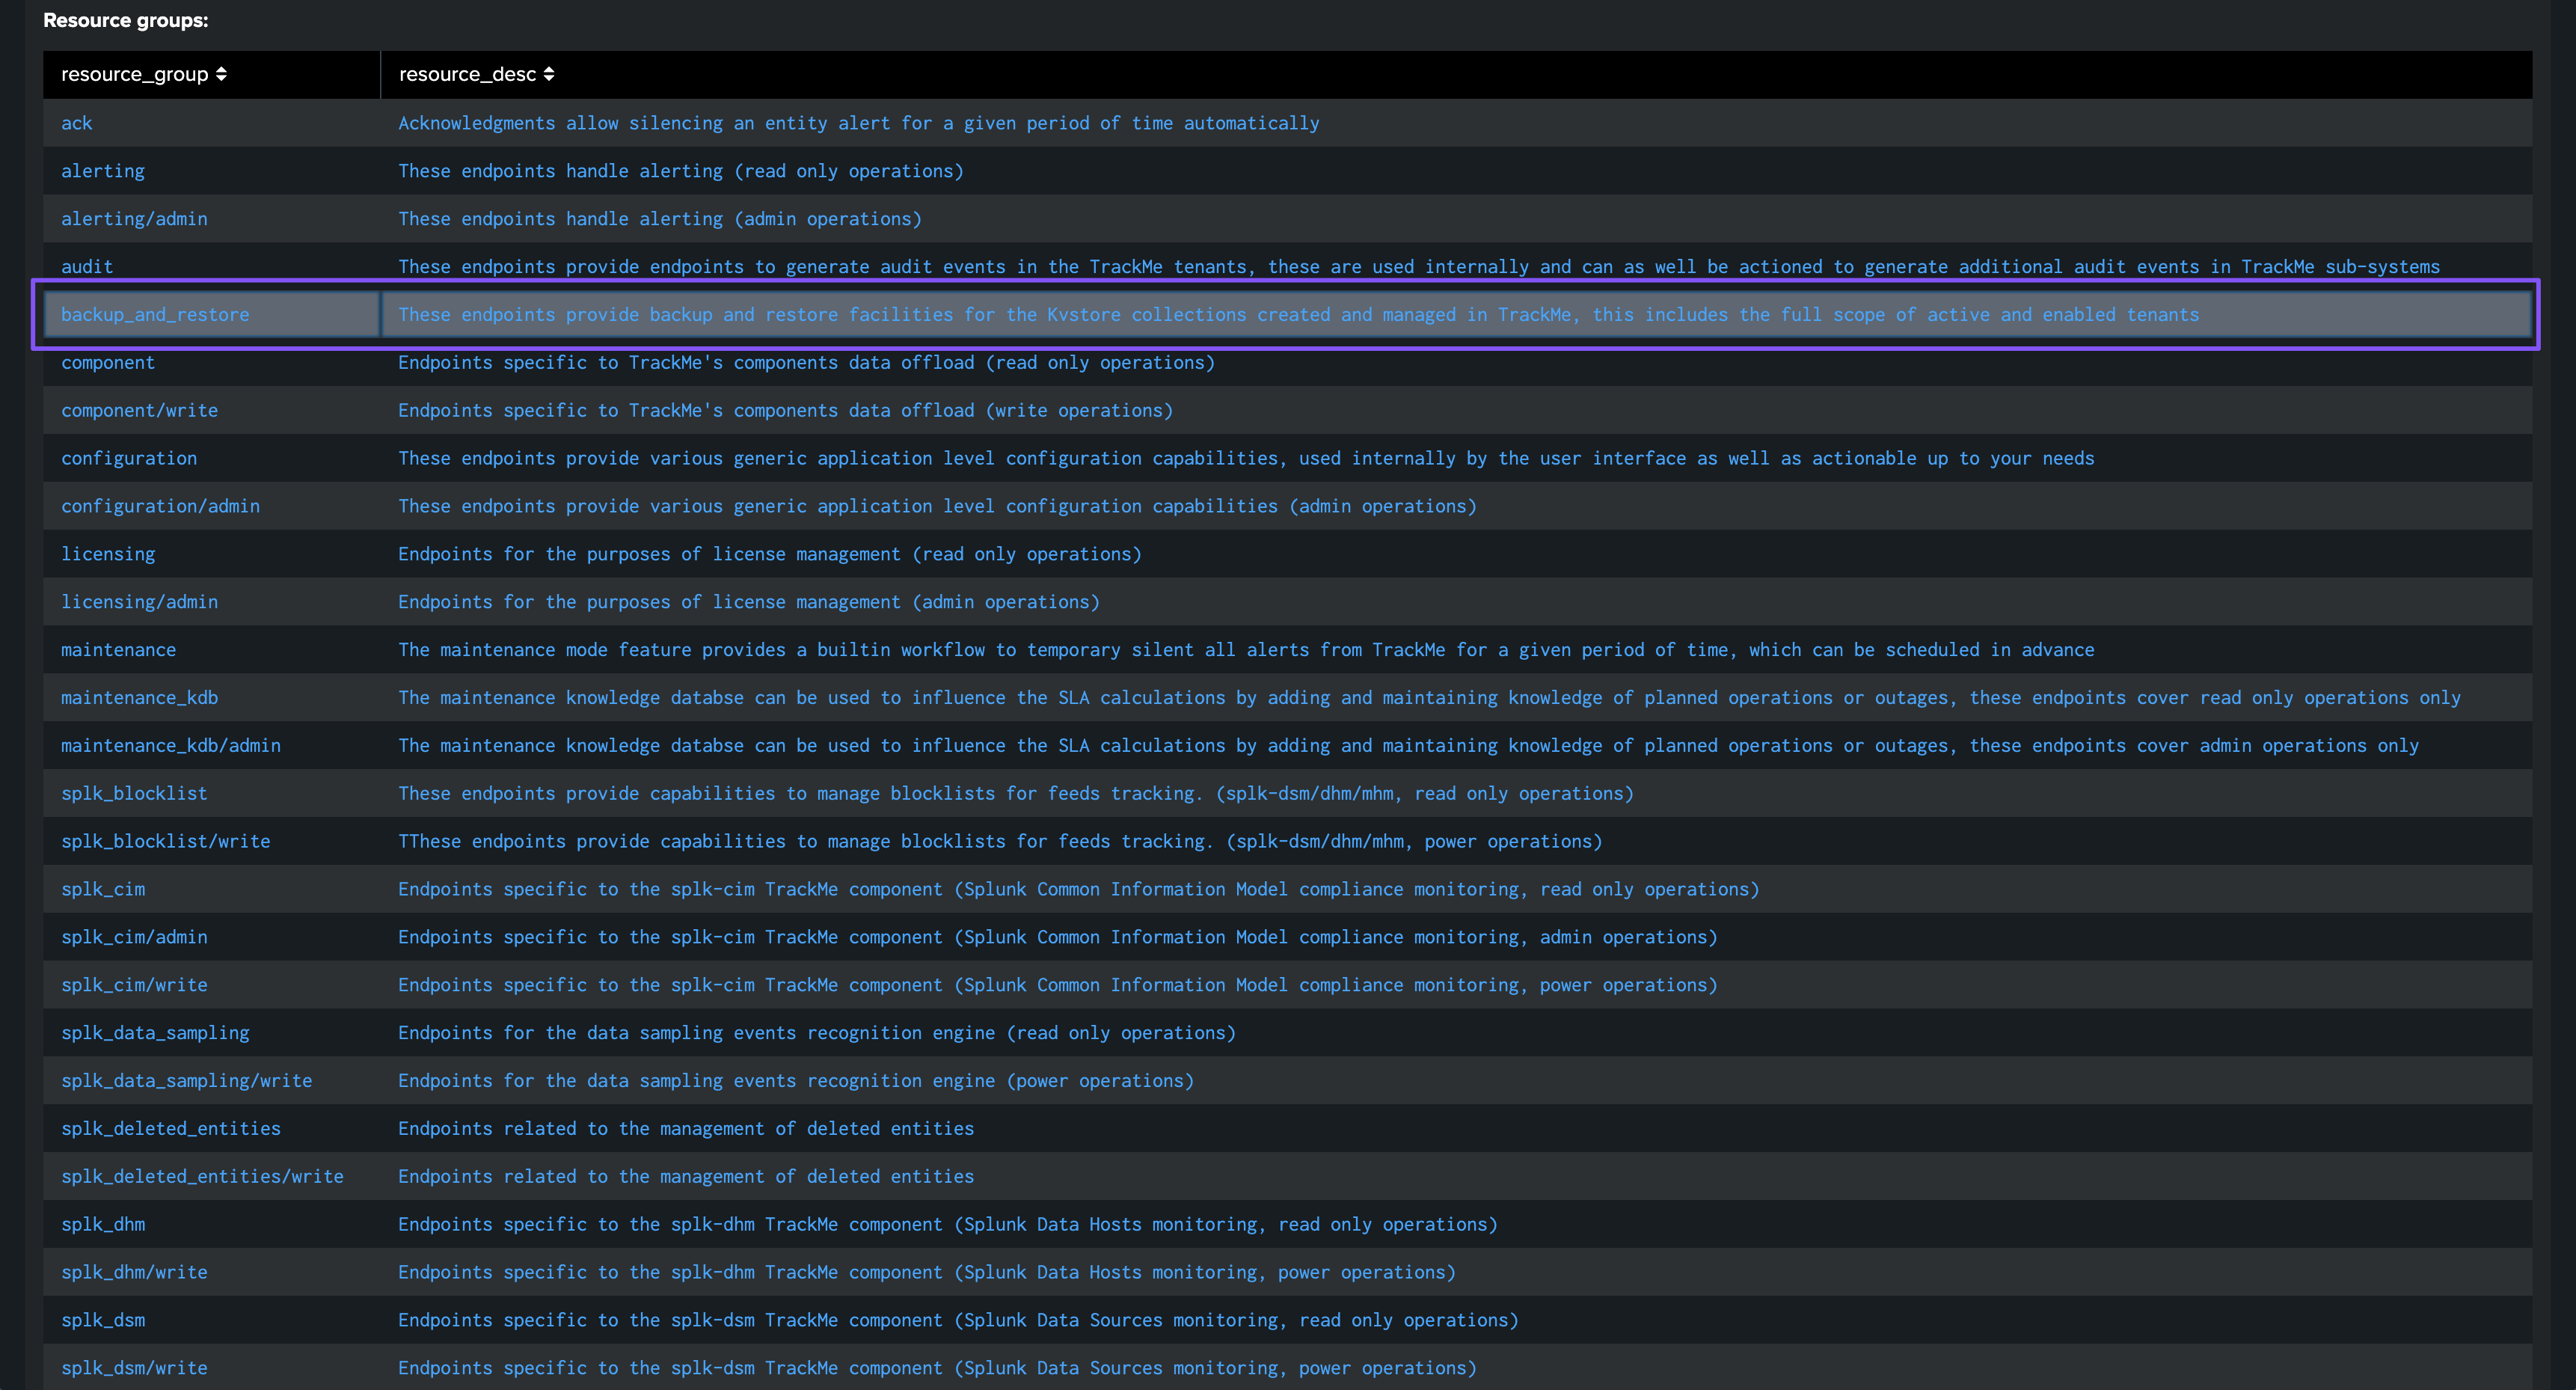
The TrackMe API restore endpoint handle these operations, you can review backup and restore endpoints and their usage in the API Reference dashboard:
You can also run:
| trackmeapiautodocs target="endpoints" | search resource_group="backup_and_restore"
Endpoint options:
backup_archive: The archive file to be restored, the tarball compressed file must be located in the backup directory of the trackMe application.dry_run: (true / false) OPTIONAL: if true, the endpoint will only verify that the archive can be found and successfully extracted, there will be no modifications at all. (default to true)knowledge_objects_lists: (all / comma separated list of objects to be restored) OPTIONAL: restore all knowledge objects that were backed up in the submitted archive, or provide a comma separated list of objects to be restored (defaults to all) - This requires a backup archive generated with TrackMe 2.1.5 or laterknowledge_objects_replace_existing: (true / false) OPTIONAL: if the object already exists, it will be replaced (default to true) - This requires a backup archive generated with TrackMe 2.1.5 or laterknowledge_objects_tenants_scope: (all / comma separated list of tenant_id) OPTIONAL: restore the knowledge objects for all tenants or provide a comma separated list of tenant_id to be restored (defaults to all) - This requires a backup archive generated with TrackMe 2.1.5 or laterkvstore_collections_clean_empty: (true / false) OPTIONAL: if the collection was empty in the backup, restoring will empty any existing record in the collection (default to true)kvstore_collections_restore_non_tenants_collections: (true / false) OPTIONAL: restore non-tenants collections (default to true), non tenants collections are KVstore collections which are tenant specific, such as user preferences, user settings, etc. If set to True, the content of the collection content will be restored from the backup.kvstore_collections_scope: (all / comma separated list of KVstore collections) OPTIONAL: restore all collections that were backed up in the submitted archive, or provide a comma separated list of collections to be restored (defaults to all)restore_knowledge_objects: (true / false) OPTIONAL: restore the knowledge objects from the submitted archive (default to true) - This requires a backup archive generated with TrackMe 2.1.5 or laterrestore_kvstore_collections: (true / false) OPTIONAL: restore the KVstore collections from the submitted archive (default to true)restore_virtual_tenant_accounts: (true / false) OPTIONAL: check and restore the virtual tenant accounts from the submitted archive (default to true)restore_virtual_tenant_main_kvrecord: (true / false) OPTIONAL: check and restore the virtual tenant main record from the submitted archive (default to true)
Restore operations examples
Full restoration of TrackMe
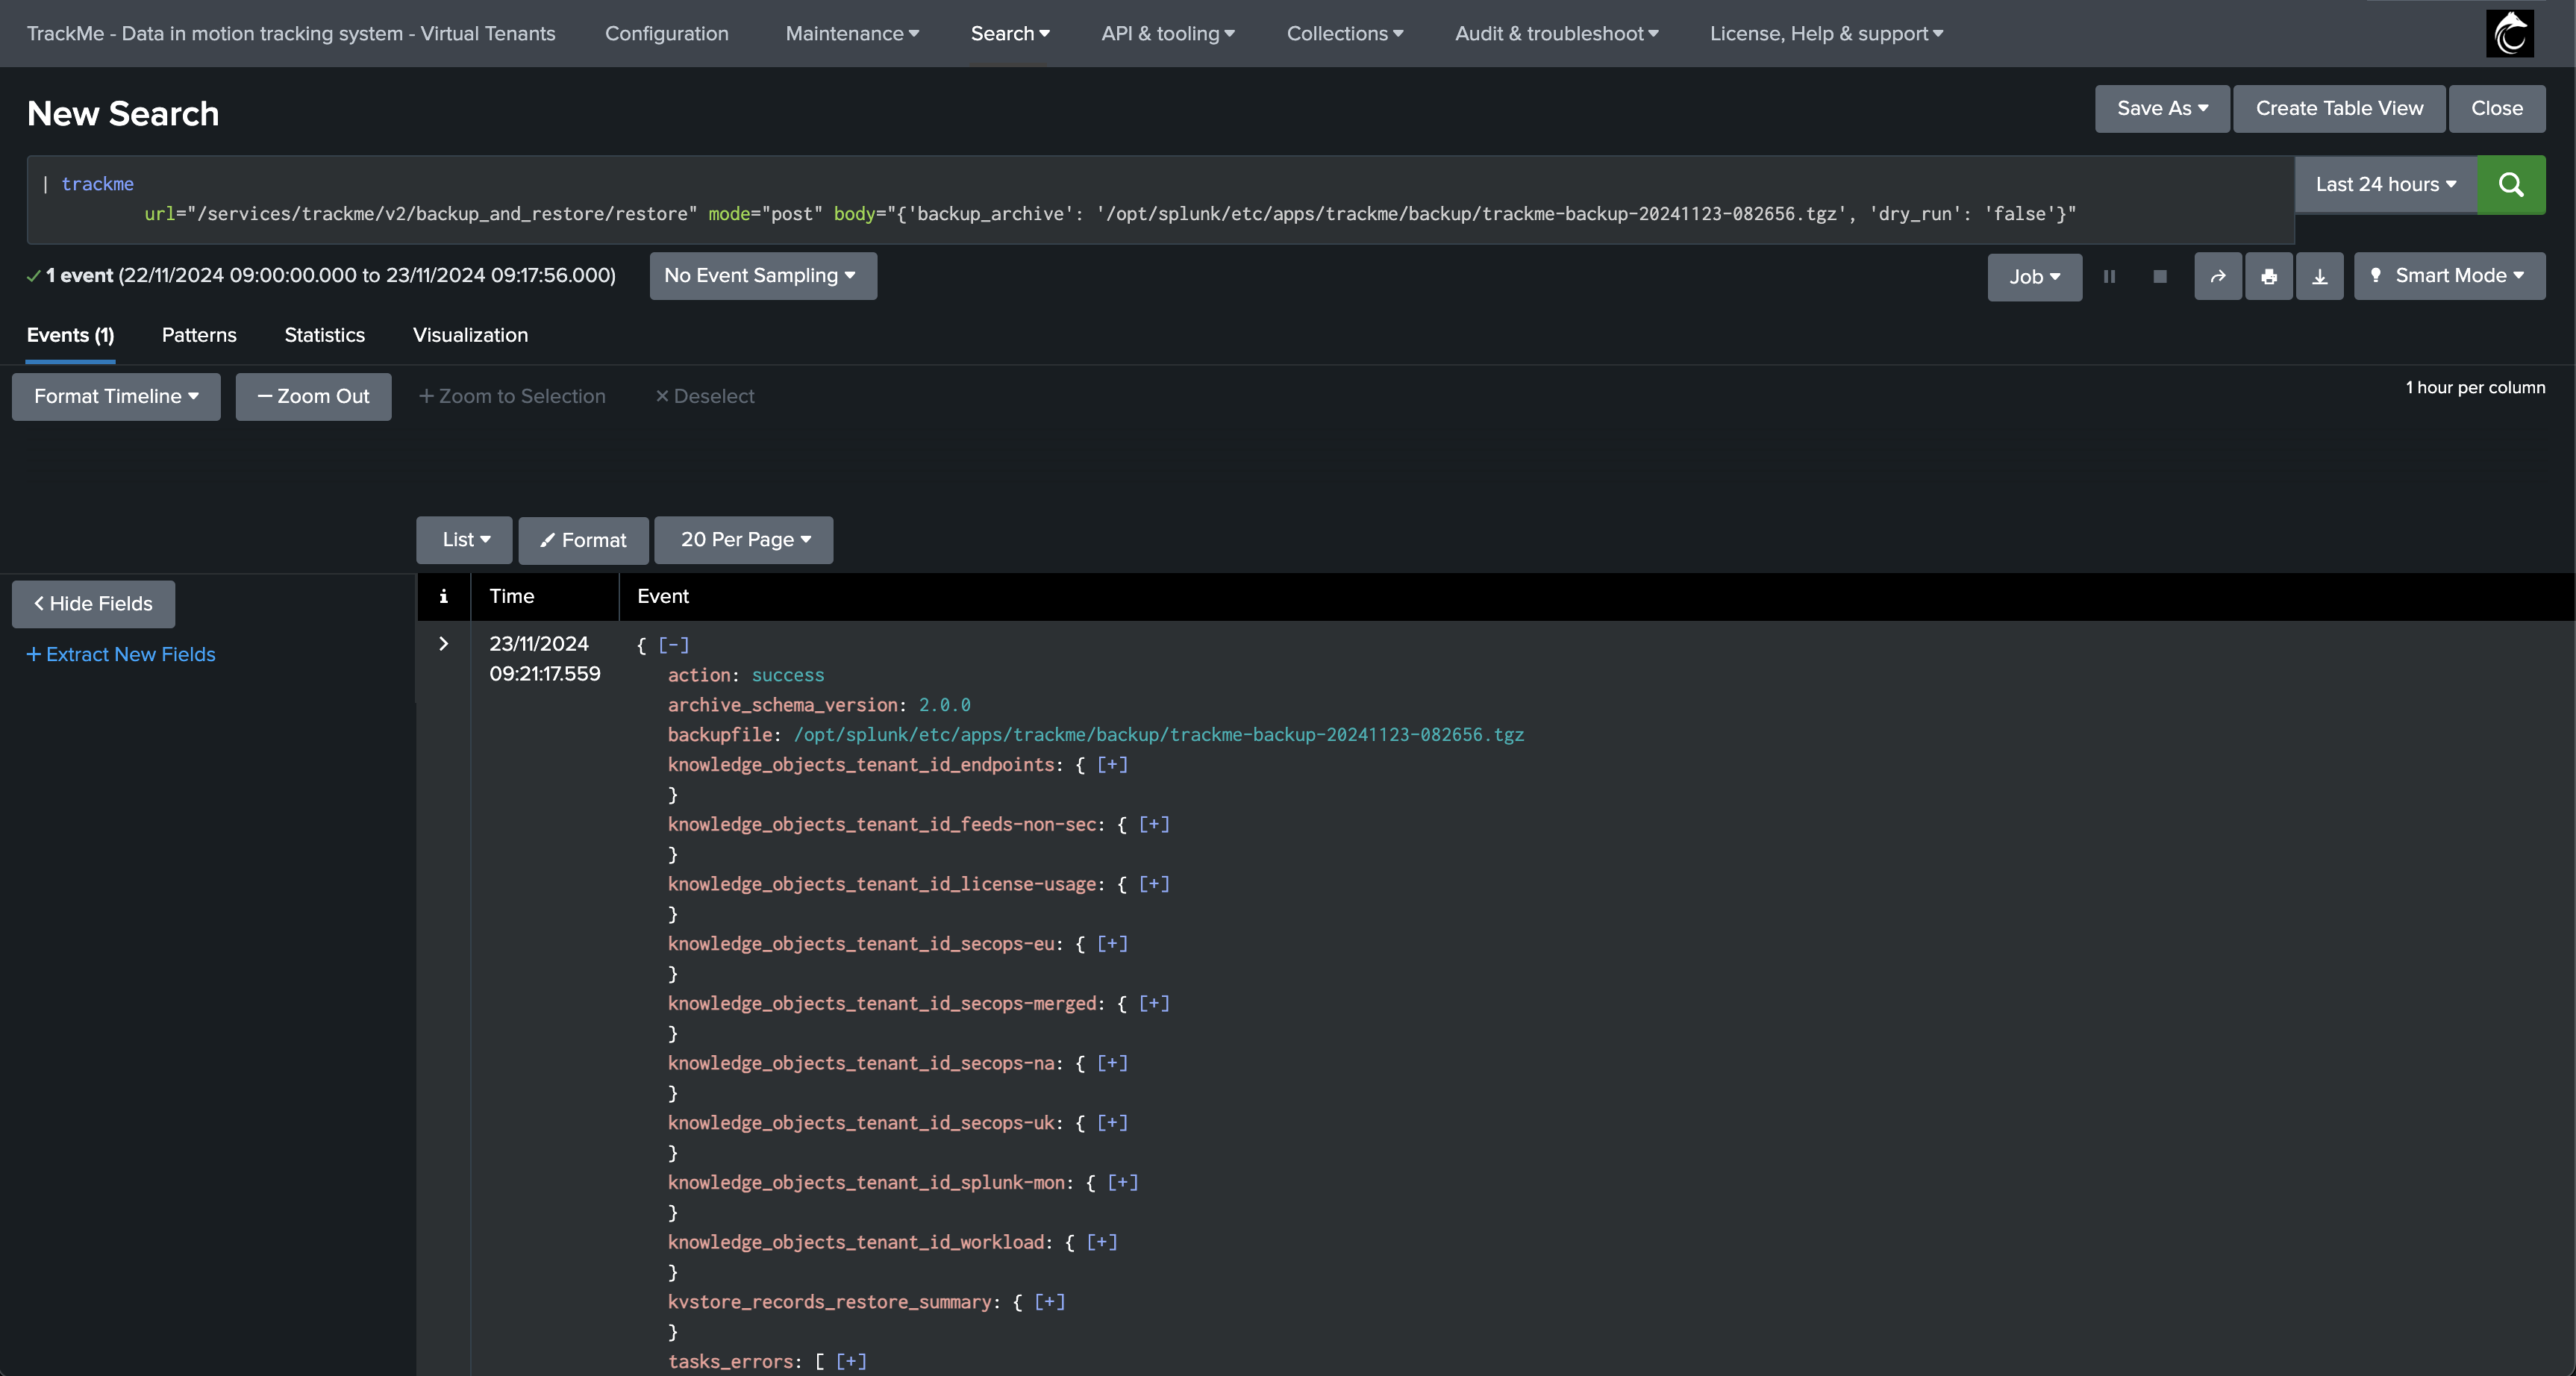
Example:
| trackme
url="/services/trackme/v2/backup_and_restore/restore" mode="post" body="{'backup_archive': '/opt/splunk/etc/apps/trackme/backup/trackme-backup-20241117-220628.tgz', 'dry_run': 'false'}"
This example above will:
For each Virtual Tenant, restore the Virtual Tenant account
For each Virtual Tenant, restore the central KVstore record
For each Virtual Tenant, restore Knowledge Objects, for each Knowledge Object, if the Knowledge Object exists already, it will be deleted and re-created from the backup
For each Virtual Tenant KVstore collection, restore the KVstore collection records (if the collection was empty in the backup, the collection will be emptied)
Restore central and non-tenants related KVstore collections records
Restore example: restore a specific Virtual Tenant, including all Virtual Tenants Knowledge Objects and all TrackMe KVstore records for this Virtual Tenant only
| trackme
      url="/services/trackme/v2/backup_and_restore/restore" mode="post" body="{'backup_archive': '/opt/splunk/etc/apps/trackme/backup/trackme-backup-20241117-220628.tgz', 'dry_run': 'false', 'knowledge_objects_tenants_scope': 'my_tenant', 'knowledge_objects_replace_existing': 'true', 'kvstore_collections_clean_empty': 'true', 'kvstore_collections_restore_non_tenants_collections': 'false'}"
This example above will:
For the Virtual Tenant “my_tenant”, restore the Virtual Tenant account
For the Virtual Tenant “my_tenant”, restore the central KVstore record
For the Virtual Tenant “my_tenant”, restore Knowledge Objects, for each Knowledge Object, if the Knowledge Object exists already, it will be deleted and re-created from the backup
Restore example: restore one or more specific Knowledge Objects, and nothing else (if the report calls itself another report, the parent report will be also restored automatically)
| trackme
url="/services/trackme/v2/backup_and_restore/restore" mode="post" body="{'backup_archive': '/opt/splunk/etc/apps/trackme/backup/trackme-backup-20241117-220628.tgz', 'dry_run': 'false', 'knowledge_objects_lists': 'my-tracker-001,my-tracker-002', 'restore_virtual_tenant_accounts': 'false', 'restore_virtual_tenant_main_kvrecord': 'false', 'knowledge_objects_replace_existing': 'true', 'restore_kvstore_collections': 'false'}"
This example above will:
Restore the Knowledge Objects “my-tracker-001” and “my-tracker-002” from the backup
If the Knowledge Object exists already, it will be deleted and re-created from the backup
No Virtual Tenant account will be restored
No Virtual Tenant KVstore record will be restored
No KVstore collection records will be restored
Restore example: restore one or more specific KVstore collections contents, and nothing else (kvstore_collections_clean_empty allows controlling if the collection should be empty, if it was actually empty during the backup)
| trackme
url="/services/trackme/v2/backup_and_restore/restore" mode="post" body="{'backup_archive': '/opt/splunk/etc/apps/trackme/backup/trackme-backup-20241117-220628.tgz', 'dry_run': 'false', 'kvstore_collections_scope': 'kv_trackme_dsm_tenant_mytenant,kv_trackme_dsm_priority_policies_tenant_test-restore', 'kvstore_collections_clean_empty': 'true', 'restore_knowledge_objects': 'false', 'restore_virtual_tenant_accounts': 'false', 'restore_virtual_tenant_main_kvrecord': 'false'}"
This example above will:
Restore the KVstore collections “kv_trackme_dsm_tenant_mytenant” and “kv_trackme_dsm_priority_policies_tenant_test-restore” from the backup
If the collection was empty in the backup, the collection will be emptied
No Knowledge Objects will be restored
No Virtual Tenant account will be restored
No Virtual Tenant KVstore record will be restored
Exporting and Importing TrackMe backups, for migration or cloning purposes
TrackMe provides importing and exporting capabilities that can be used to migrate or clone TrackMe configurations and data between different TrackMe deployments:
Exporting a TrackMe backup (source system)
Hint
Easily exporting a backup file from the user interface since TrackMe 2.1.32
Since TrackMe 2.1.32, you can easily export a backup file from the user interface.
This allows you to easily migrate or clone TrackMe deployments, or to backup and restore TrackMe Knowledge Objects and KVstore collections.
This feature is available in the TrackMe Backup and Restore dashboard, and is accessible via the menu API & Tooling.
You can also export per backup in the detailed information section of the user interface:
The export API call be used to export a TrackMe backup archive as a base64 string, which can then be used to call the import endpoint to a different Splunk instance running TrackMe (use cases: migration, cloning…) - This example shows the usage with curl
curl -k -u admin https://mysplunk-source:8089/services/trackme/v2/backup_and_restore/export_backup -X "POST" -d "{\"archive_name\": \"trackme-backup-20241120-064752.tgz\"}" --output export.json
Review the resulting file export.json.*
Importing a TrackMe backup (target system)
Hint
Easily importing a backup file from the user interface since TrackMe 2.1.32
Since TrackMe 2.1.32, you can easily import a backup file from the user interface.
This allows you to easily migrate or clone TrackMe deployments, or to backup and restore TrackMe Knowledge Objects and KVstore collections.
This feature is available in the TrackMe Backup and Restore dashboard, and is accessible via the menu API & Tooling.
Then, you can use the import REST API to import a TrackMe backup archive from the base64 string, TrackMe automatically verifies the archive, if the archive is valid, it will be discovered and integrated into the available archives immediately - This example shows the usage with curl
curl -k -u admin https://mysplunk-target:8089/services/trackme/v2/backup_and_restore/import_backup -X "POST" -H "Content-Type: application/json" --data @export.json
Expected response:
{"success":"Backup imported successfully"}
Note:
TrackMe will automatically identify the backup file on the target system, and will include it in the available backups.
After an import, if you open the TrackMe Backup and Restore dashboard, you will see the imported backup in the list of available backups.
Migrating or cloning the TrackMe deployment
Once you have imported the backup on the target system, you can then proceed with the restoration process as described in the previous section, to restore the Knowledge Objects and KVstore records.
| trackme
url="/services/trackme/v2/backup_and_restore/restore" mode="post" body="{'backup_archive': '/opt/splunk/etc/apps/trackme/backup/trackme-backup-20241117-220628.tgz', 'dry_run': 'false'}"
Splunk Search Head Cluster specific considerations
Since TrackMe 2.1.32, TrackMe supports transparently running in a Search Head Cluster (SHC) context, which means:
You can download a backup archive file the user interface or Rest API transparently, TrackMe will automatically retrieve the backup archive file from the member actually owning the archive file.
When TrackMe purges a backup archive upon its expiration, it will automatically handle the remote counter part if the backup archive is stored on a remote member.
Accessing logs and troubleshooting
TrackMe logs all backup and restore operations:
index=_internal sourcetype=trackme:rest_api trackme_rest_handler_backup_and_restore.py