Migrate from TrackMe V1 to TrackMe V2
Introduction
The purpose of this page is to provide a path for existing users of TrackMe V1 to migrate to TrackMe V2, as easily as possible.
Hint
About configuration losses, interruption of service and efforts
We appreciate many fellow TrackMe V1 users invested time and efforts in fine tuning the many various configuration items in TrackMe V1
In many cases, TrackMe became a central tool, providing deep visibility and efficient monitoring capabilities
Although the migration requires manual operations, there is a limited amount of efforts needed for TrackMe V2 to be operation and replacing your previous deployment
However, during this phase, existing monitoring operations will stop, until your new TrackMe V2 deployment is operational
Review this migration manual, performing planning and backups, and upgrade peacefully
If you missed something, you can always retrieve these information from summary events, TrackMe backups or file backups
Top information
You cannot run both TrackMe V1 and V2 on the same Splunk instance / SHC
When the application is upgraded, it replaces V1 entirely, all configuration, settings are permanently lost (apart from TrackMe and third party backups)
Prior to the migration you must follow this documentation if you wish to migrate existing settings and rules
If for some reasons you didn’t read this documentation before (sic), you still can recover information from TrackMe’s summary events and backups
The documentation cannot cover every subtitle of potential customizations of TrackMe, you may need to adapt some of these to your own context
TrackMe V2 is deeply different from TrackMe V1 in all means, TrackMe V2 notably introduces a brand new key concept of Virtual Tenants which slightly influences the migration path.
Due to the highly flexible nature of TrackMe V2, there are various design questions that could be taken into account, the present document describes the general migration path and options.
Migrating or restarting from scratch?
Depending on your context, both approaches can make sense, in short:
Starting from scratch has the advantage of starting fully clean, without taking any risks of leverage obsolete rules or settings which you could improve today
You can directly leverage the many powerful advantages of TrackMe V2, including designing Virtual Tenants for instance, for a better experience and value
On the opposite, you may have spent time and efforts in qualifying topics like entities priorities, it is fully understandable that you would want to migrate these settings
The migration path is in reality doing a little bit of both Worlds, you can decide at any step what makes the most sense in your context, and selectively import settings from your TrackMe V1 deployment.
Planning the migration
Not all users are equal in term when it comes to the level of access, Splunk Enterprise users have full backend accesses, while users in Splunk Cloud have much more limitations.
In short, the migration from an existing deployment of TrackMe V1 can be summarised as:
Performing backups prior to the migration (KVstore backups and file-system level backups)
Auditing local knowledge objects and customisations
Allowing a maintenance window for the operation, if you are relying on TrackMe V1 in a Production context, no alerts will be available as long as the migration and configuration is not terminated
Performing the application upgrade from V1 to V2
Creating at least one TrackMe V2 Virtual Tenant to replace the migrated TrackMe V1 deployment
Creating Hybrid Trackers, discover and perform the basis setup
Import target key configuration items, such as entities priority or custom threshold policies
Creating additional Knowledge Objects, such as TrackMe alerts or Elastic Sources, etc
Prior to the migration: Performing backups and exports
file-system level backup (For Splunk Enterprise)
Splunk Cloud users
If you are a Splunk Cloud user, you can ignore this step
Performing backup here is only for Splunk on-premise users, and a simple additional safety before proceding to an upgrade as a generic recommendation
It is recommended to perform a full backup of the TrackMe application root directory prior to the upgrade.
In a basic way, this means creating a compressed archive of the existing root directory:
cd /opt/splunk/etc/apps
tar -czf <target_path>/trackme_v1_backup_DDMMYYYY.tgz trackme
TrackMe KVstores backup
TrackMe backups
While you wouldn’t be able to restore directly the V1 backups into TrackMe V2, these provides means to retrieve and access any useful settings of TrackMe
For instance, if you later on realise that you have created some specific content such as Elastic Sources, block lists, tags and so forth, these information can be retrieved from the JSON files contained in the backup archive
TrackMe V1 has a concept of a backup job which targets its own KVstore collections, this job is by default executed once per day and stores backup archives locally on the search head.
You can ensure that this process is functional, and run an immediate backup job prior to the migration.
In TrackMe V1, this scheduled report is named:
TrackMe - Backup KVstore collections and purge older backup files.
You can manually run this job to ensure a backup will be taken prior to the upgrade.
Auditing TrackMe V1 objects
TrackMe V1 has 3 main types of components:
Data sources tracking
Data hosts tracking
Metric hosts tracking
As part of its normal activity, TrackMe V1 generates summary events which contain the essential entity information, such as the priority of their monitor status.
There are various additional TrackMe V1 features which you may have used, mostly:
Elastic Sources, either shared or dedicated
Allow and block lists, which are specific collections for each component
Data sampling custom rules
Tag policies
TrackMe alerts
Use the following search to detect which KVstore collections have actual records, you can ignore empty collections:
Notes:
run this search prior to the migration, if TrackMe was upgraded already, this is too late so you can ignore these steps
ignore empty collections
some of the KVstore collections have generated and/or dynamic content, this is not relevant for the purpose of the migration
for each of the collection resulting from the following search, you can manually copy the collection in a CSV file for the ease of re-creation and/or re-applying some of steps
| rest splunk_server=local /services/server/introspection/kvstore/collectionstats
| mvexpand data
| spath input=data
| rex field=ns "(?<app>.*)\.(?<collection>.*)"
| stats first(count) as count by app, collection
| where app="trackme" AND count>0
| where NOT collection in ("kv_trackme_alerts_ack", "kv_trackme_audit_changes", "kv_trackme_backup_archives_info", "kv_trackme_data_sampling", "kv_trackme_maintenance_mode", "kv_trackme_objects_summary", "kv_trackme_summary_investigator_volume_outliers")
| rex field=collection "^kv_(?<transforms_definition>.*)"
| fields app collection transforms_definition count
TrackMe Collections CSV export
BEFORE TrackMe is upgraded, the easiest and simplest procedure is to manually export the principal collections into CSV lookups, which will be used to restore main configuration items.
These steps need to be taken prior to the migration, once upgraded the original TrackMe V1 collections will not exist anymore and therefore their content wilk has been deleted automatically.
Allow lists & block lists
TrackMe V2 handles concepts of allow lists & block lists in a fundamentally different fashion, as of now, these cannot be migrated and need to be replayed if necessary
Splunk Cloud
Splunk Cloud will normally preserve CSV lookup files created prior to the migration (unless for some technical reasons, the app is uninstalled at some points)
As an additional measure of safety, you can as well download the CSV lookups out of Splunk when performing the following steps
Hint
Empty collections:
If any of the following collection is empty, you can safety ignore its export and associated restoration
Proceed as follows:
Export Data Sources collection
| inputlookup trackme_data_source_monitoring | eval keyid=_key
| eval object=coalesce(data_name, data_host, metric_host)
| outputlookup trackme_v1_trackme_data_source_monitoring.csv
Export Data Hosts collection
| inputlookup trackme_host_monitoring | eval keyid=_key
| eval object=coalesce(data_name, data_host, metric_host)
| eval object="key:host|" . lower(object)
| outputlookup trackme_v1_trackme_host_monitoring.csv
Export Metric Hosts collection
| inputlookup trackme_metric_host_monitoring | eval keyid=_key
| eval object=coalesce(data_name, data_host, metric_host)
| eval object="key:host|" . lower(object)
| outputlookup trackme_v1_trackme_metric_host_monitoring.csv
Export Dedicated Elastic Sources collection
Elastic Dedicated
Elastic Dedicated cannot be migrated from V1 to V2, the trackers have to be re-created from TrackMe V2
However, you can export the V1 collection records to support the re-creation in the further steps
| inputlookup trackme_elastic_sources_dedicated | eval keyid=_key
| outputlookup trackme_v1_trackme_elastic_sources_dedicated.csv
Export Data Sampling custom rules
| inputlookup trackme_data_sampling_custom_models | eval keyid=_key
| outputlookup trackme_v1_trackme_data_sampling_custom_models.csv
Export Lagging policies for Data Sources & Hosts
| inputlookup trackme_custom_lagging_definition | eval keyid=_key
| outputlookup trackme_v1_trackme_custom_lagging_definition.csv
Export Lagging policies for Metric Hosts
| inputlookup trackme_metric_lagging_definition | eval keyid=_key
| outputlookup trackme_v1_trackme_metric_lagging_definition.csv
Export tag policies
| inputlookup trackme_tags_policies | eval keyid=_key
| outputlookup trackme_v1_trackme_tags_policies.csv
Export Logical groups
| inputlookup trackme_logical_group | eval keyid=_key
| eval object_group_members=lower(mvjoin(object_group_members, "|"))
| outputlookup trackme_v1_trackme_logical_group.csv
Upgrading to TrackMe V2
Upgrade the application
Once you are ready to migrate, perform the application upgrade as usually:
If running Splunk Enterprise in a standalone instance, you can either upgrade through Splunk Web, or manually by extracting the compressed tarball archive, in both cases, make sure to restart Splunk post-upgrade
If running Splunk Enterprise in a Search Head Cluster, extract TrackMe V2 to the SHC deployer, publish the bundle and wait for the Rolling Restart to complete
If you are a Splunk Cloud Victoria user, you can upgrade to TrackMe V2 through Splunk Cloud self-services
If you are a Splunk Cloud user on any other flavour, request the application upgrade to Cloud Operations
What will happen once TrackMe was upgraded?
TrackMe V2 will be mostly fully virgin, the Virtual Tenants wizard will propose you to guide you through the creation of your first tenant
Previously defined KVstore do not exist anymore, their content is now lost, this will be the case for almost all KVstore collections
There are no more entities monitored yet
There are no more active alerts
Create your first Virtual Tenant
Designing Virtual Tenants
Free Limited Edition
The Free Limited Edition mode is restricted to two Virtual Tenants
The Full Registered Edition allows to create an unlimited number of tenants
A new key concept in TrackMe V2 consists in the Virtual Tenants feature, depending on your context, Virtual Tenants allow you to:
Dedicate entire virtual instances of TrackMe depending on your needs (think about departments, technologies, companies, teams, etc…)
Scale by scoping Virtual Tenants to reasonable volumes of entities (customers rarely have 10,000 or 20,000 forwarders without any form of convention, context or regions!)
And many more
For the purposes of the migration, this present documentation assumes the creation of a single Virtual Tenant which replaces your previous existing TrackMe V1 deployment.
However, keep in mind that Virtual Tenants provide a key concept to address many various use cases with minimal levels of design.
For more details about the creation of Virtual Tenants for Splunk feeds tracking, see Creating Virtual Tenants
Use the wizard to create your new Virtual Tenant
Following the wizard and creation your first Virtual Tenant, you can define various options at the wizard phase, you can for instance:
Create a tenant with no trackers at all, then create your own Hybrid Trackers after through the wizard
Create a tenant with trackers to be created at the stage of the Virtual tenant creation
Choose settings such as target for indexers, ownership and RBAC
Create a new Virtual Tenant in command line, with no trackers
In TrackMe, go in a Search, and run the following command:
| trackme url="/services/trackme/v2/vtenants/add_tenant" mode="post" body="{\"tenant_desc\":\"Splunk Feeds tracking\",\"tenant_name\":\"splk-feeds-tracking\",\"tenant_roles_admin\":[\"trackme_admin\"],\"tenant_roles_user\":[\"trackme_user\"],\"tenant_owner\":\"admin\",\"tenant_idx_settings\":\"global\",\"tenant_dsm_enabled\":true,\"tenant_dsm_sampling_obfuscation\":\"disabled\",\"tenant_dhm_enabled\":true,\"tenant_dhm_alerting_policy\":\"track_per_host\",\"tenant_mhm_enabled\":true}"
There are many more options available through the REST API, for more information see: TrackMe REST API
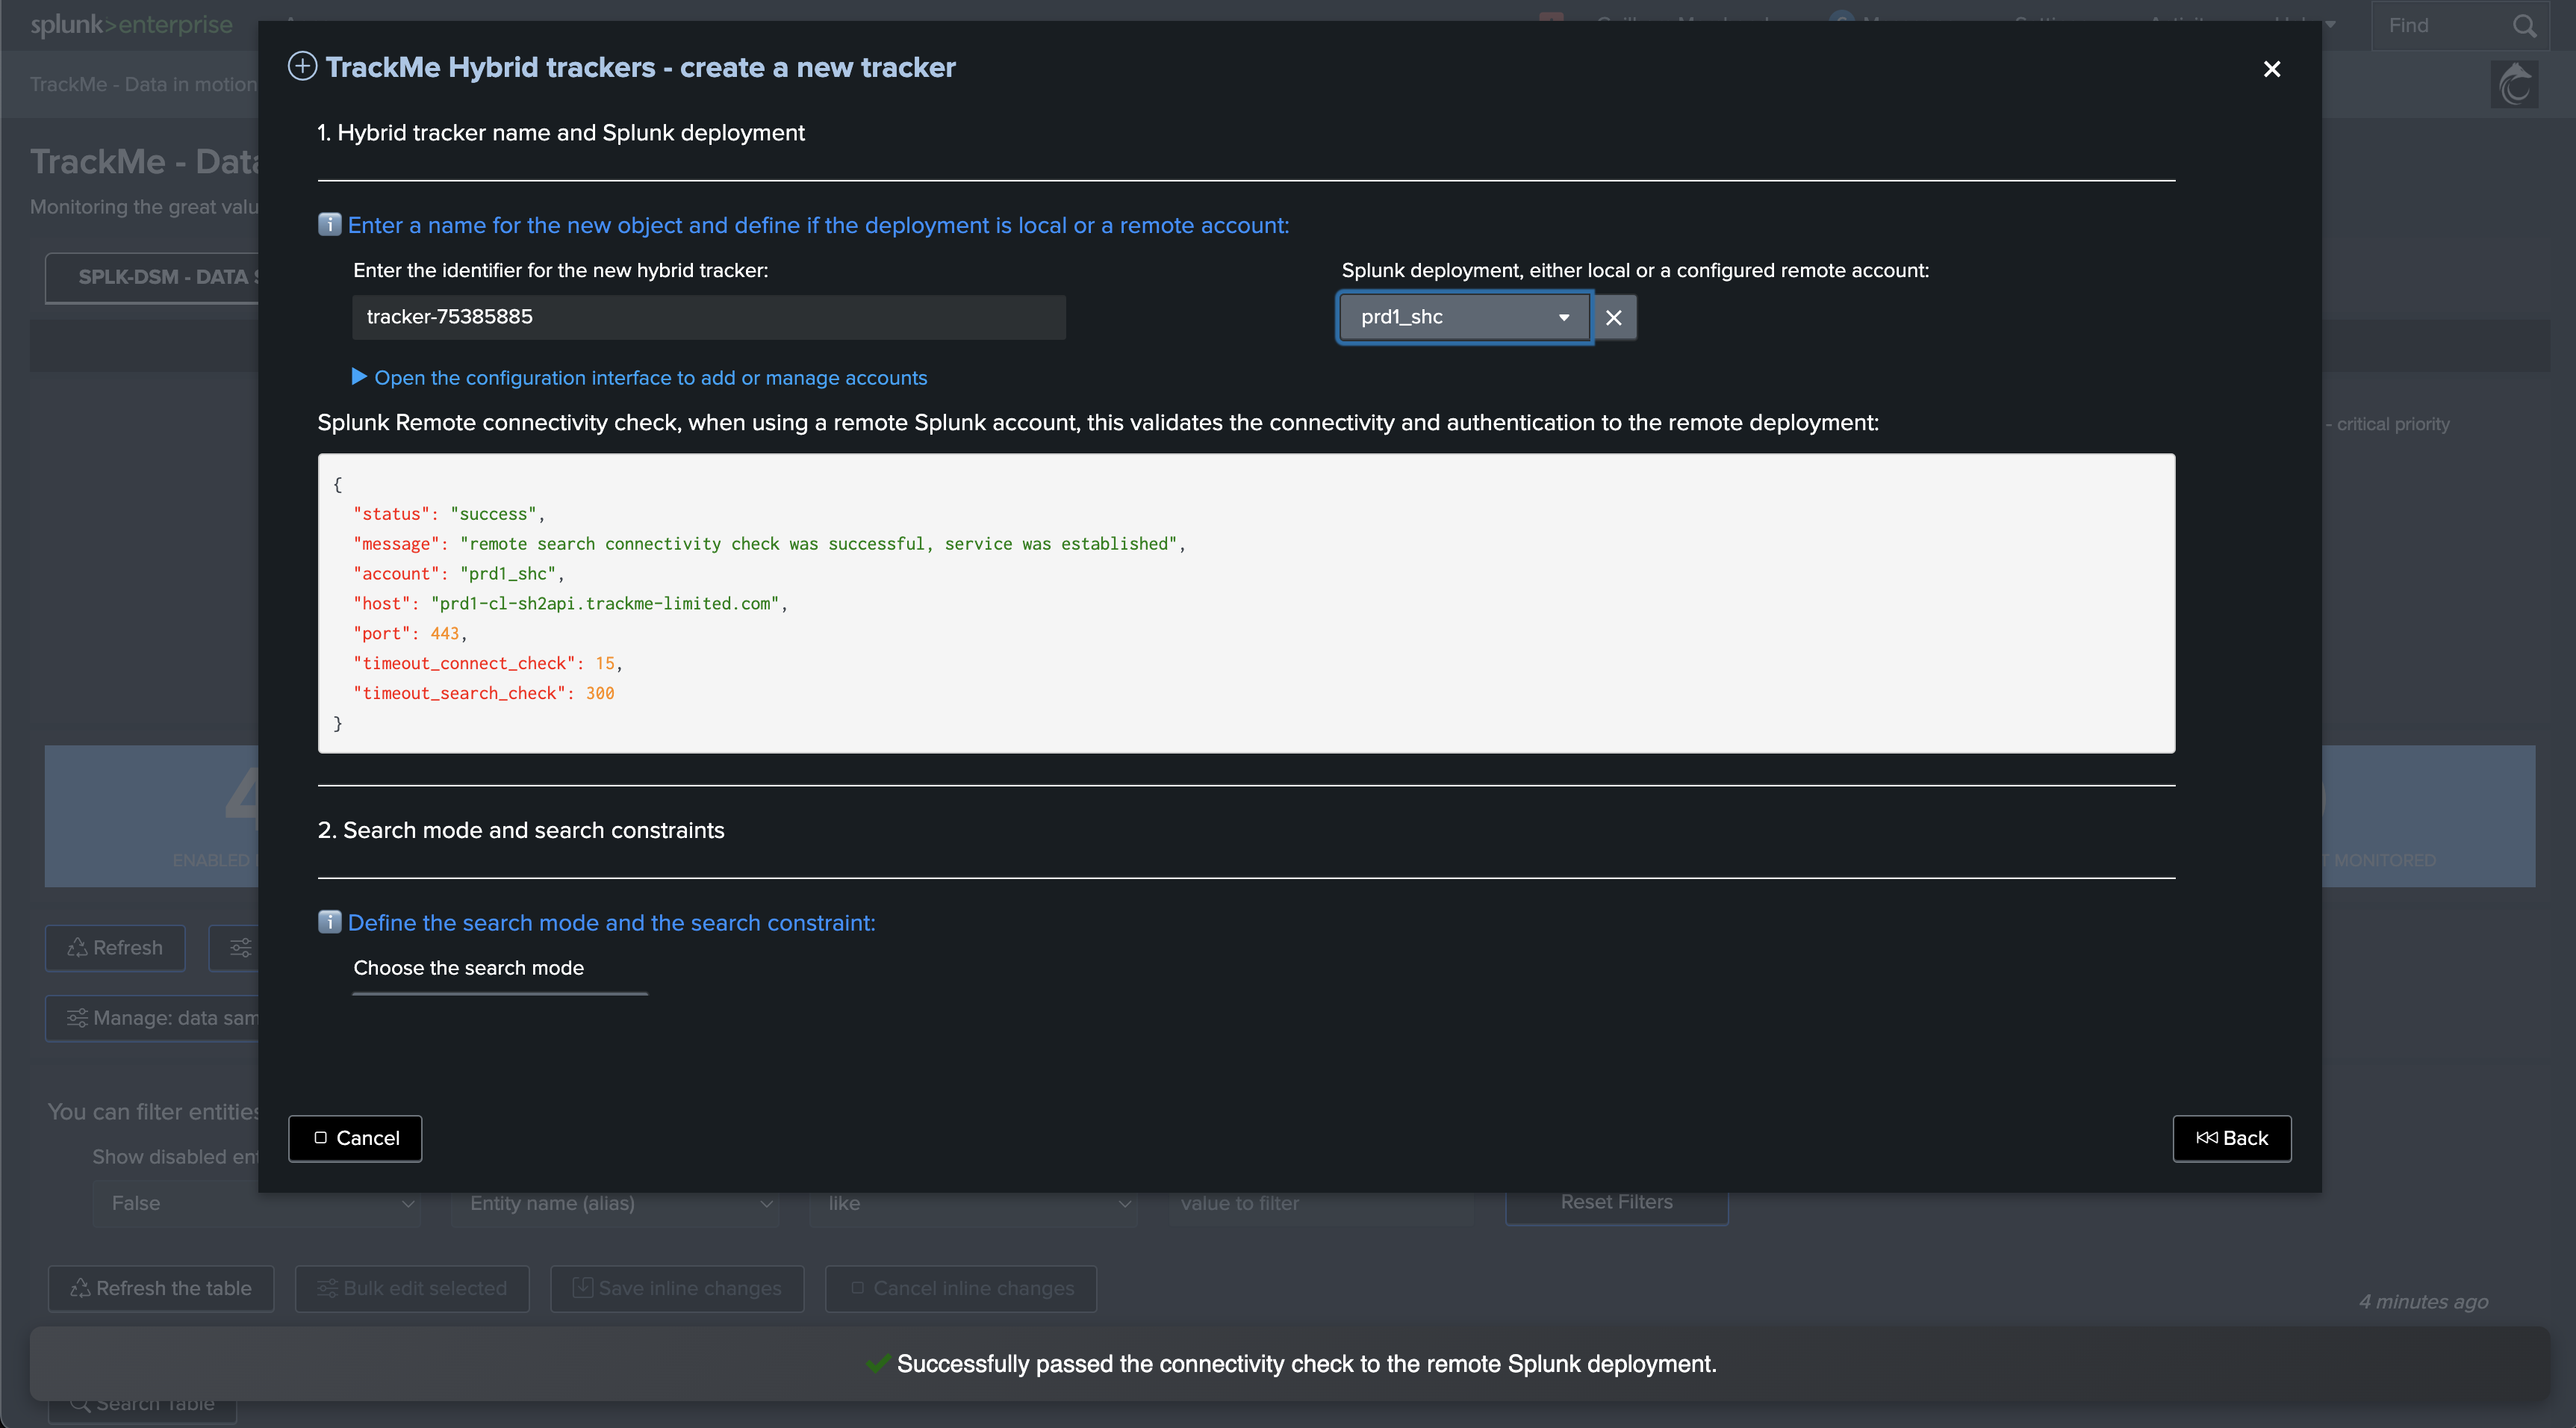
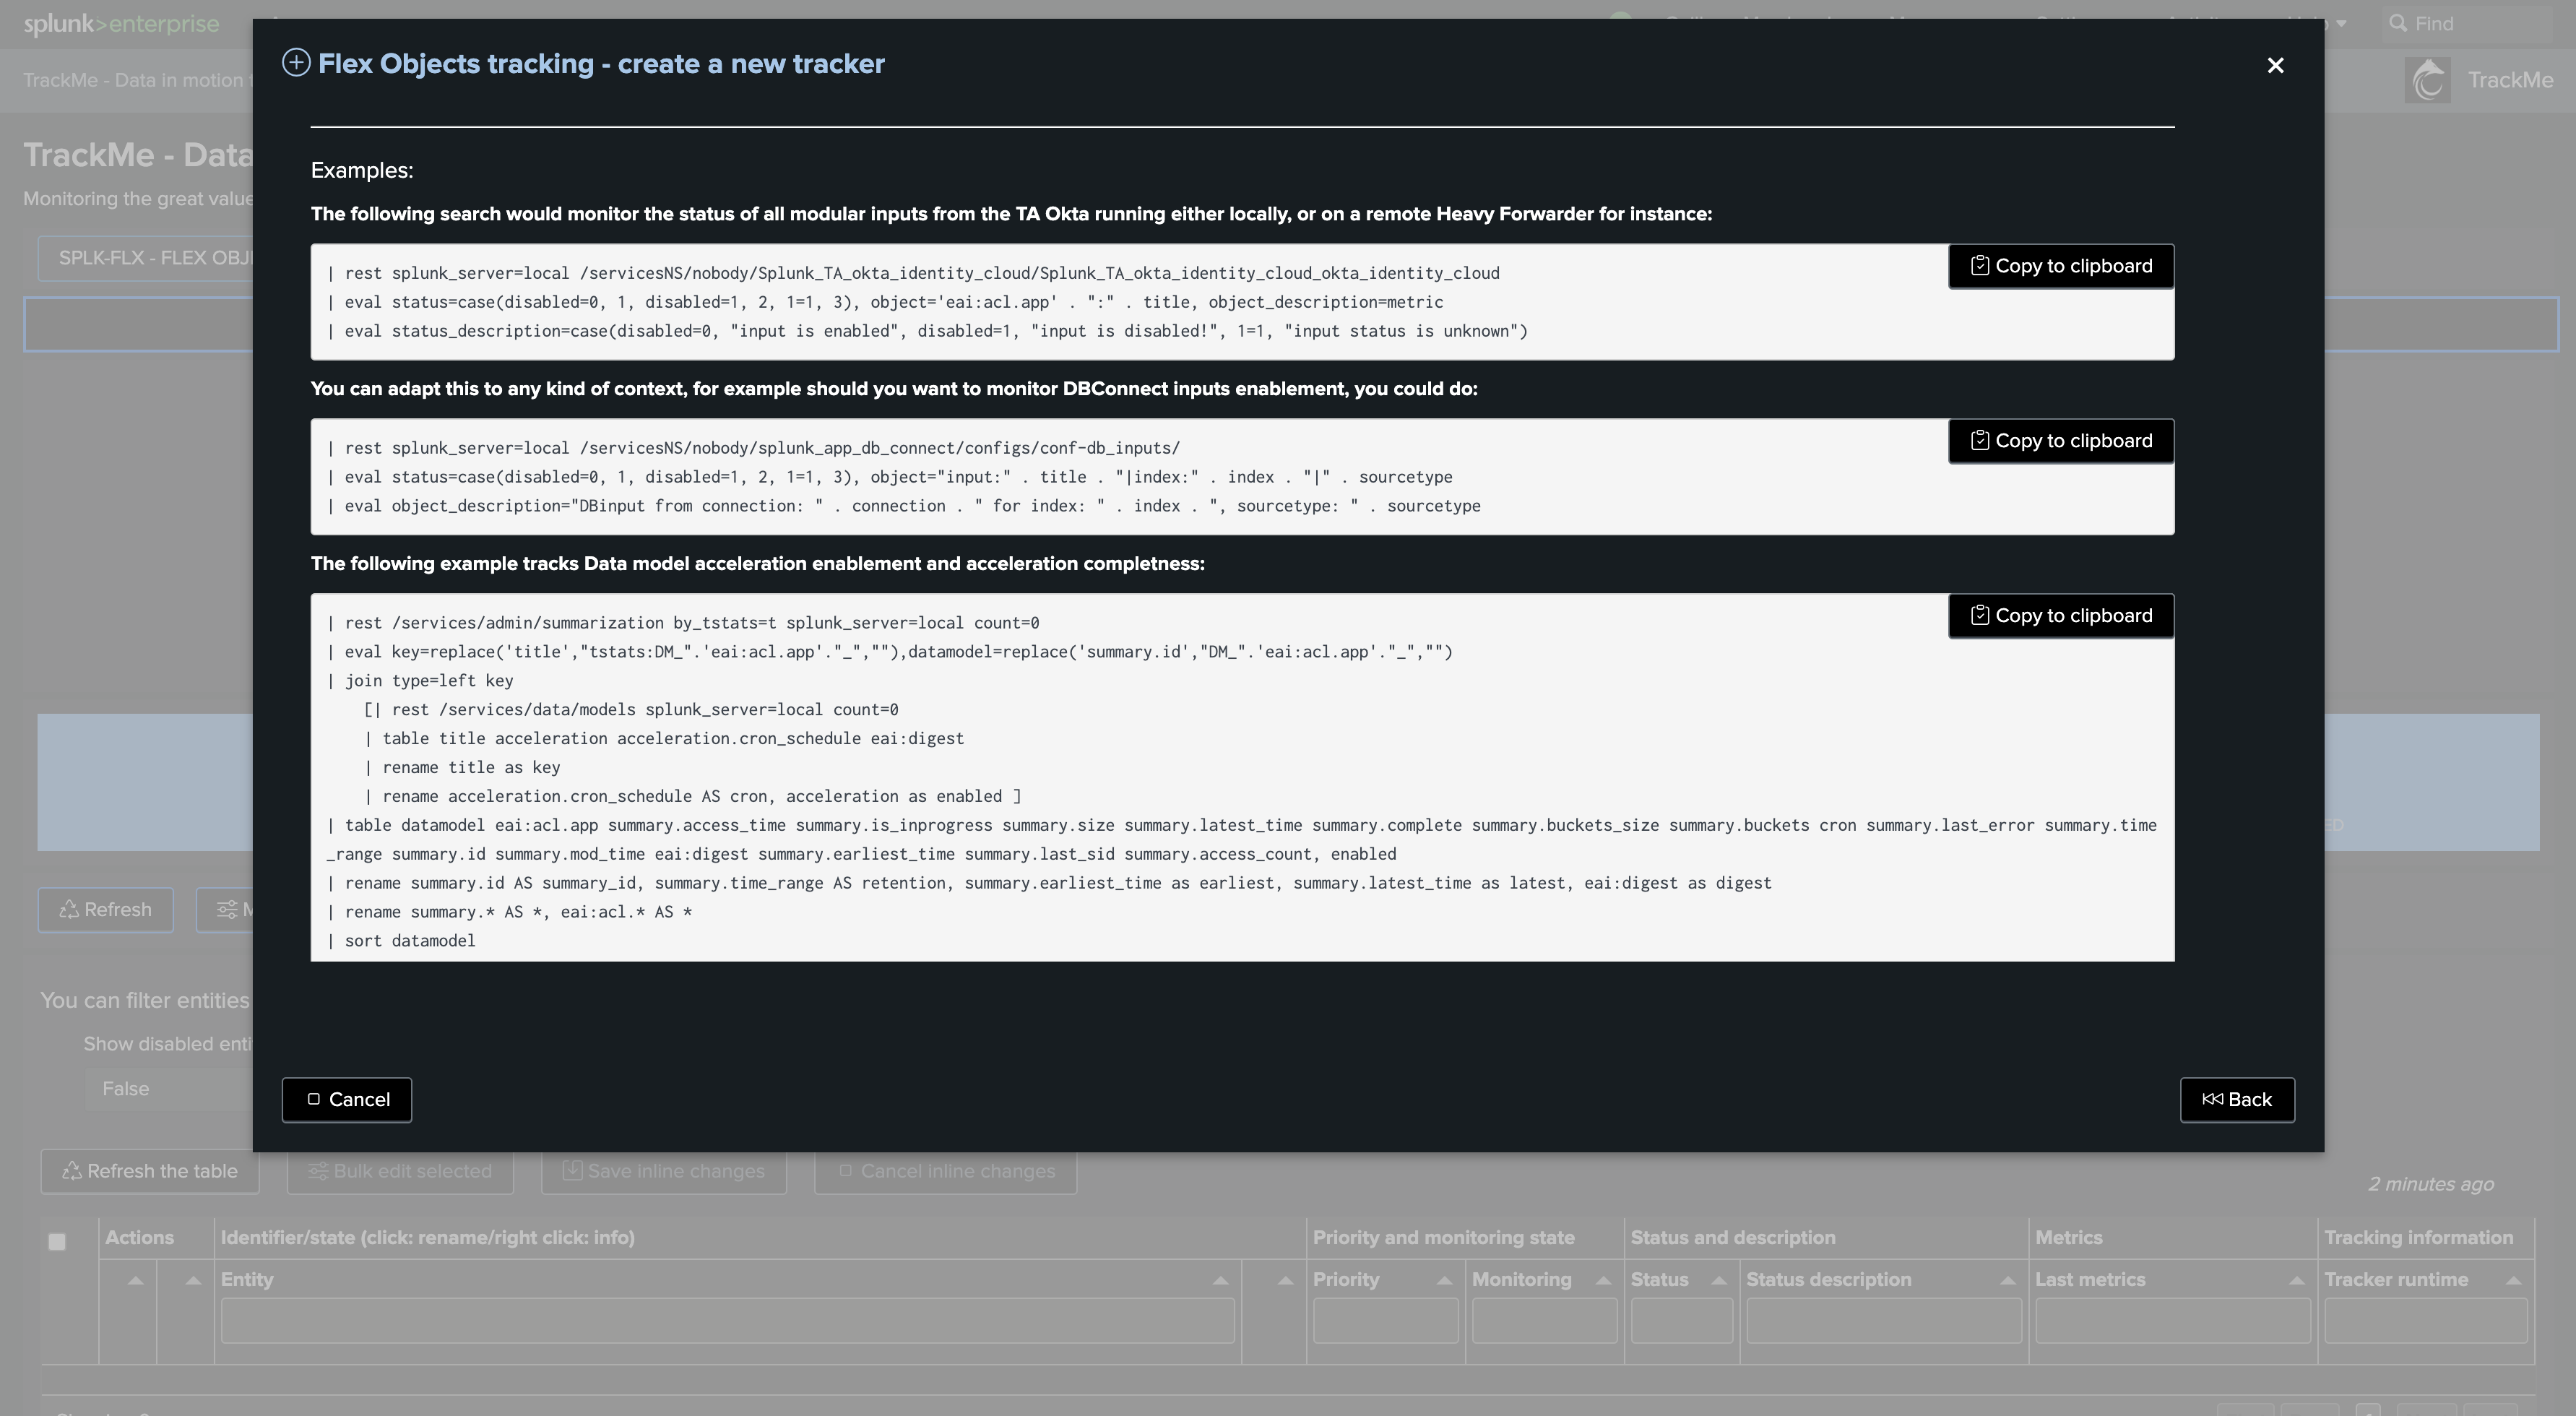
Create Hybrid Trackers
BEFORE restoring any parameters from TrackMe V1, ensure that you have create relevant Hybrid Trackers and started to discover and maintain entities in your brand new TrackMe V2 deployment.
For more information about how to create Hybrid Trackers, see: splk-feeds - Creating and Managing Hybrid Trackers
Restore priorities, monitored state and other main settings
In most of the use cases, there are two first pieces of information that you will want to restore regarding previously known entities.
Component splk-dsm (previously called Data Source Monitoring)
For the purpose of the documentation, and if you have not exported the collection prior to the upgrade, you can still use the summary data to generate the latest known information:
Ignore this if you performed exports prior to the migration
index=trackme_summary sourcetype=stash source="current_state_tracking:data_source"
| stats latest(priority) as priority, latest(data_monitored_state) as monitored_state by key, object
| outputlookup trackme_v1_trackme_data_source_monitoring.csv
Apply:
notes:
replace
splk-feeds-trackingwith the identifier of the tenant previously created
| inputlookup trackme_dsm_tenant_splk-feeds-tracking | eval keyid=_key
| lookup trackme_v1_trackme_data_source_monitoring.csv object OUTPUT data_max_lag_allowed as previous_data_max_lag_allowed, priority as previous_priority, data_monitored_state as previous_monitored_state, data_monitoring_wdays as previous_data_monitoring_wdays, data_override_lagging_class as previous_data_override_lagging_class, min_dcount_host as previous_min_dcount_host
| eval data_max_delay_allowed=coalesce(previous_data_max_lag_allowed, data_max_delay_allowed)
| eval data_max_lag_allowed=coalesce(previous_data_max_lag_allowed, data_max_lag_allowed)
| eval priority=coalesce(previous_priority, priority), monitored_state=coalesce(previous_monitored_state, monitored_state)
| eval data_monitoring_wdays=coalesce(previous_data_monitoring_wdays, data_monitoring_wdays), data_override_lagging_class=coalesce(previous_data_override_lagging_class, data_override_lagging_class), min_dcount_host=coalesce(previous_min_dcount_host, min_dcount_host)
| outputlookup trackme_dsm_tenant_splk-feeds-tracking append=t key_field=keyid
Component splk-dhm (previously called Data Host Monitoring)
For the purpose of the documentation, and if you have not exported the collection prior to the upgrade, you can still use the summary data to generate the latest known information:
Ignore this if you performed exports prior to the migration
index=trackme_summary sourcetype=stash source="current_state_tracking:data_host"
| stats latest(priority) as priority, latest(data_monitored_state) as monitored_state by key, object
| eval object=lower(object)
| eval object="key:host|" . lower(object)
| outputlookup trackme_v1_trackme_host_monitoring.csv
Apply:
notes:
replace
splk-feeds-trackingwith the identifier of the tenant previously created
| inputlookup trackme_dhm_tenant_splk-feeds-tracking | eval keyid=_key
| lookup trackme_v1_trackme_host_monitoring.csv object OUTPUT data_max_lag_allowed as previous_data_max_lag_allowed, priority as previous_priority, data_monitored_state as previous_monitored_state, data_monitoring_wdays as previous_data_monitoring_wdays, data_override_lagging_class as previous_data_override_lagging_class, data_host_alerting_policy as previous_splk_dhm_alerting_policy
| eval data_max_delay_allowed=coalesce(previous_data_max_lag_allowed, data_max_delay_allowed)
| eval data_max_lag_allowed=coalesce(previous_data_max_lag_allowed, data_max_lag_allowed)
| eval priority=coalesce(previous_priority, priority), monitored_state=coalesce(previous_monitored_state, monitored_state)
| eval data_monitoring_wdays=coalesce(previous_data_monitoring_wdays, data_monitoring_wdays), data_override_lagging_class=coalesce(previous_data_override_lagging_class, data_override_lagging_class)
| eval splk_dhm_alerting_policy=coalesce(previous_splk_dhm_alerting_policy, splk_dhm_alerting_policy)
| outputlookup trackme_dhm_tenant_splk-feeds-tracking append=t key_field=keyid
Push expected hosts
You can push expected hosts from a third party lookup (such as a CMDB or the export of TrackMe V1)
This way, if you have hosts which are not active yet, TrackMe will automatically take these into account, and update their status as soon as they are active
See: Pushing Expected Sources to TrackMe (Tracking Expected Sources or Hosts in splk-dsm/splk-dhm)
Component splk-mhm (previously called Metric Host Monitoring)
For the purpose of the documentation, and if you have not exported the collection prior to the upgrade, you can still use the summary data to generate the latest known information:
Ignore this if you performed exports prior to the migration
index=trackme_summary sourcetype=stash source="current_state_tracking:metric_host"
| stats latest(priority) as priority, latest(metric_monitored_state) as monitored_state by key, object
| eval object="key:host|" . lower(object)
| outputlookup trackme_v1_trackme_metric_host_monitoring.csv
Apply:
notes:
replace
splk-feeds-trackingwith the identifier of the tenant previously created
| inputlookup trackme_mhm_tenant_splk-feeds-tracking | eval keyid=_key
| lookup trackme_v1_trackme_metric_host_monitoring.csv object OUTPUT priority as previous_priority, metric_monitored_state as previous_monitored_state
| eval priority=coalesce(previous_priority, priority), monitored_state=coalesce(previous_monitored_state, monitored_state)
| outputlookup trackme_mhm_tenant_splk-feeds-tracking append=t key_field=keyid
Restore lagging policies for splk-dsm/splk-dhm
If you had created lagging policies in TrackMe V1 for splk-dsm/splk-dhm, these records were stored in the following collection:
collection: kv_trackme_custom_lagging_definition, transforms: trackme_custom_lagging_definition
You can restore the policies from an export made previously:
notes:
replace
splk-feeds-trackingwith the identifier of the tenant previously createdTrackMe V2 has an additional concept in the lagging policies where delay and lag are stored independently
For the purpose of the migration, we will apply the V1 value in both cases
You can later modify these values if needed in TrackMe V2
Apply:
| inputlookup trackme_v1_trackme_custom_lagging_definition.csv
| eval value_delay=value, value_lag=value
| outputlookup trackme_common_lagging_classes_tenant_splk-feeds-tracking
Restore lagging policies for splk-mhm
If you had created lagging policies in TrackMe V1 for splk-mhm, these records were stored in the following collection:
collection: kv_trackme_custom_lagging_definition, transforms: trackme_custom_lagging_definition
You can restore the policies from an export made previously:
notes:
replace
splk-feeds-trackingwith the identifier of the tenant previously created
Apply:
| inputlookup trackme_v1_trackme_metric_lagging_definition.csv
| outputlookup trackme_mhm_lagging_classes_tenant_splk-feeds-tracking
Restore logical groups association
If you had created logical groups association in TrackMe V1 for splk-dhm/splk-mhm, these records were stored in the following collection:
collection: kv_trackme_logical_group, transforms: trackme_logical_group
You can restore the policies from an export made previously:
notes:
replace
splk-feeds-trackingwith the identifier of the tenant previously createdMake sure you carefully exported and respect the SPL syntax, the object_group_members field is expected as a pipe separated field form the export, and transformed back to an mvfield
Apply:
| inputlookup trackme_v1_trackme_logical_group.csv
| makemv delim="|" object_group_members
| outputlookup trackme_common_logical_group_tenant_splk-feeds-tracking
Restore tag policies
If you had created tag policies in TrackMe V1, these records were stored in the following collection:
collection: kv_trackme_tags_policies, transforms: trackme_tags_policies
You can restore the policies from an export made previously:
notes:
replace
splk-feeds-trackingwith the identifier of the tenant previously created
| inputlookup trackme_v1_trackme_tags_policies.csv
| outputlookup trackme_common_tag_policies_tenant_splk-feeds-tracking
Restore Data Sampling custom rules
If you had created tag policies in TrackMe V1, these records were stored in the following collection:
collection: kv_trackme_data_sampling_custom_models, transforms: trackme_data_sampling_custom_models
notes:
replace
splk-feeds-trackingwith the identifier of the tenant previously created
| inputlookup trackme_v1_trackme_data_sampling_custom_models.csv
| outputlookup trackme_dsm_data_sampling_custom_models_tenant_splk-feeds-tracking
Re-create TrackMe alerts
You cannot migrate as such TrackMe V1 alerts, nor modify the existing alerts to match TrackMe V2 requirements.
You must disable these alerts in the first phase, then create new alerts up to your needs in TrackMe V2, and finally later on, delete the TrackMe V1 alerts once you are up and running.
To identity existing active alerts:
| rest splunk_server=local /servicesNS/nobody/trackme/saved/searches | search eai:acl.app="trackme" alert.track=1
| fields title, cron_schedule, schedule_window, alert.suppress.fields, alert.suppress.period, disabled, next_scheduled_time, id, actions
For more details about the creation of TrackMe alerts, see Alerting Architecture & Third-Party Integration
End of migration
You are now done and should have a fully operational fancy TrackMe V2 deployment, well done!
Review TrackMe V2 carefully, for more information about the massively enhanced troubleshooting and administration experience in TrackNe V2:
You can now get some rest and enjoy well deserved pizza, with or without pepperoni depending on your preferences.