Outliers Anomaly Detection
Machine Learning Outliers Anomaly Detection in TrackMe
TrackMe implements Machine Learning Outliers Anomaly detection in every component, from the feeds tracking to the monitoring of scheduled activity in Splunk, based on the following concepts:
TrackMe relies on the Splunk Machine Learning Toolkit and the Python Scientific Packages with its own custom logic and workflow which orchestrates the life cycle of anomaly detection in the product
We use the
applyandfitcommands from the toolkit and orchestrate their usage when entities are discovered and maintained, thedensity functionis used for the anomaly detection calculation purposesTrackMe orchestrates the Anomaly Detection workflow in two essential steps, the ML models generation and training (
mltrain), and the ML models rendering phase (mlmonitor) where TrackMe verifies the Anomaly detection status for a given entityDepending on the TrackMe
component, ML models are generates automatically using metrics that are relevant for the component activity, models can be created, deleted, and customised easily to change the model behaviours if necessary
Hint
ML models learn over time from historical data
ML detection in TrackMe requires historical data and gets more accurate over time
Depending on the settings, this can require up to several weeks or months of historical data with the most granular parameters
Historical data translates to the metrics stored in TrackMe’s metric store indexes, not the raw data itself
Metrics start to get generated as soon as TrackMe discovered and started to maintain an entity
While TrackMe learns about the data by training ML models, it applies various safeties to avoid generating false positive alerts
Through this documentation, we demonstrate by example how Anomaly detection works in our product to help you tackle the challenges of detecting difficult conditions by more traditional monitoring approaches, however TrackMe does it in a simple and efficient way, which is automated in most of the cases and easily manageable.
Data seasonality and behaviours
In most of the cases, data have typical patterns which we eventually can recognize when running investigations.
The situation is however more complex when it comes to automating this recognition, Machine Learning and current major progresses in AI are leading the way through new powerful ways to tackle these challenges.
Note
Generating samples for outliers detection
You can find, download and use with no restrictions the following content: https://github.com/trackme-limited/mlgen-python
We use this content to generate samples with seasonality concepts for the purposes of development, qualification and documentation
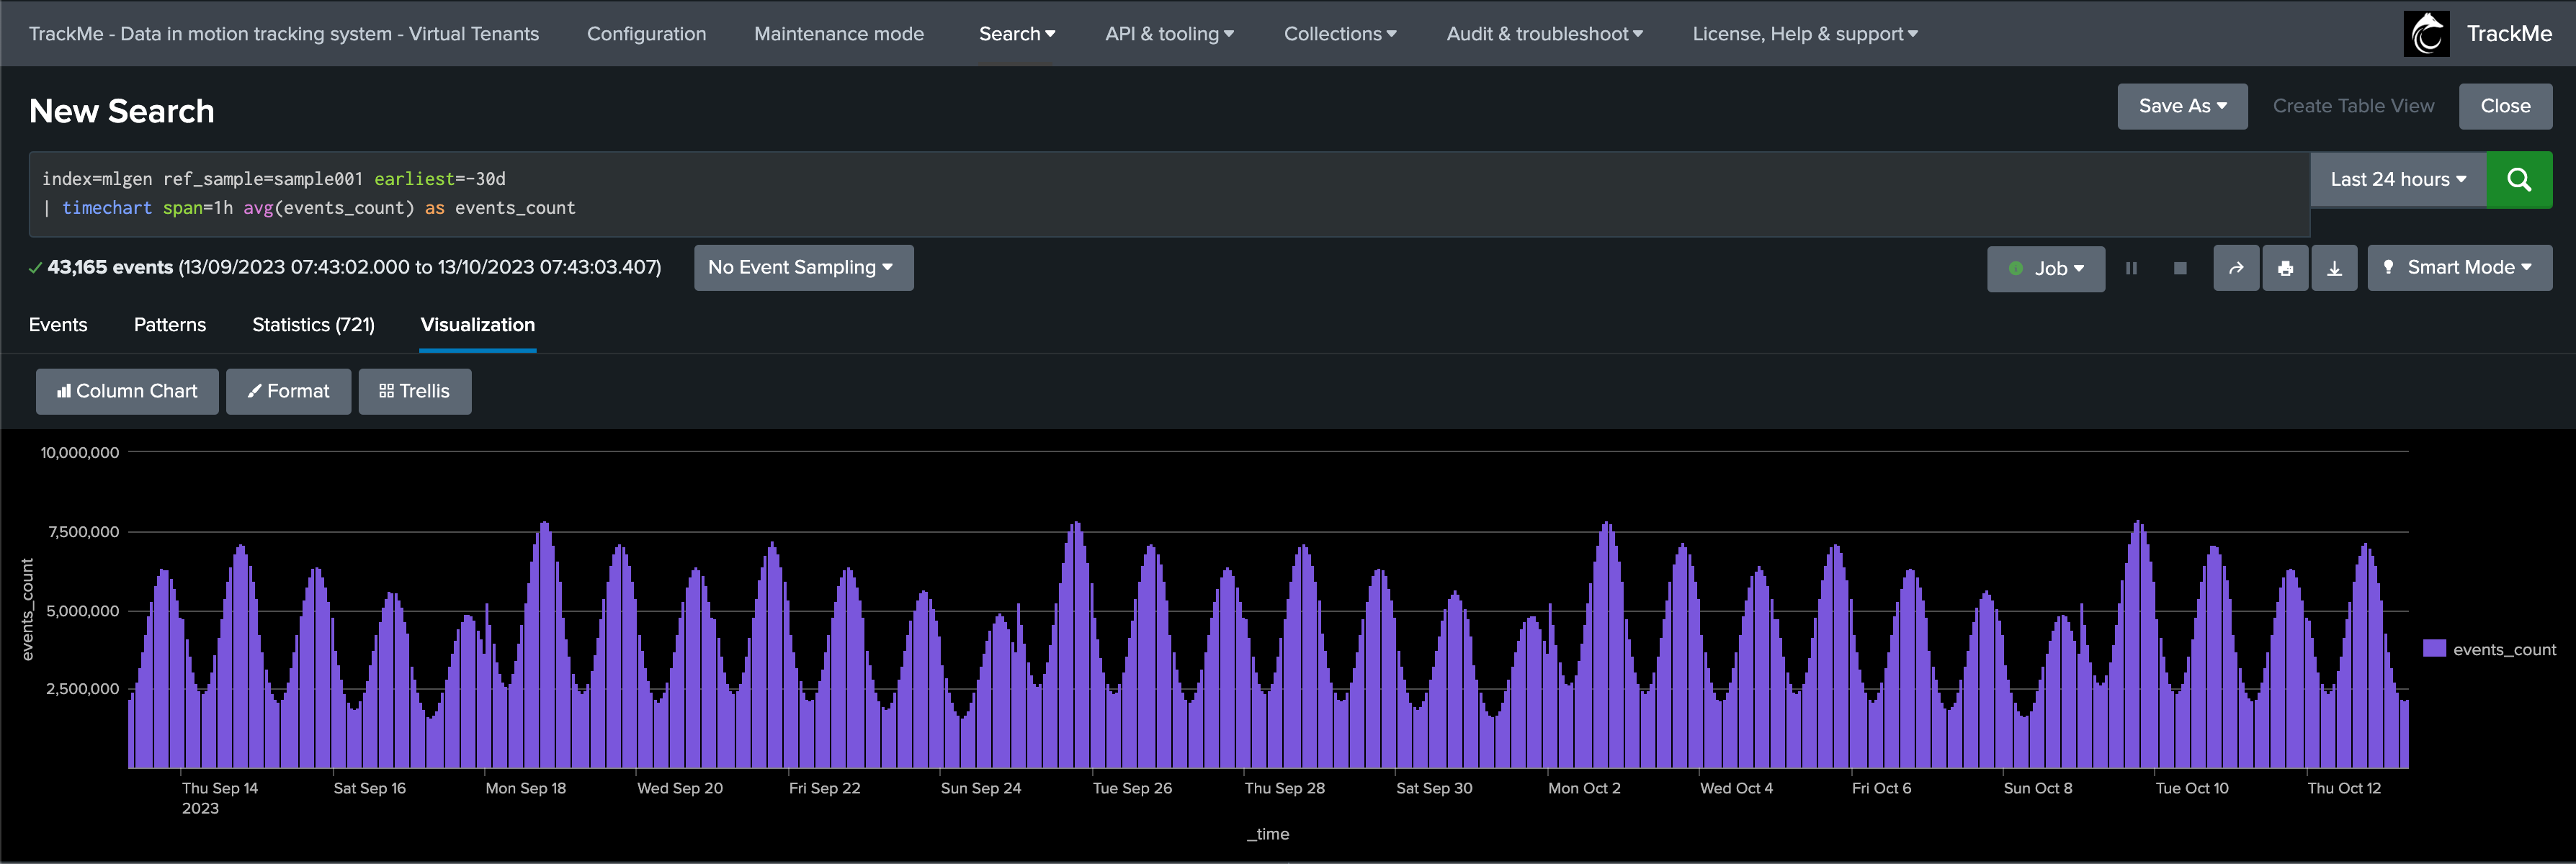
Sample pattern over past 30 days, seasonality by week days with higher activity during the working hours
Demonstrating Machine Outliers detection in TrackMe
How ML Outliers works in TrackMe
In short:
All components are eligible to Machine Learning Outliers
Outliers rely on TrackMe generated metrics only
This allows to run fast and efficient training and rendering searches, with the minimal costs in terms of resources
For the purpose of this demonstration, we create a Flex Object TrackMe tenant which takes into account our ML generator:
Fore more information about TrackMe restricted Flex Objects component: splk-flx - Creating and managing Flex Trackers
Our Flex tracker:
Tracker name: “demo”
Runs every 5 minutes (earliest: -5m, latest: now)
index=mlgen ref_sample=*
| stats avg(dcount_hosts) as dcount_hosts, avg(events_count) as events_count by ref_sample

| eval object = "mlgen" . ":" . ref_sample, alias = object
| eval object_description = "Demo Outliers in TrackMe"
| eval metrics = "{'dcount_hosts': " . dcount_hosts . ", 'events_count': " . events_count . "}"
| eval outliers_metrics = "{'dcount_hosts': {'alert_lower_breached': 1, 'alert_upper_breached': 1}, 'events_count': {'alert_lower_breached': 1, 'alert_upper_breached': 1}}"
| eval status=1
| eval status_description="Machine Learning Outliers detection demo"
| table object, alias, object_description, metrics, outliers_metrics, status, status_description

``` alert if inactive for more than 3600 sec```
| eval max_sec_inactive=3600
This Flex Tracker creates entities by monitoring the availability of data in our ML index, it also generates metrics and automates the definition of models which alert on both lower bound and upper bound outliers.
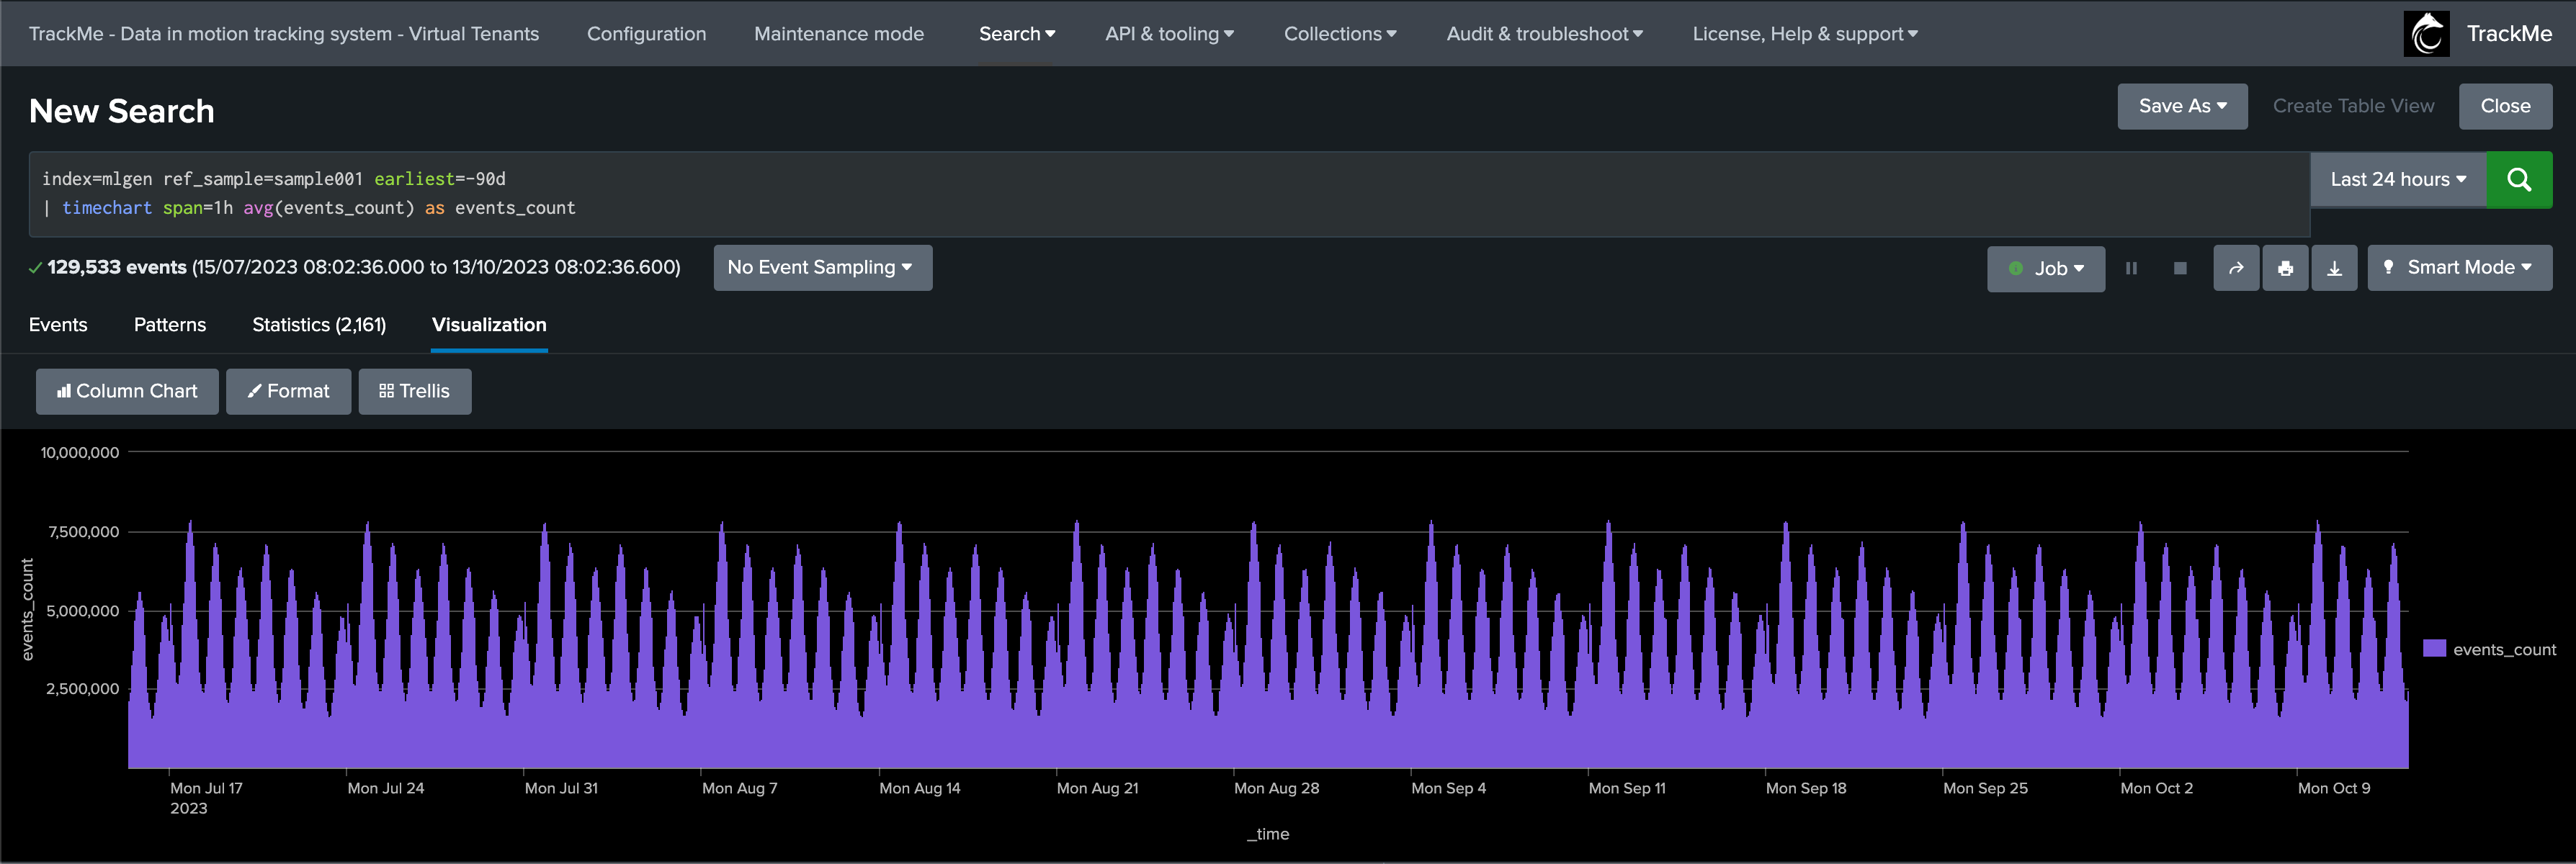
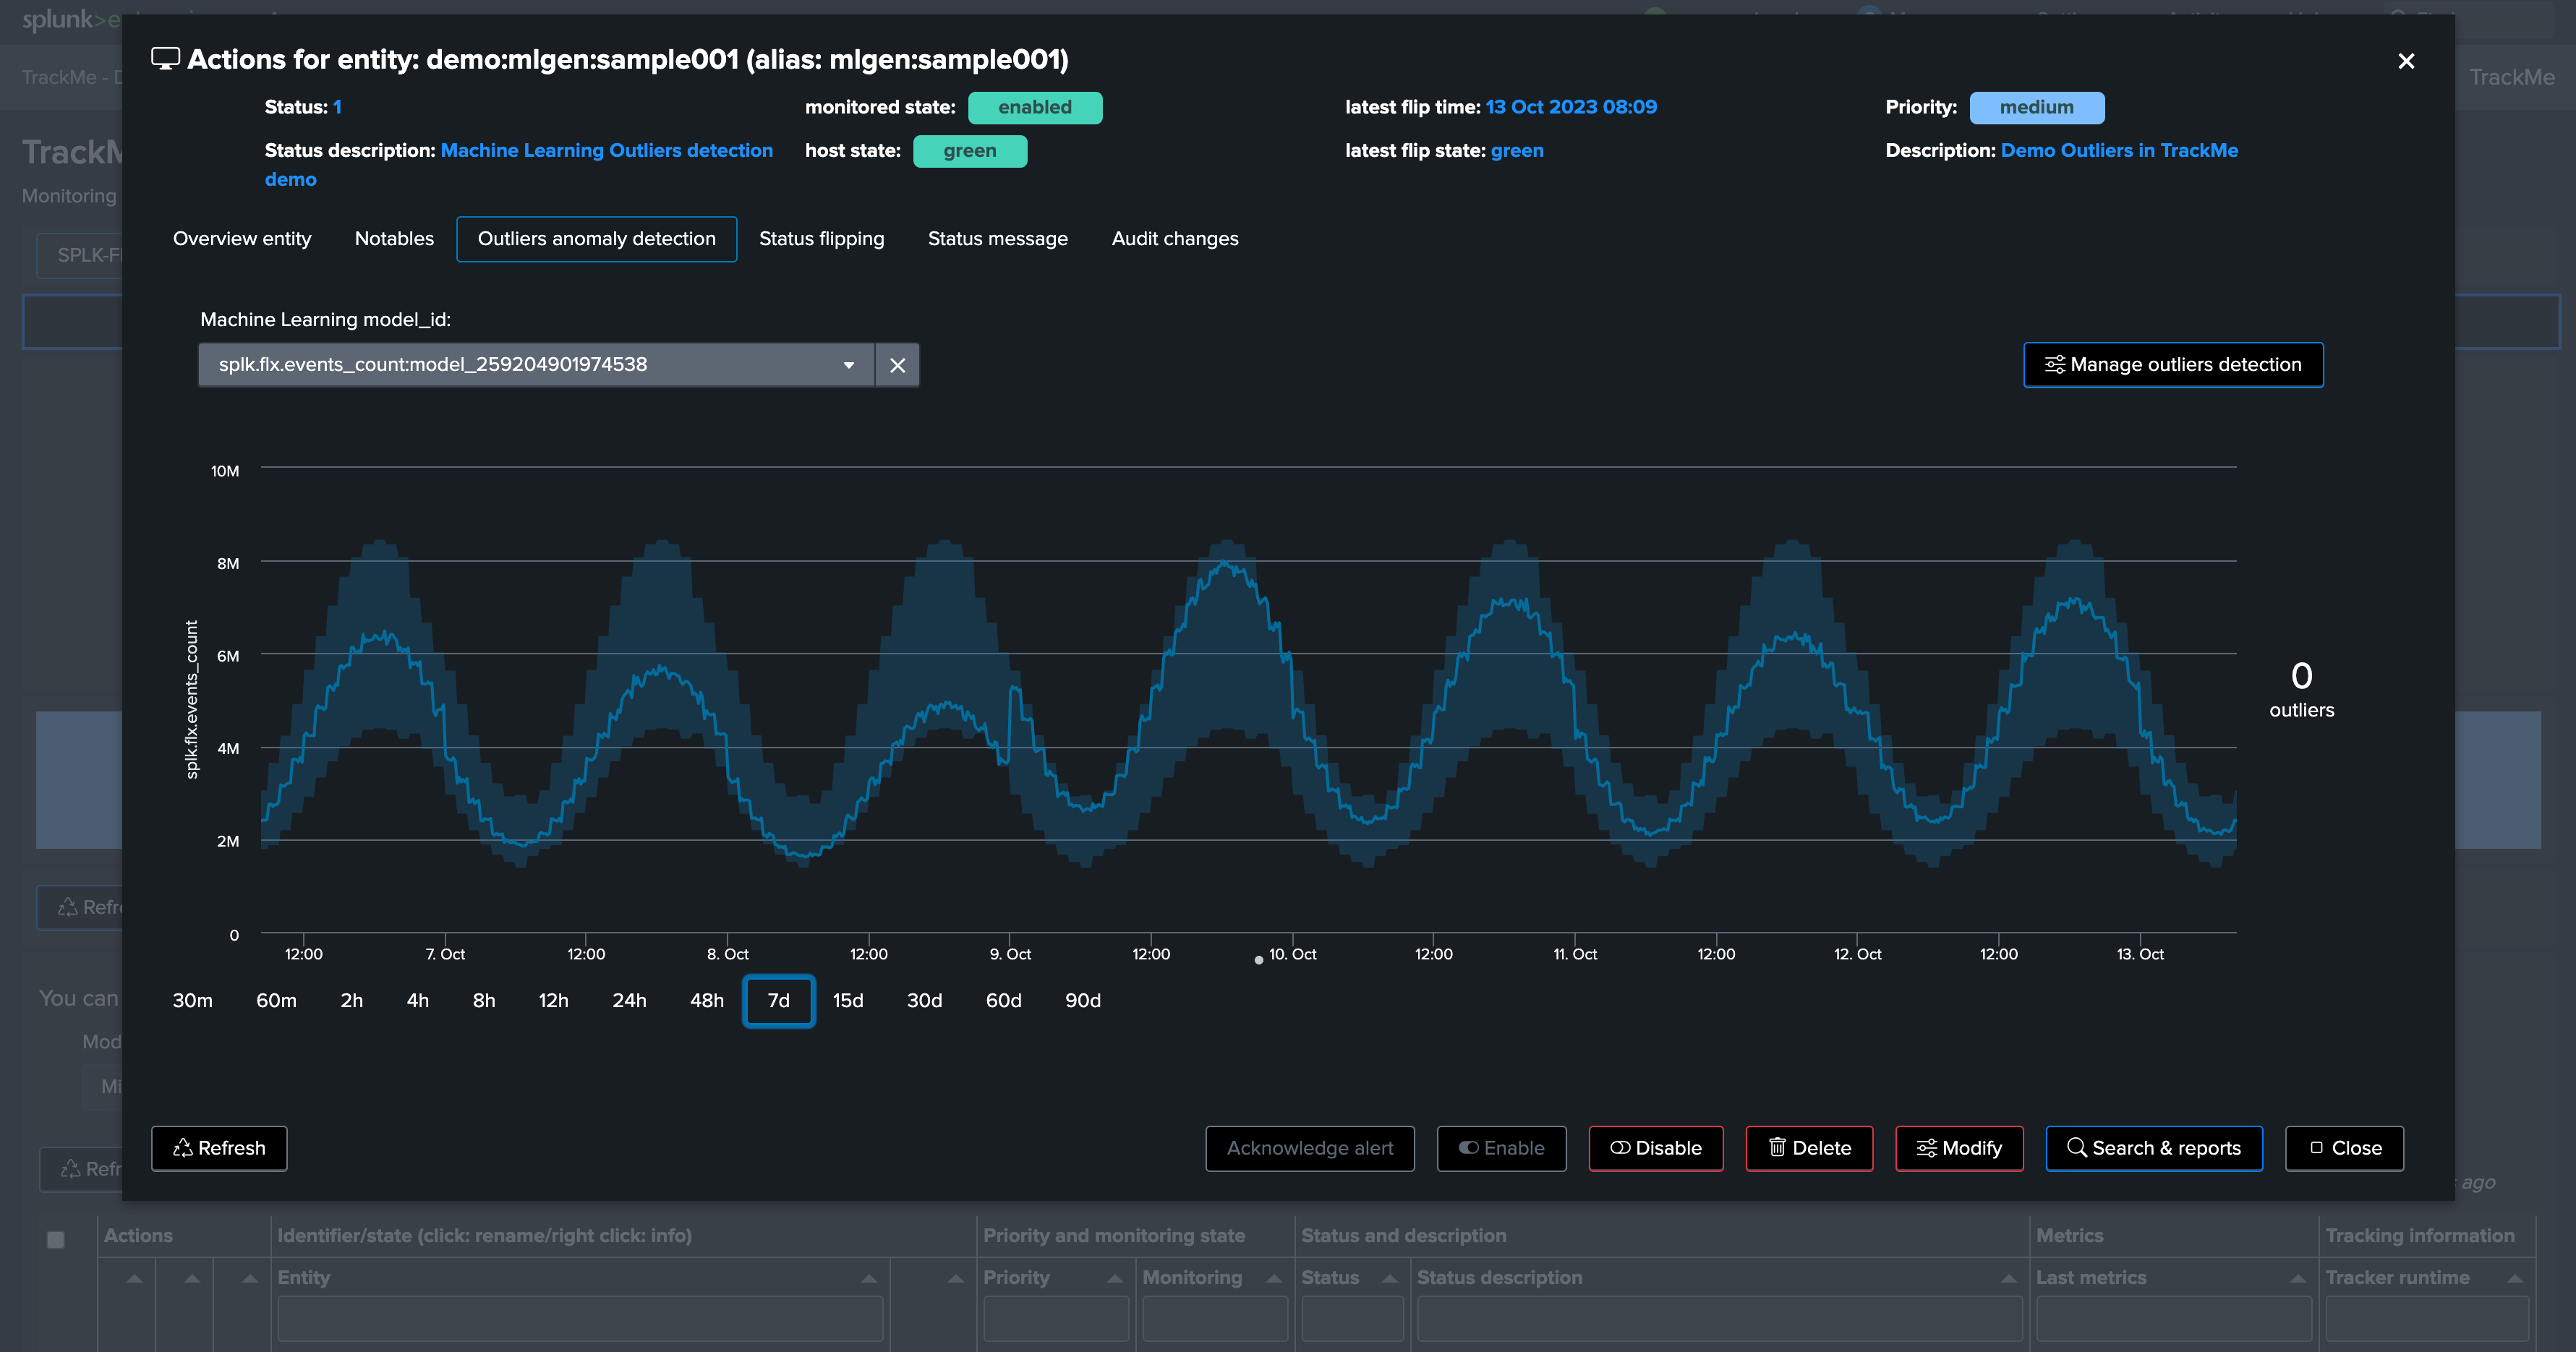
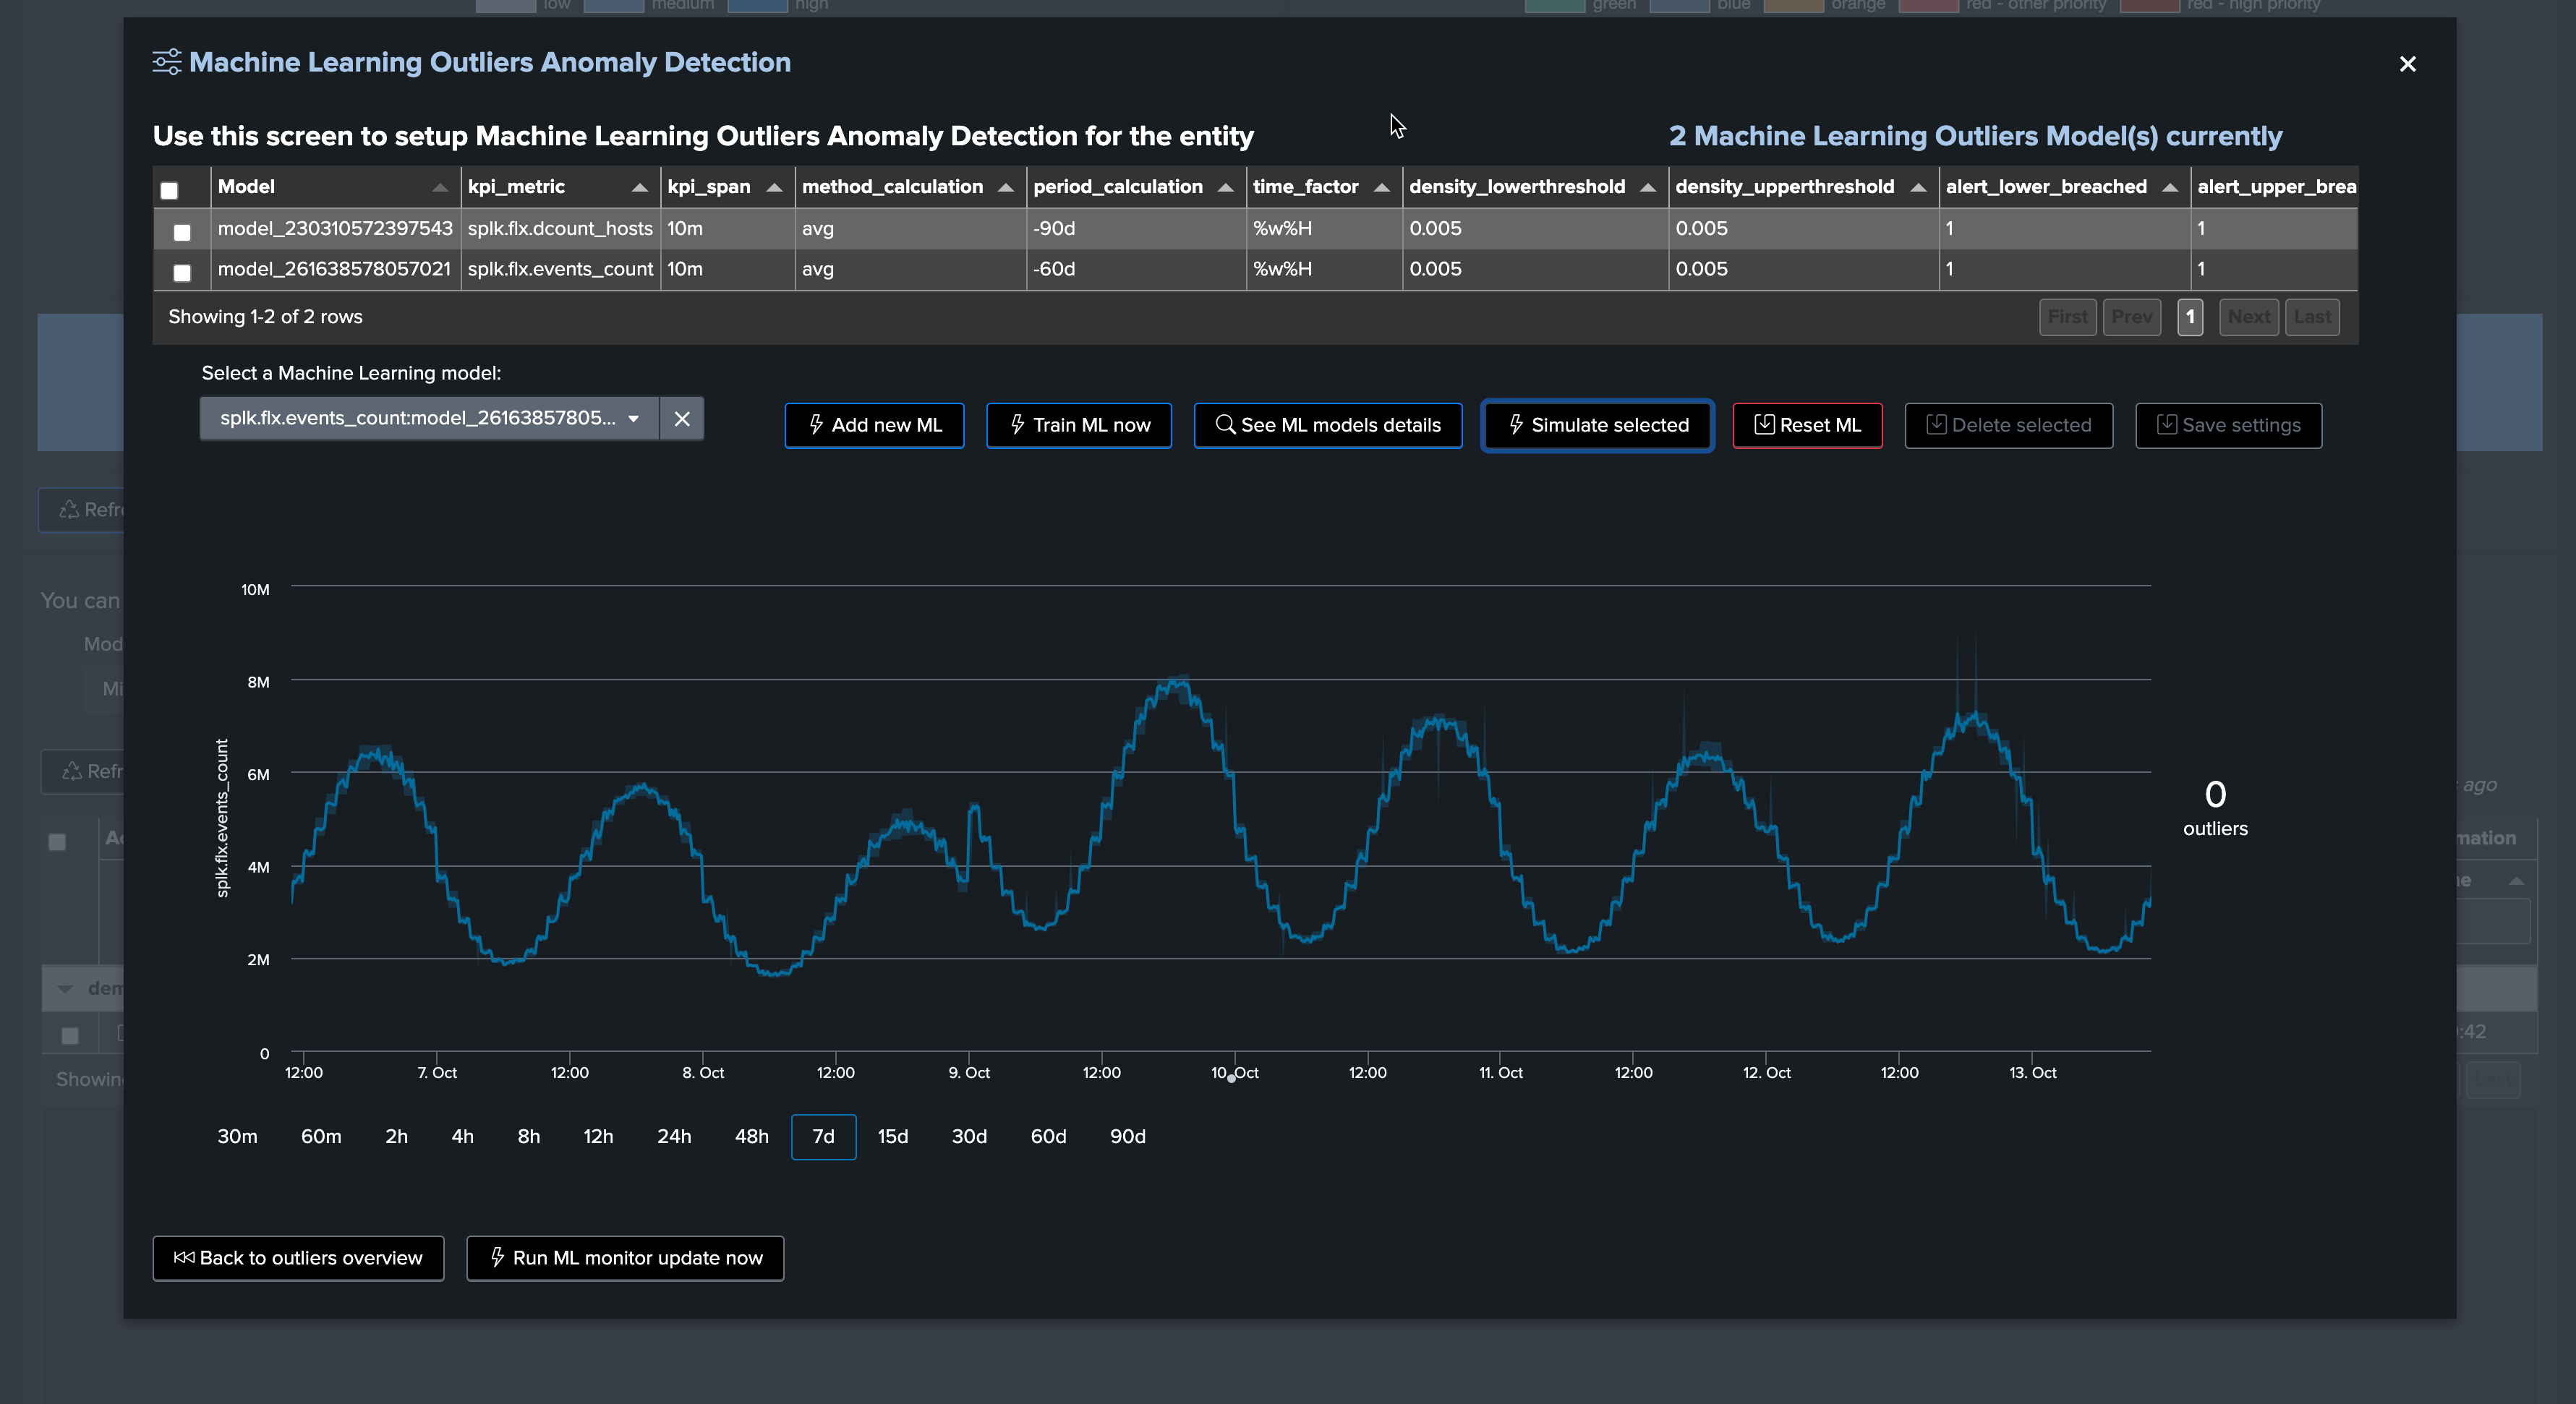
We have our ML generator running and having backfilled the past 90 days of data, it currently does not generate any outliers:
index=mlgen ref_sample=sample001 earliest=-90d
| timechart span=1h avg(events_count) as events_count
Our ML generator takes into account the week days, we can use the following search to compare the relative activity of the current week days against the past 4 previous same week day:
index=mlgen ref_sample=sample001 earliest=@d latest=+1d@d
| timechart span=5m avg(events_count) as events_count_today
| appendcols [
search index=mlgen ref_sample=sample001 earliest=-7d@d latest=-6d@d
| timechart span=5m avg(events_count) as events_count_ref
]
| appendcols [
search index=mlgen ref_sample=sample001 earliest=-14d@d latest=-13d@d
| timechart span=5m avg(events_count) as events_count_ref2
]
| appendcols [
search index=mlgen ref_sample=sample001 earliest=-21d@d latest=-20d@d
| timechart span=5m avg(events_count) as events_count_ref3
]
results:

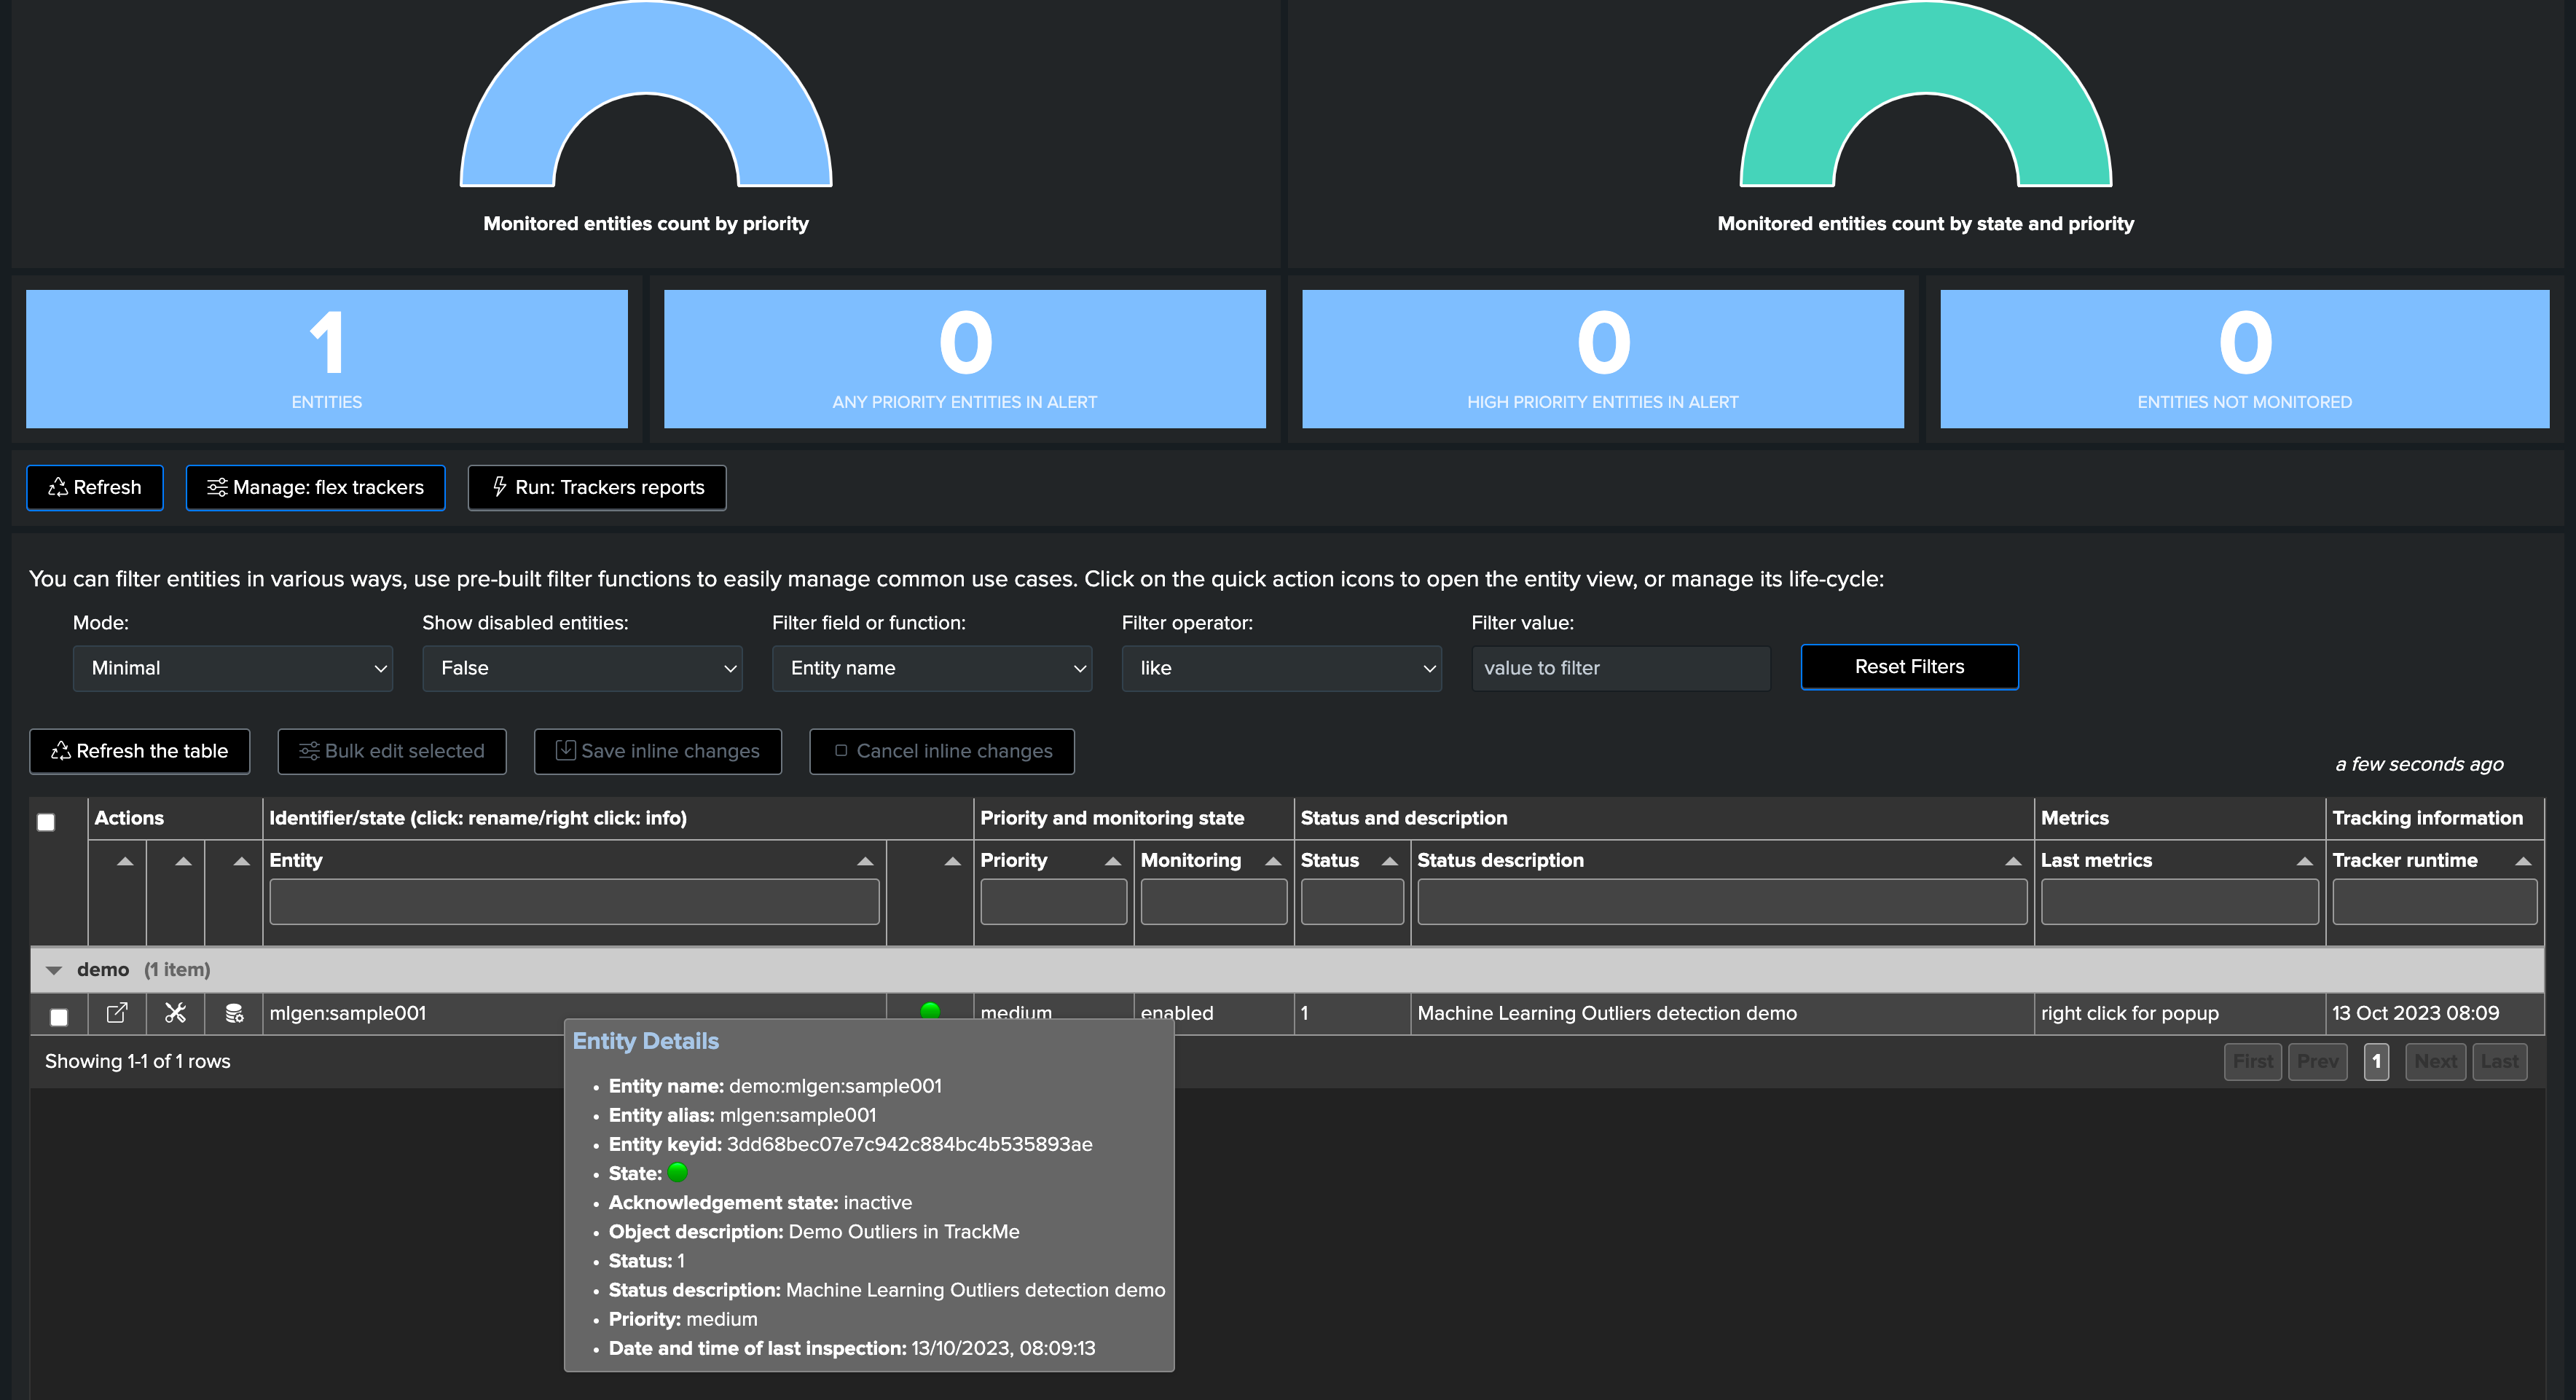
TrackMe automatically discovered the entity, let’s take note of its internal identifier which we will use to manually backfill TrackMe metrics, as if we had been monitoring this entity since the beginning:
We use mcollect to force backfilling metrics, pay attention to the name of the object, the identifier and tenant identifier:
index=mlgen ref_sample=sample001 earliest=-90d latest=-5m
| bucket _time span=5m
| stats avg(dcount_hosts) as trackme.splk.flx.dcount_hosts, avg(events_count) as trackme.splk.flx.events_count by _time, ref_sample
| eval object = "demo:mlgen:sample001", object_category = "splk-flx", object_id = "3dd68bec07e7c942c884bc4b535893ae", tenant_id = "02-demo-outliers"

| mcollect index=trackme_metrics split=t object, object_category, object_id, tenant_id
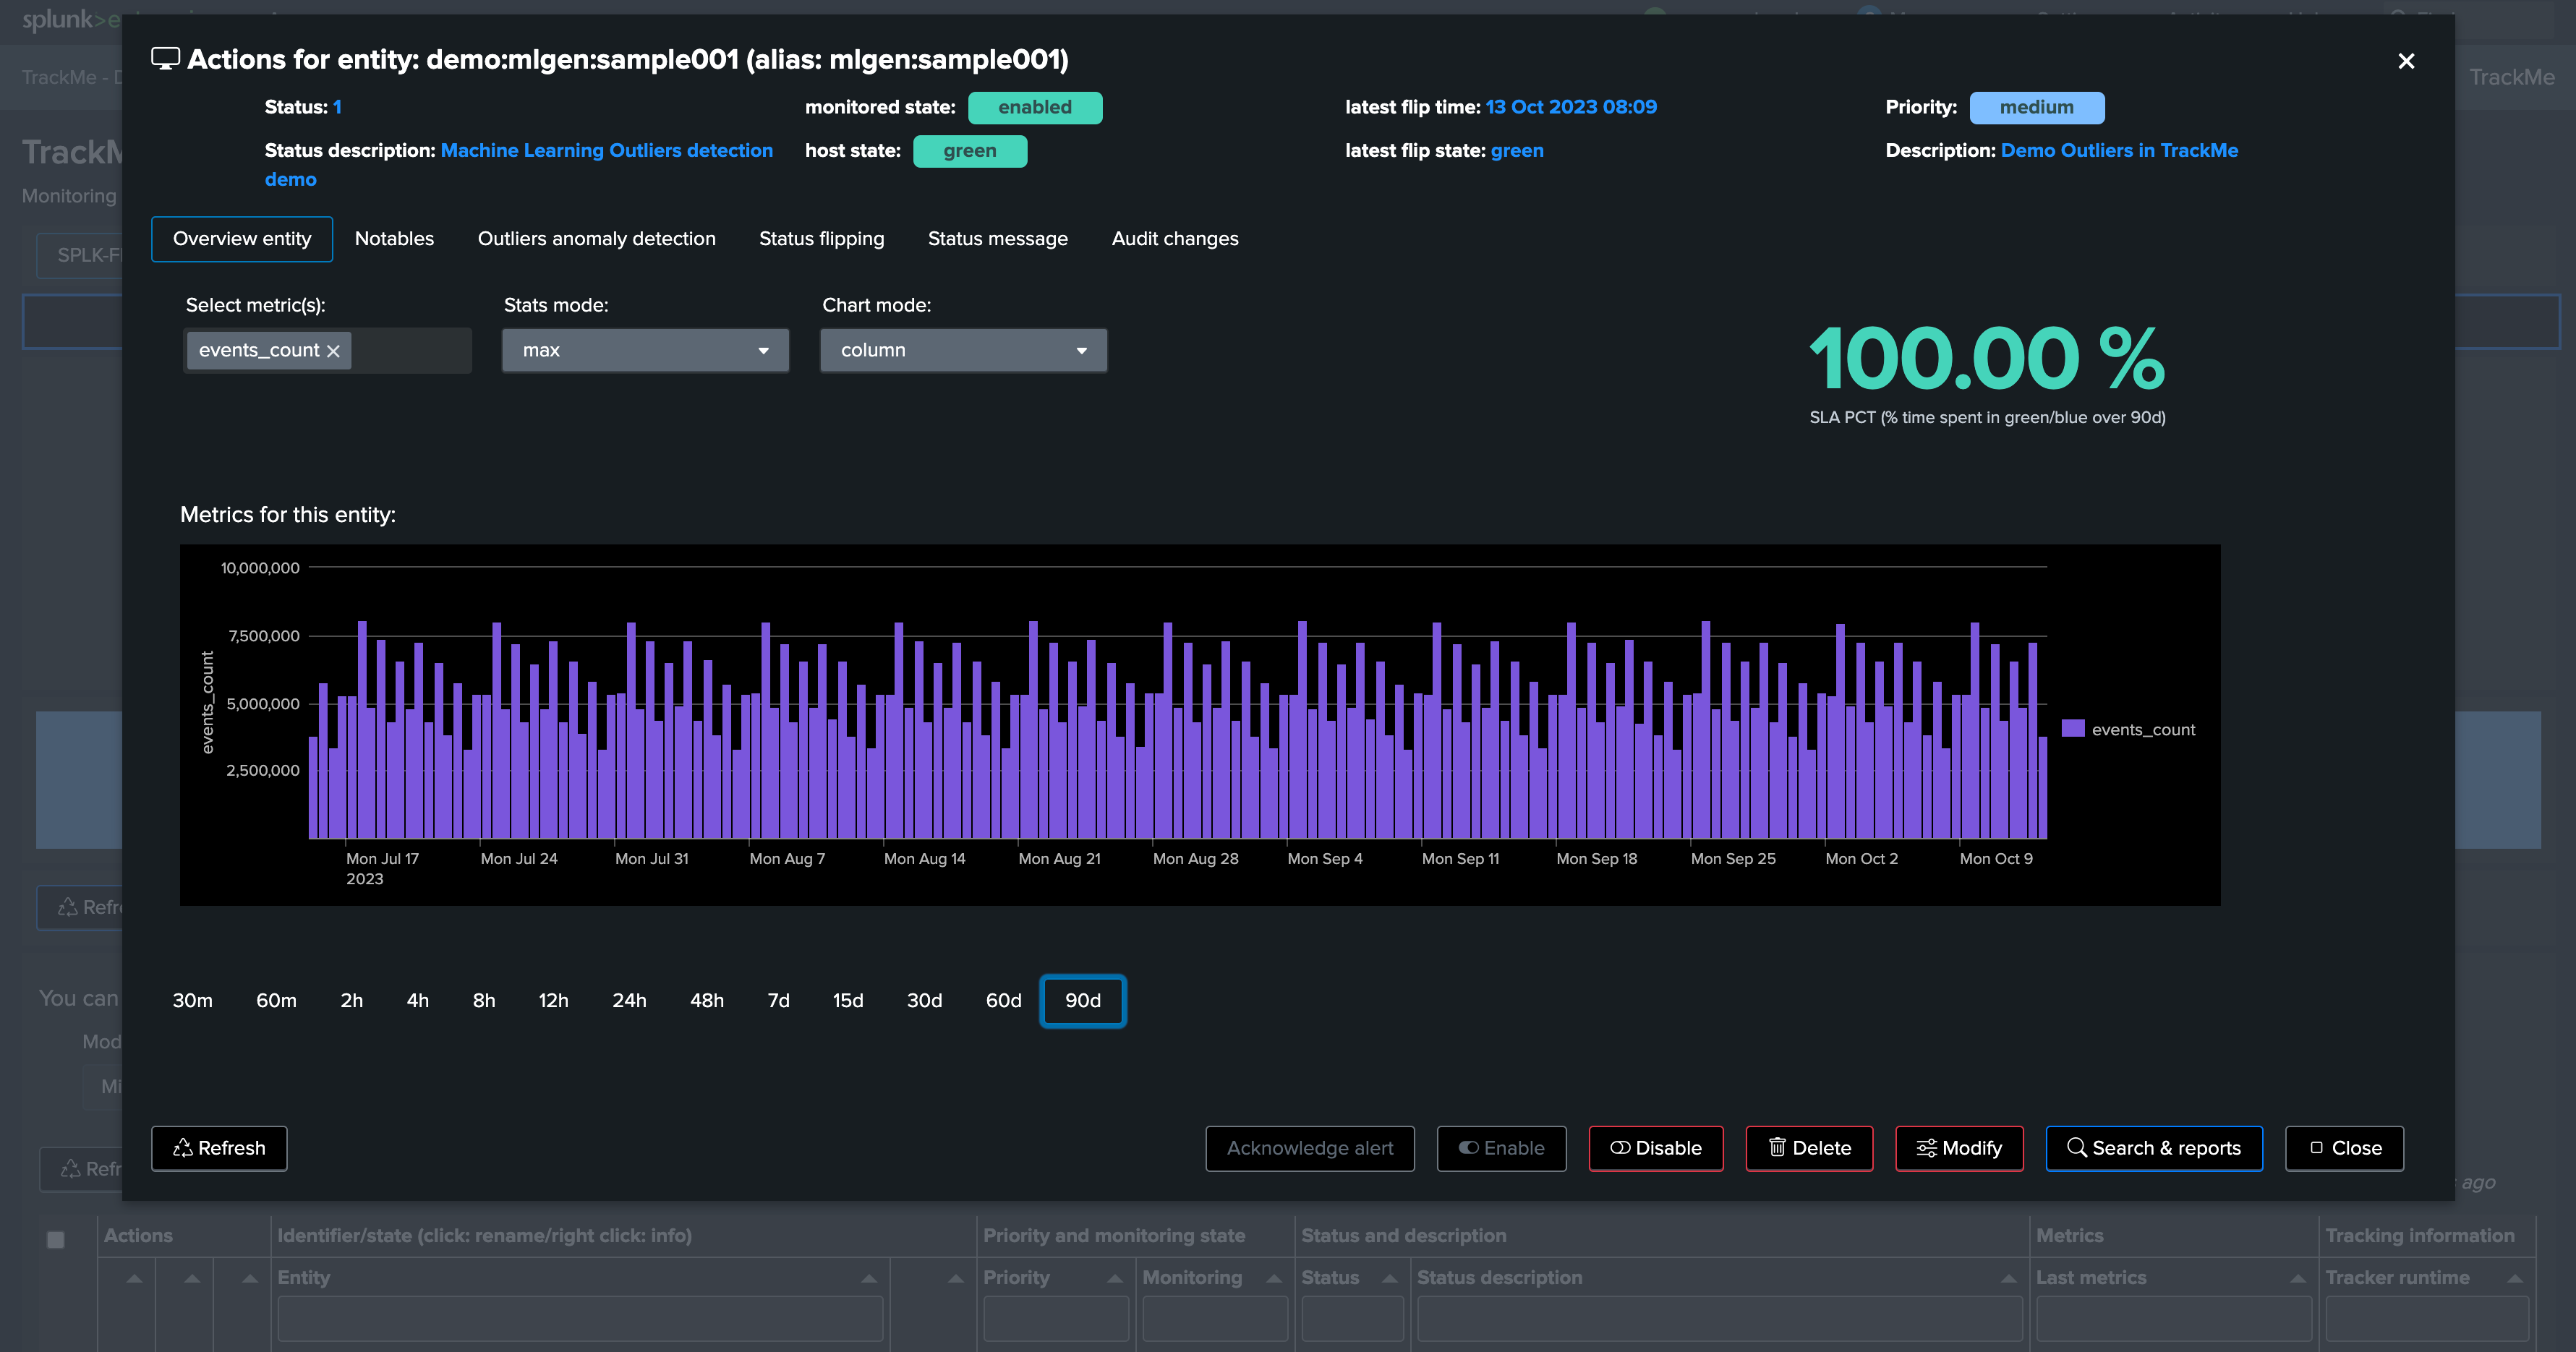
Opening the entity shows we have backfilled metrics now:
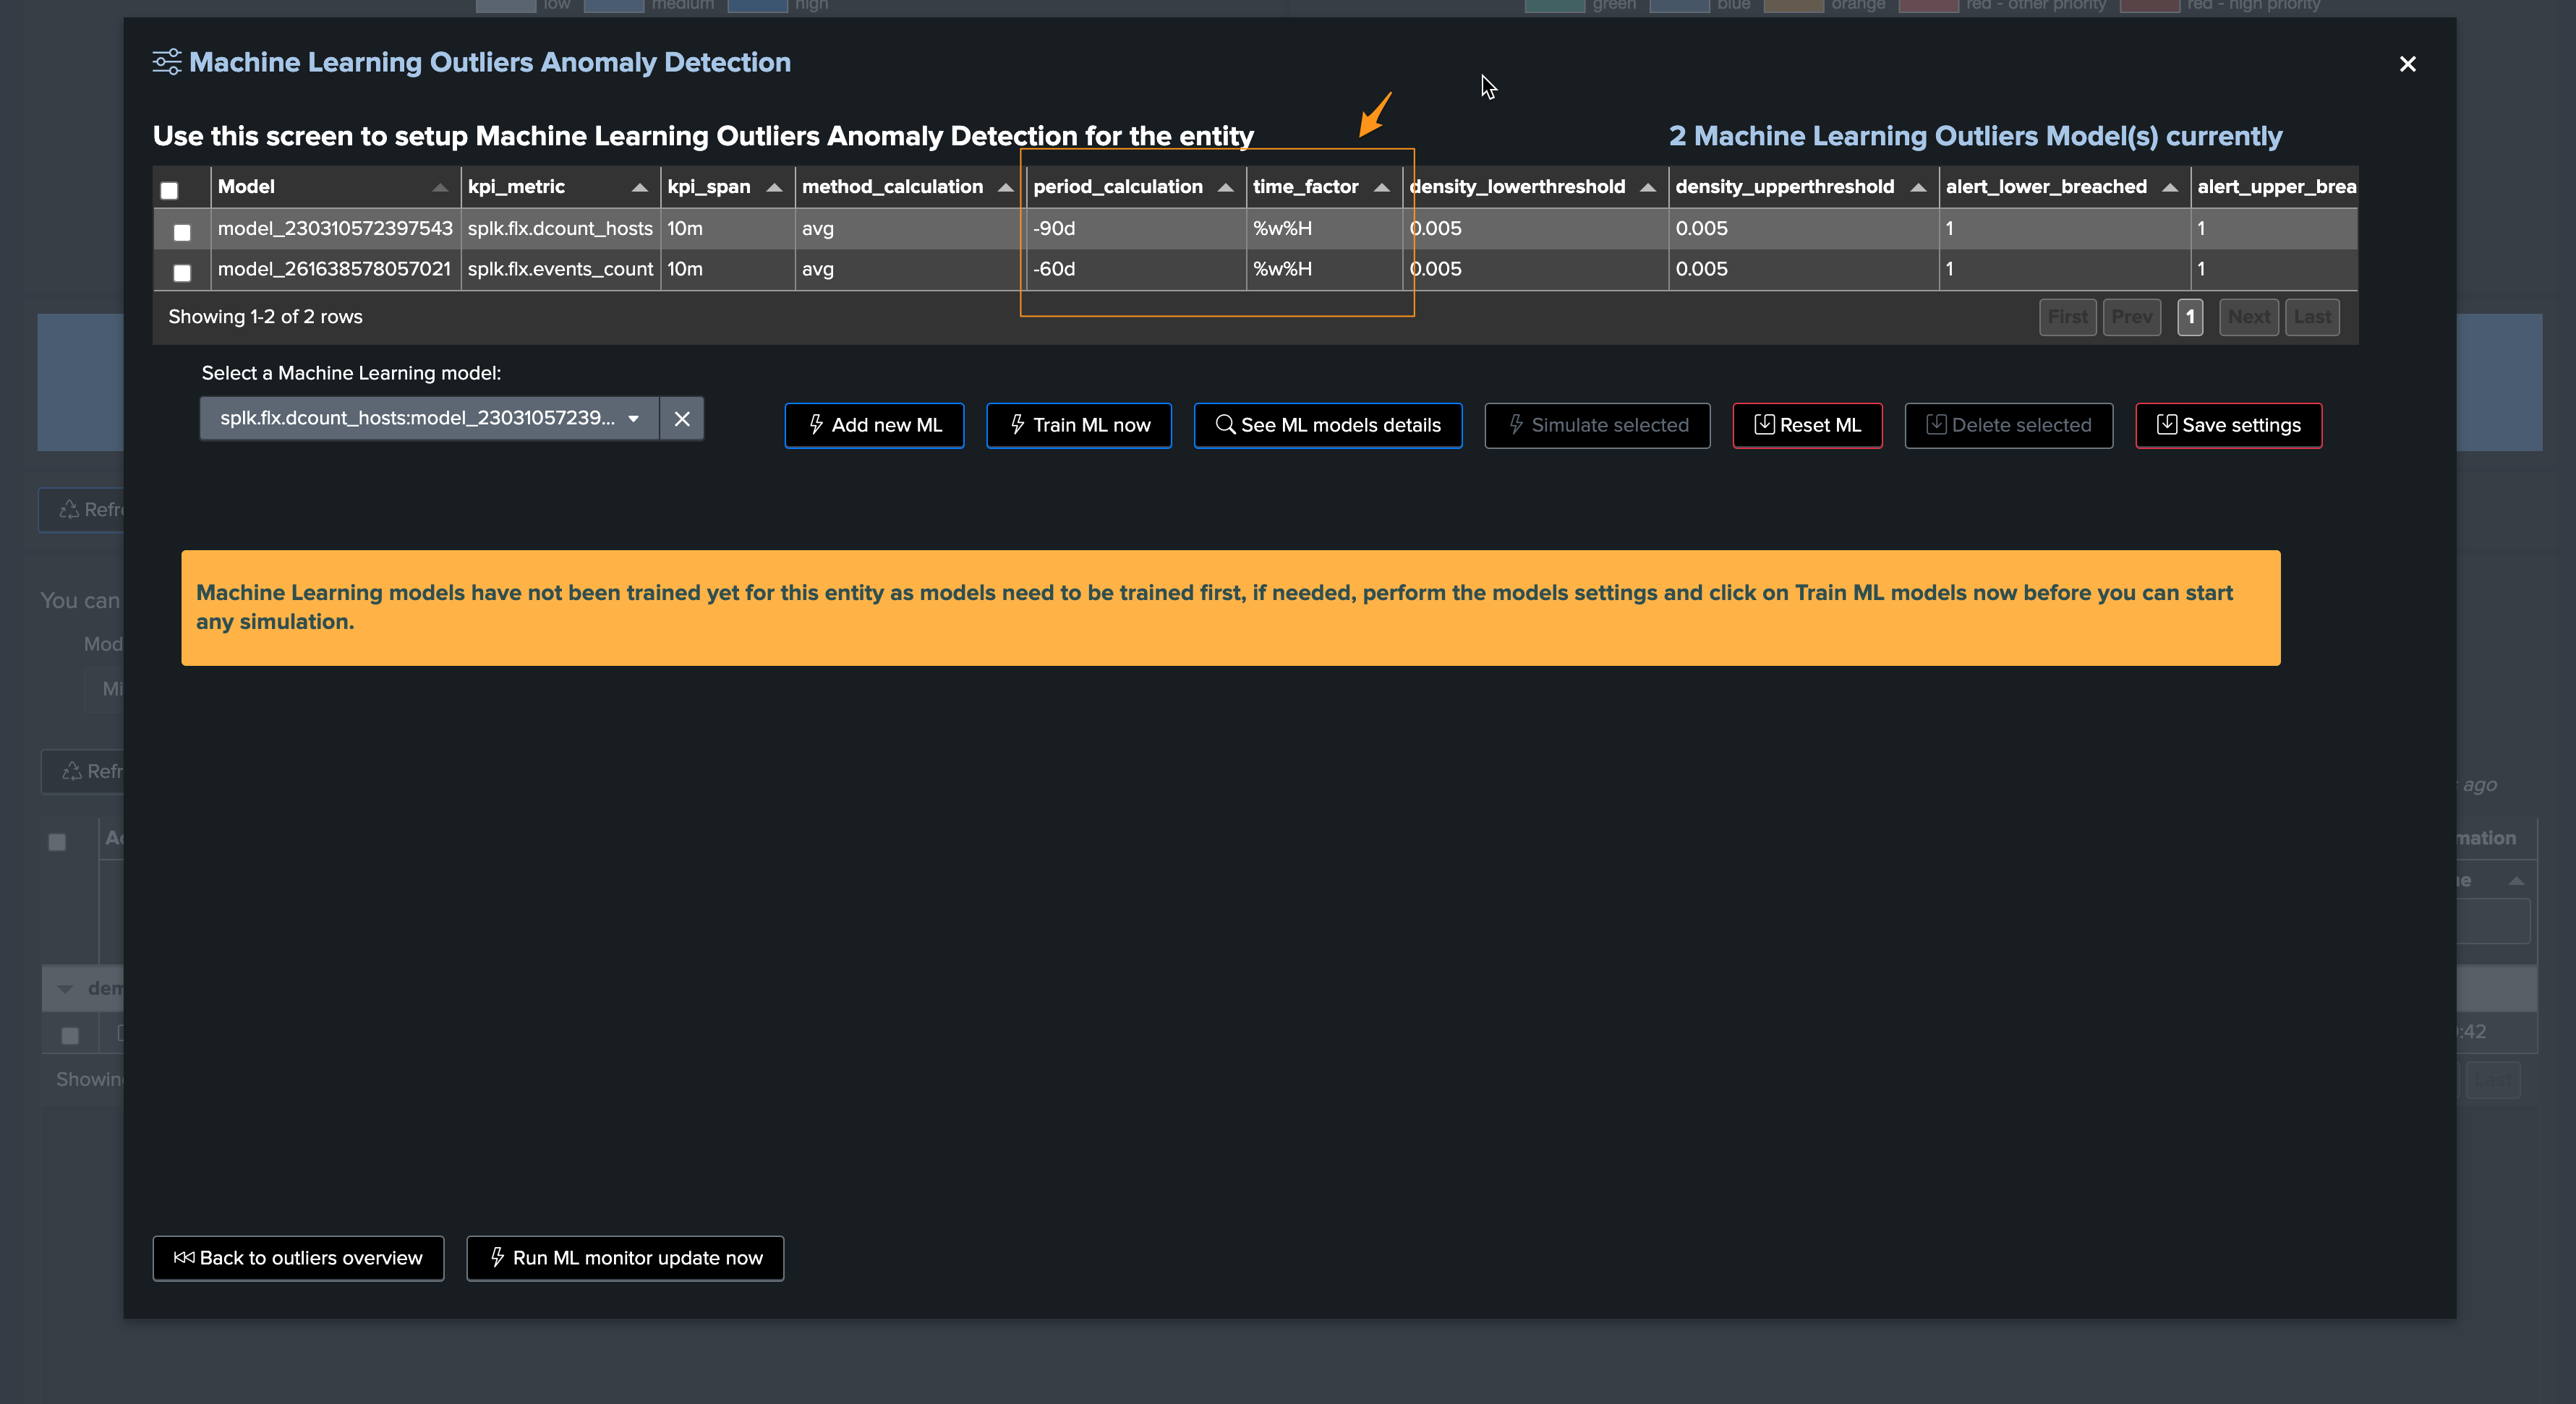
Depending on if TrackMe already ran or not the ML training job for the tenant, ML Outliers may not be ready yet:
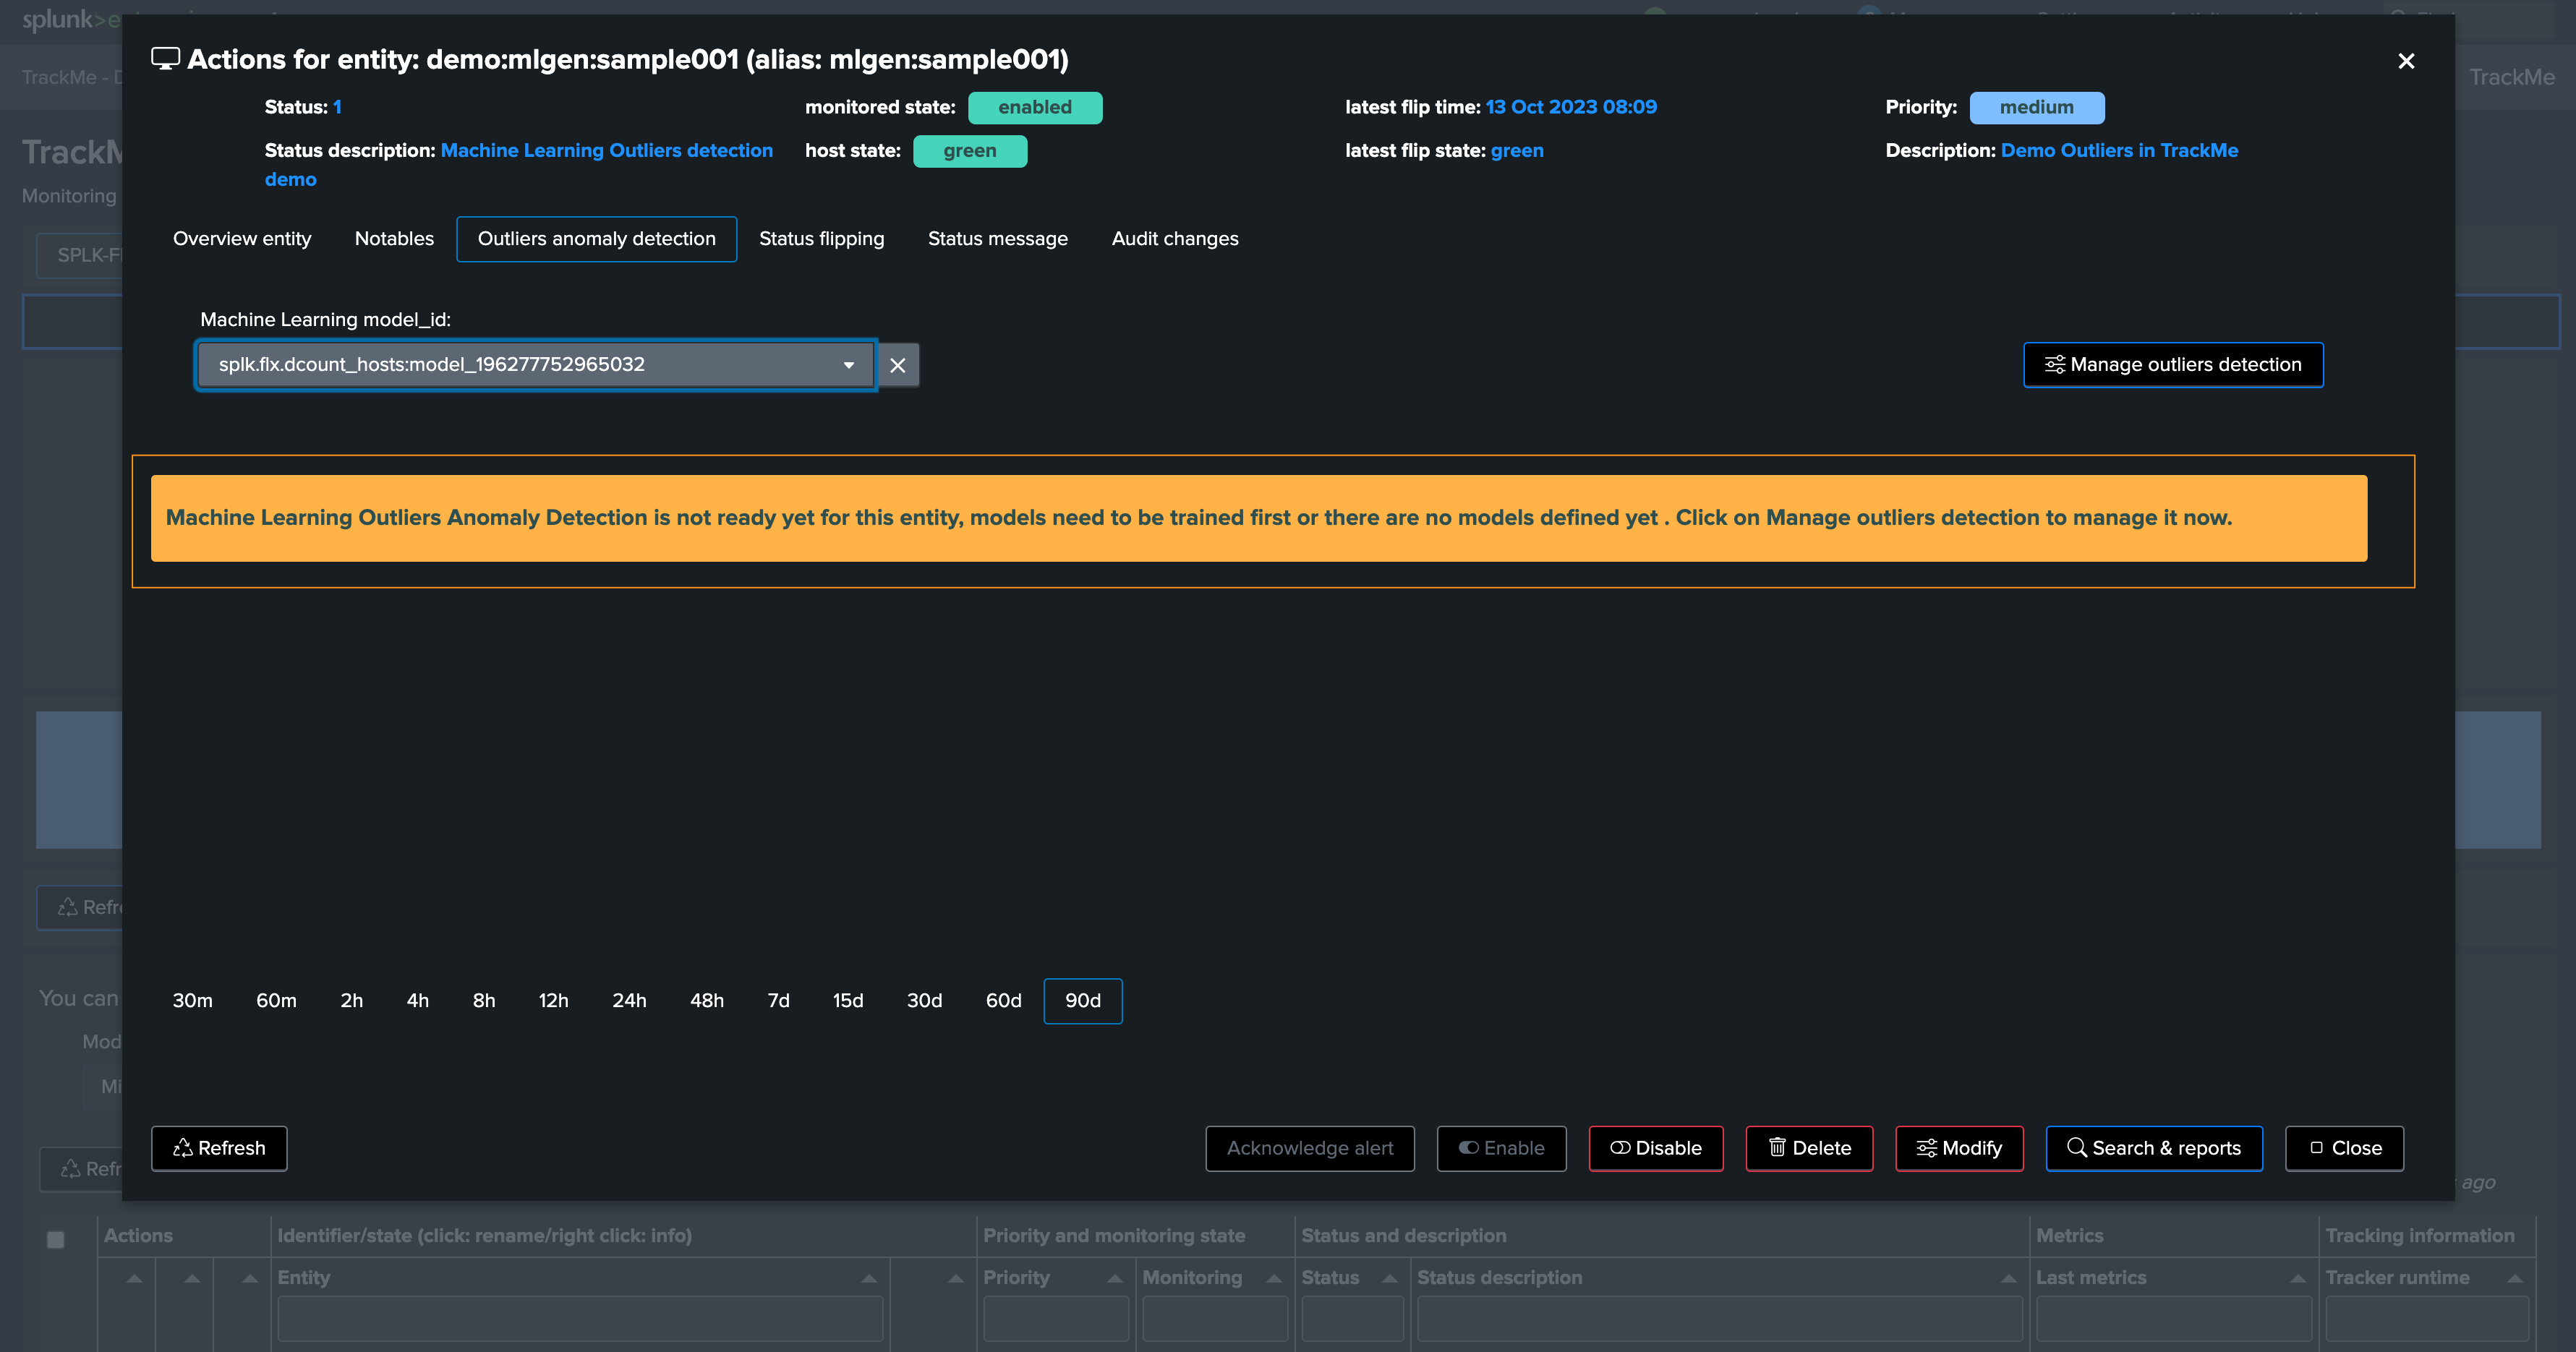
We can either run the mltrain job manually, or train the models via the UI:
If we refresh TrackMe, we can now see ML is ready:
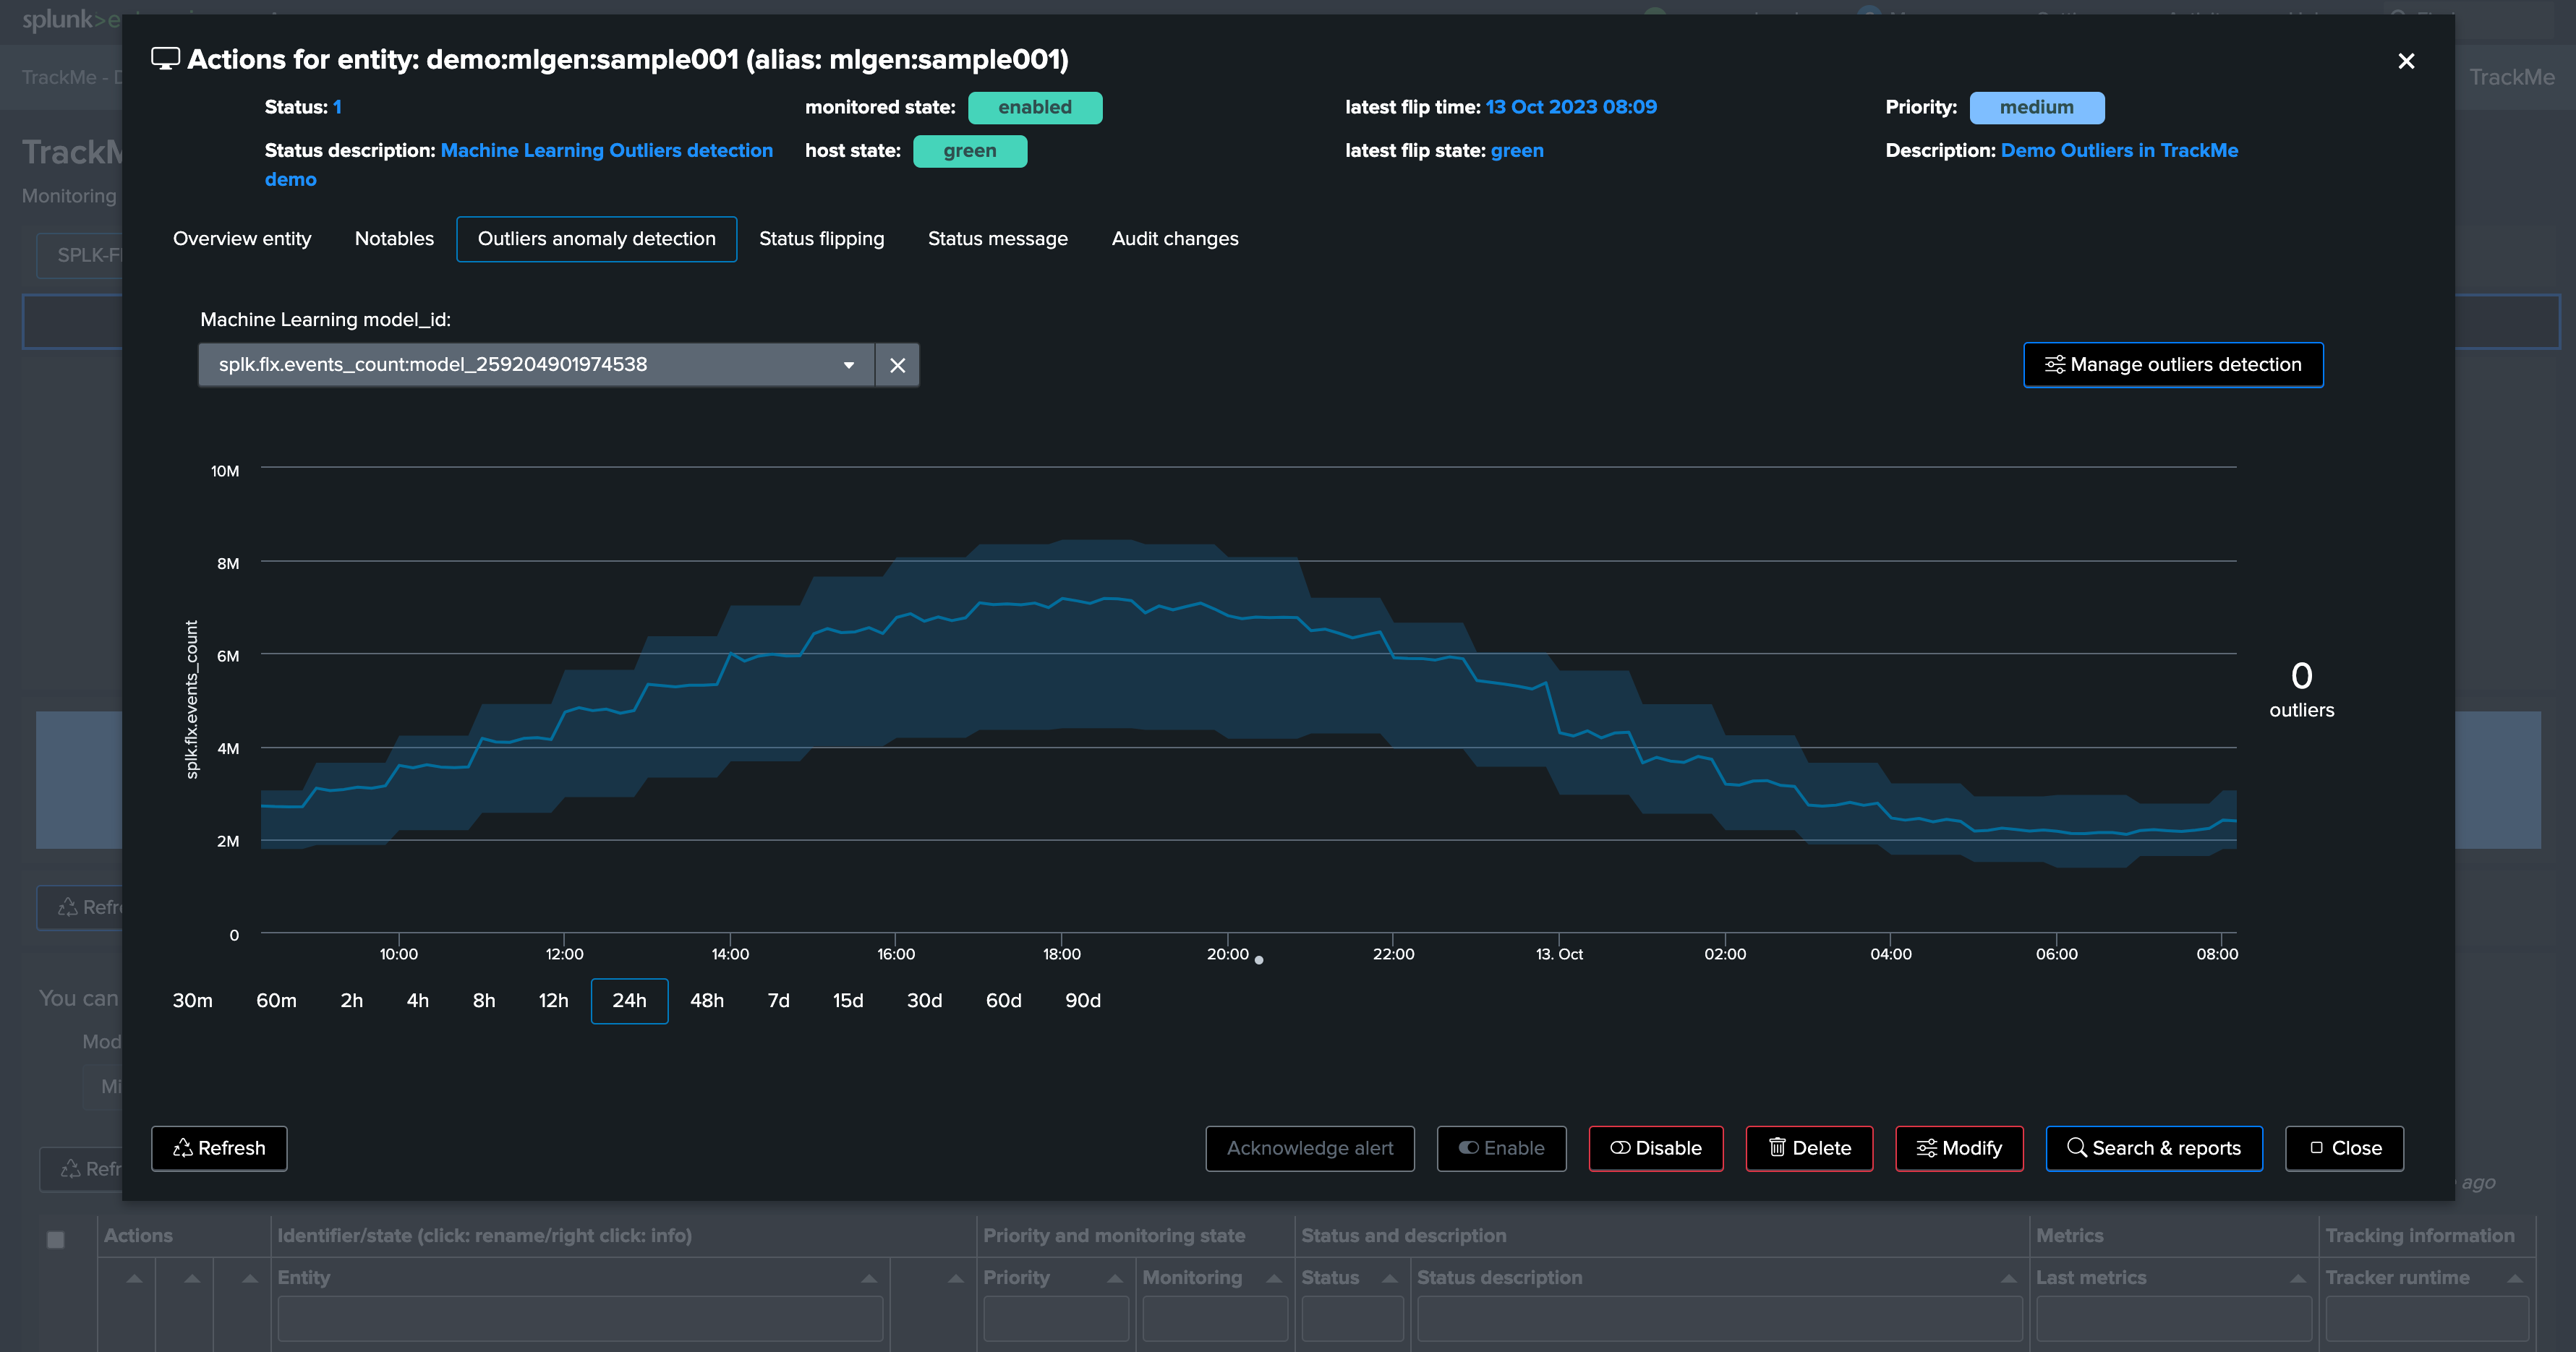
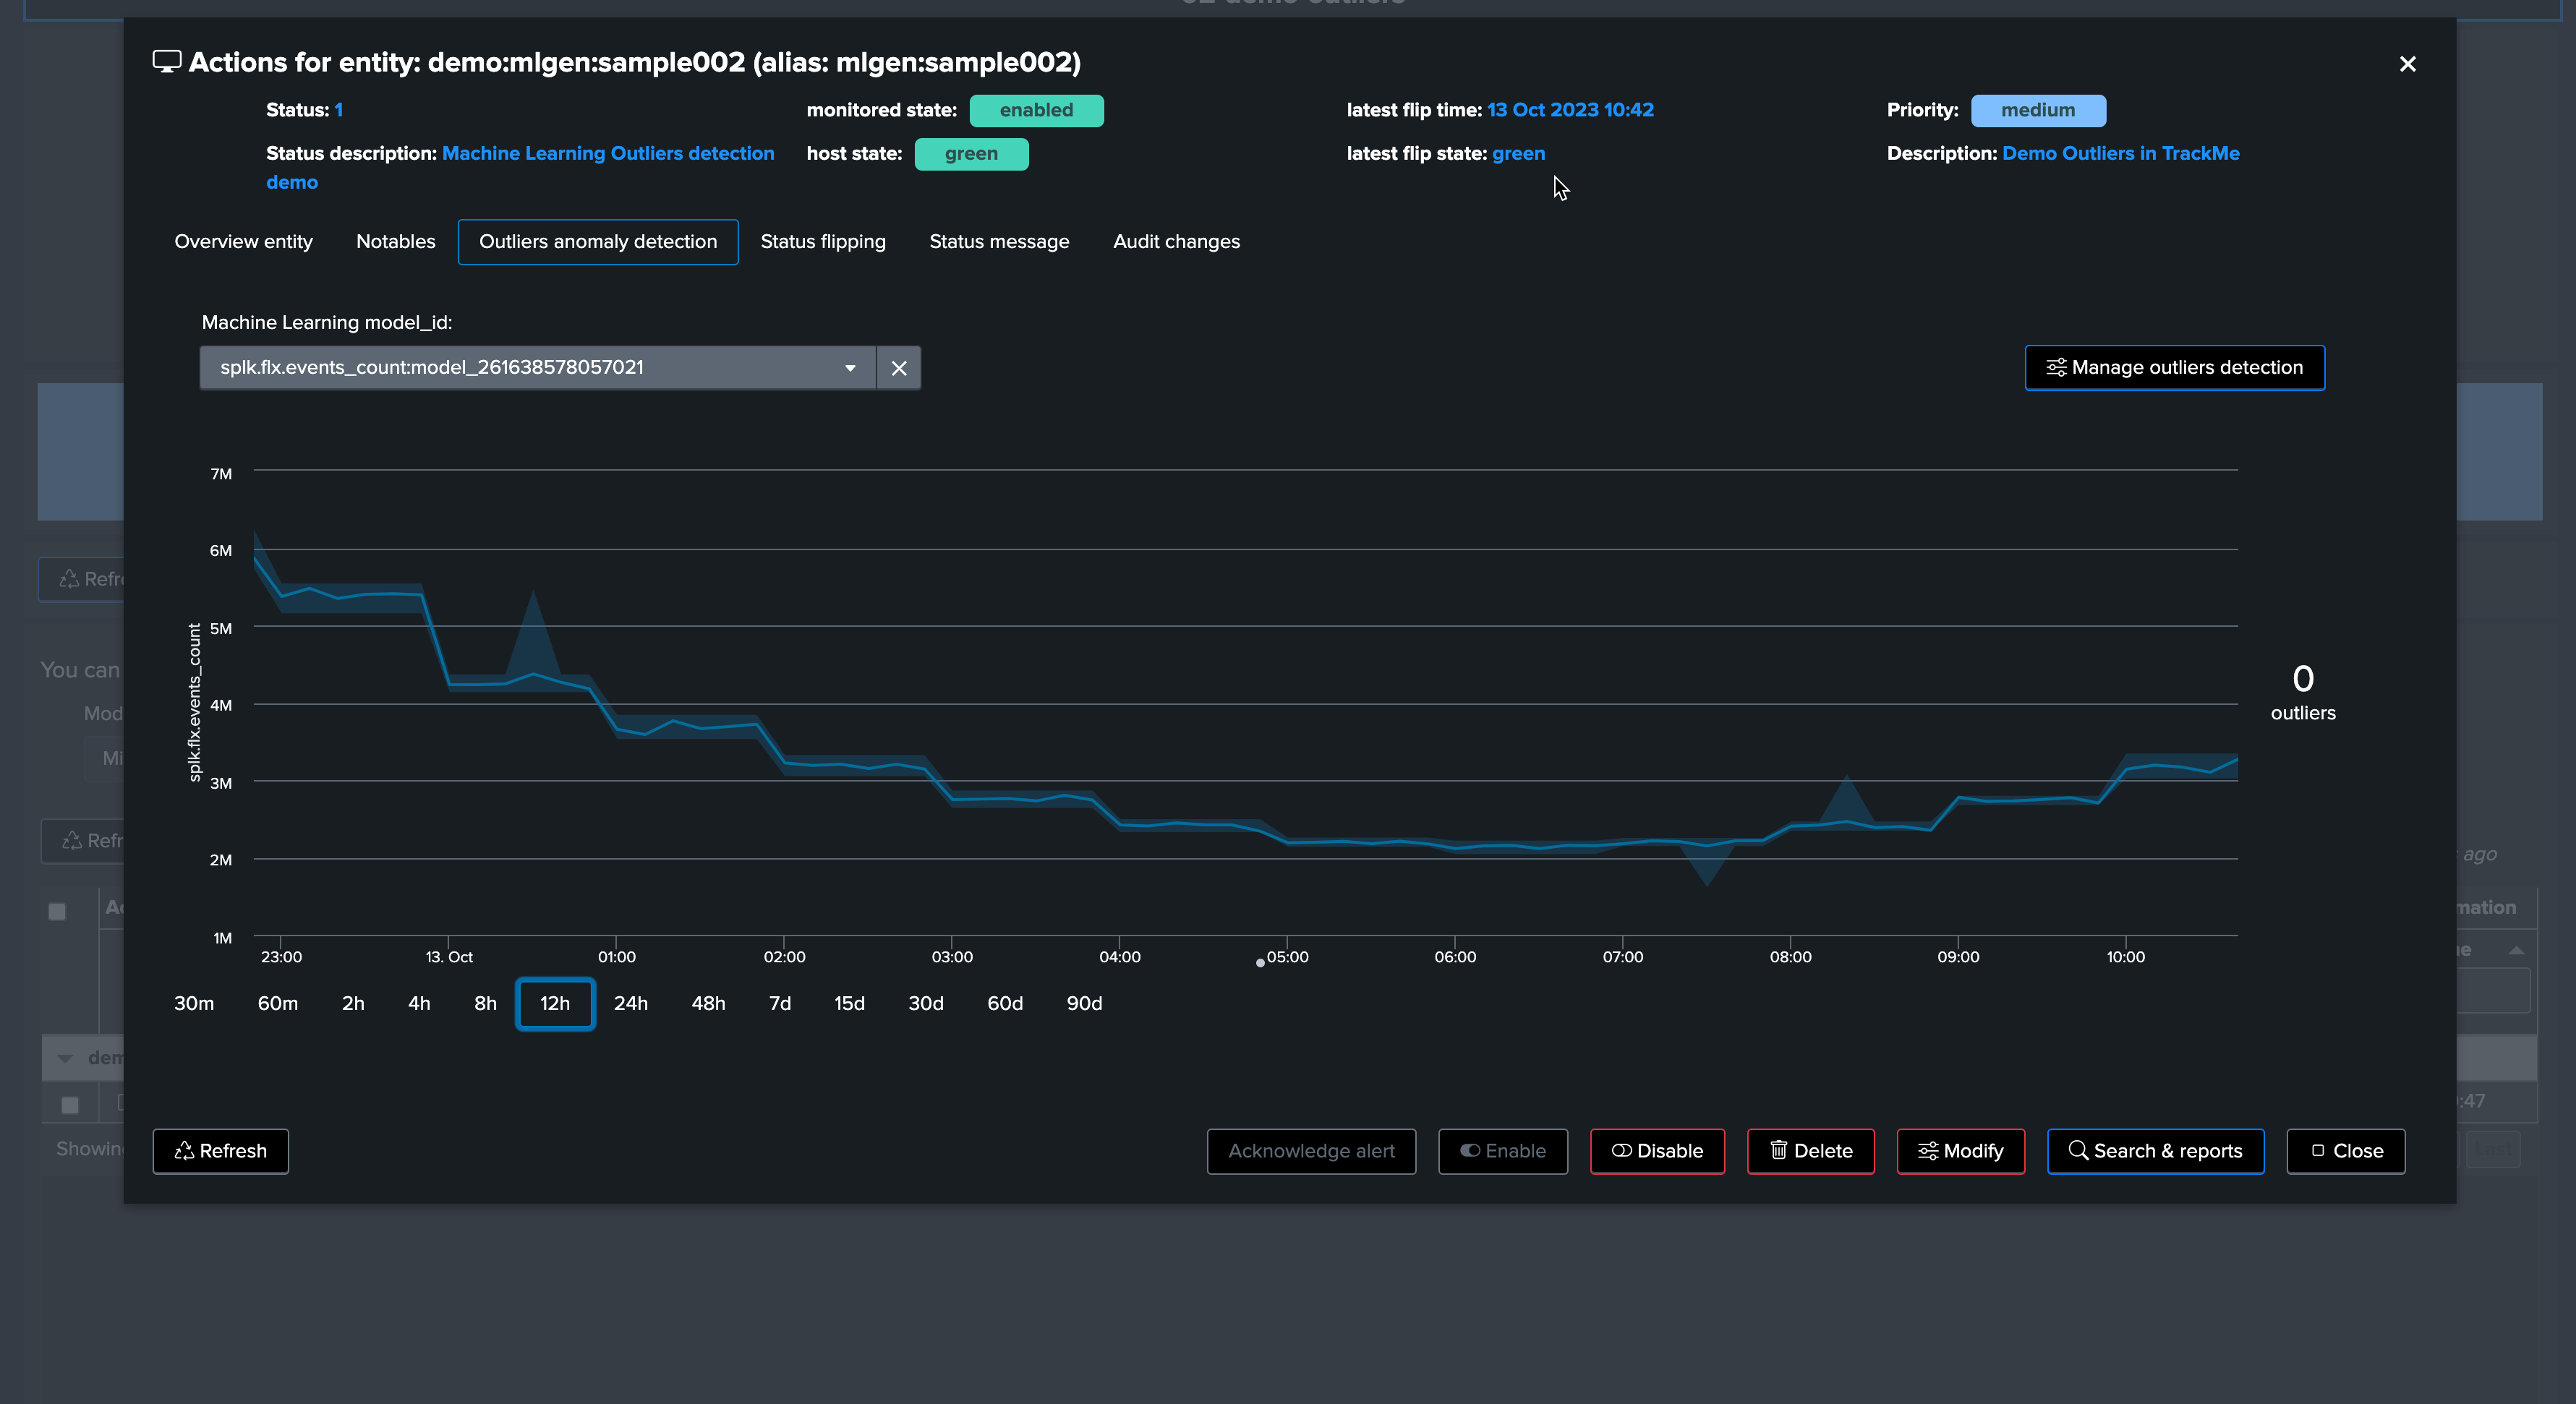
We have no outliers yet
TrackMe applied defaults settings for the ML definition (training over the past 30 days, time per hour)
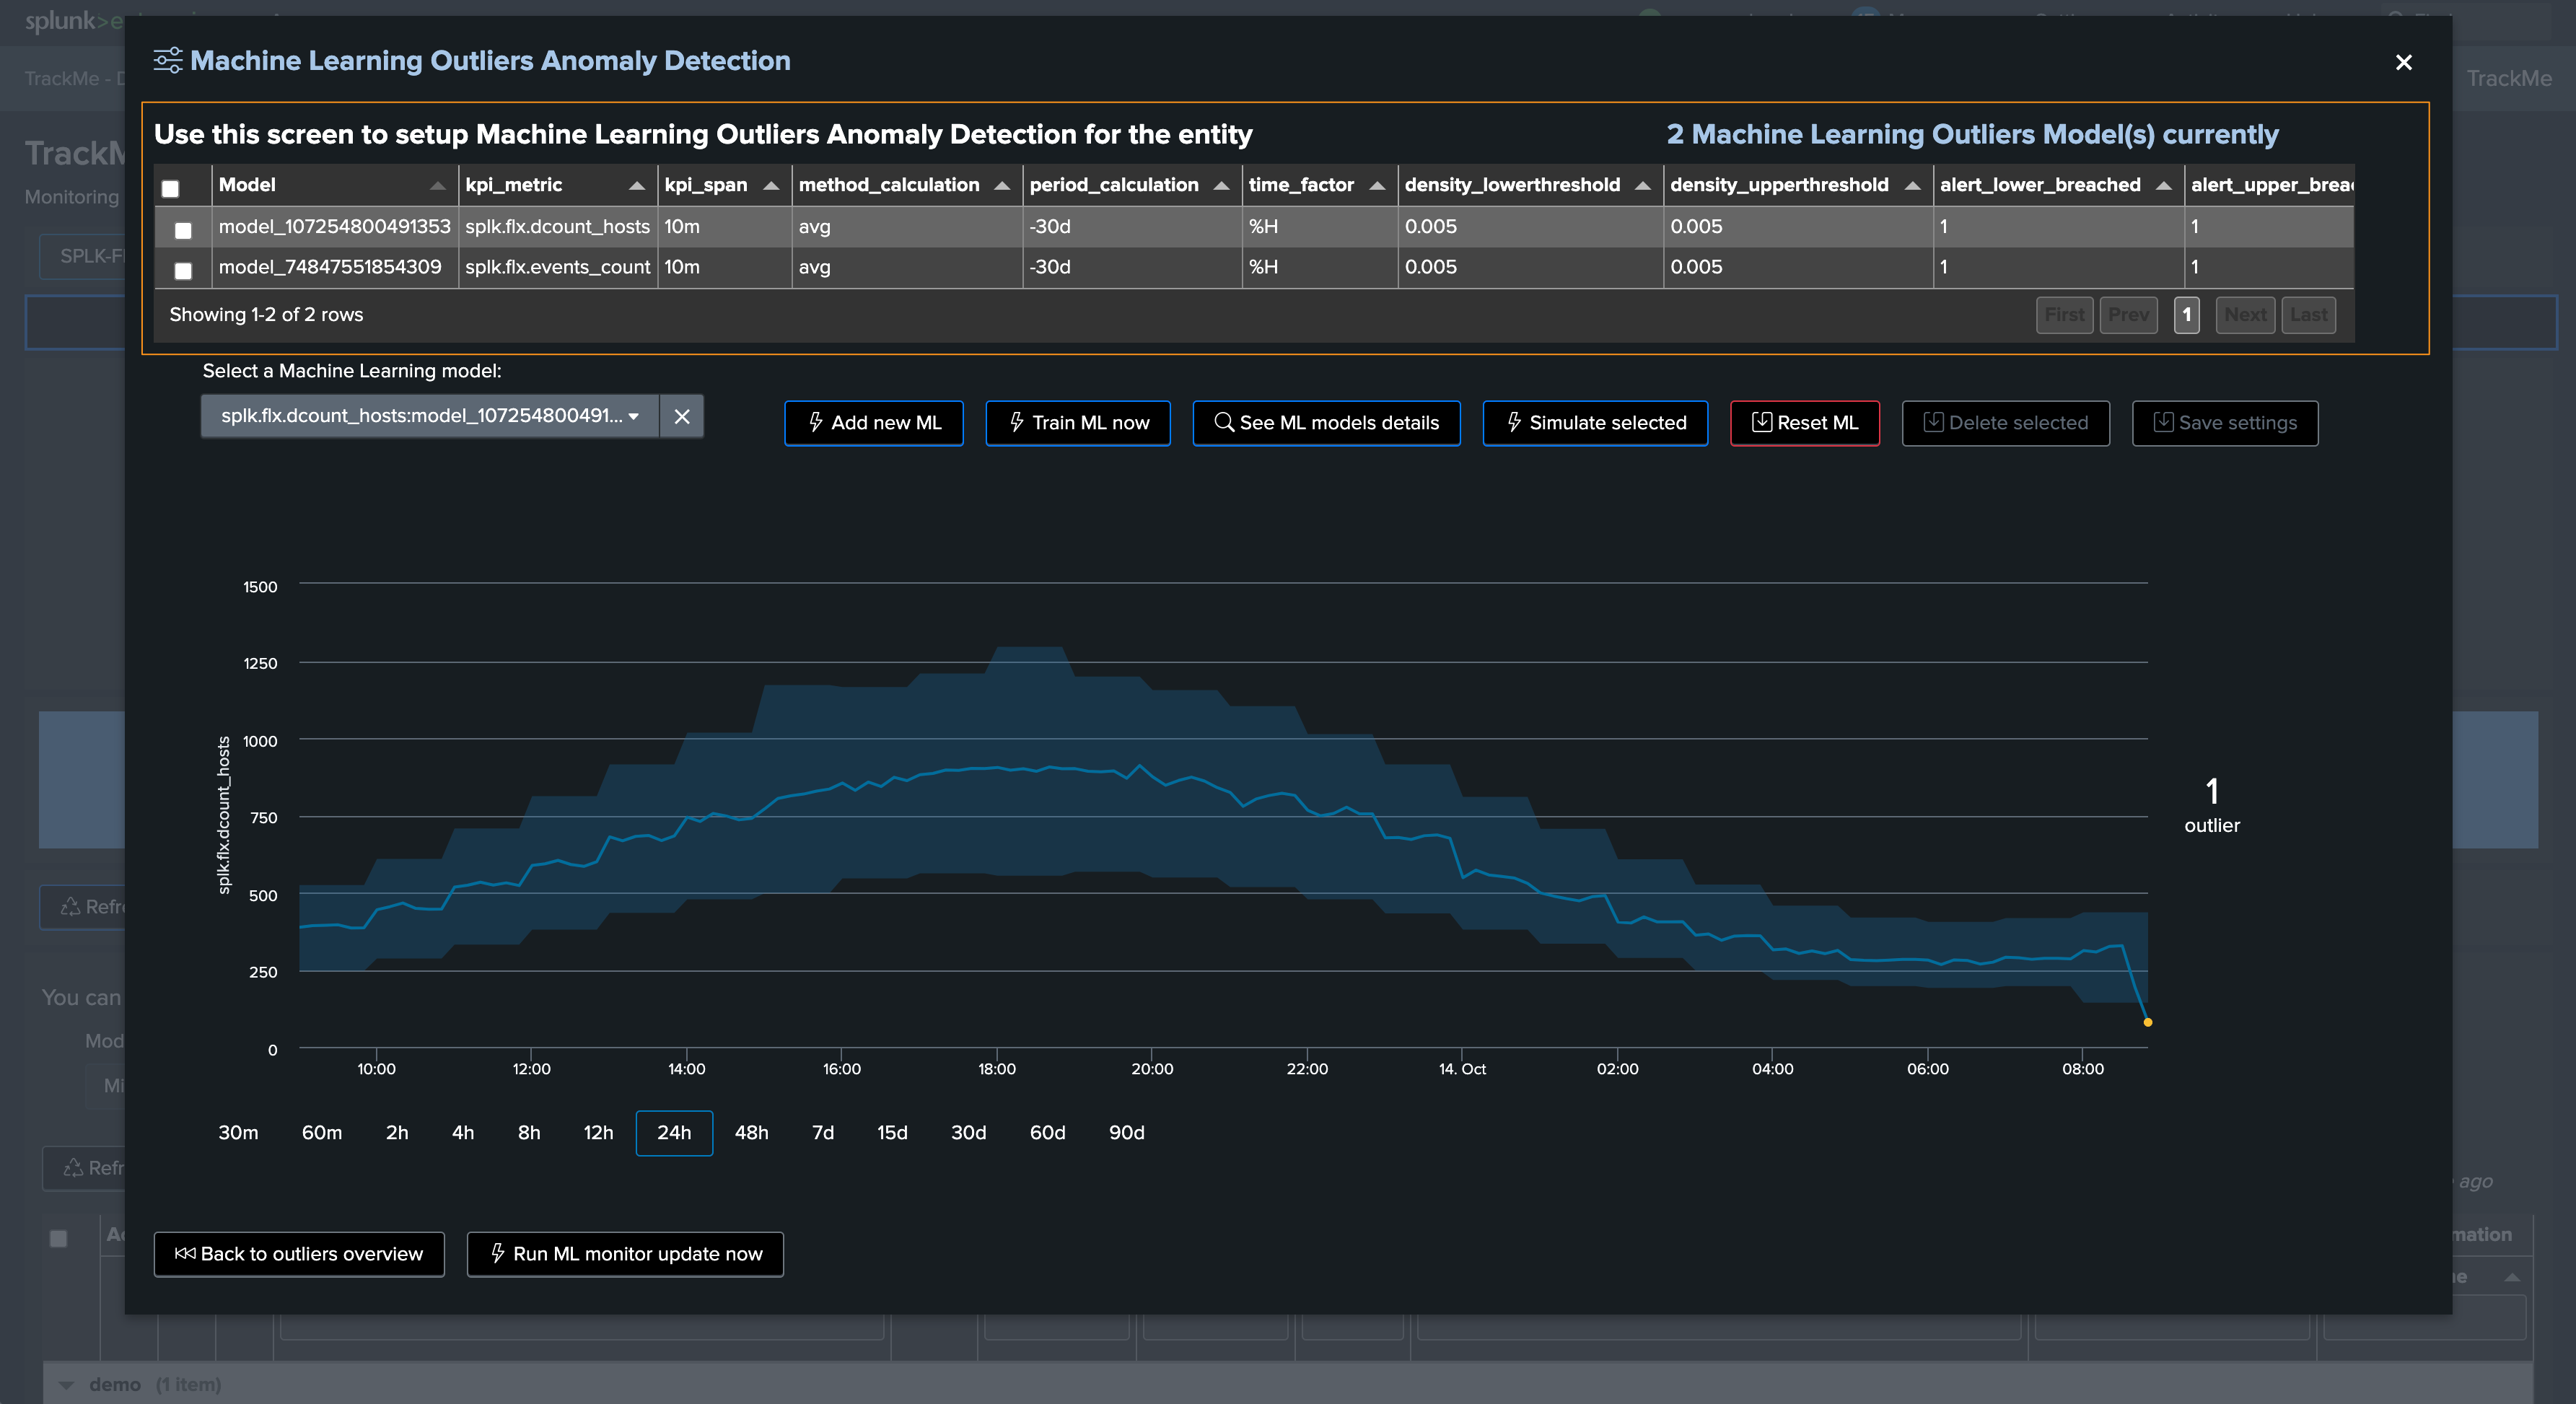
Let’s access and review the models definition, for now we will only increase the training period to the past 90 days:
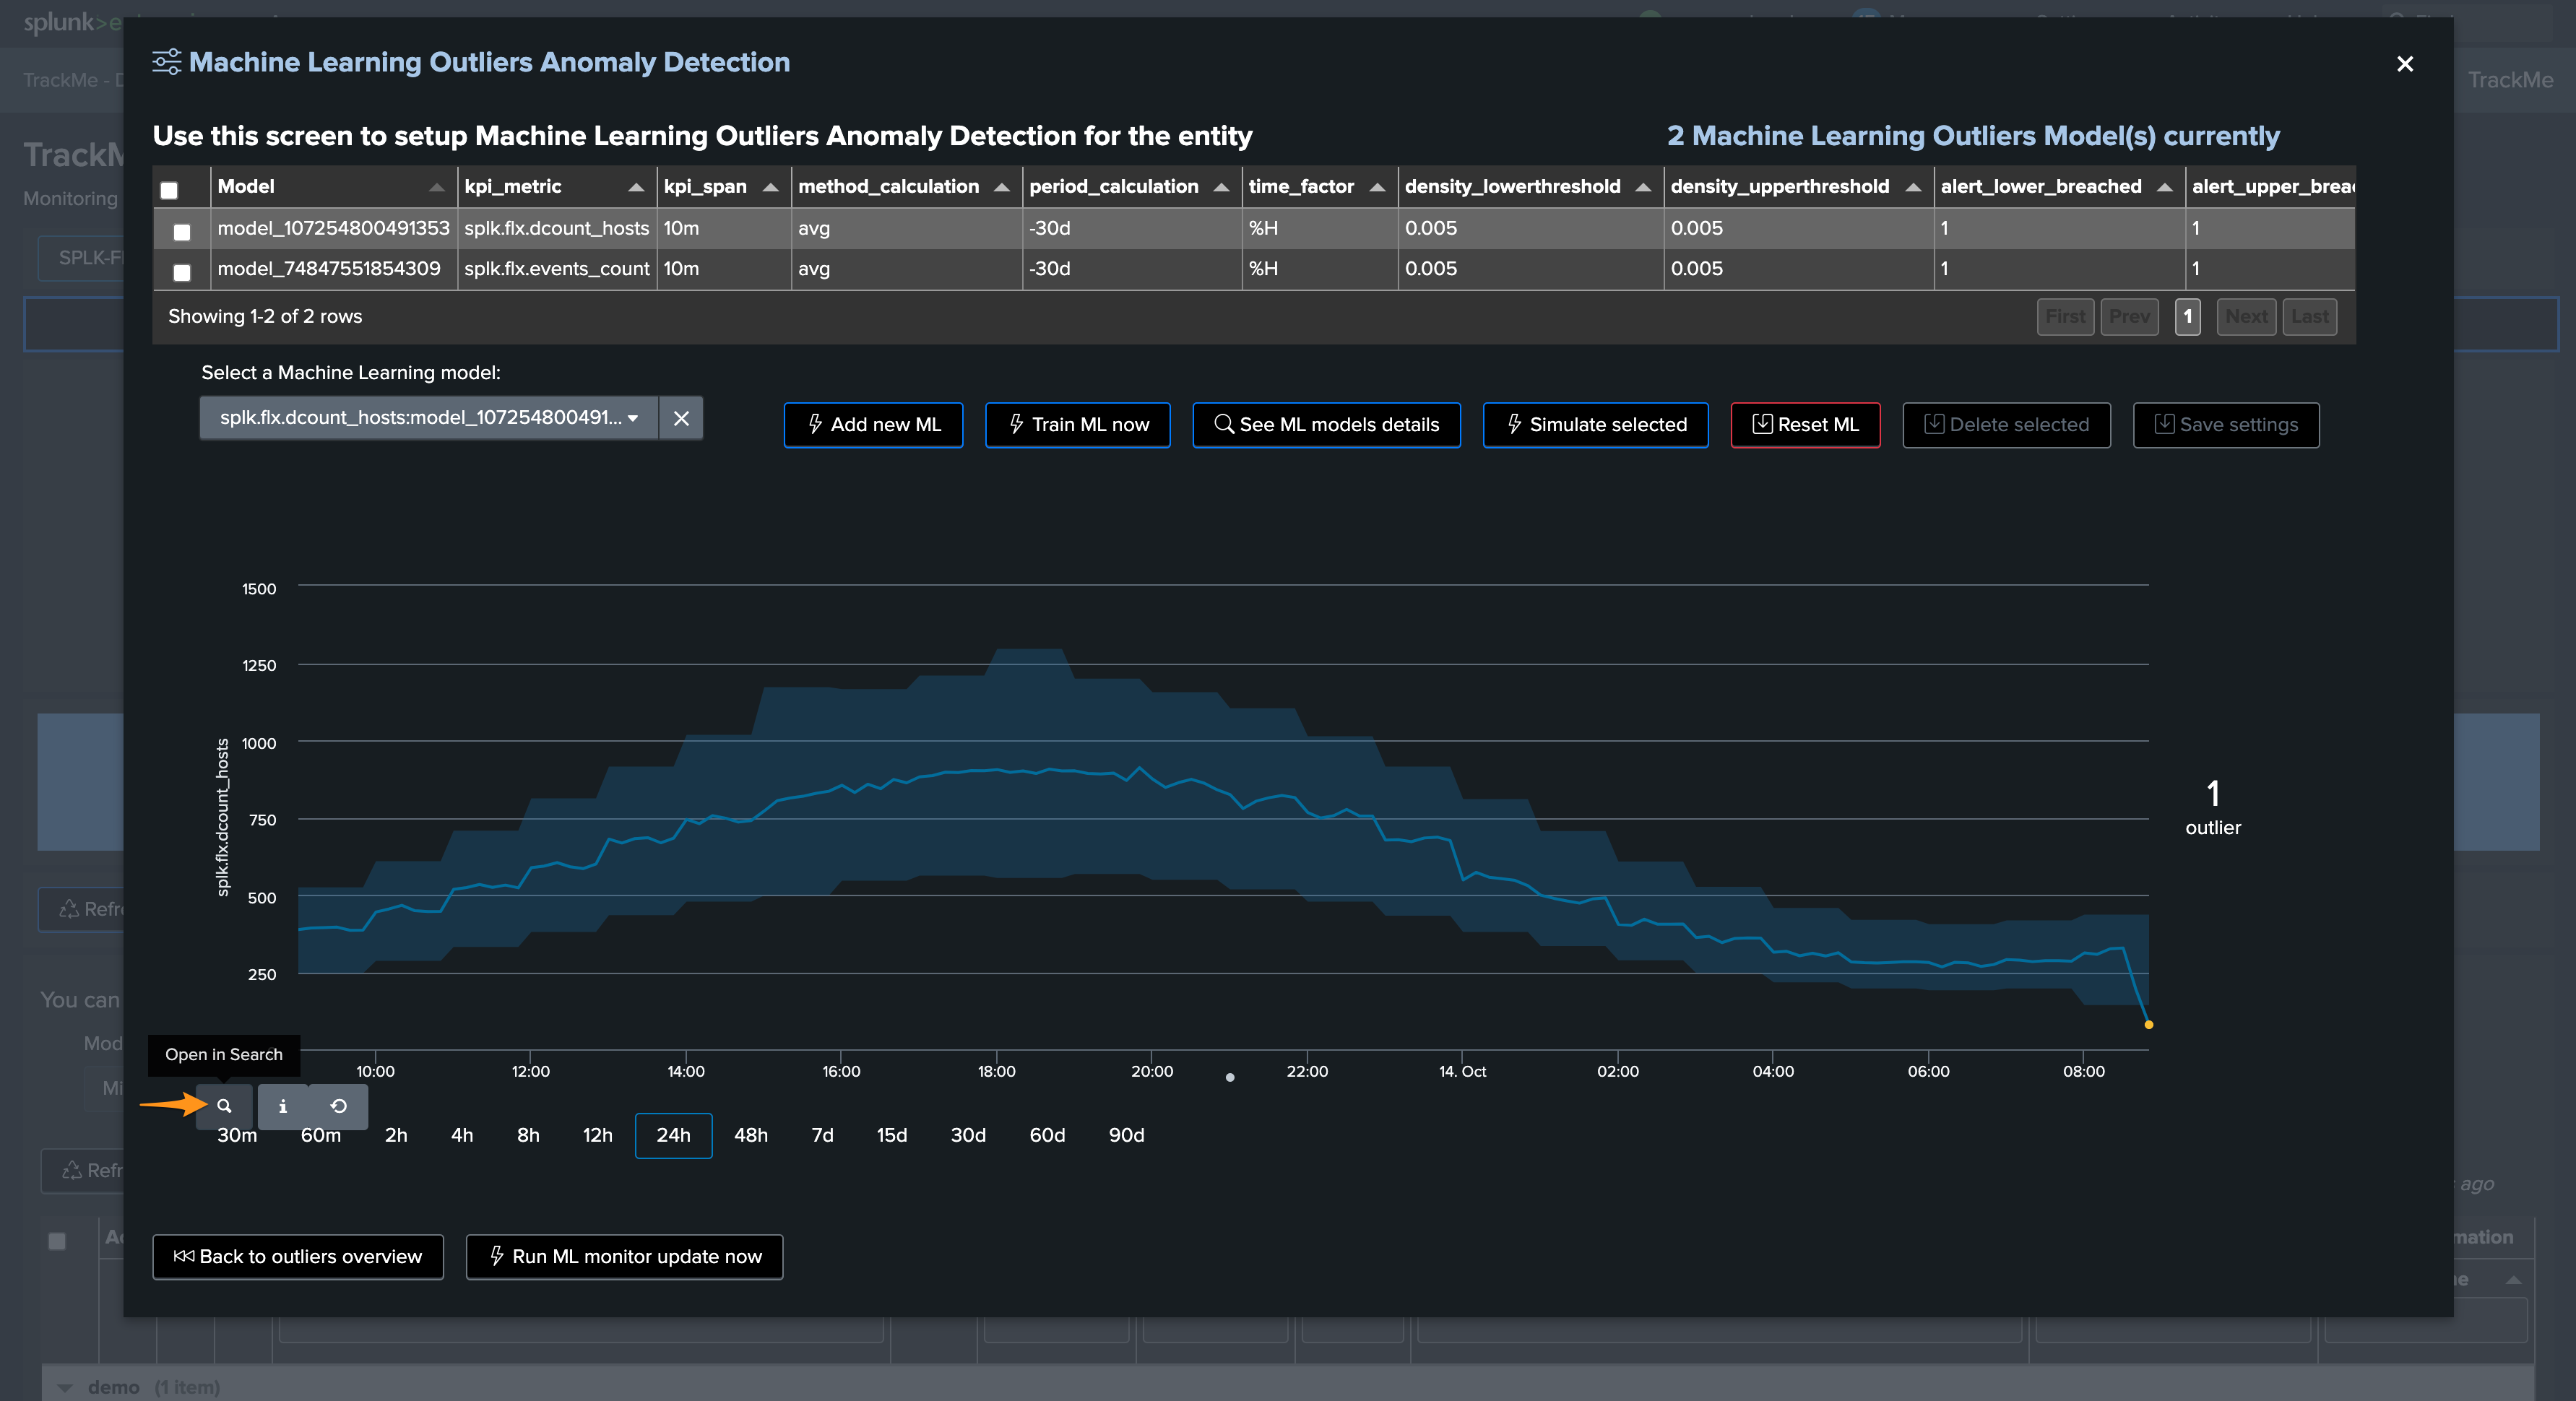
Click on “Manage Outliers detection”
Update the models to increase the time range for the calculation
Manually run a training for each model
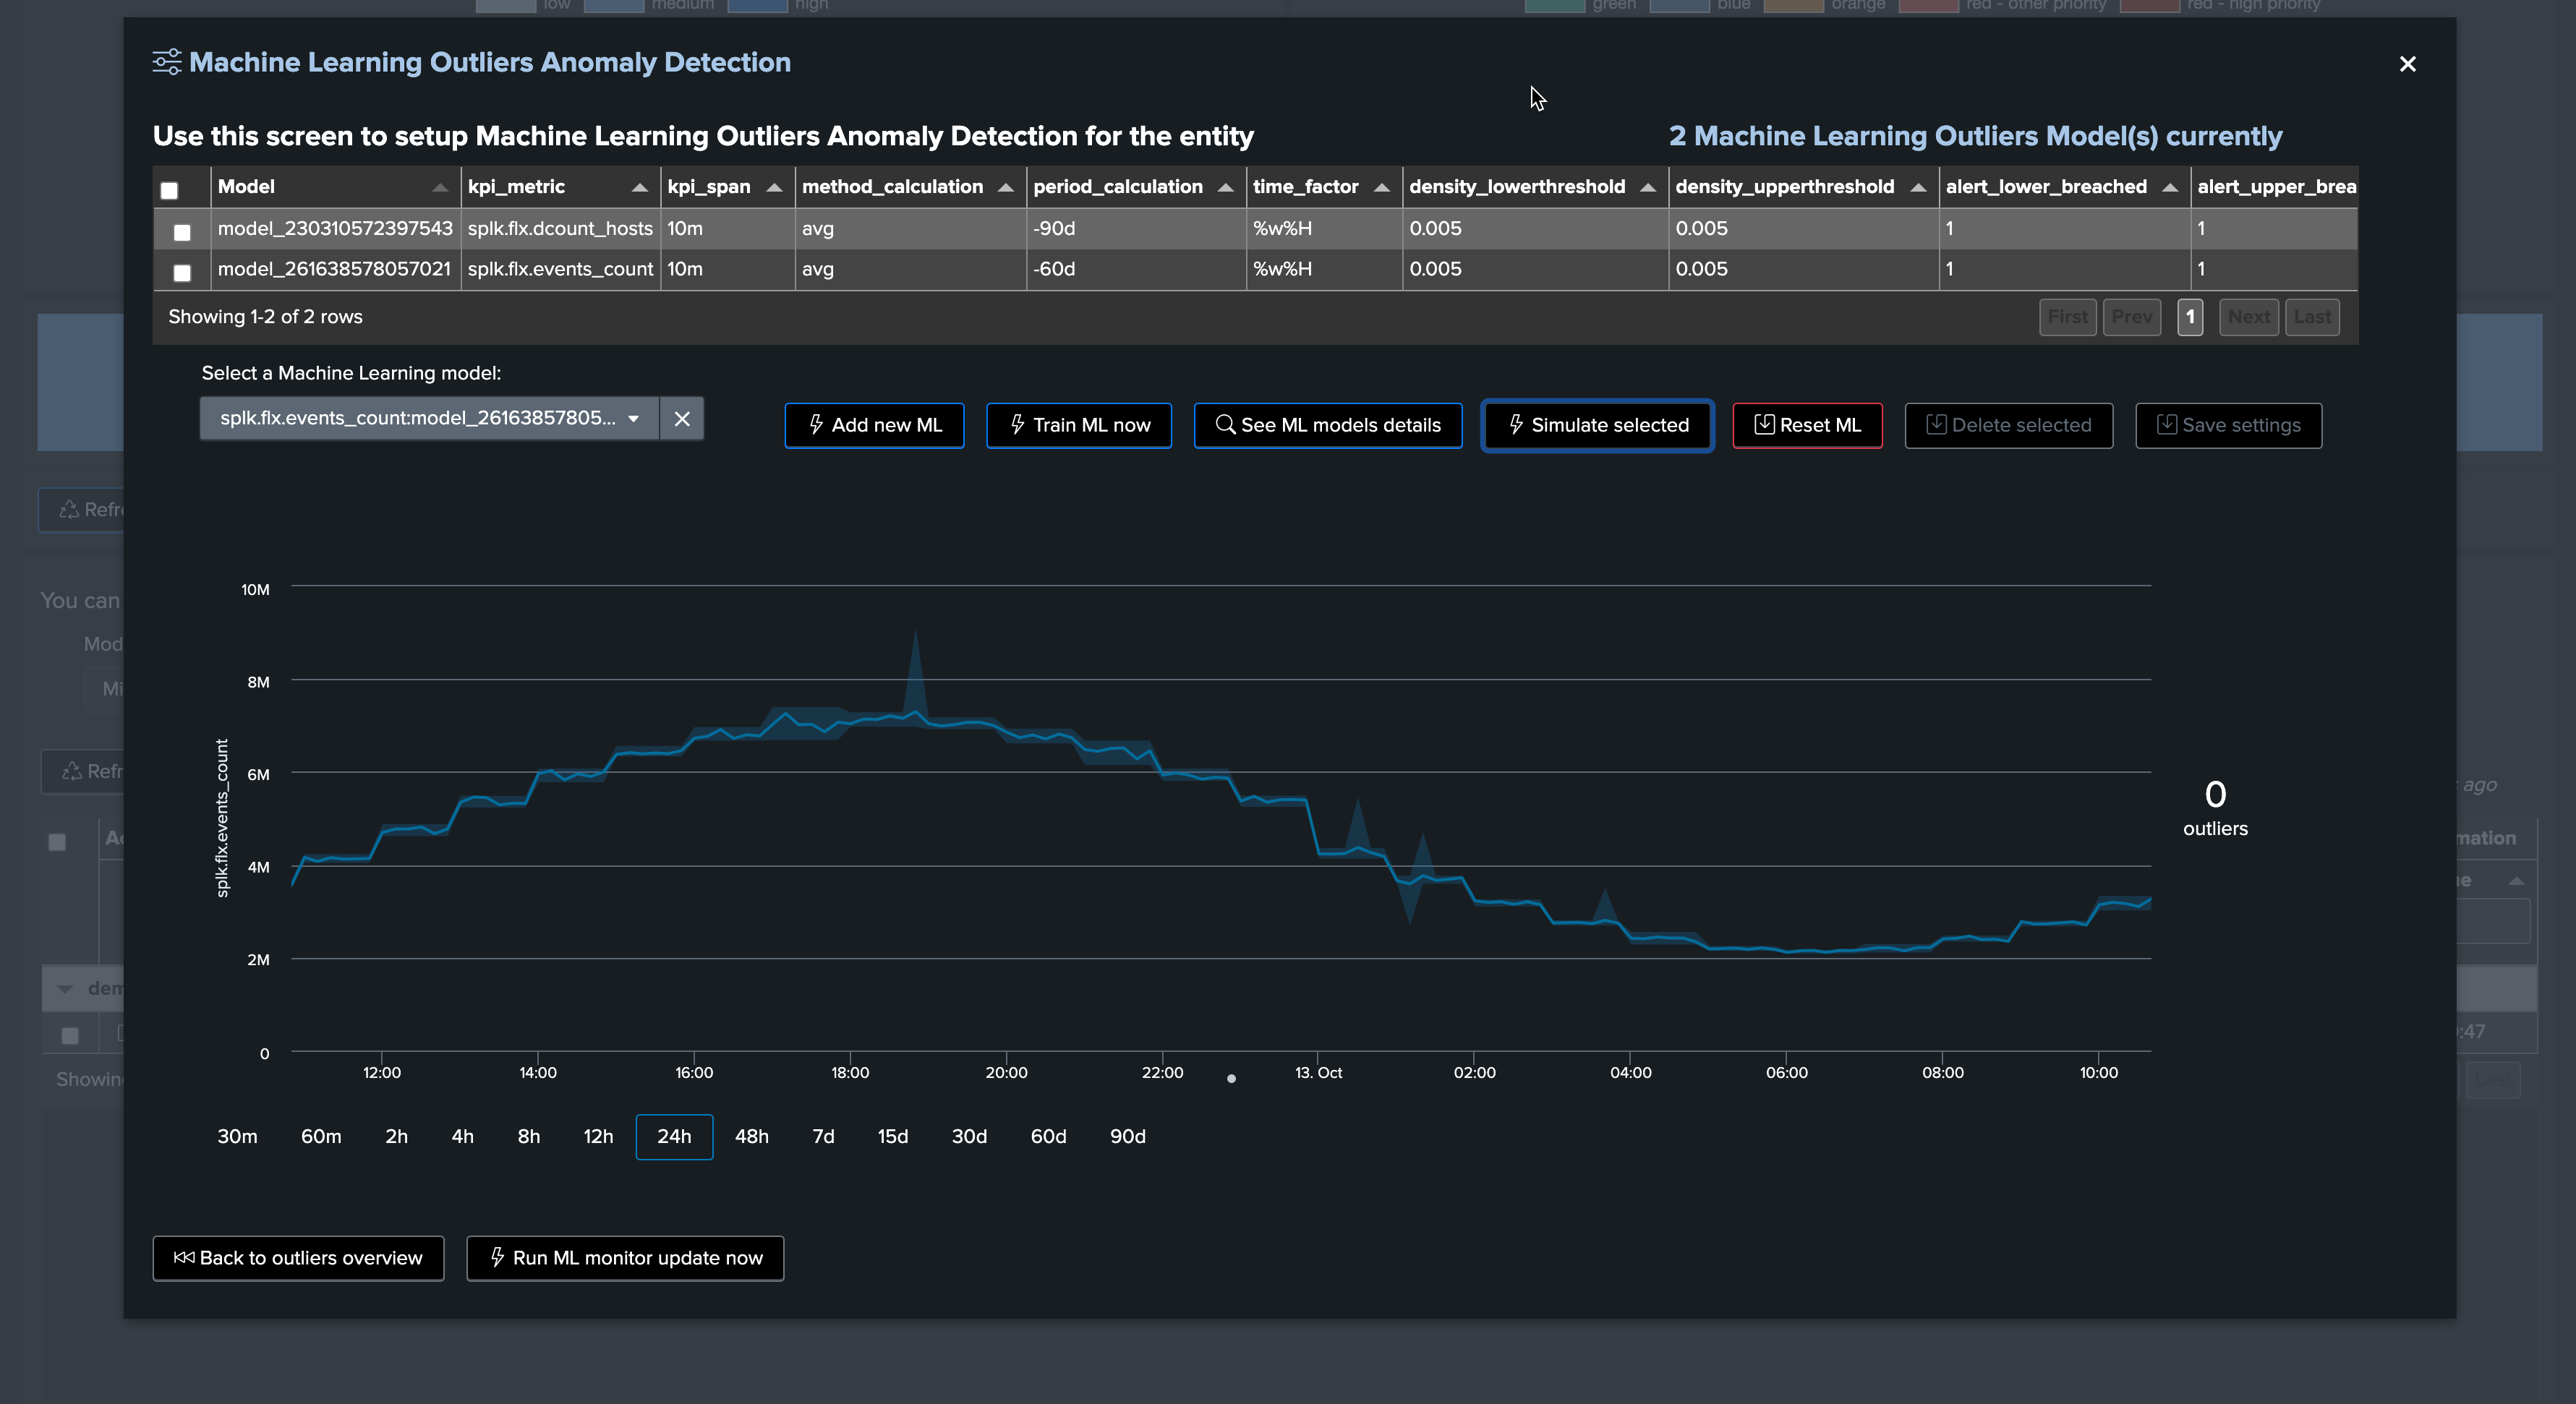
Click on Simulate Selected to review the results (we have selected the event count model), this is looking great for now
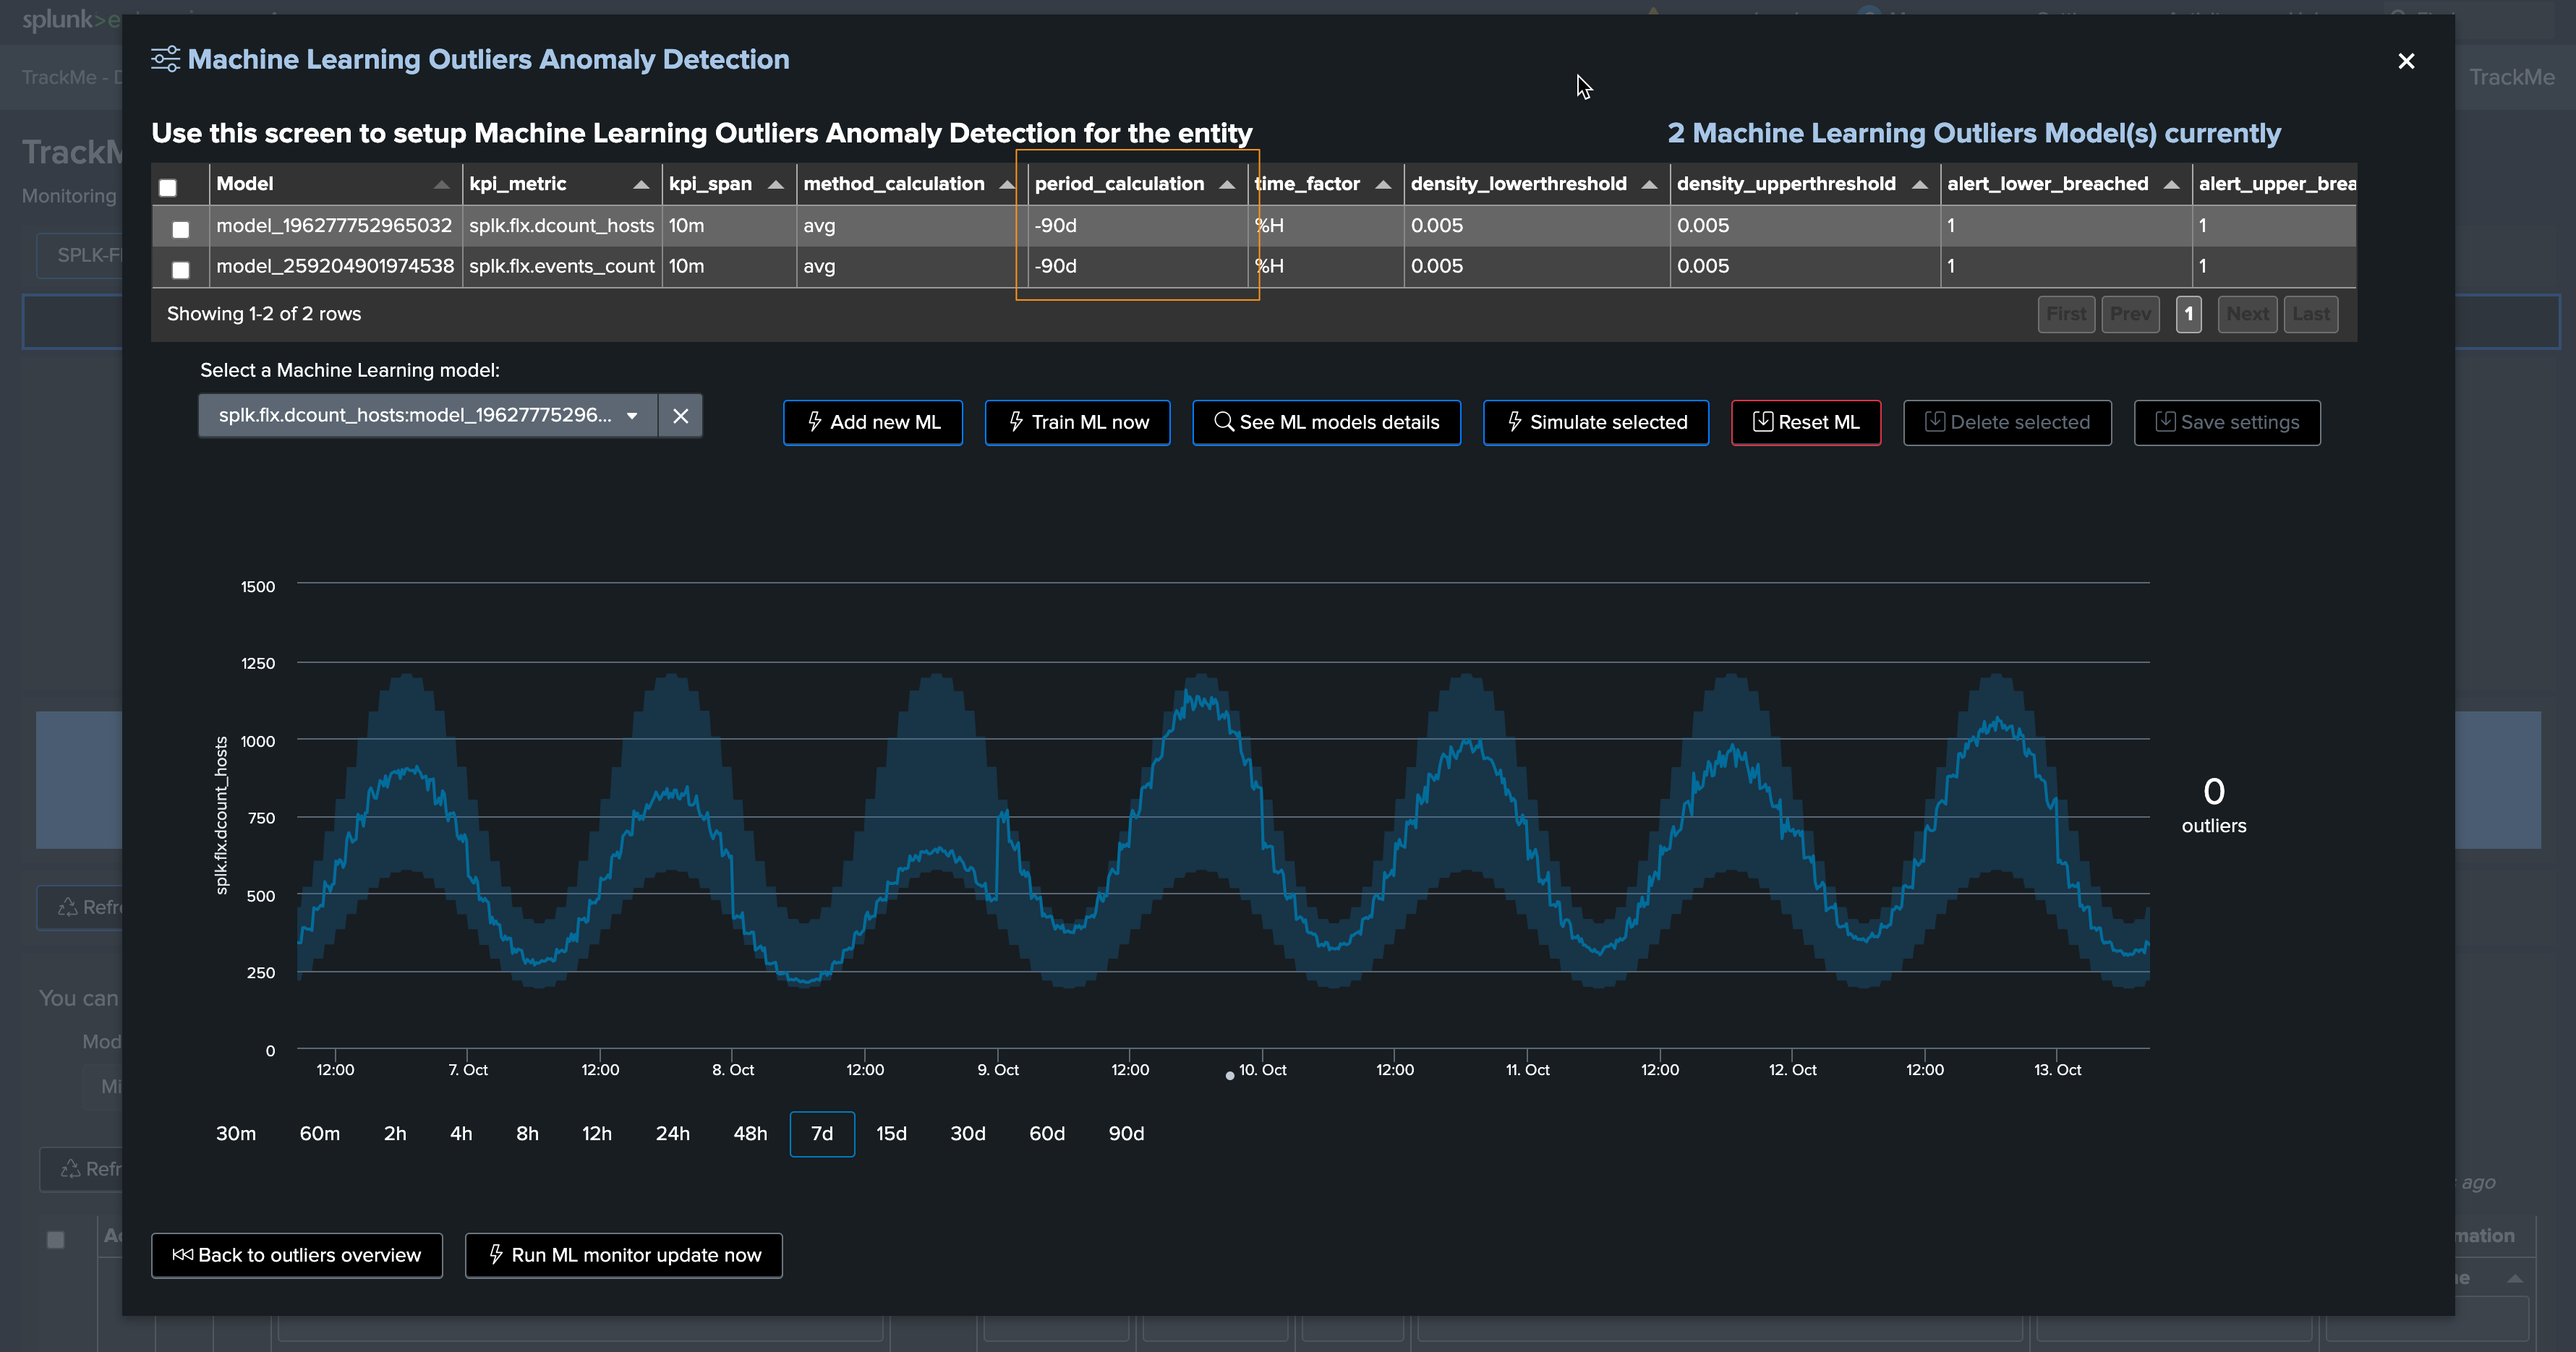
You can click on See ML model details to access and review to the models information:
Scenario: Detecting a lower bound outliers
Although we know we have a week day behaviour in the data, for now we will stick with the default settings and we will start generating a lower bound outlier.
To achieve this, we stop the run_backfill.sh and we start run_gen_lowerbound_outlier.sh, this basically:
Influence metrics with a large decrease of the curve, by an approximately 75%, accordingly to the magnitude of the week day / hour range
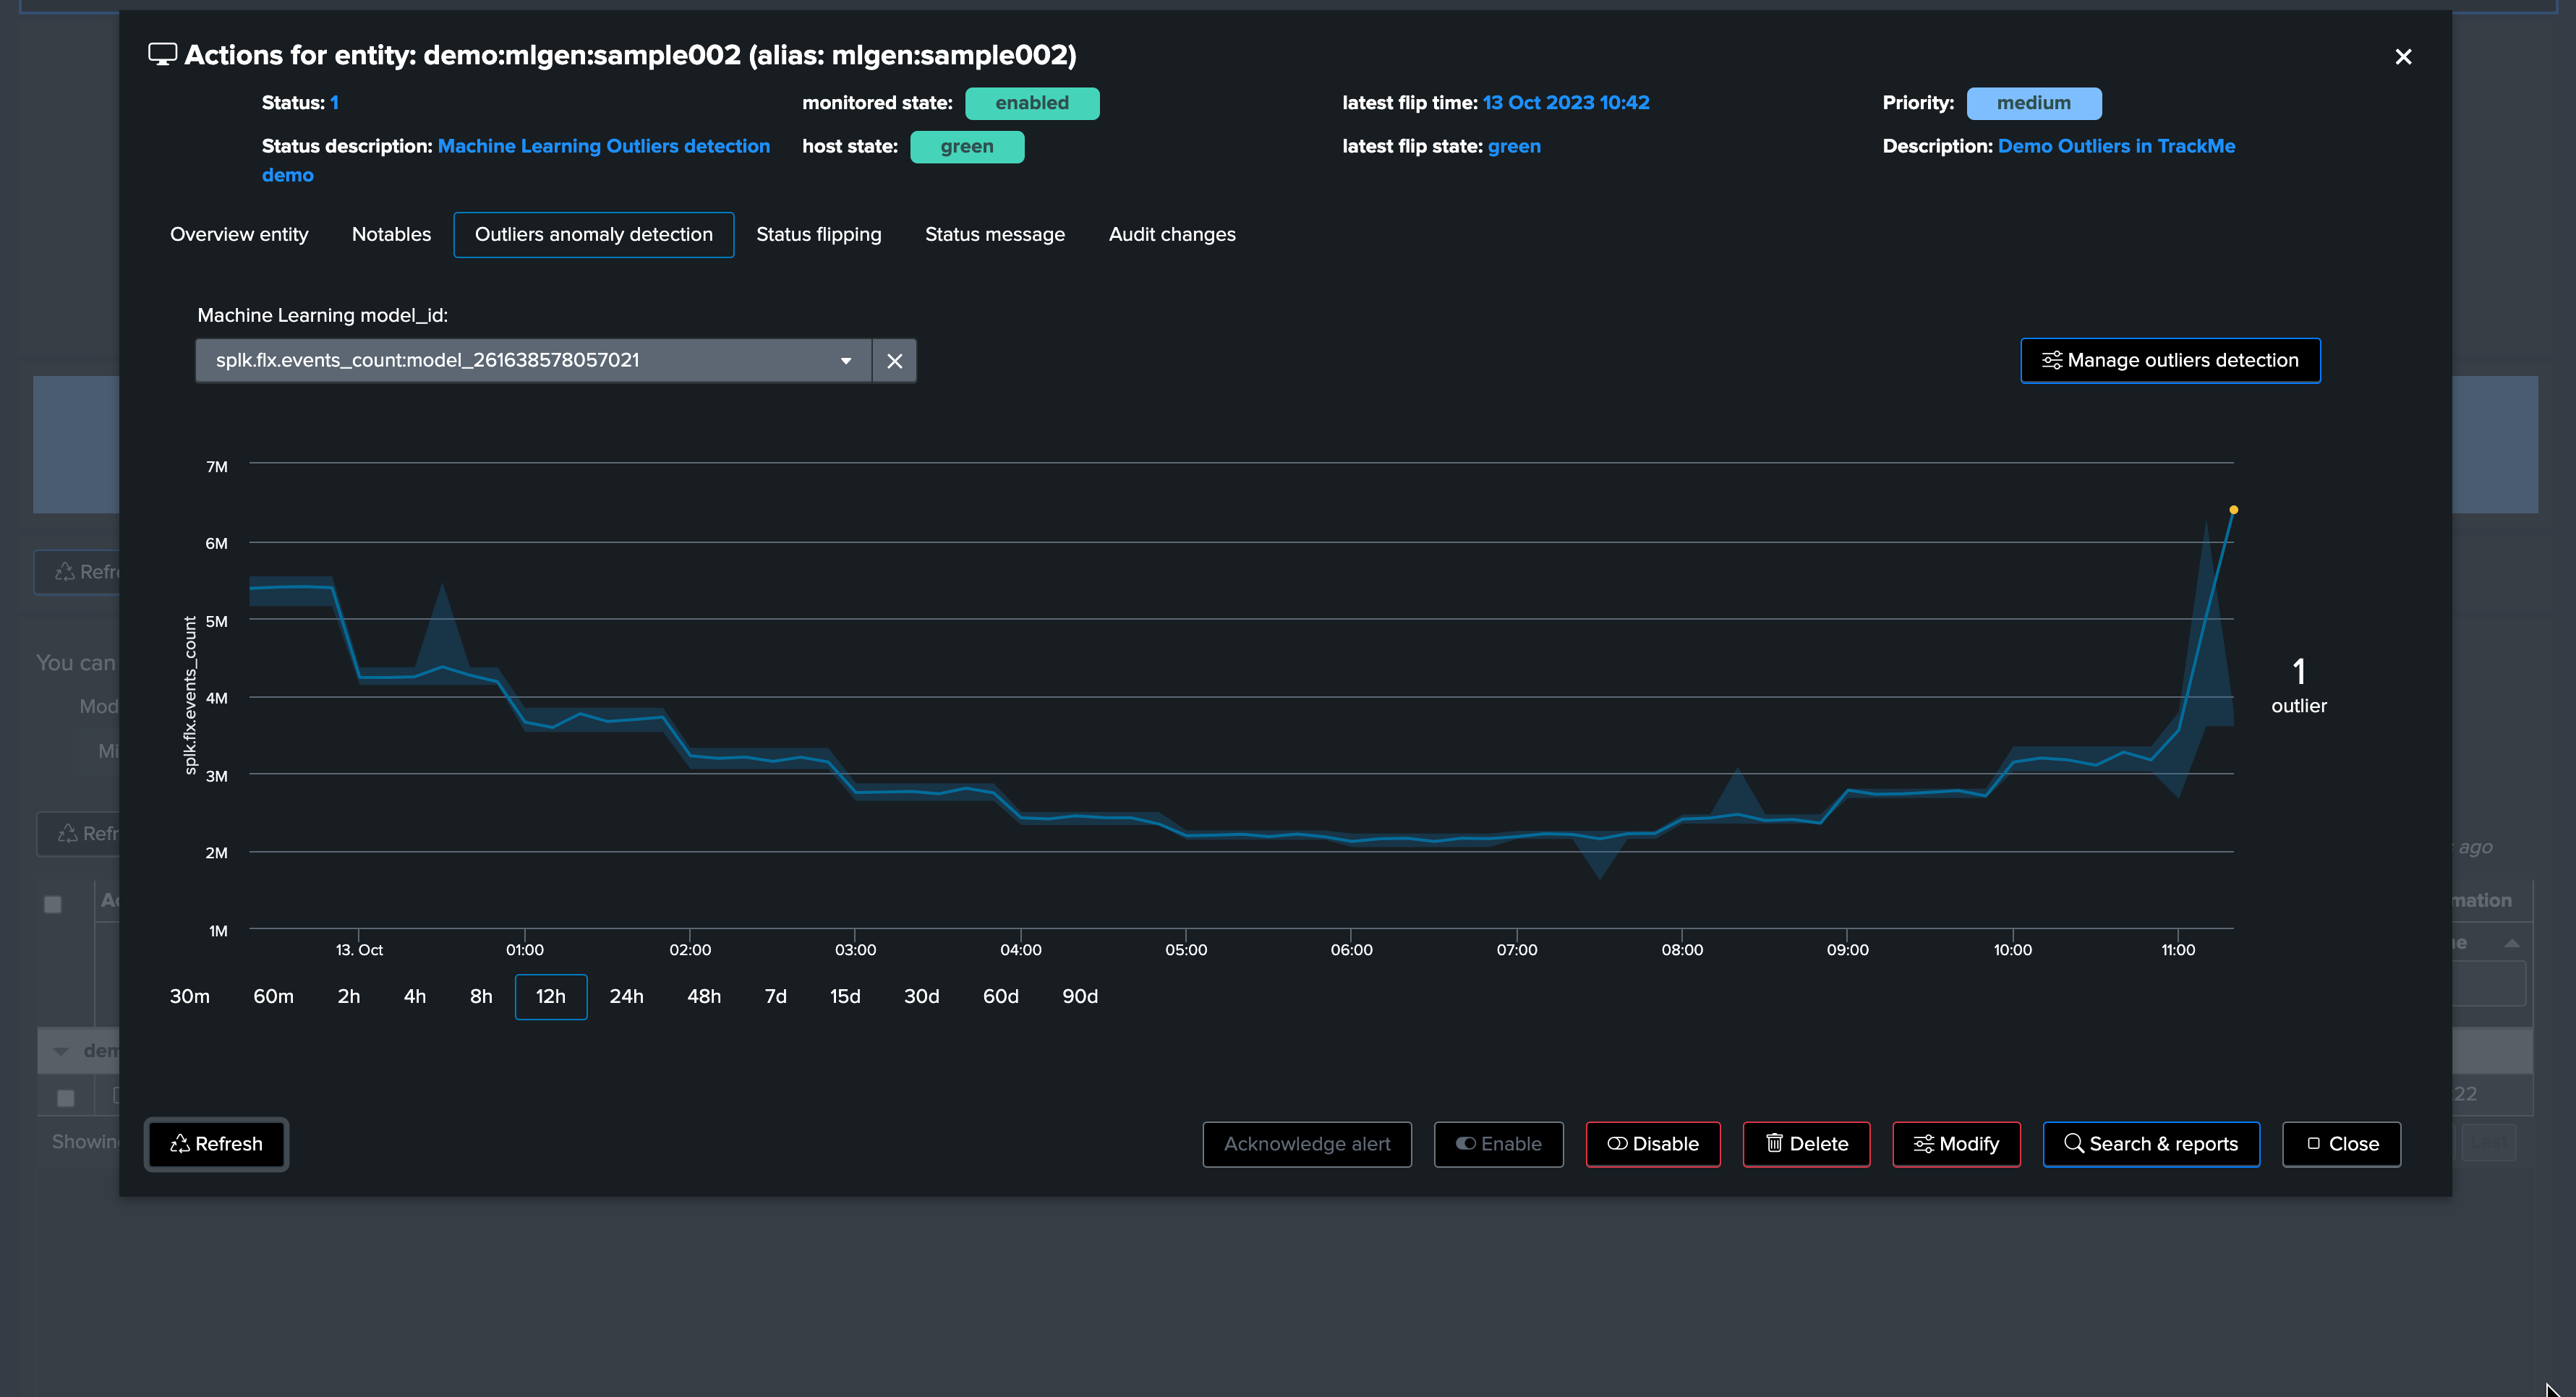
After a few minutes, we effectively start to see a clear outlier using the previous days comparison timechart search:

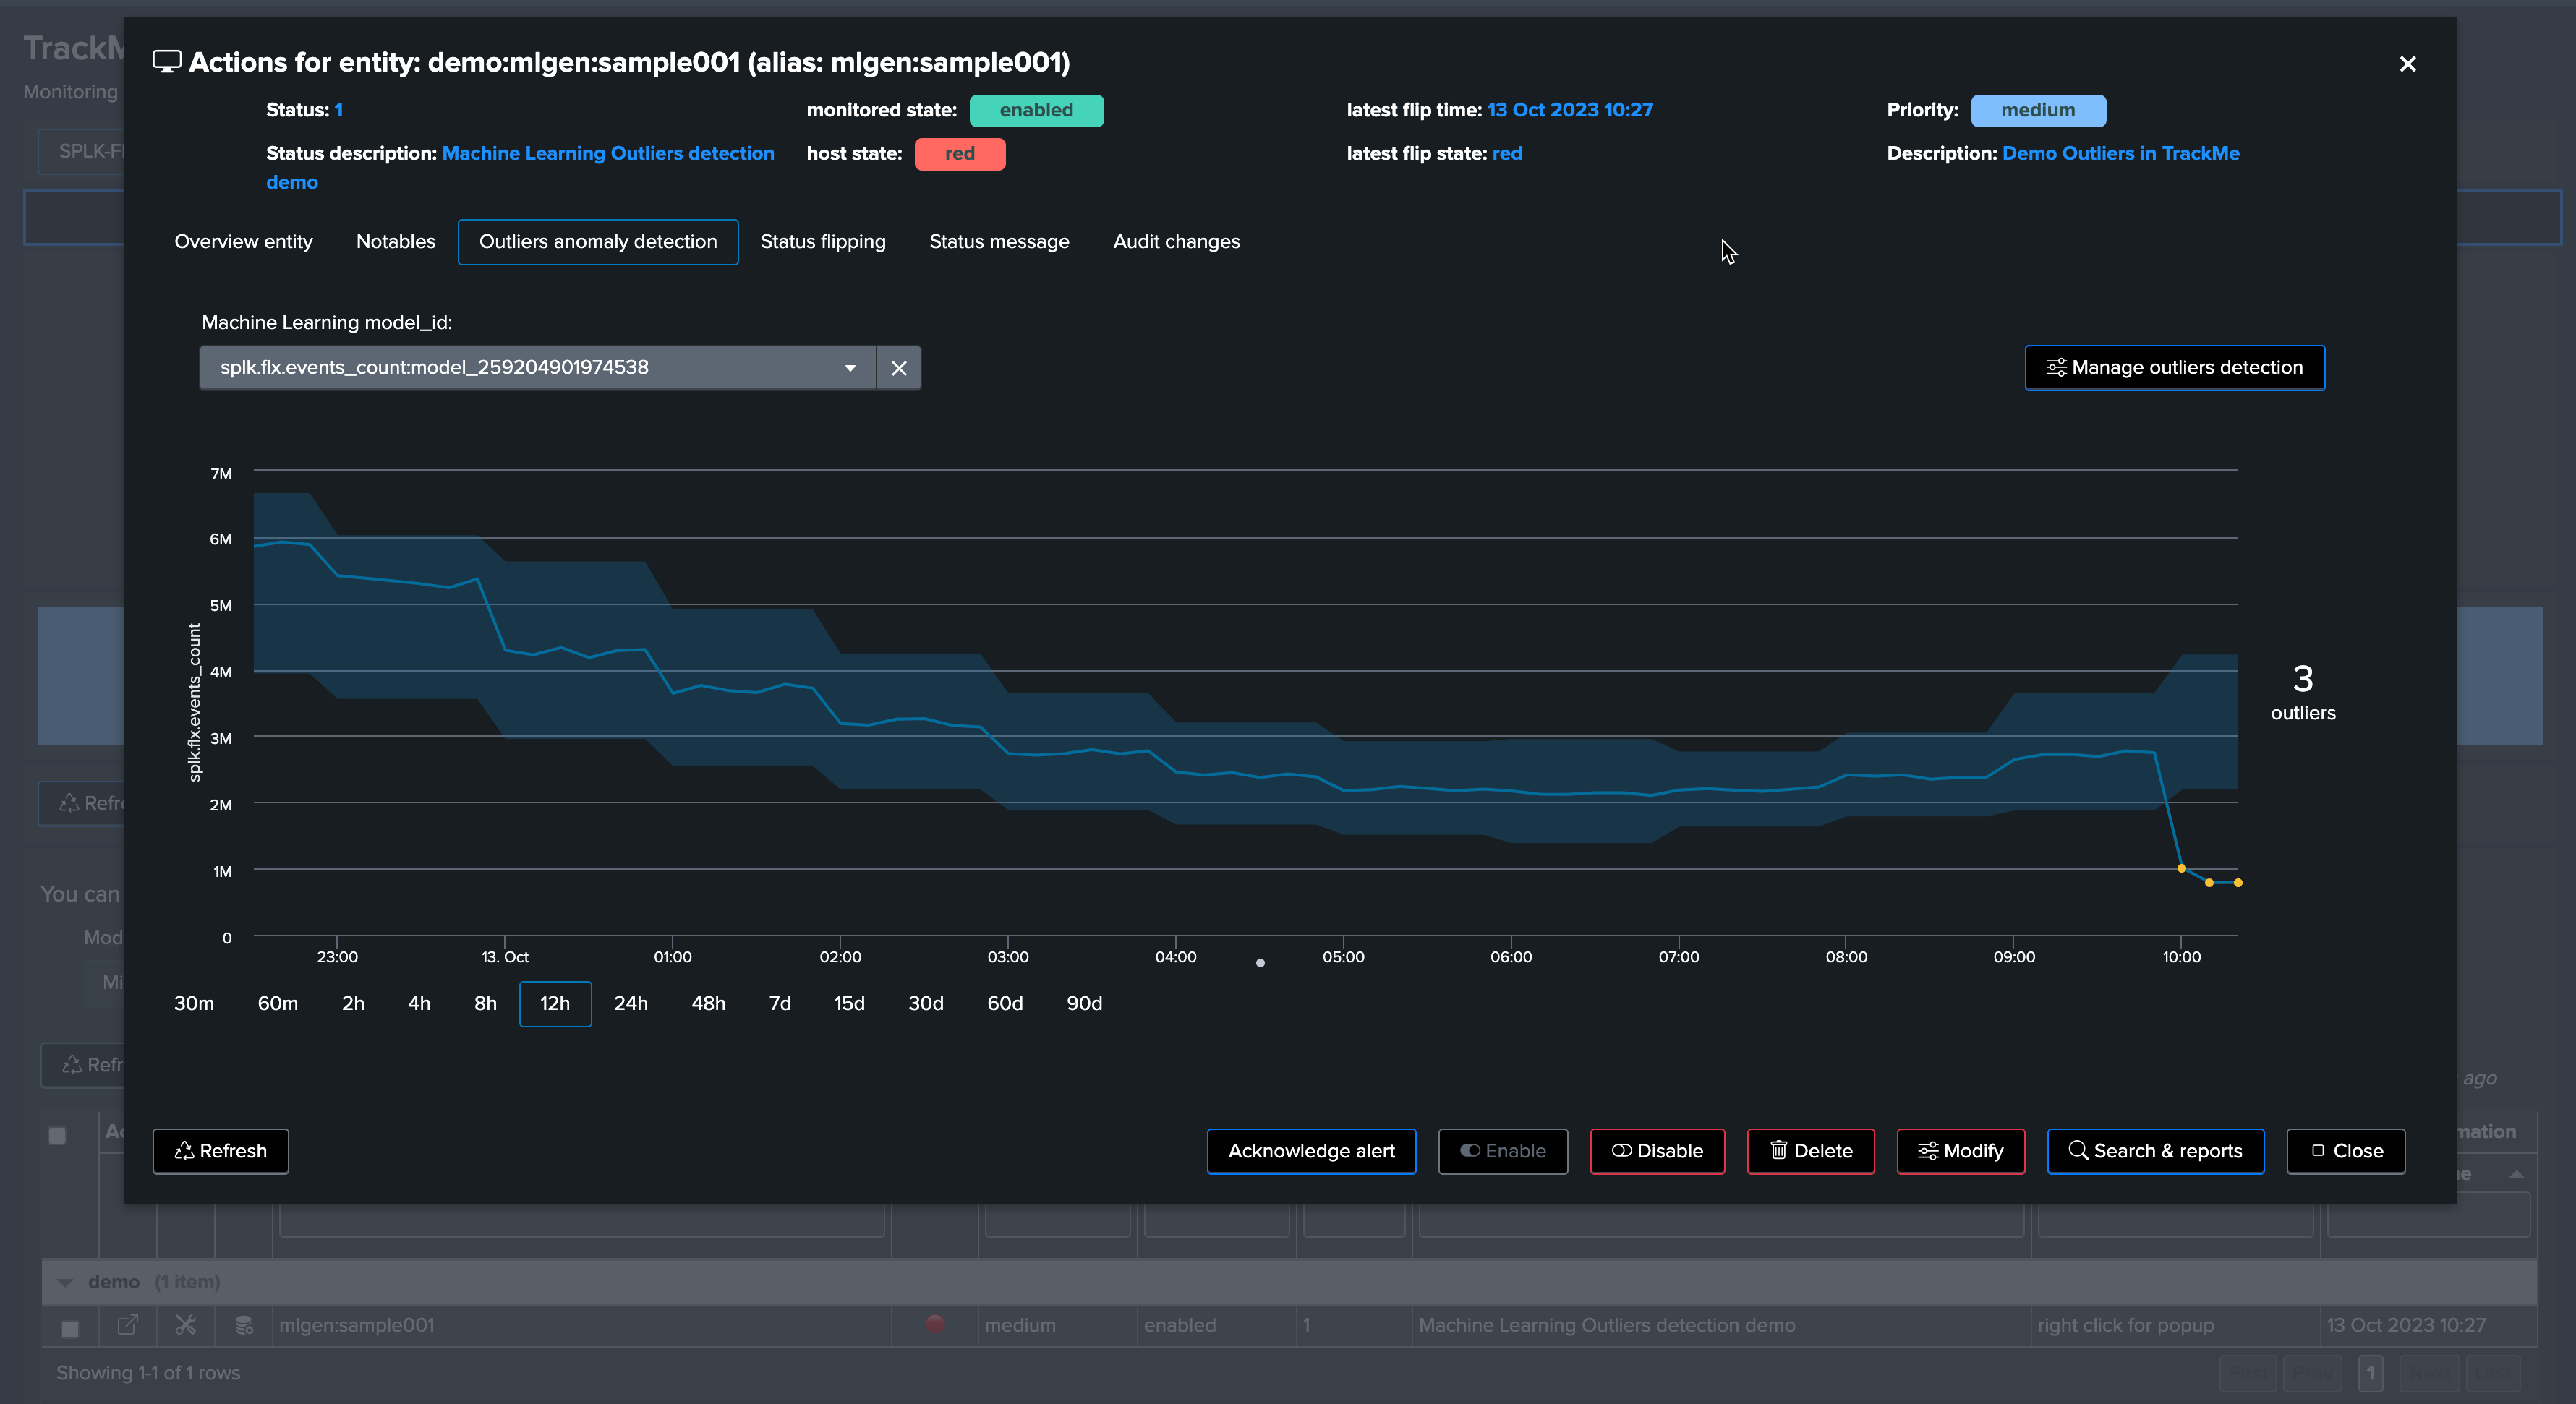
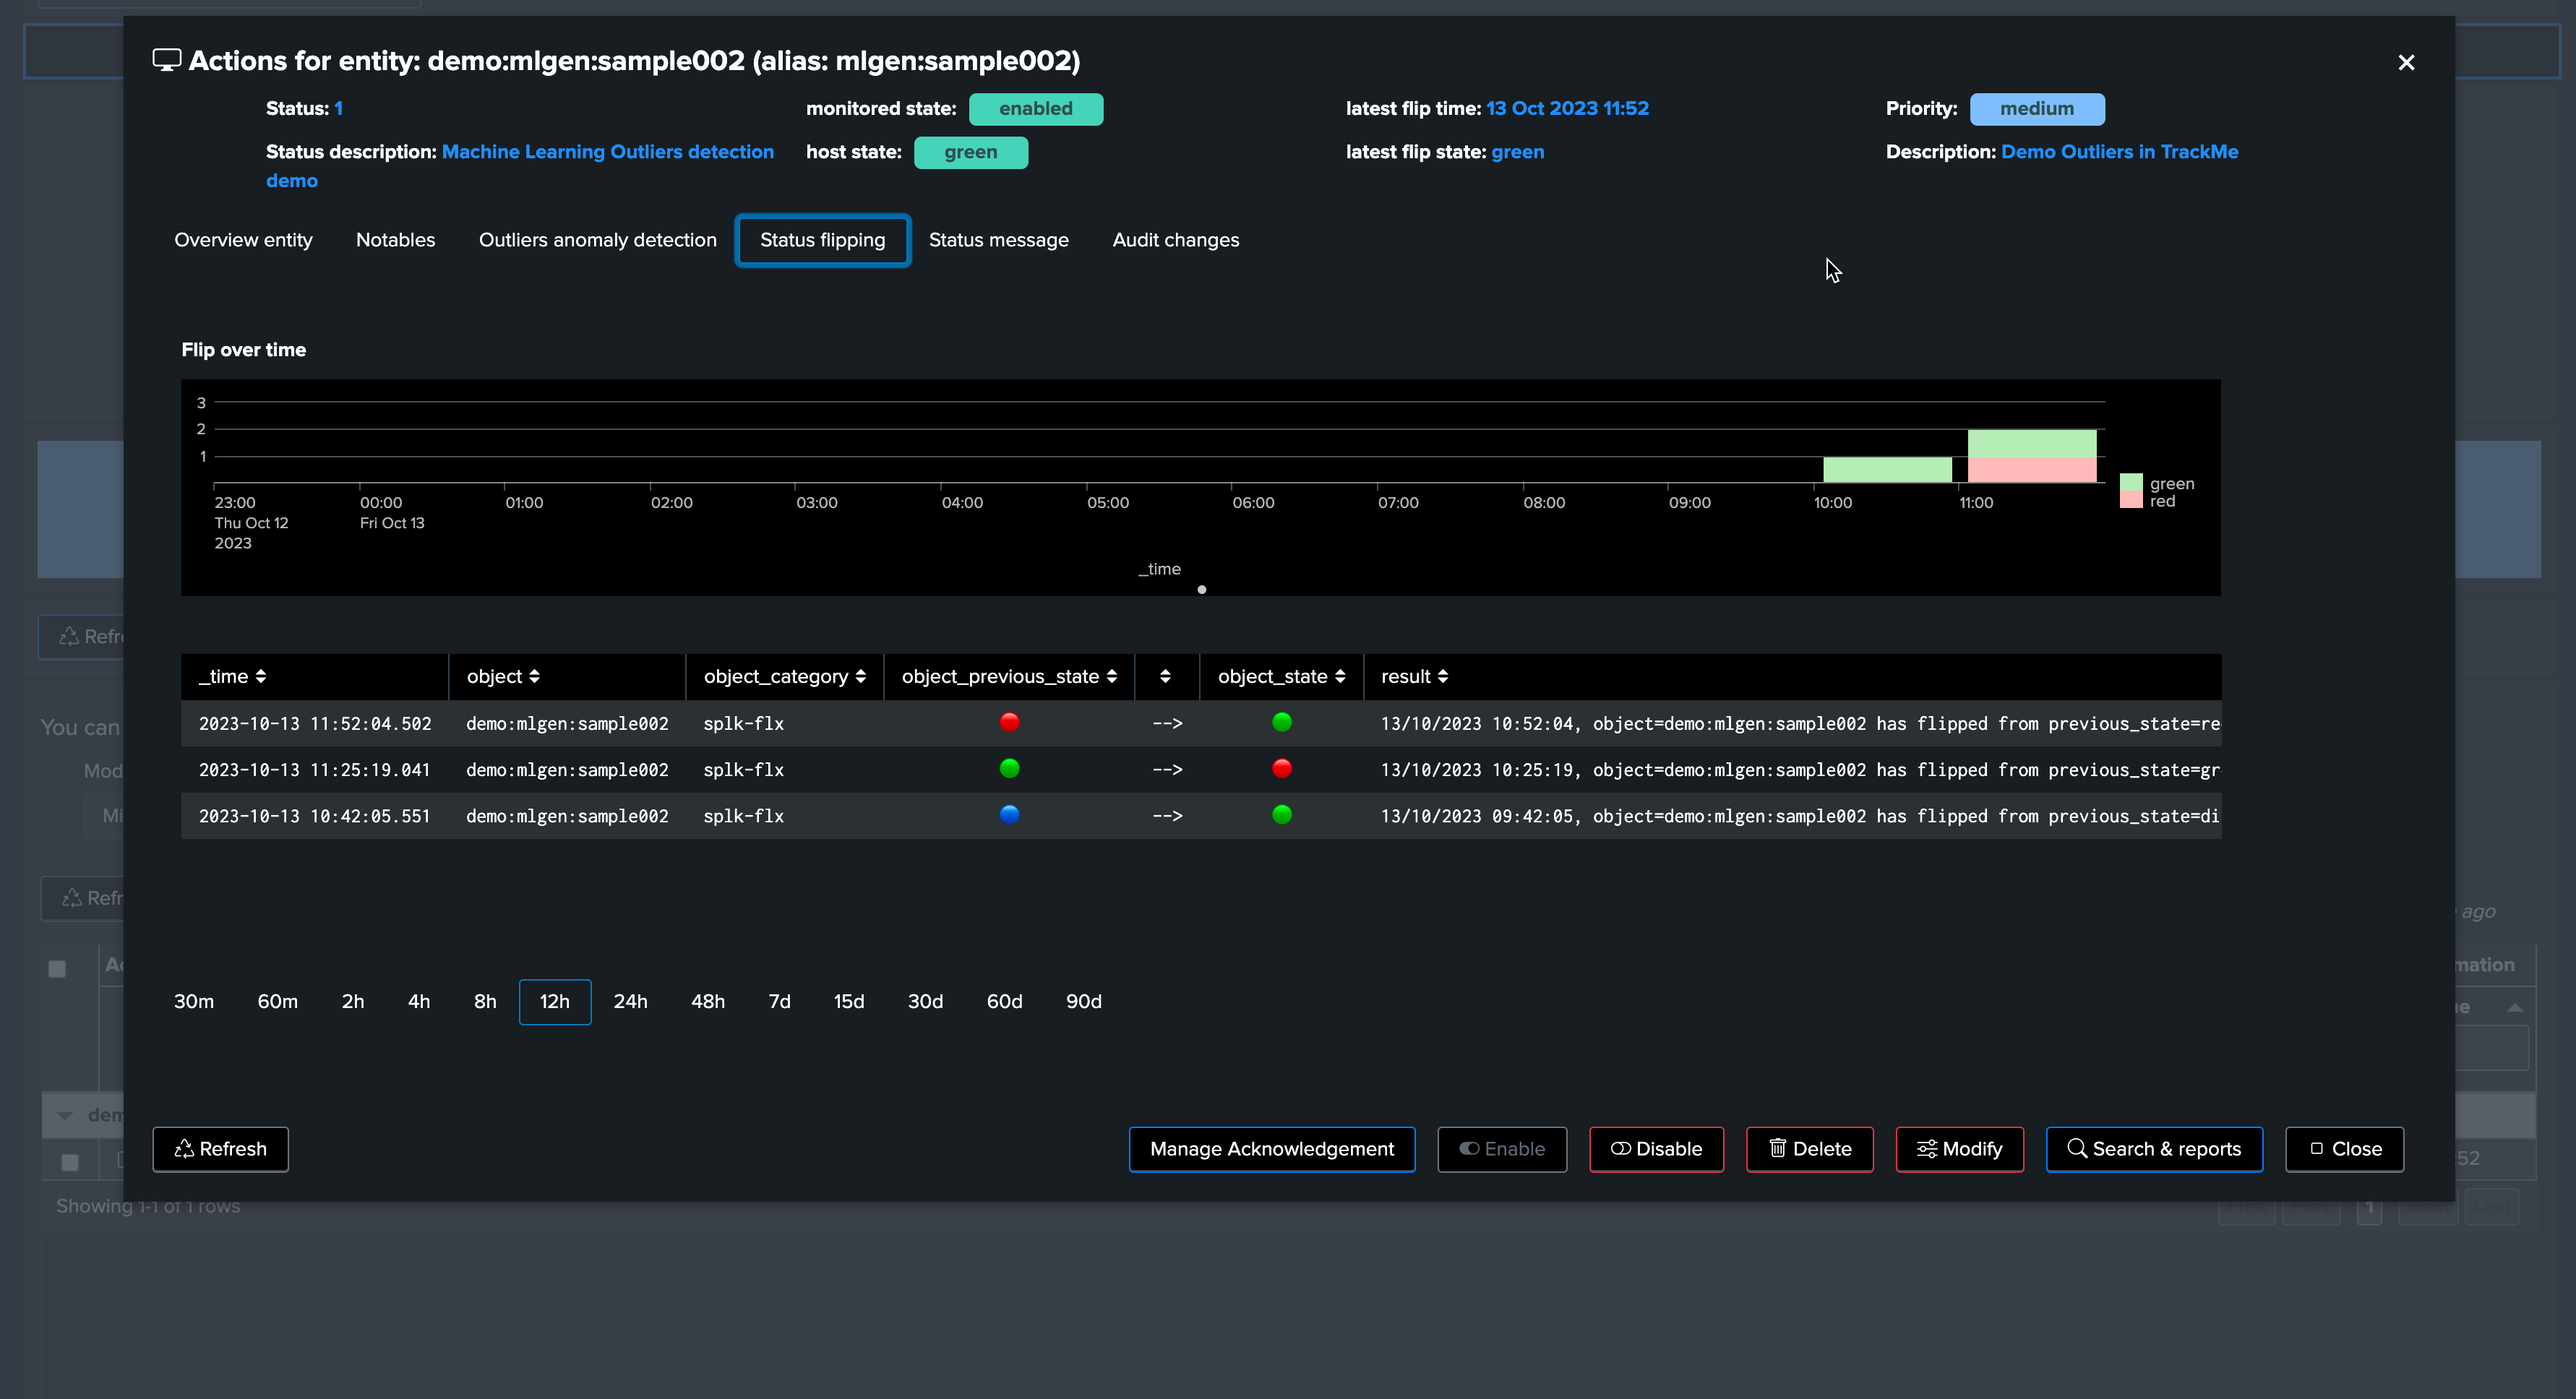
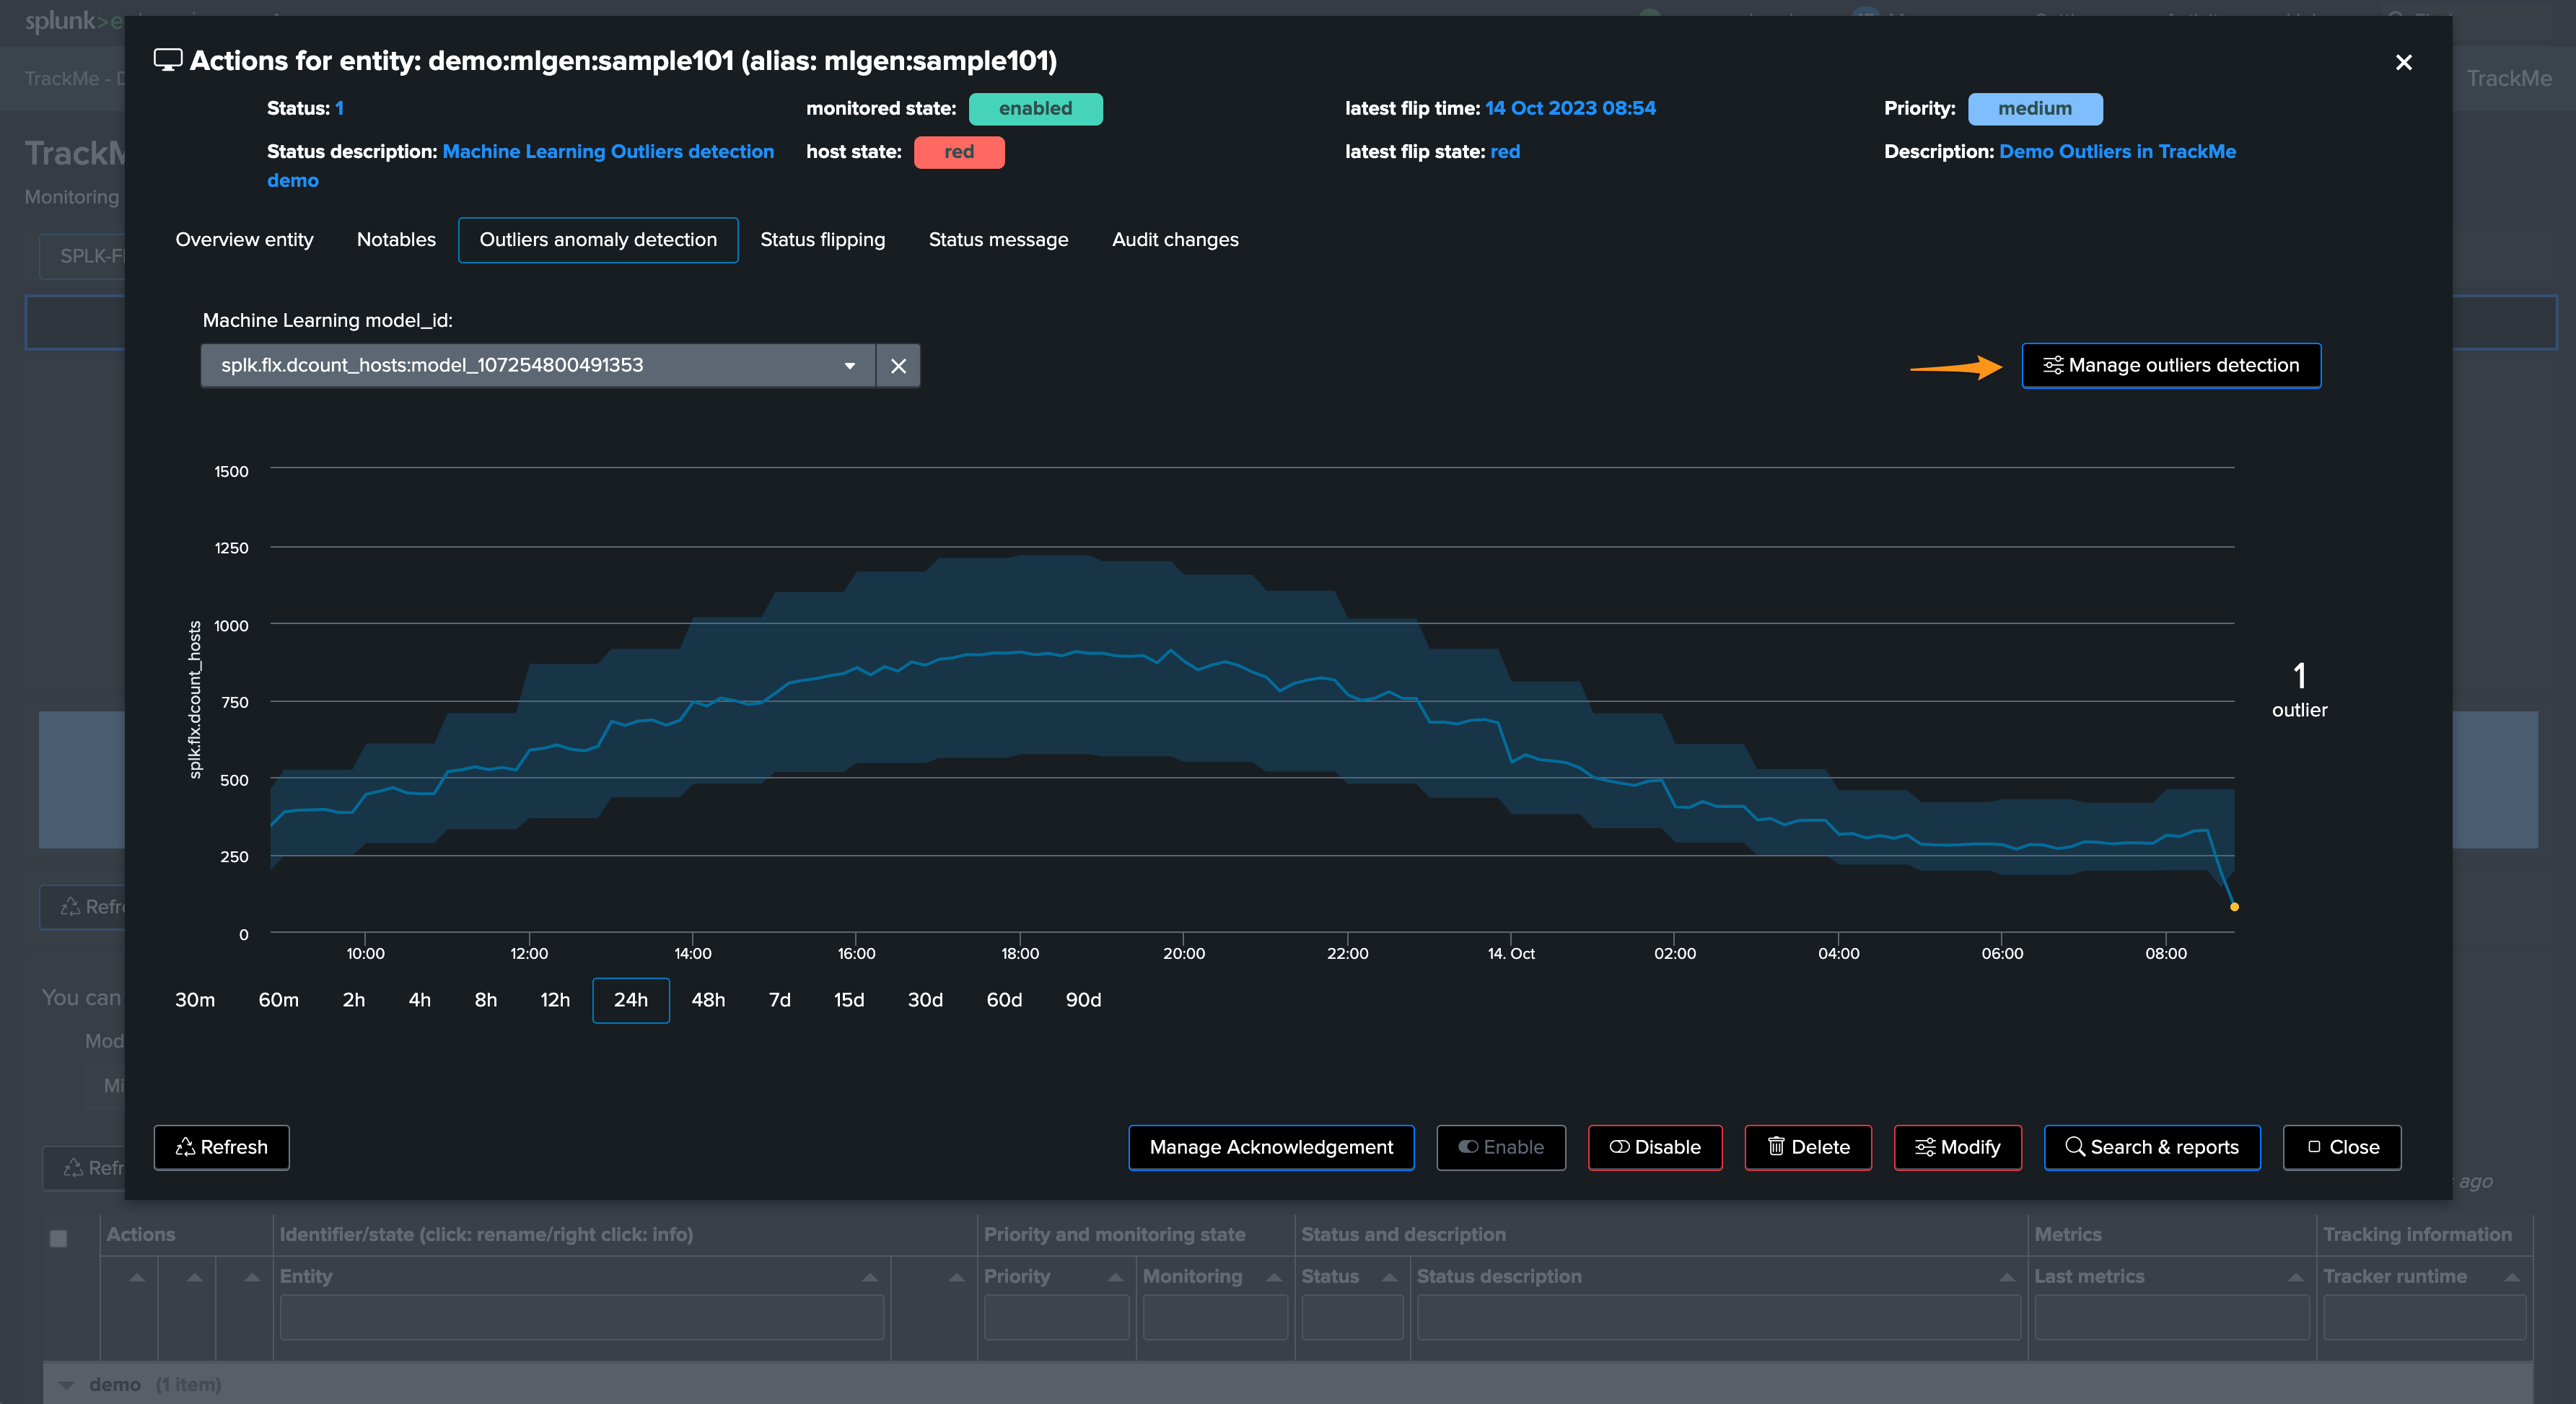
This outlier will also be reflected in TrackMe, this can take 5/10 minutes to be detected as an effective outlier:
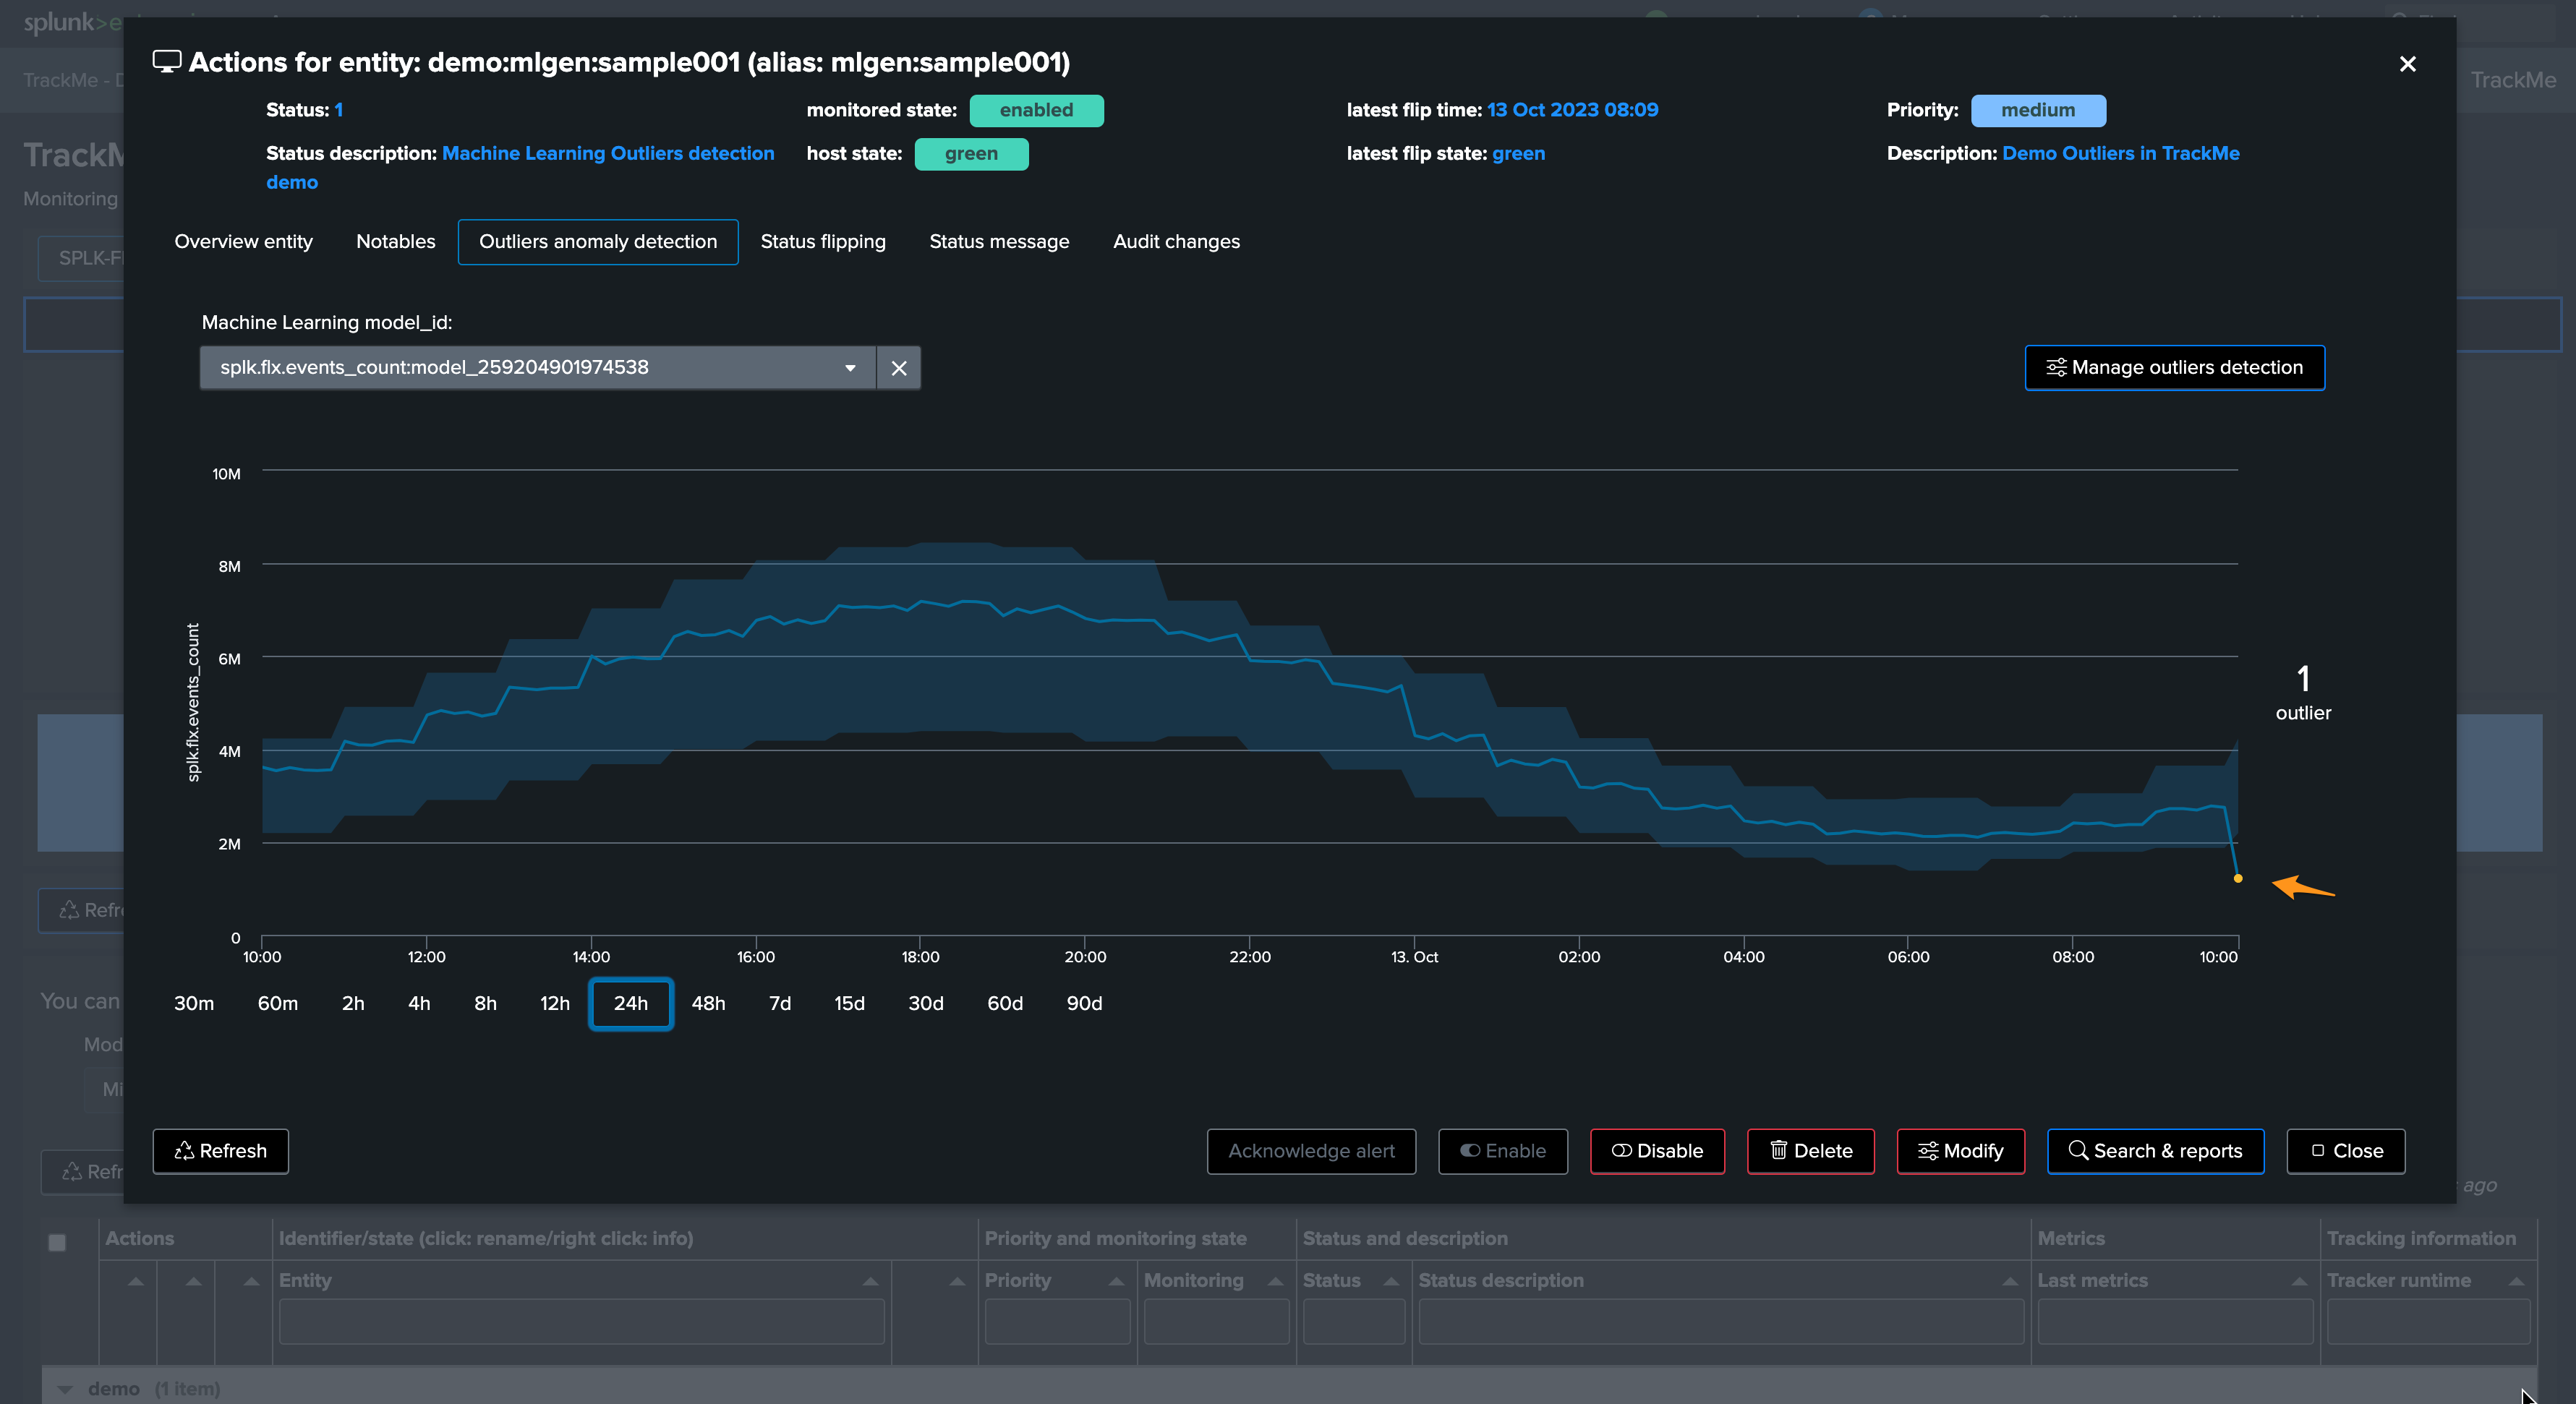
Let’s zoom in the period:
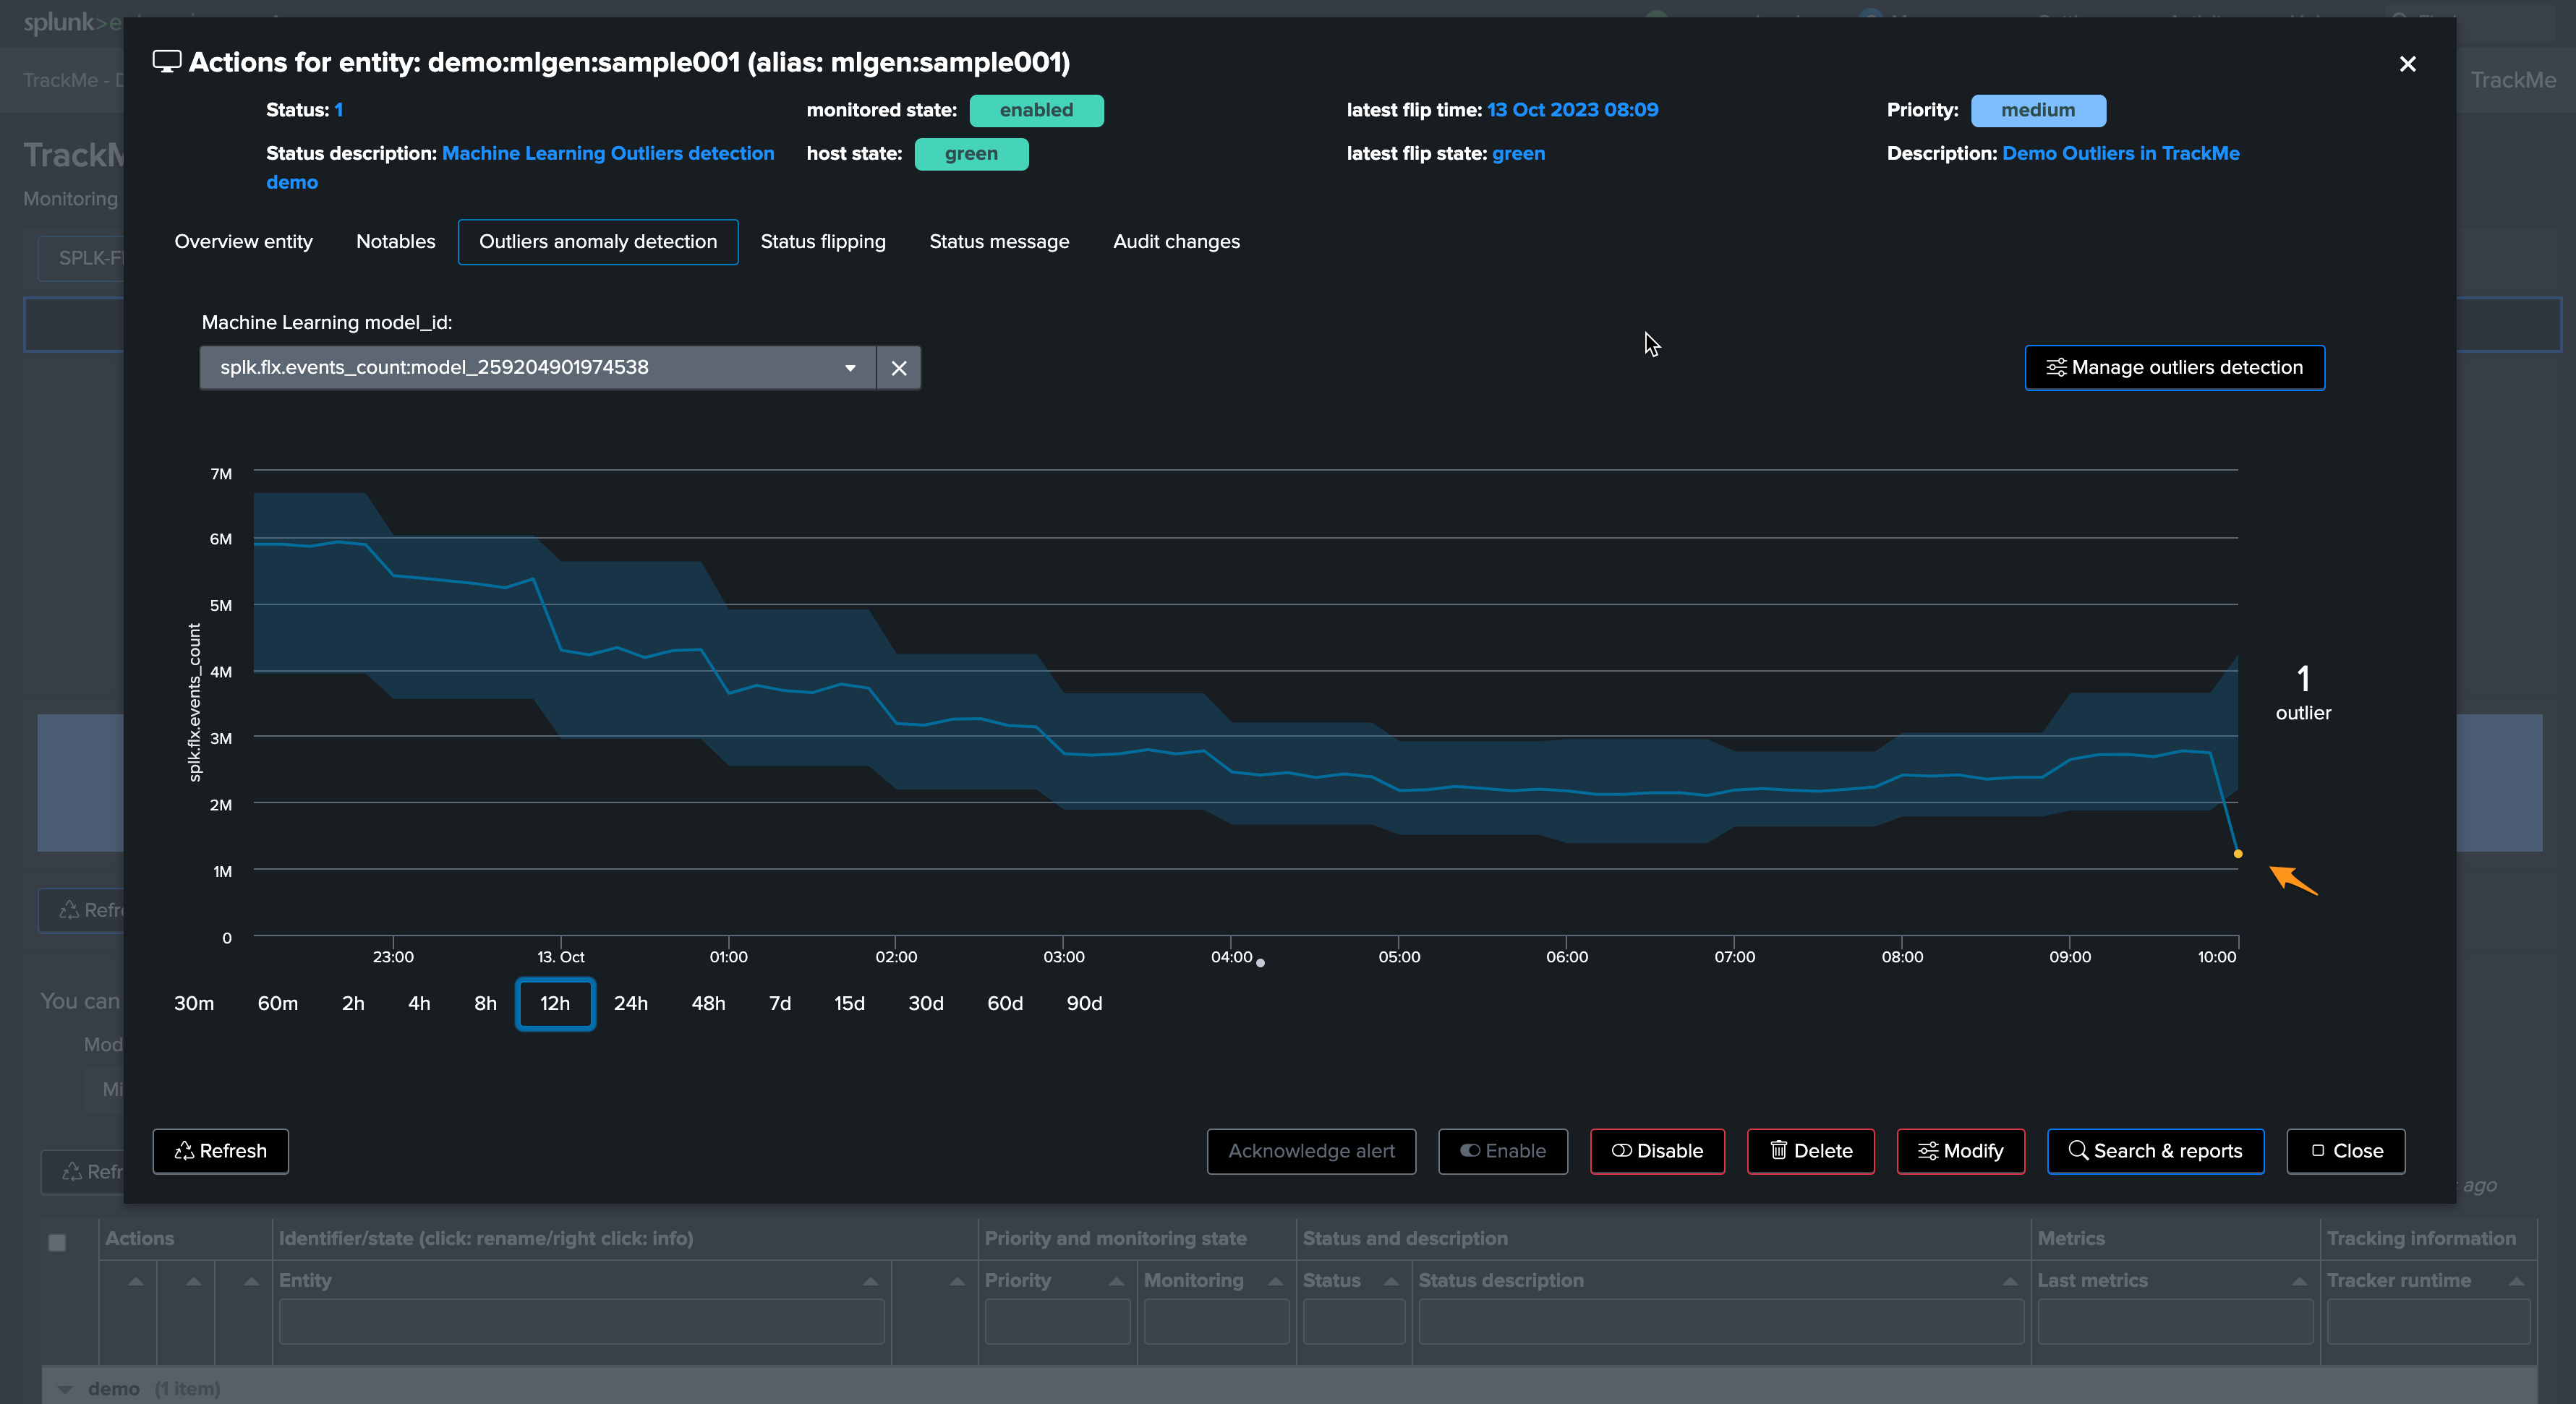
Very nice, the sudden decrease in the activity has been detected successfully!
The next phase is to review the ML rendering phase, this means:
The
_mlmonitor_scheduled backend runs on a regular basis and attempts to review as many entities in a given portion of timeDepending on the volume of entities, this process can therefore require some time before the outliers is effectively noticed
Let’s run the mlmonitor job:

By default, the ML monitor will attempt to verify any entity that has not been verified since more than an hour
This behaviour can be customised in the system wide configuration:
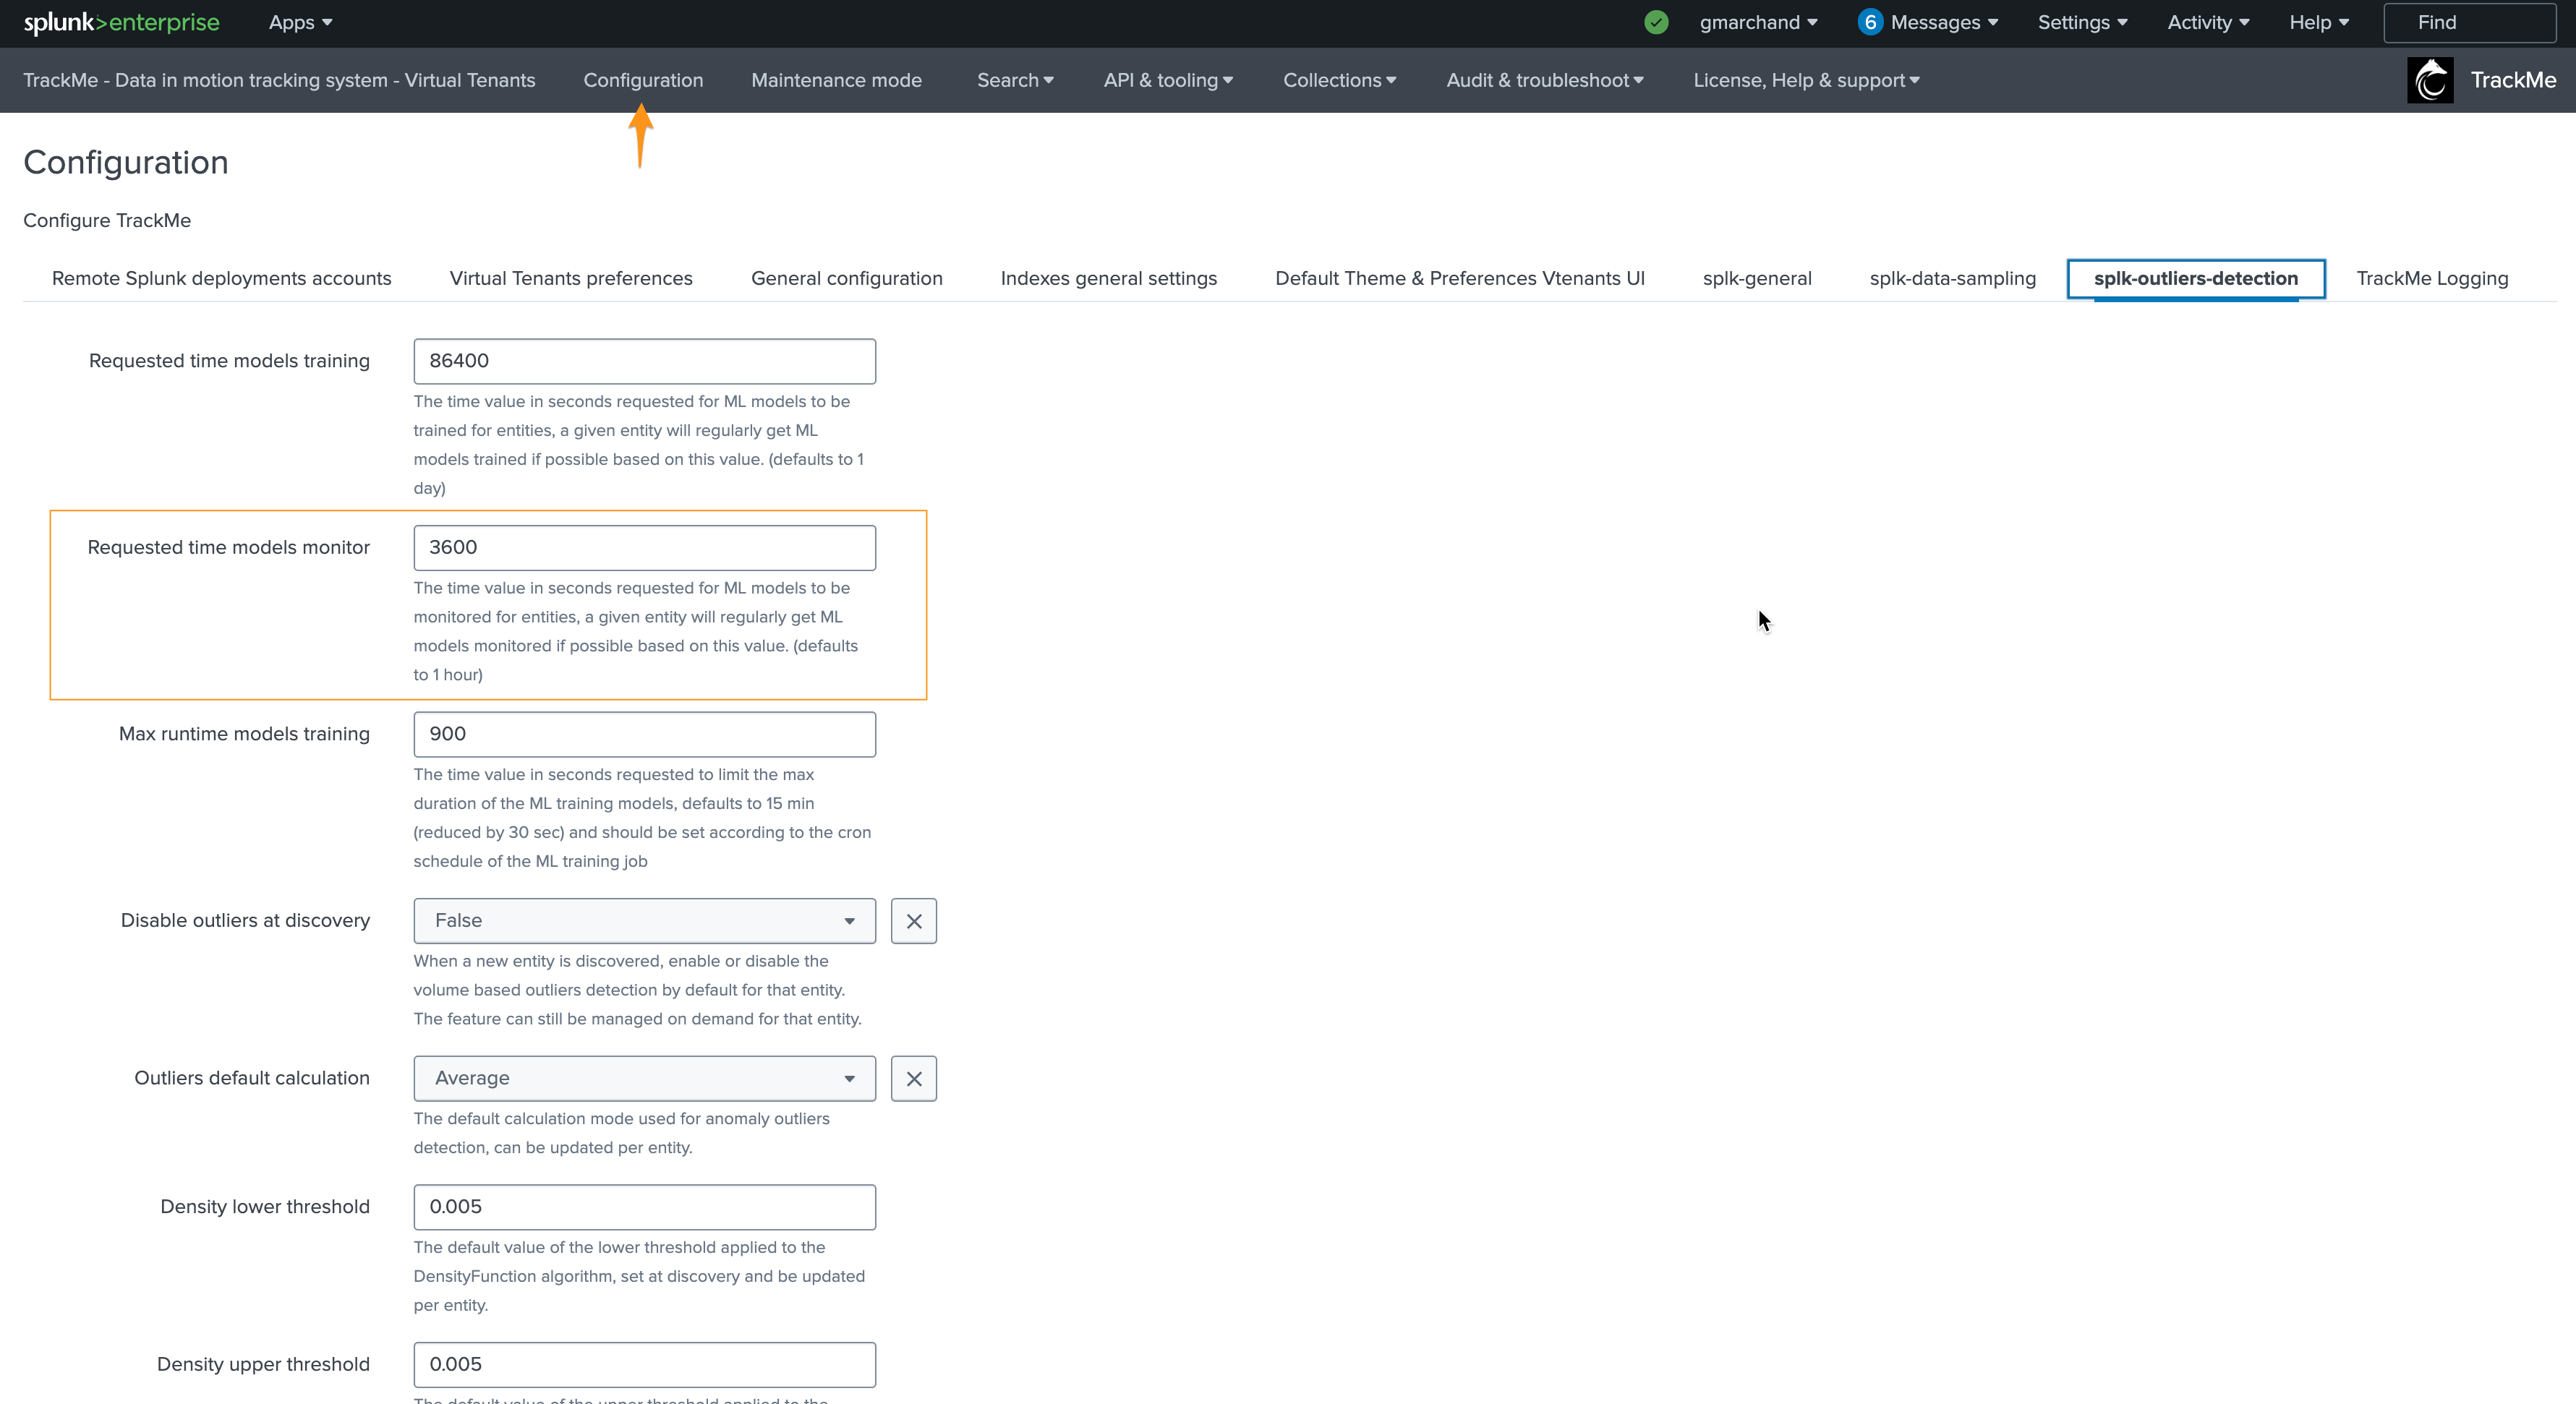
For the purposes of the documentation, we will reduce this to 5 minutes and will re-run the monitor backend:
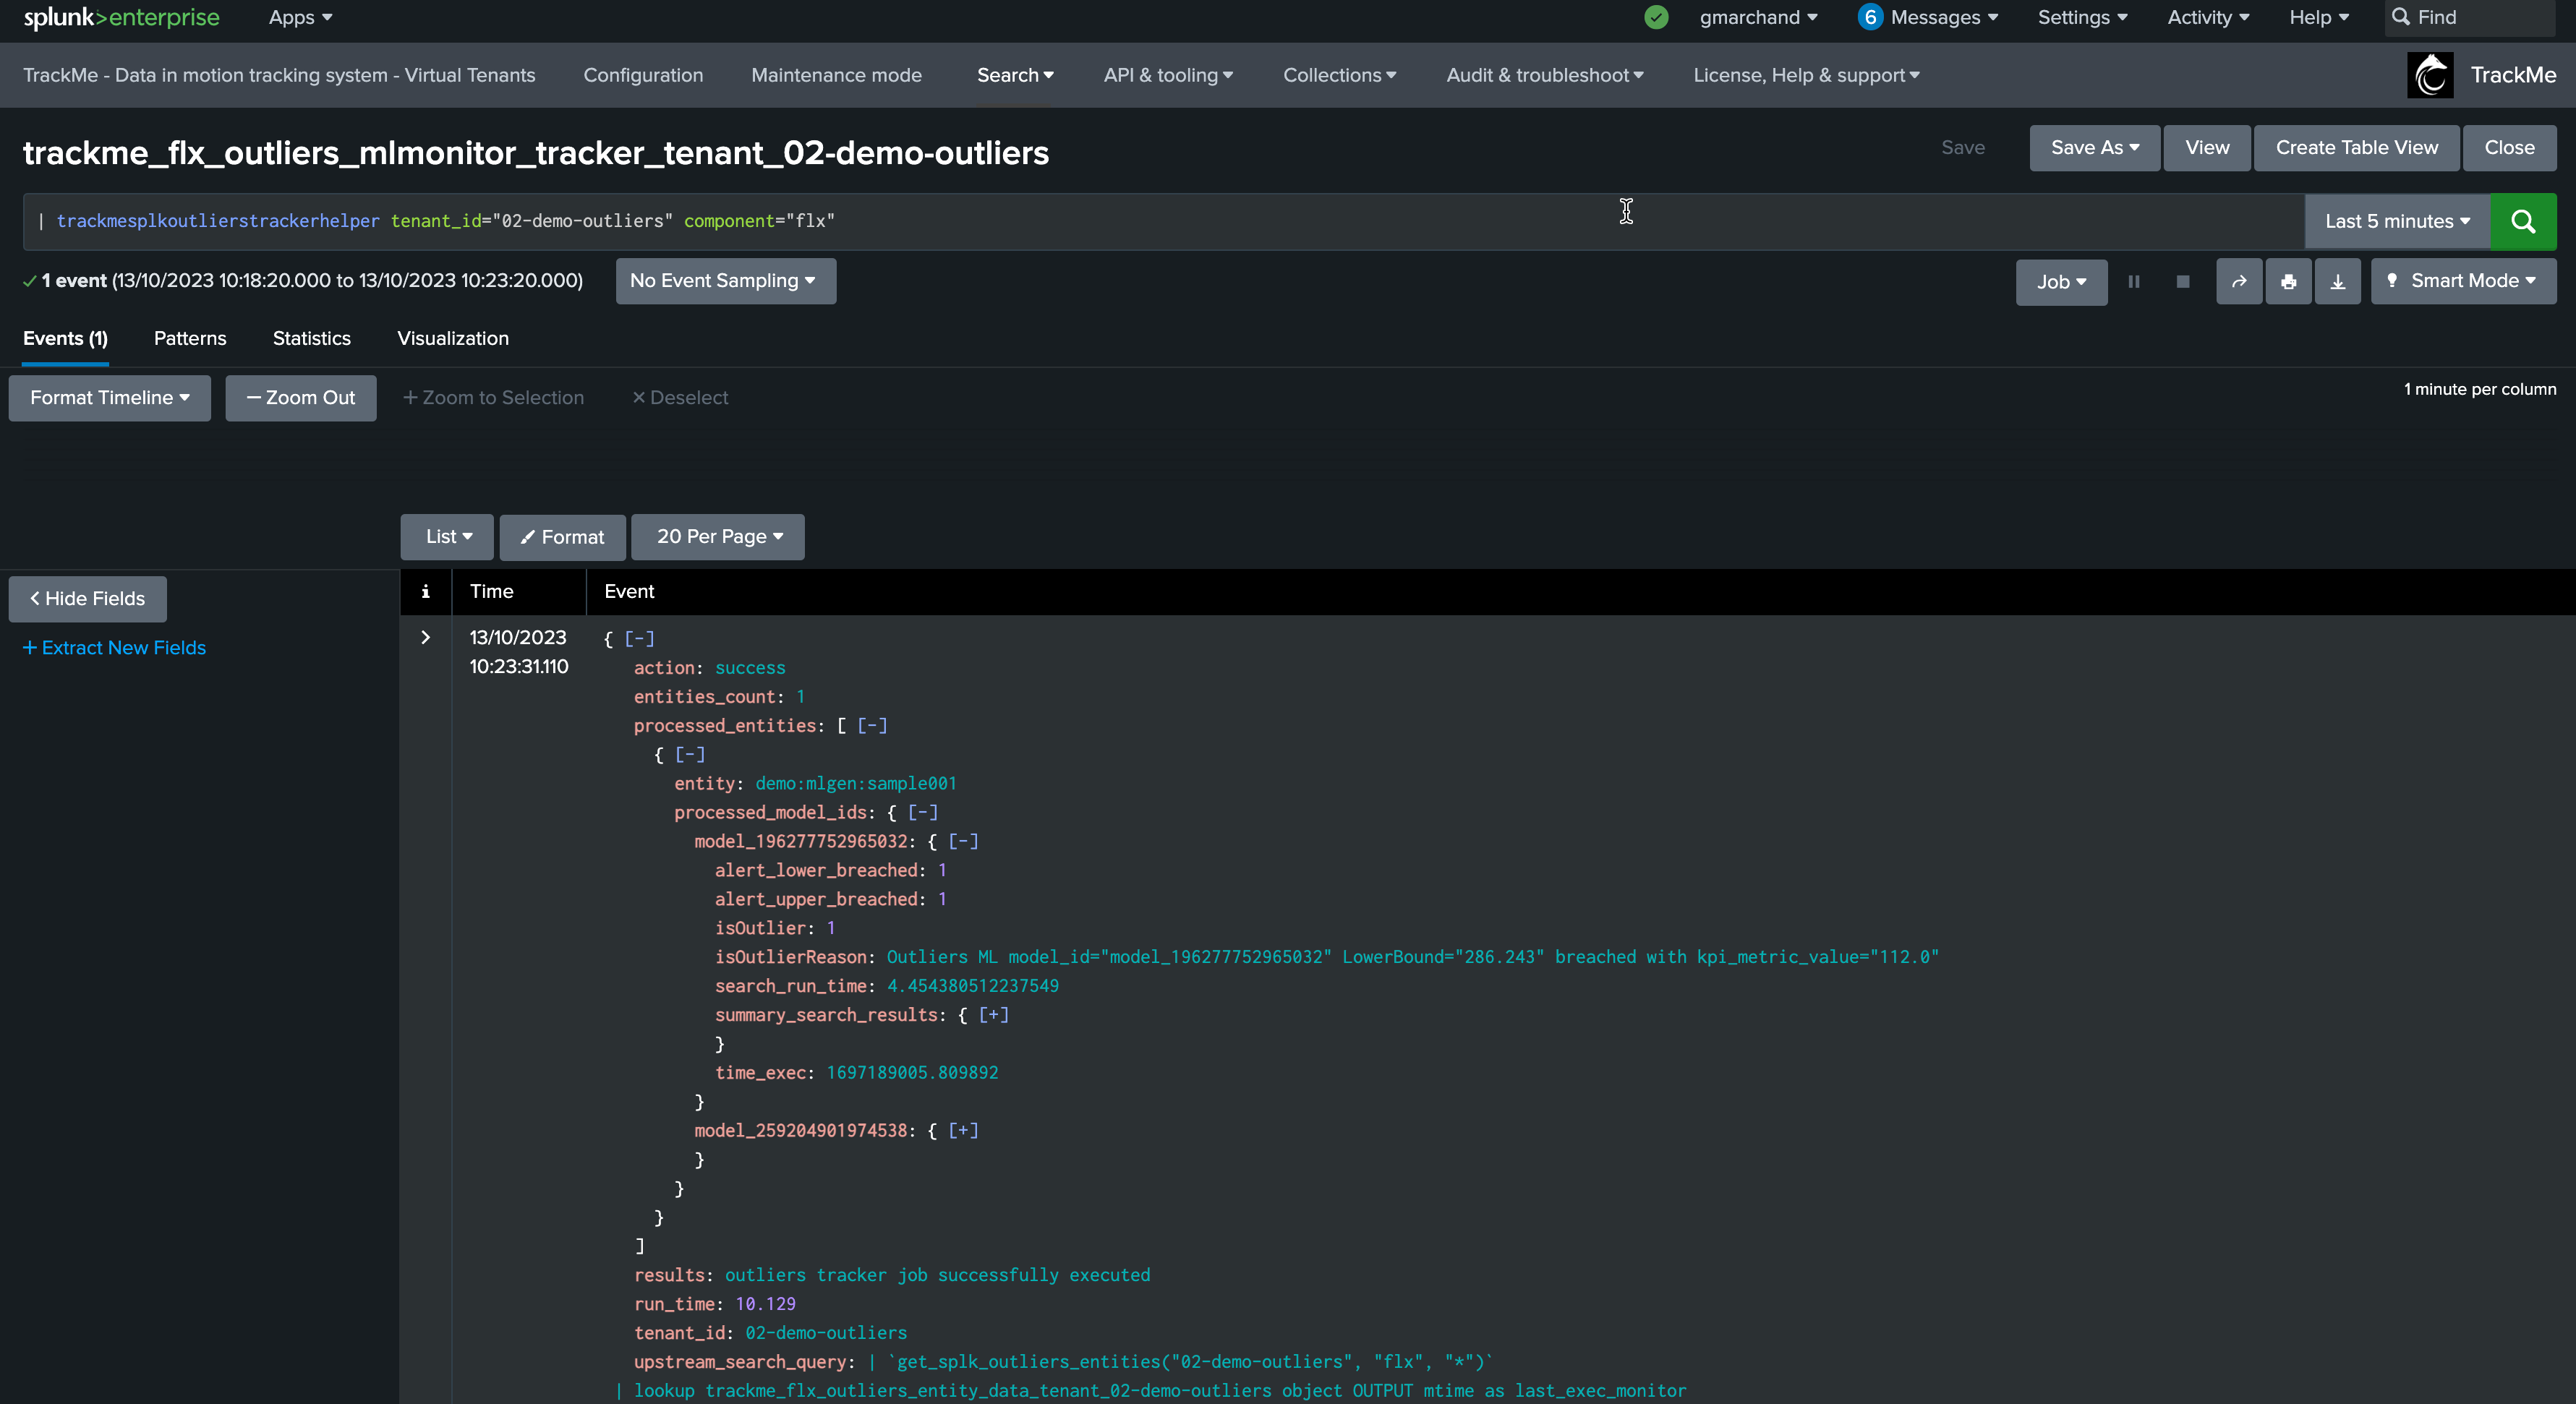
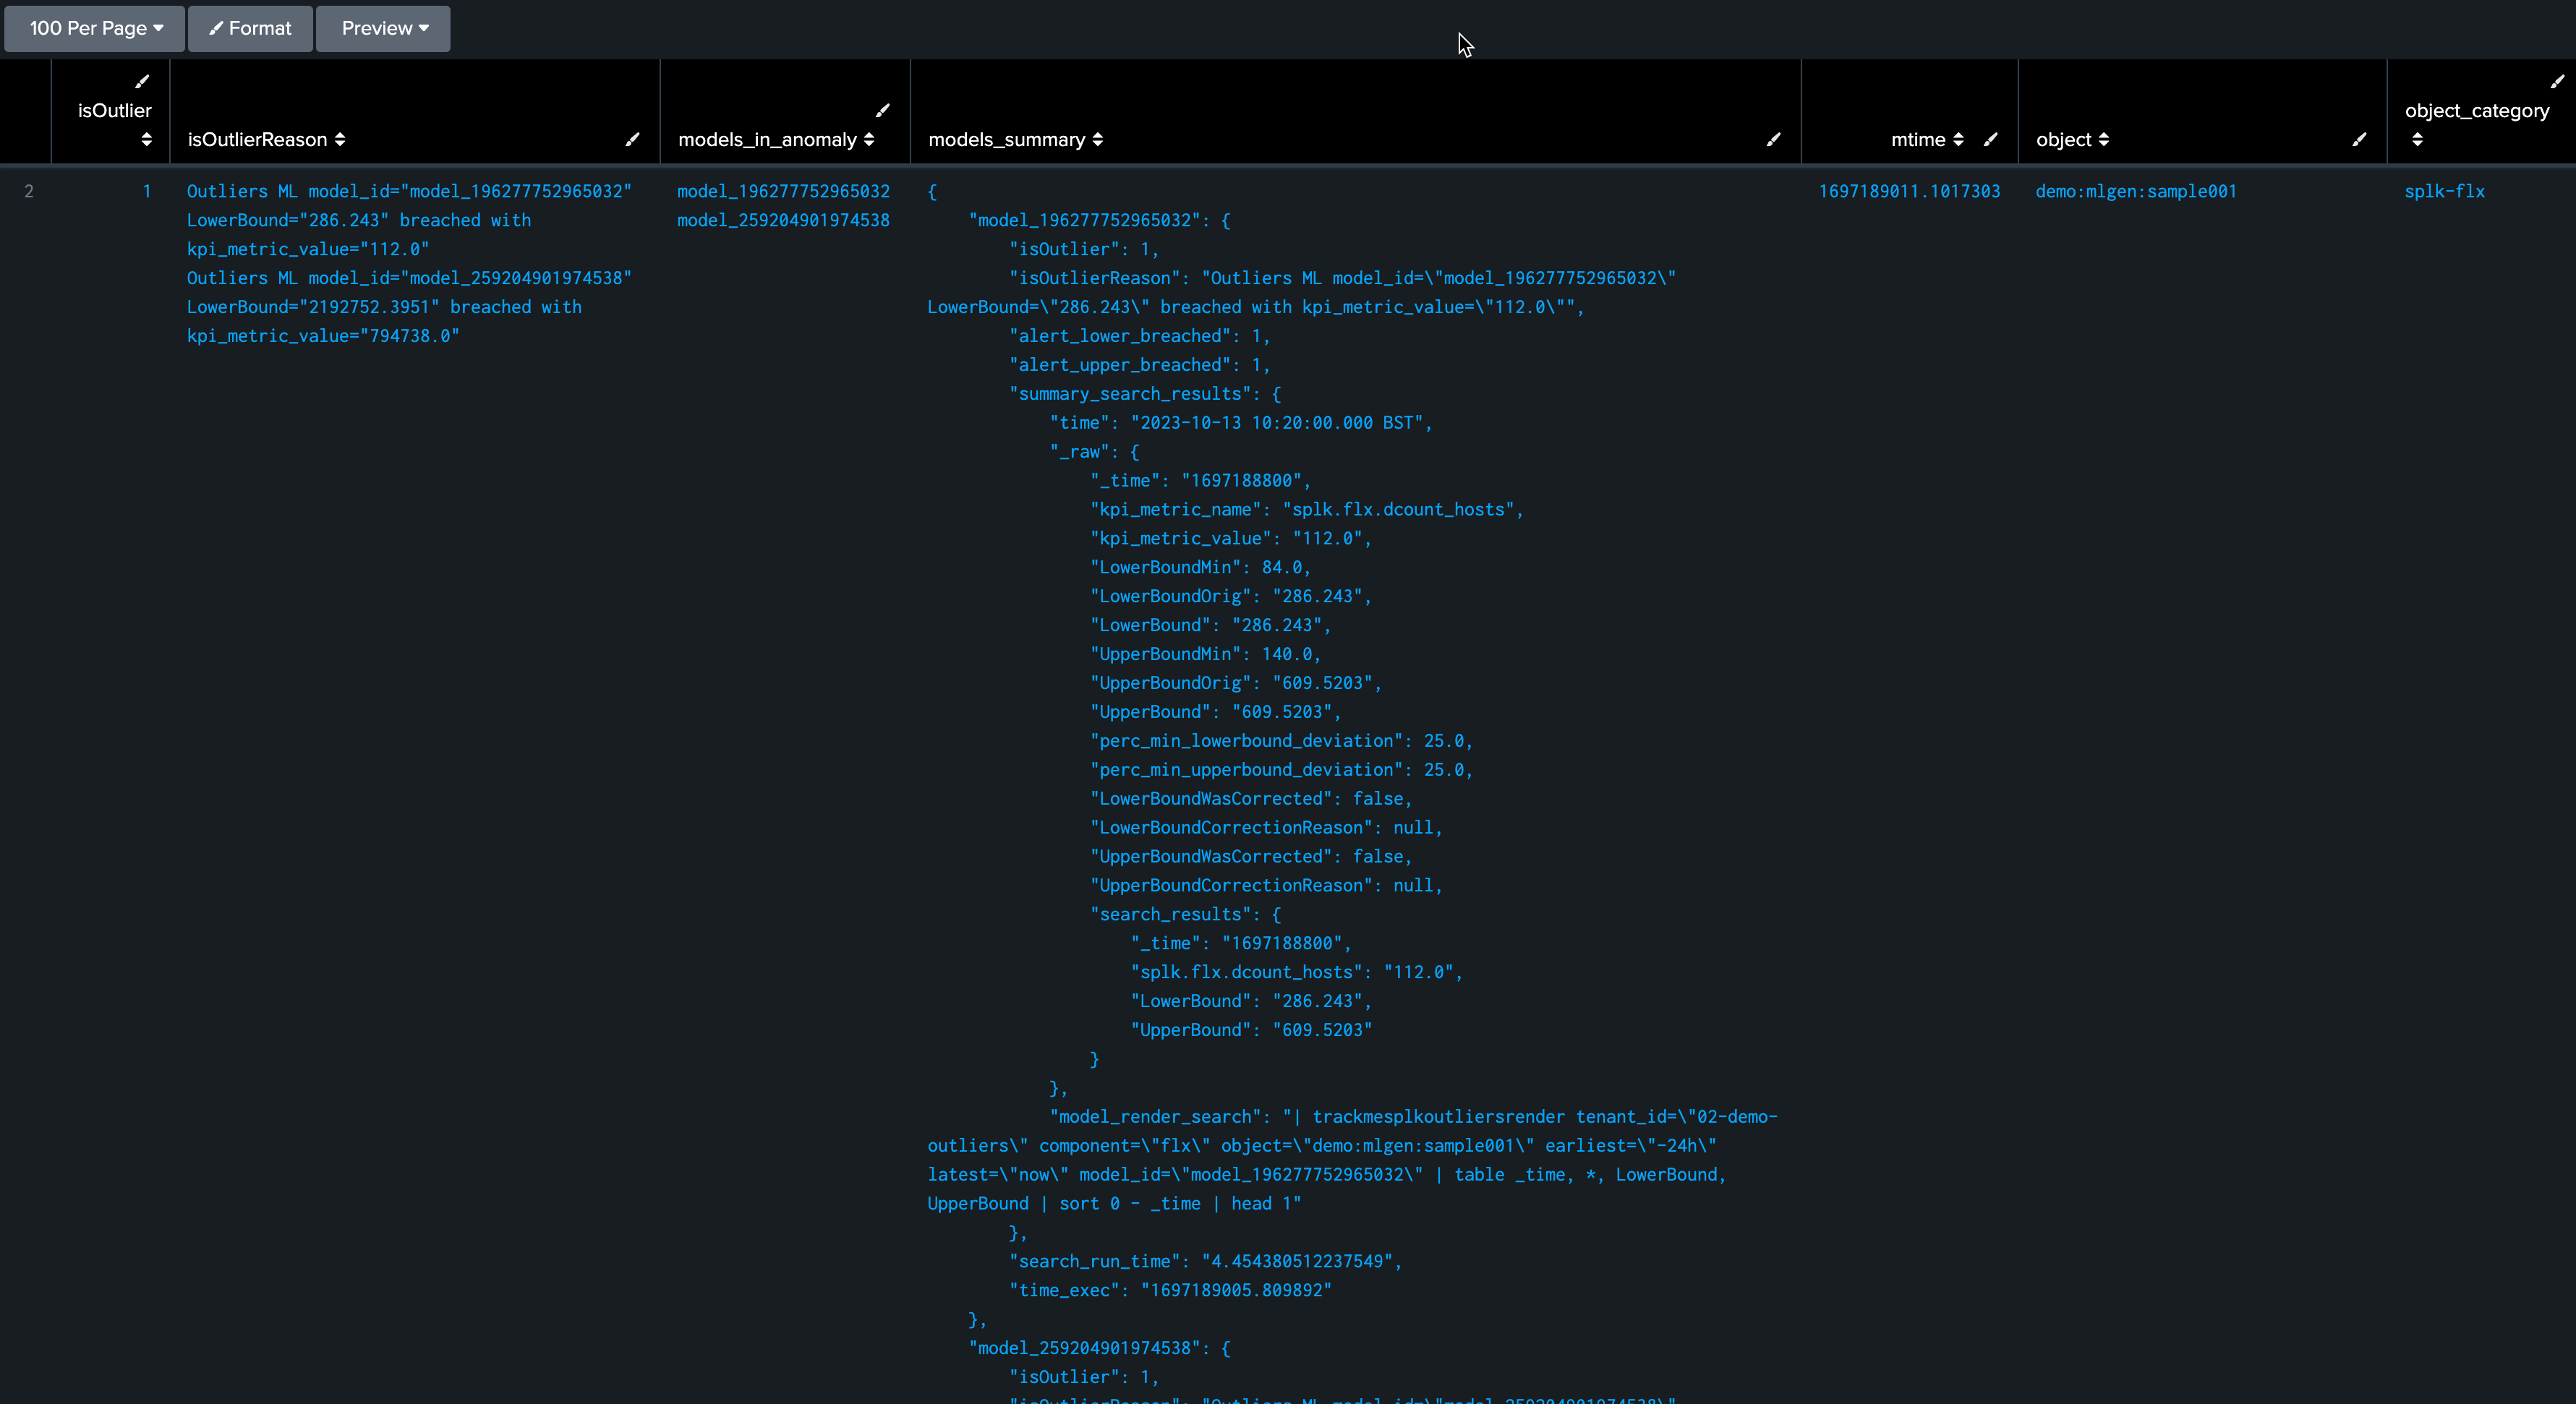
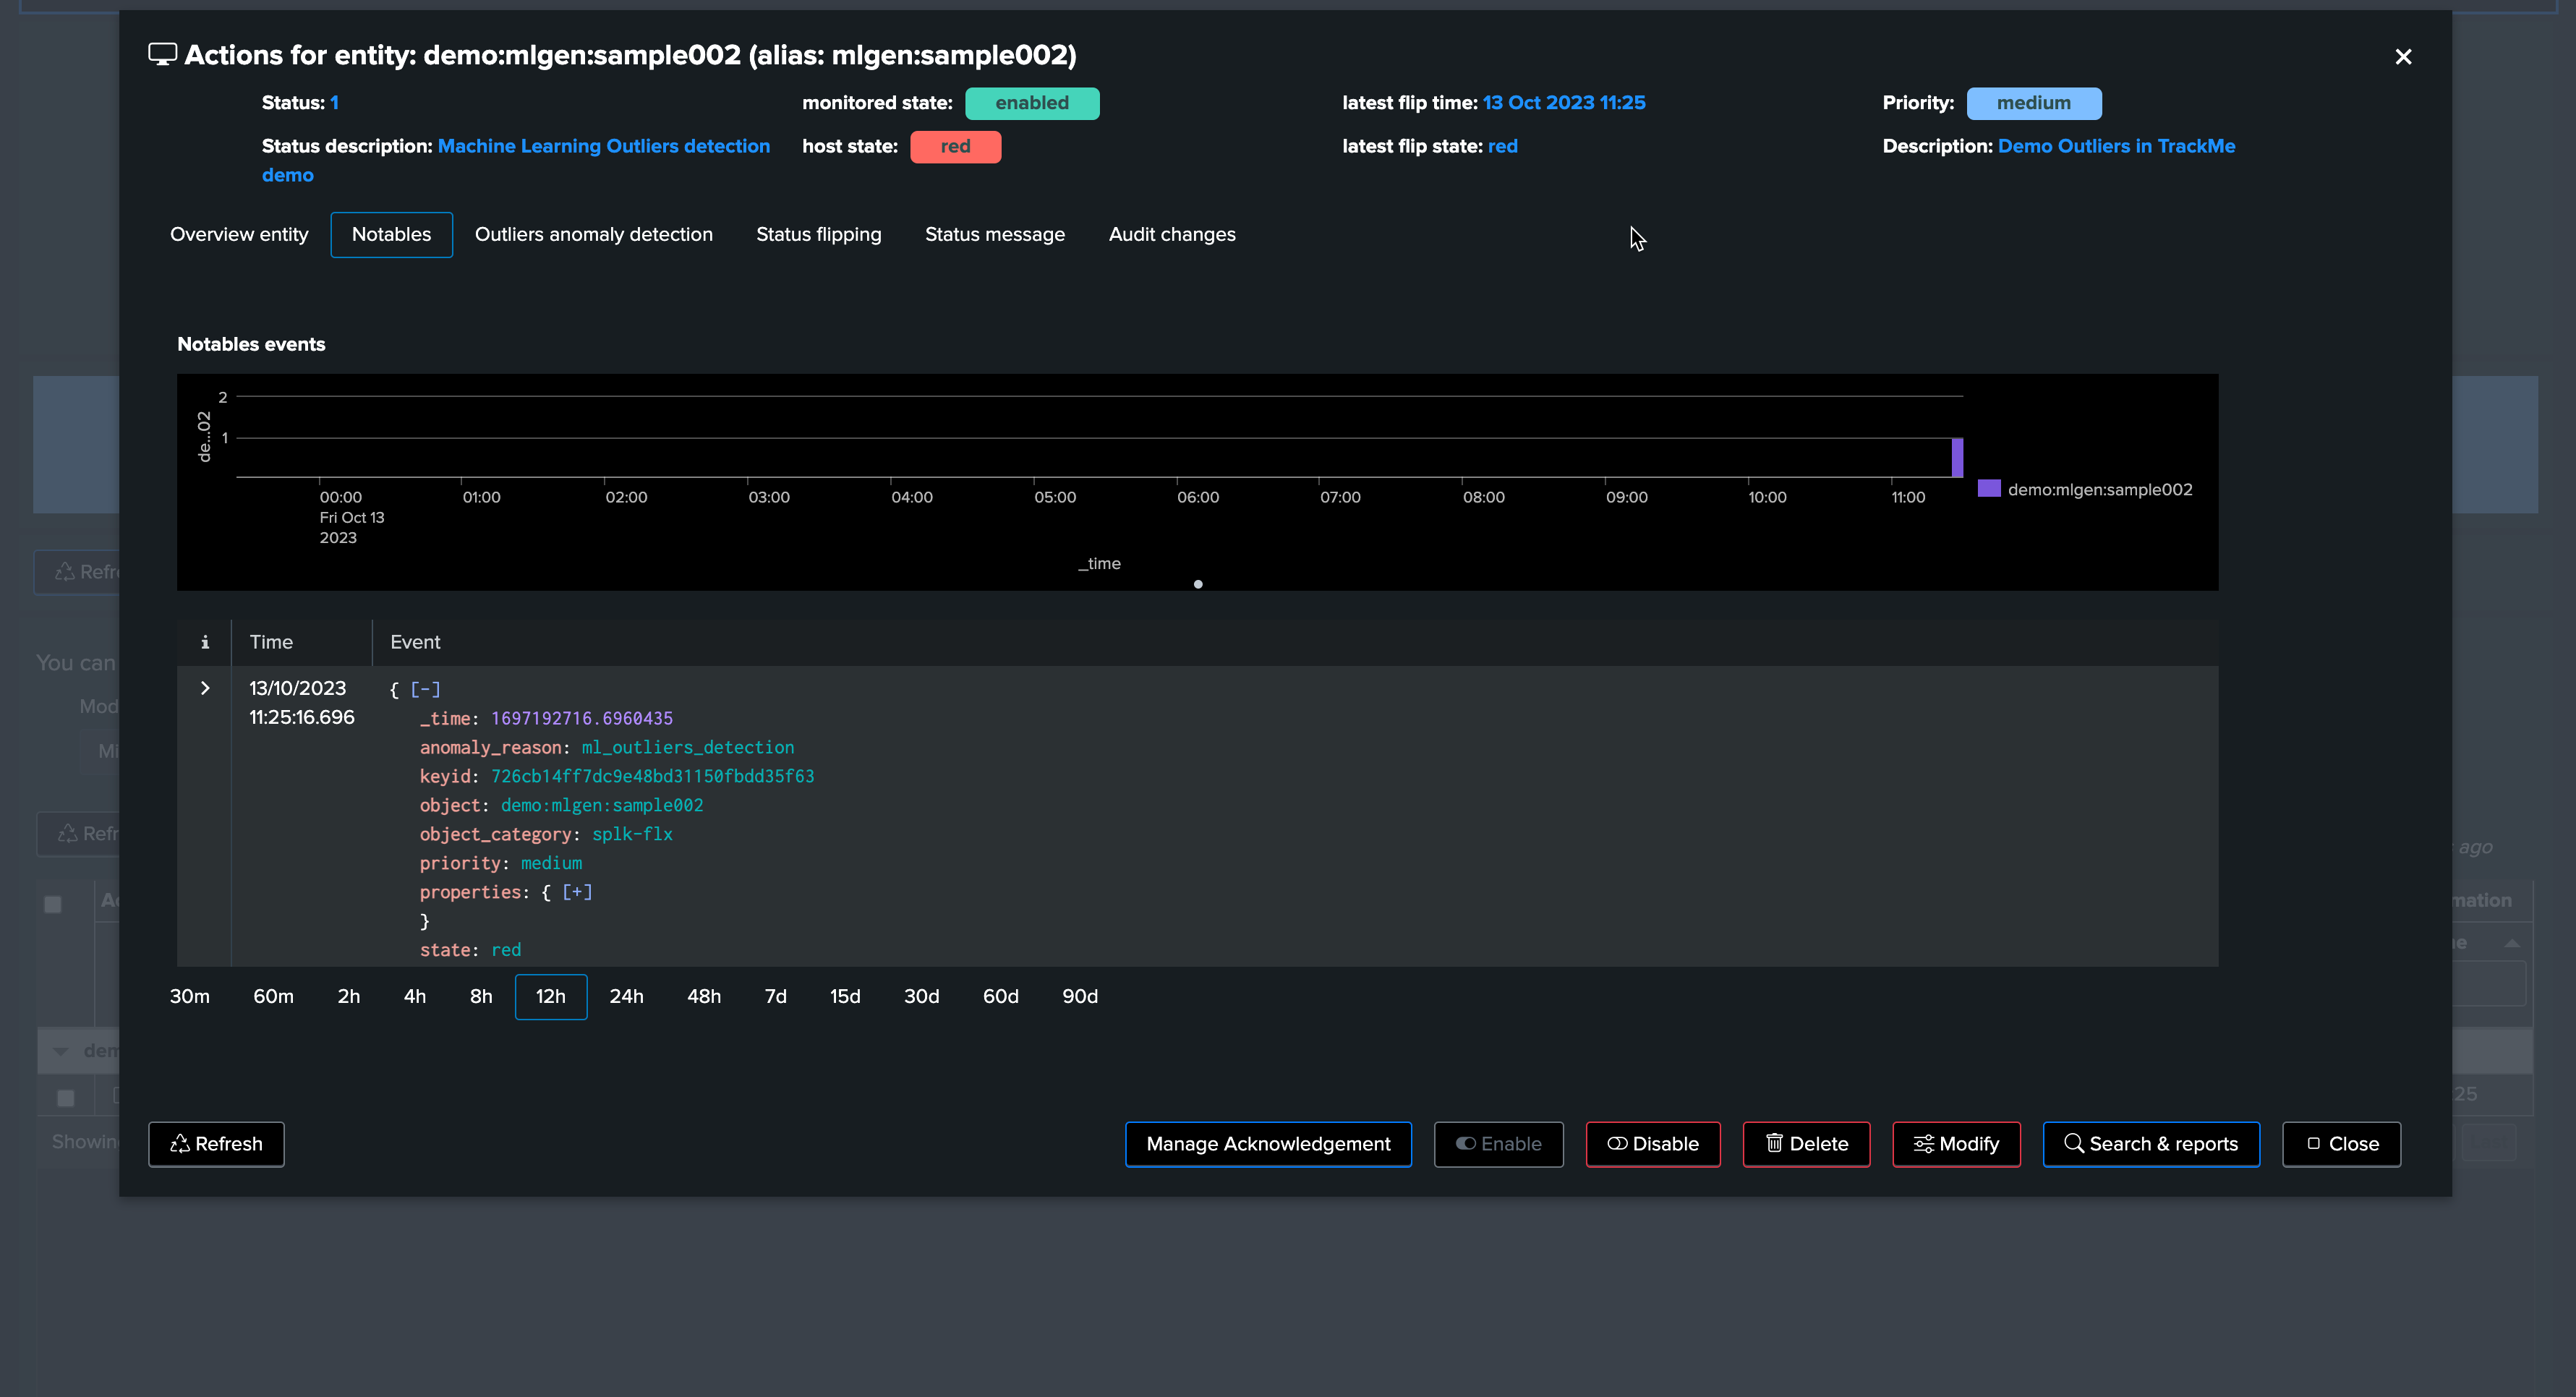
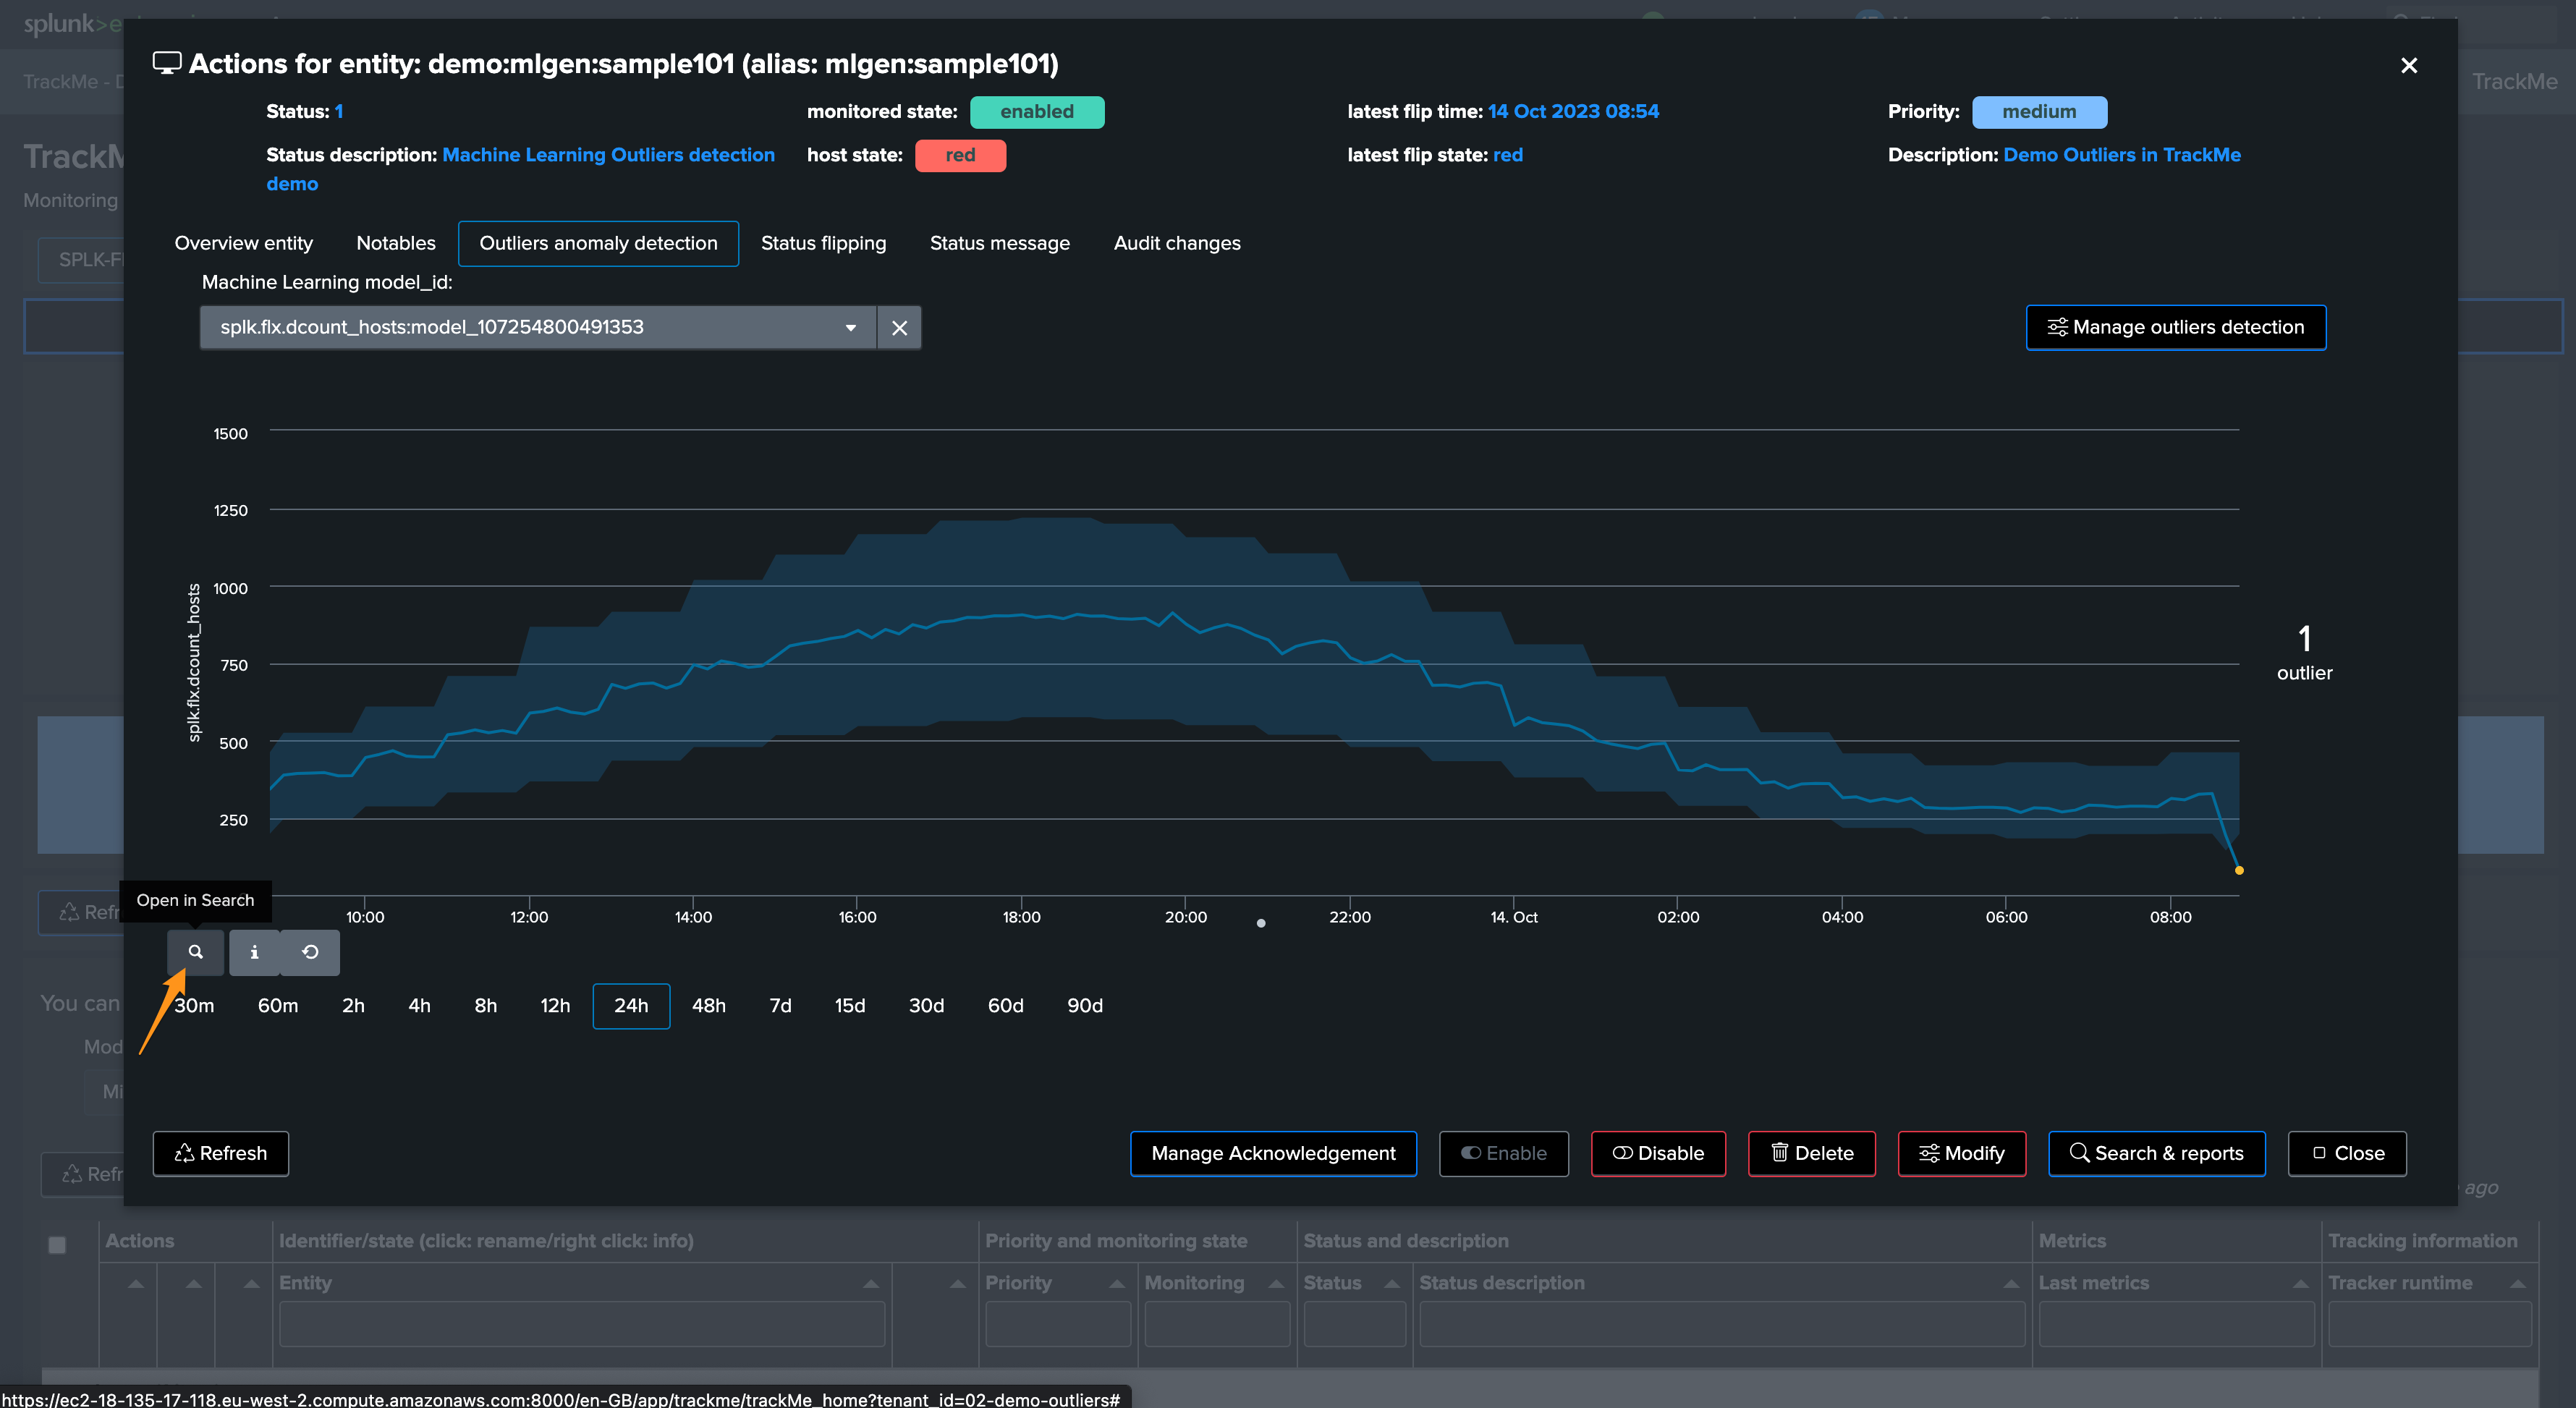
From this output, we already know that the outliers were detected, TrackMe stores the outliers results in a dedicated KVstore collection:
the name of the lookup transforms is trackme_<component>_outliers_entity_data_tenant_<tenant_id>
| inputlookup trackme_flx_outliers_entity_data_tenant_02-demo-outliers
After some minutes, the TrackMe tracker updated the Metadata and the entity appears in red:
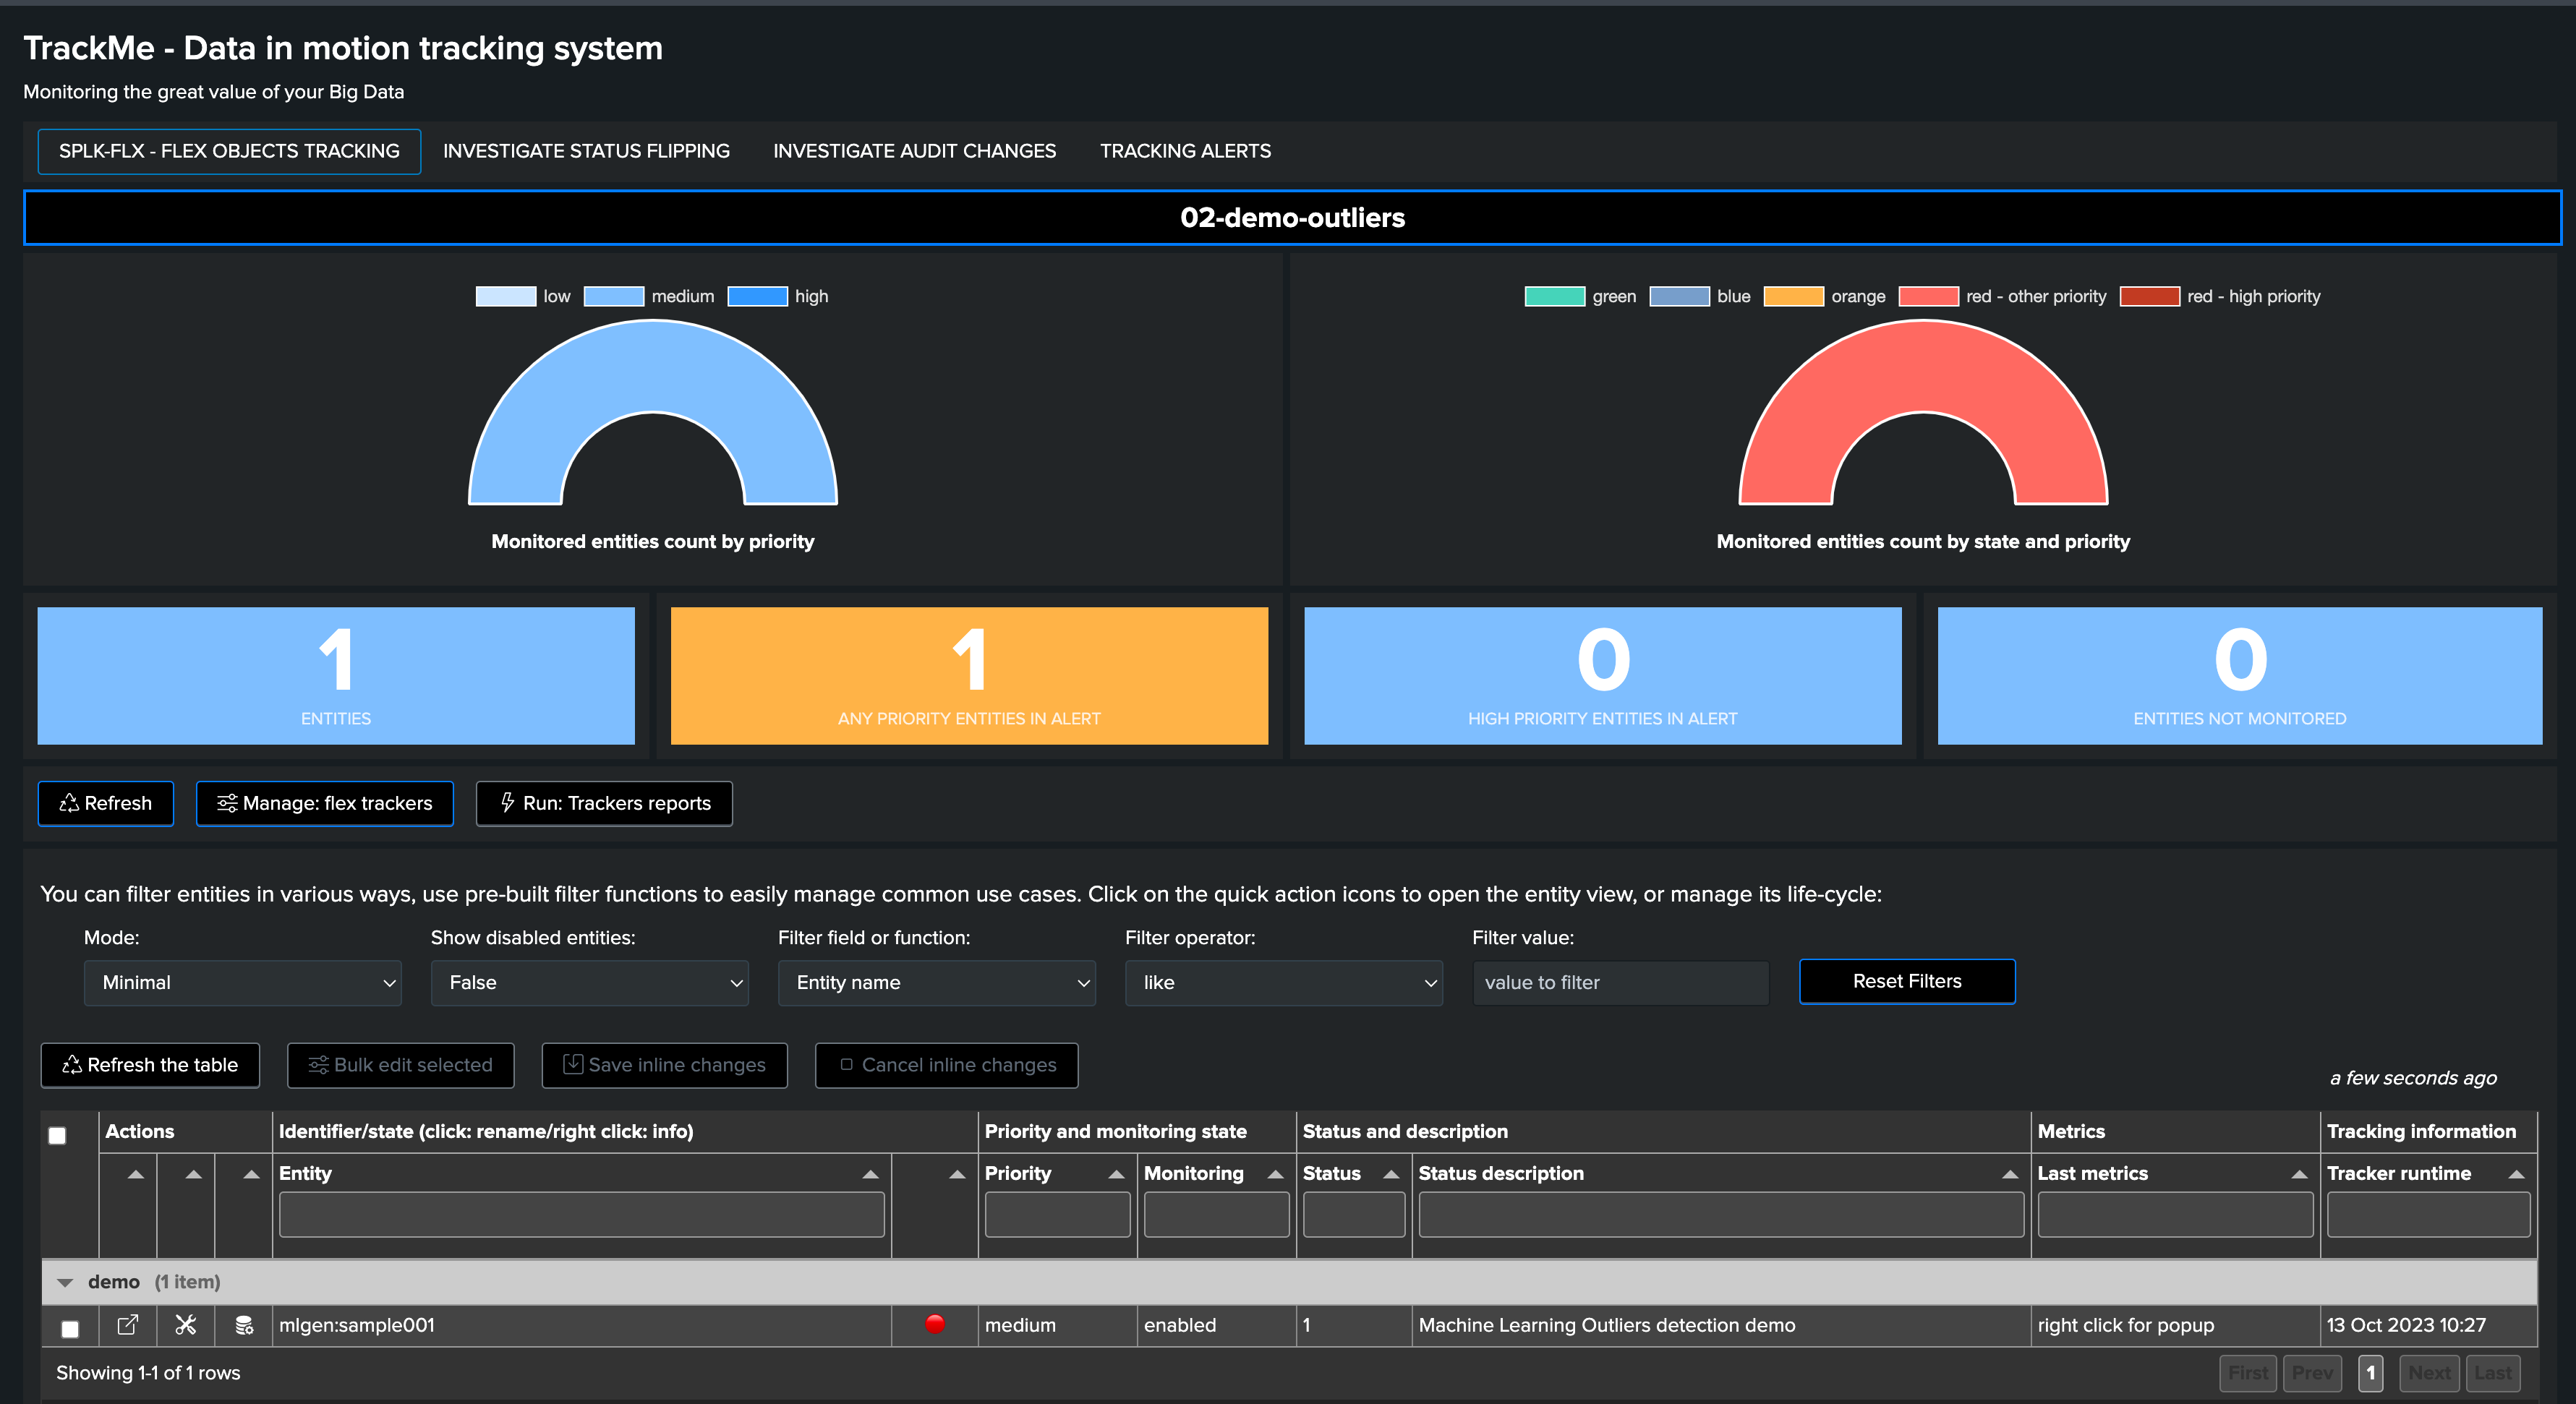

The job is all done, and we have been successfully detecting an abnormal change in behaviour, the entity was impacted, and our alerting configuration would raise an alert accordingly!

Fine tuning the ML models
As we previously mentioned, our generated data has indeed a concept of week days behaviours, which we do not leverage yet in the calculation.
To demonstrate this behaviour, we will stop our current data generation, we will update our sample entity name and will generate a new data set by running the script run_backfill.sh again.
We process the same steps as previously to backfill the metrics using mcollect once the entity was discovered
Then, we edit the models to increase the period, and this time will ask TrackMe to take into account the week days in the outliers calculation
We can observe that the behaviour is slightly different, with much closer lower bound and upper bound ranges, this is because our data is very eligible and has been showing stability enough over time.
Focus last 24 hours:
Note that this also means that our outlier detection will be much more sensitive, which can lead to false positive alerts.
TrackMe implements a concept of “auto correction” based on minimal variation lower and upper dimensions, to avoid generating false positive:

This time, we will generate an upper bound outliers, we stop the current script and start the run_gen_upper_outlier.sh which slightly increases the volume of our metrics.
After, some minutes, we can observe the variation:

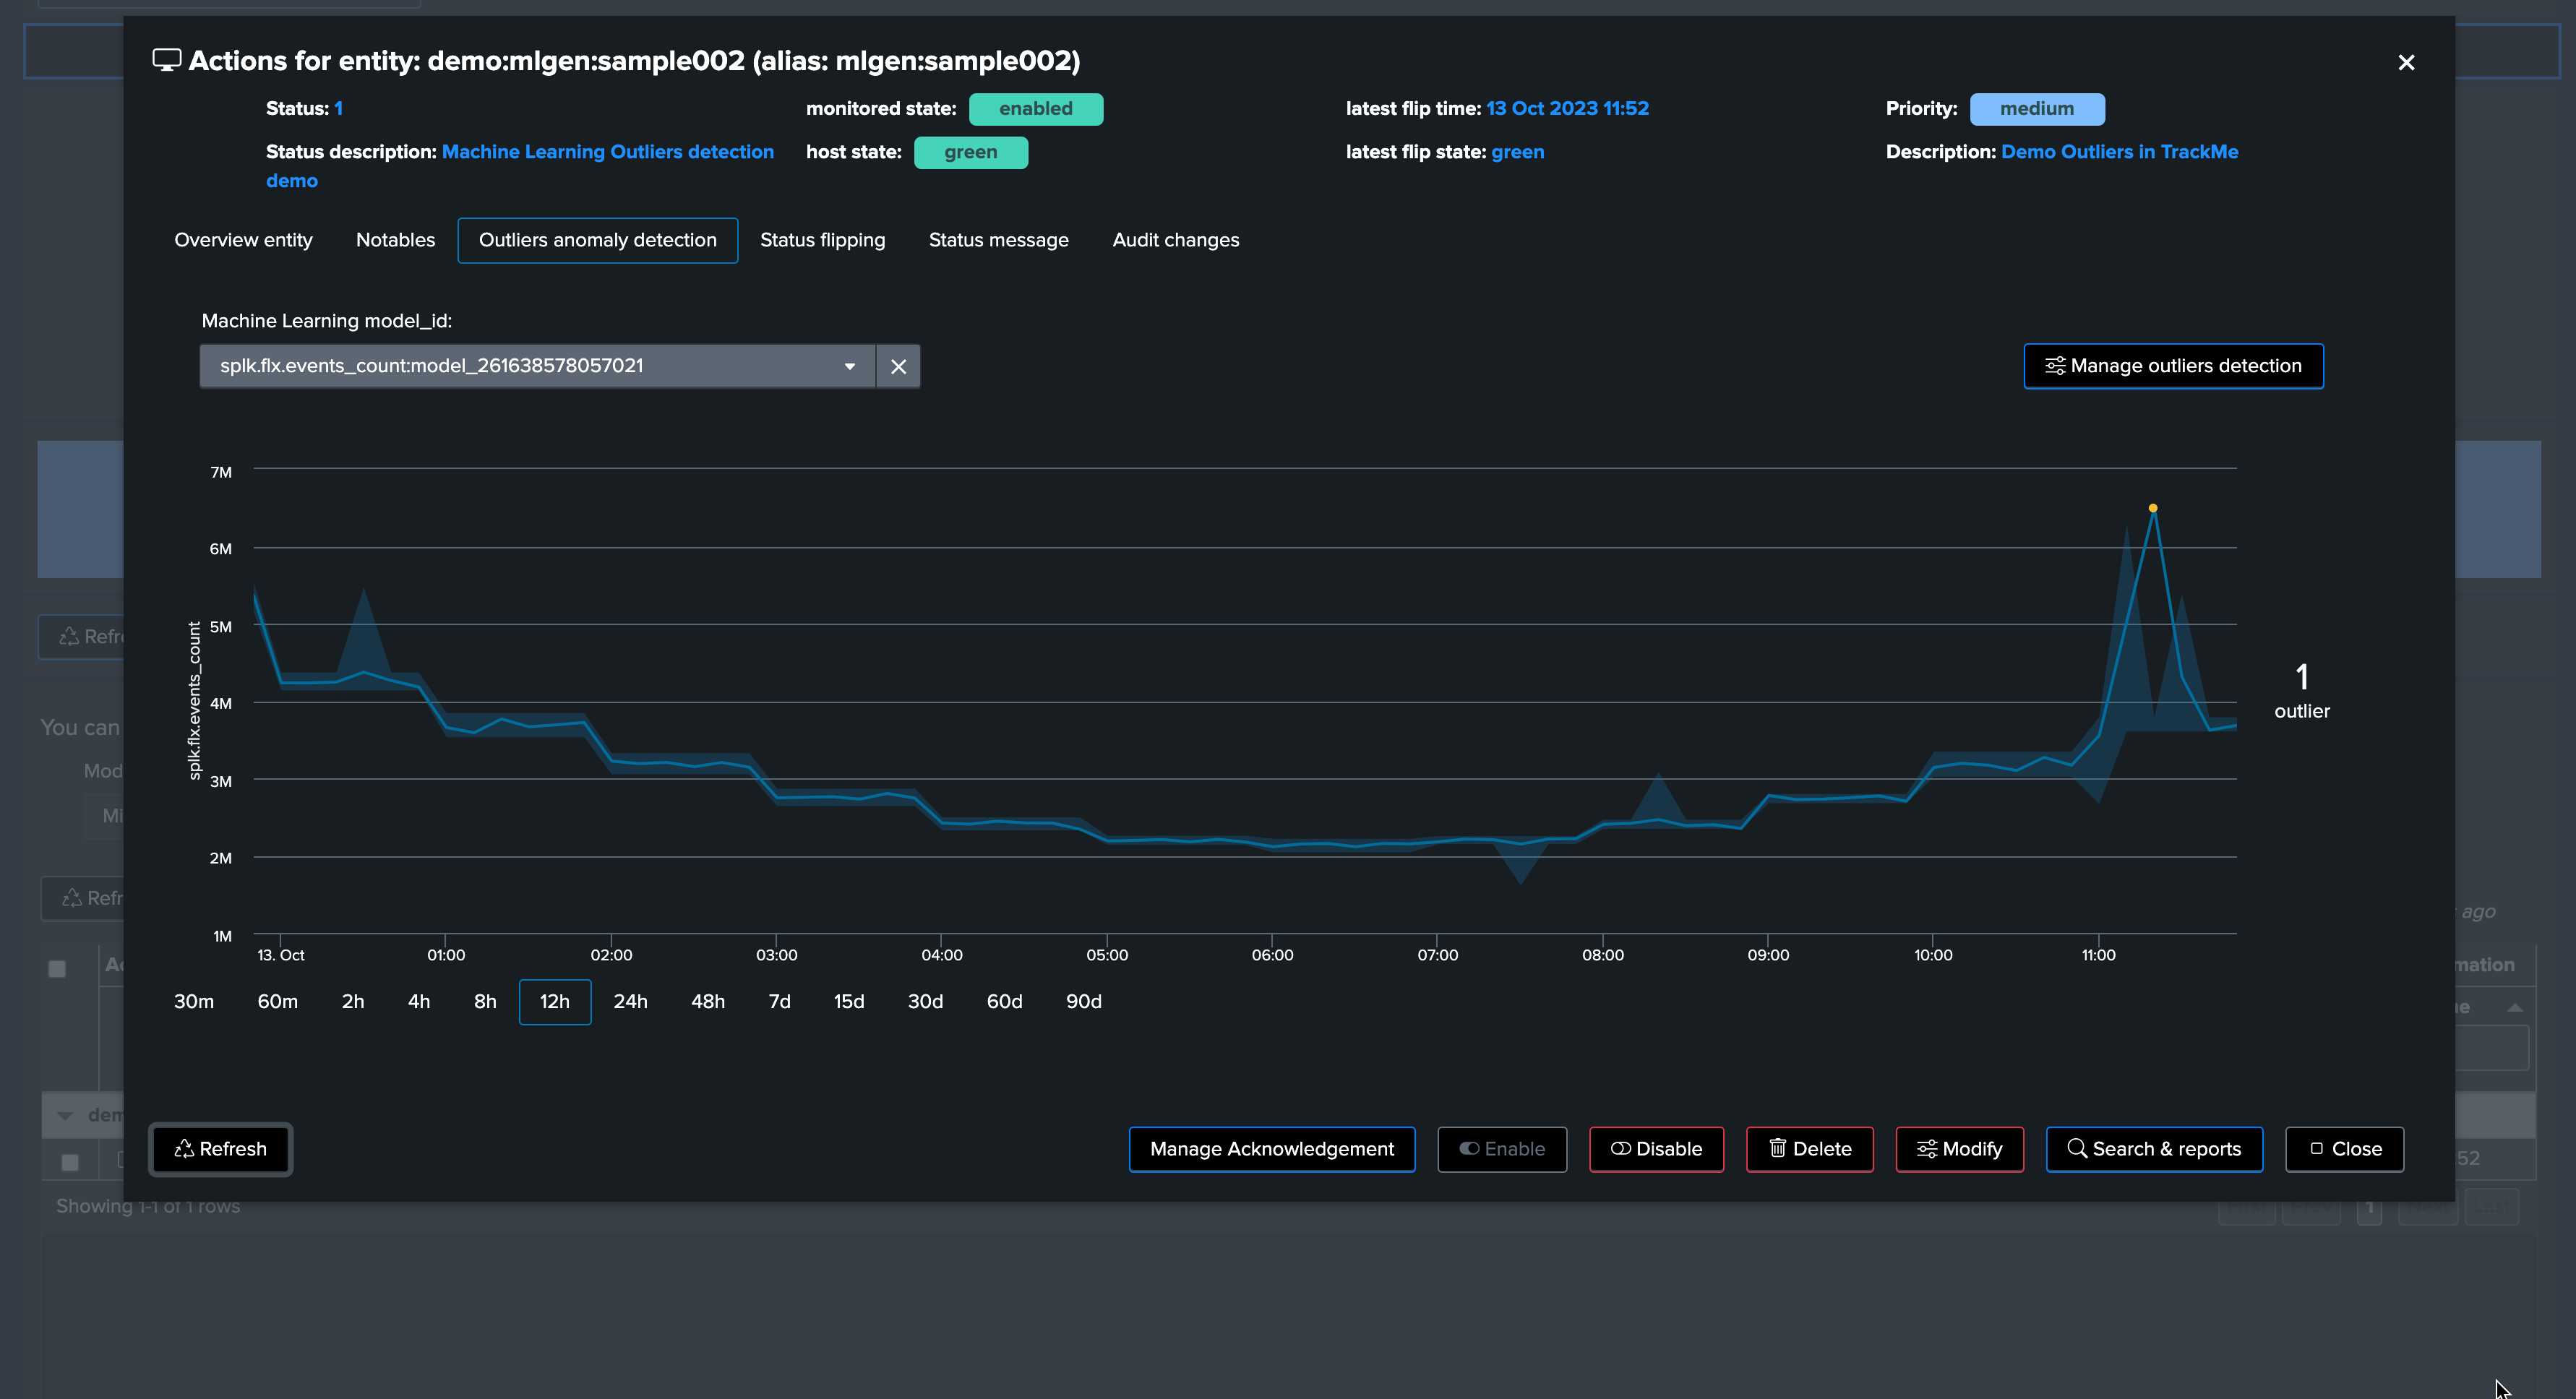
A little moment later, TrackMe notices the upper bound outlier:
After a run of the ML monitor (which happens automatically), the upper bound condition is detected and the alert is raised accordingly.

Now, let’s assume the “storm” is over, we stop the upper bound outlier gen script and instead we call run_normal.sh, after some time the outliers are not happening any longer, TrackMe will notice and the entity will come back to a green status.

Soon after, TrackMe sees the entity back to green:
And the job is done!
Note that from TrackMe version 2.0.62, you can exclude the anomaly period from the ML model, this will allow the ML model to learn from the data without the incident, and will therefore be more accurate in the future.
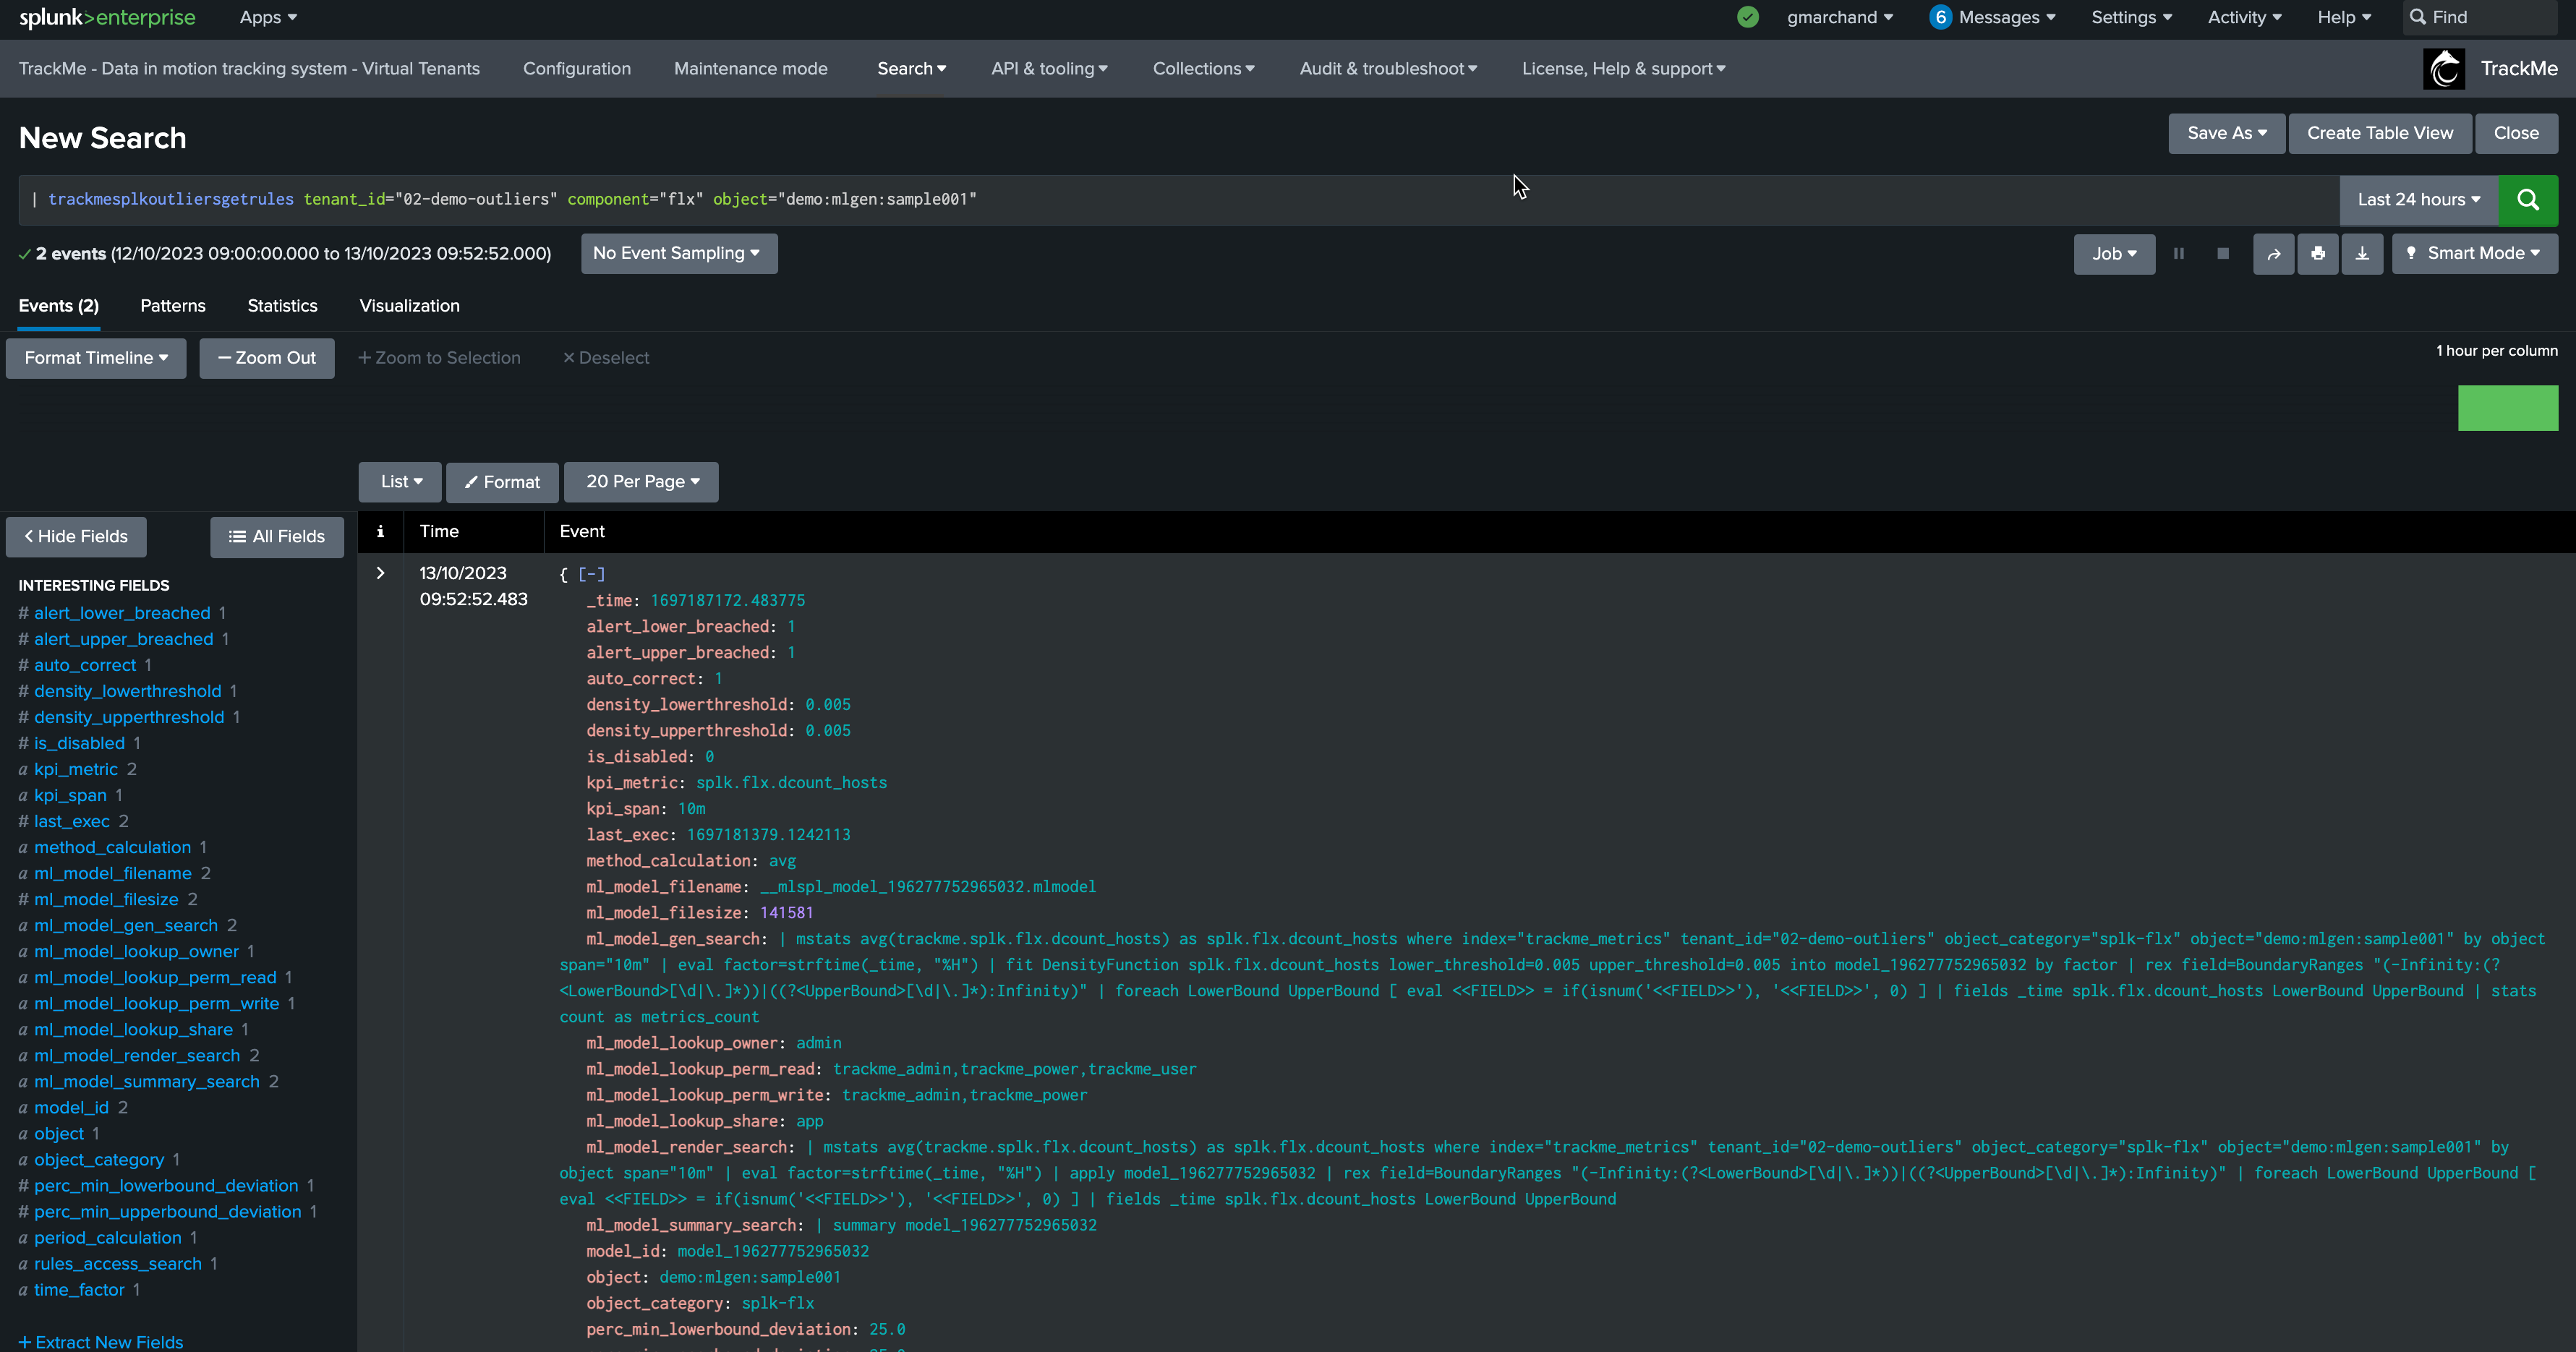
Accessing the ML models
You can access the ML models details using the following command:
| trackmesplkoutliersgetrules tenant_id="<tenant_id>" component="<component>" object="<entity_name>"
TrackMe stores the ML models definition in a KVstore:
| inputlookup trackme_<component>_outliers_entity_rules_tenant_<tenant_id>
Accessing the ML models current results
TrackMe stores the ML models current results in a KVstore:
| inputlookup trackme_<component>_outliers_entity_data_tenant_<tenant_id>
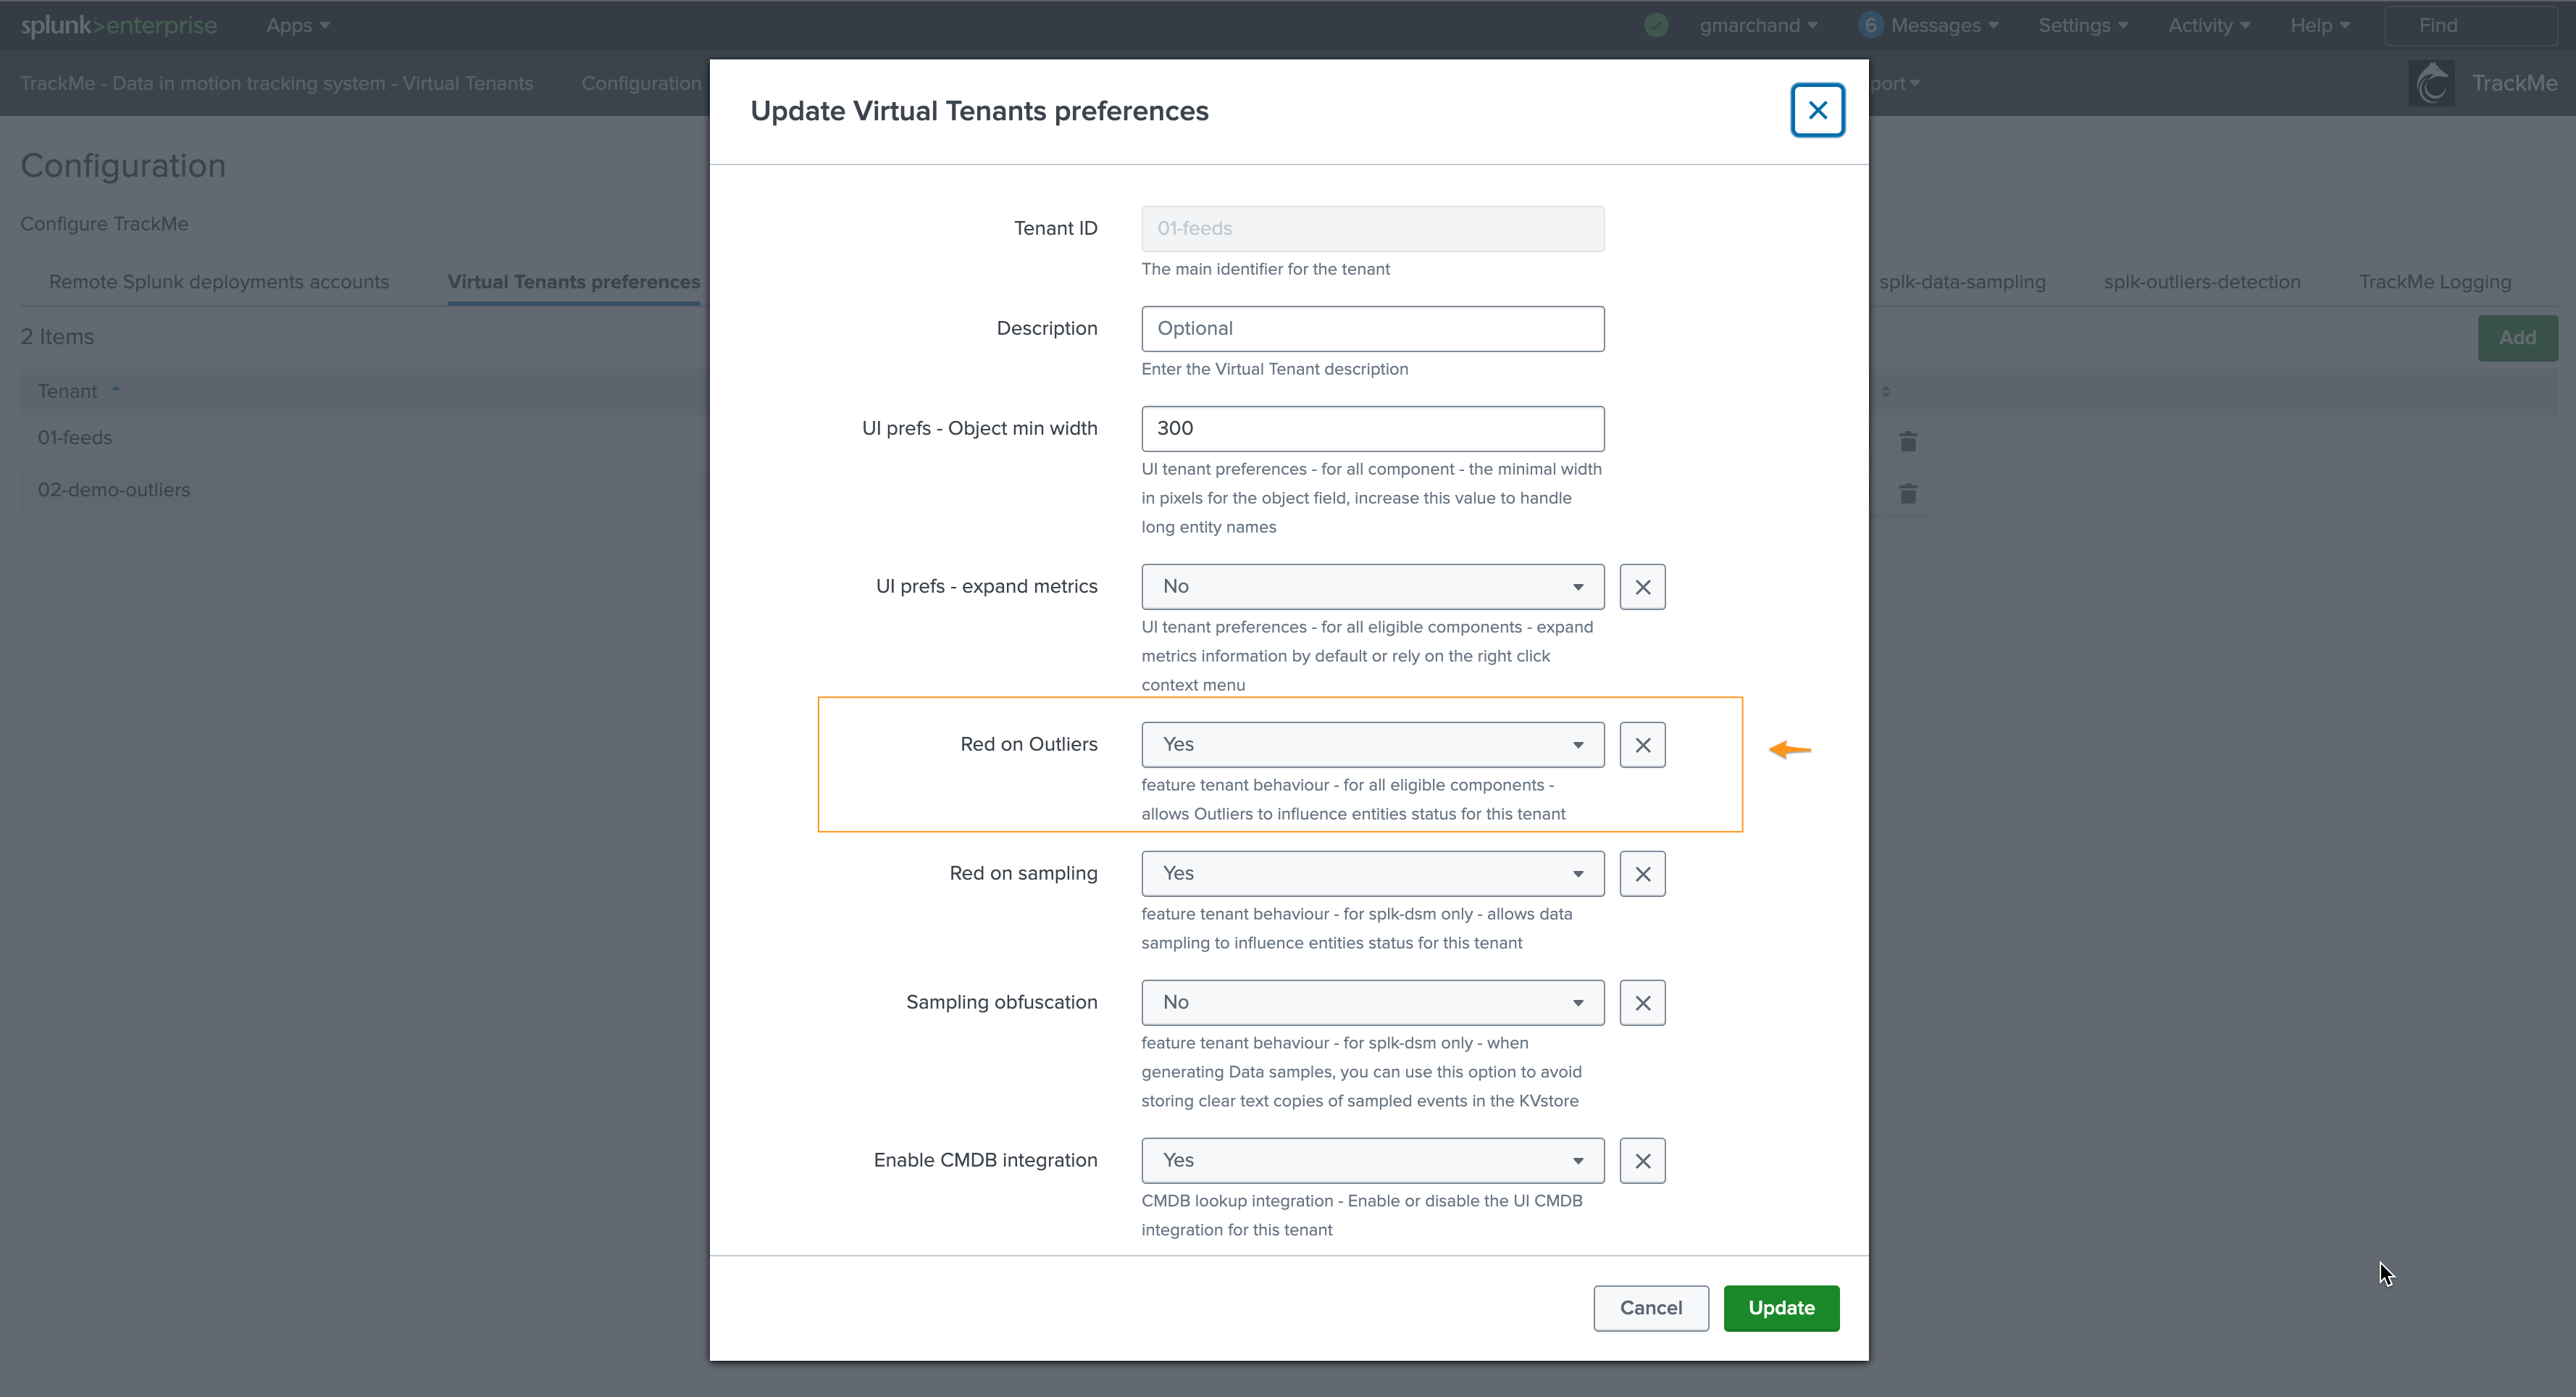
Disabling alerting on Outliers
You can very simply disable alerting on Outliers on a per Virtual Tenant basis, access to the Configuration UI and the Virtual Tenant account:
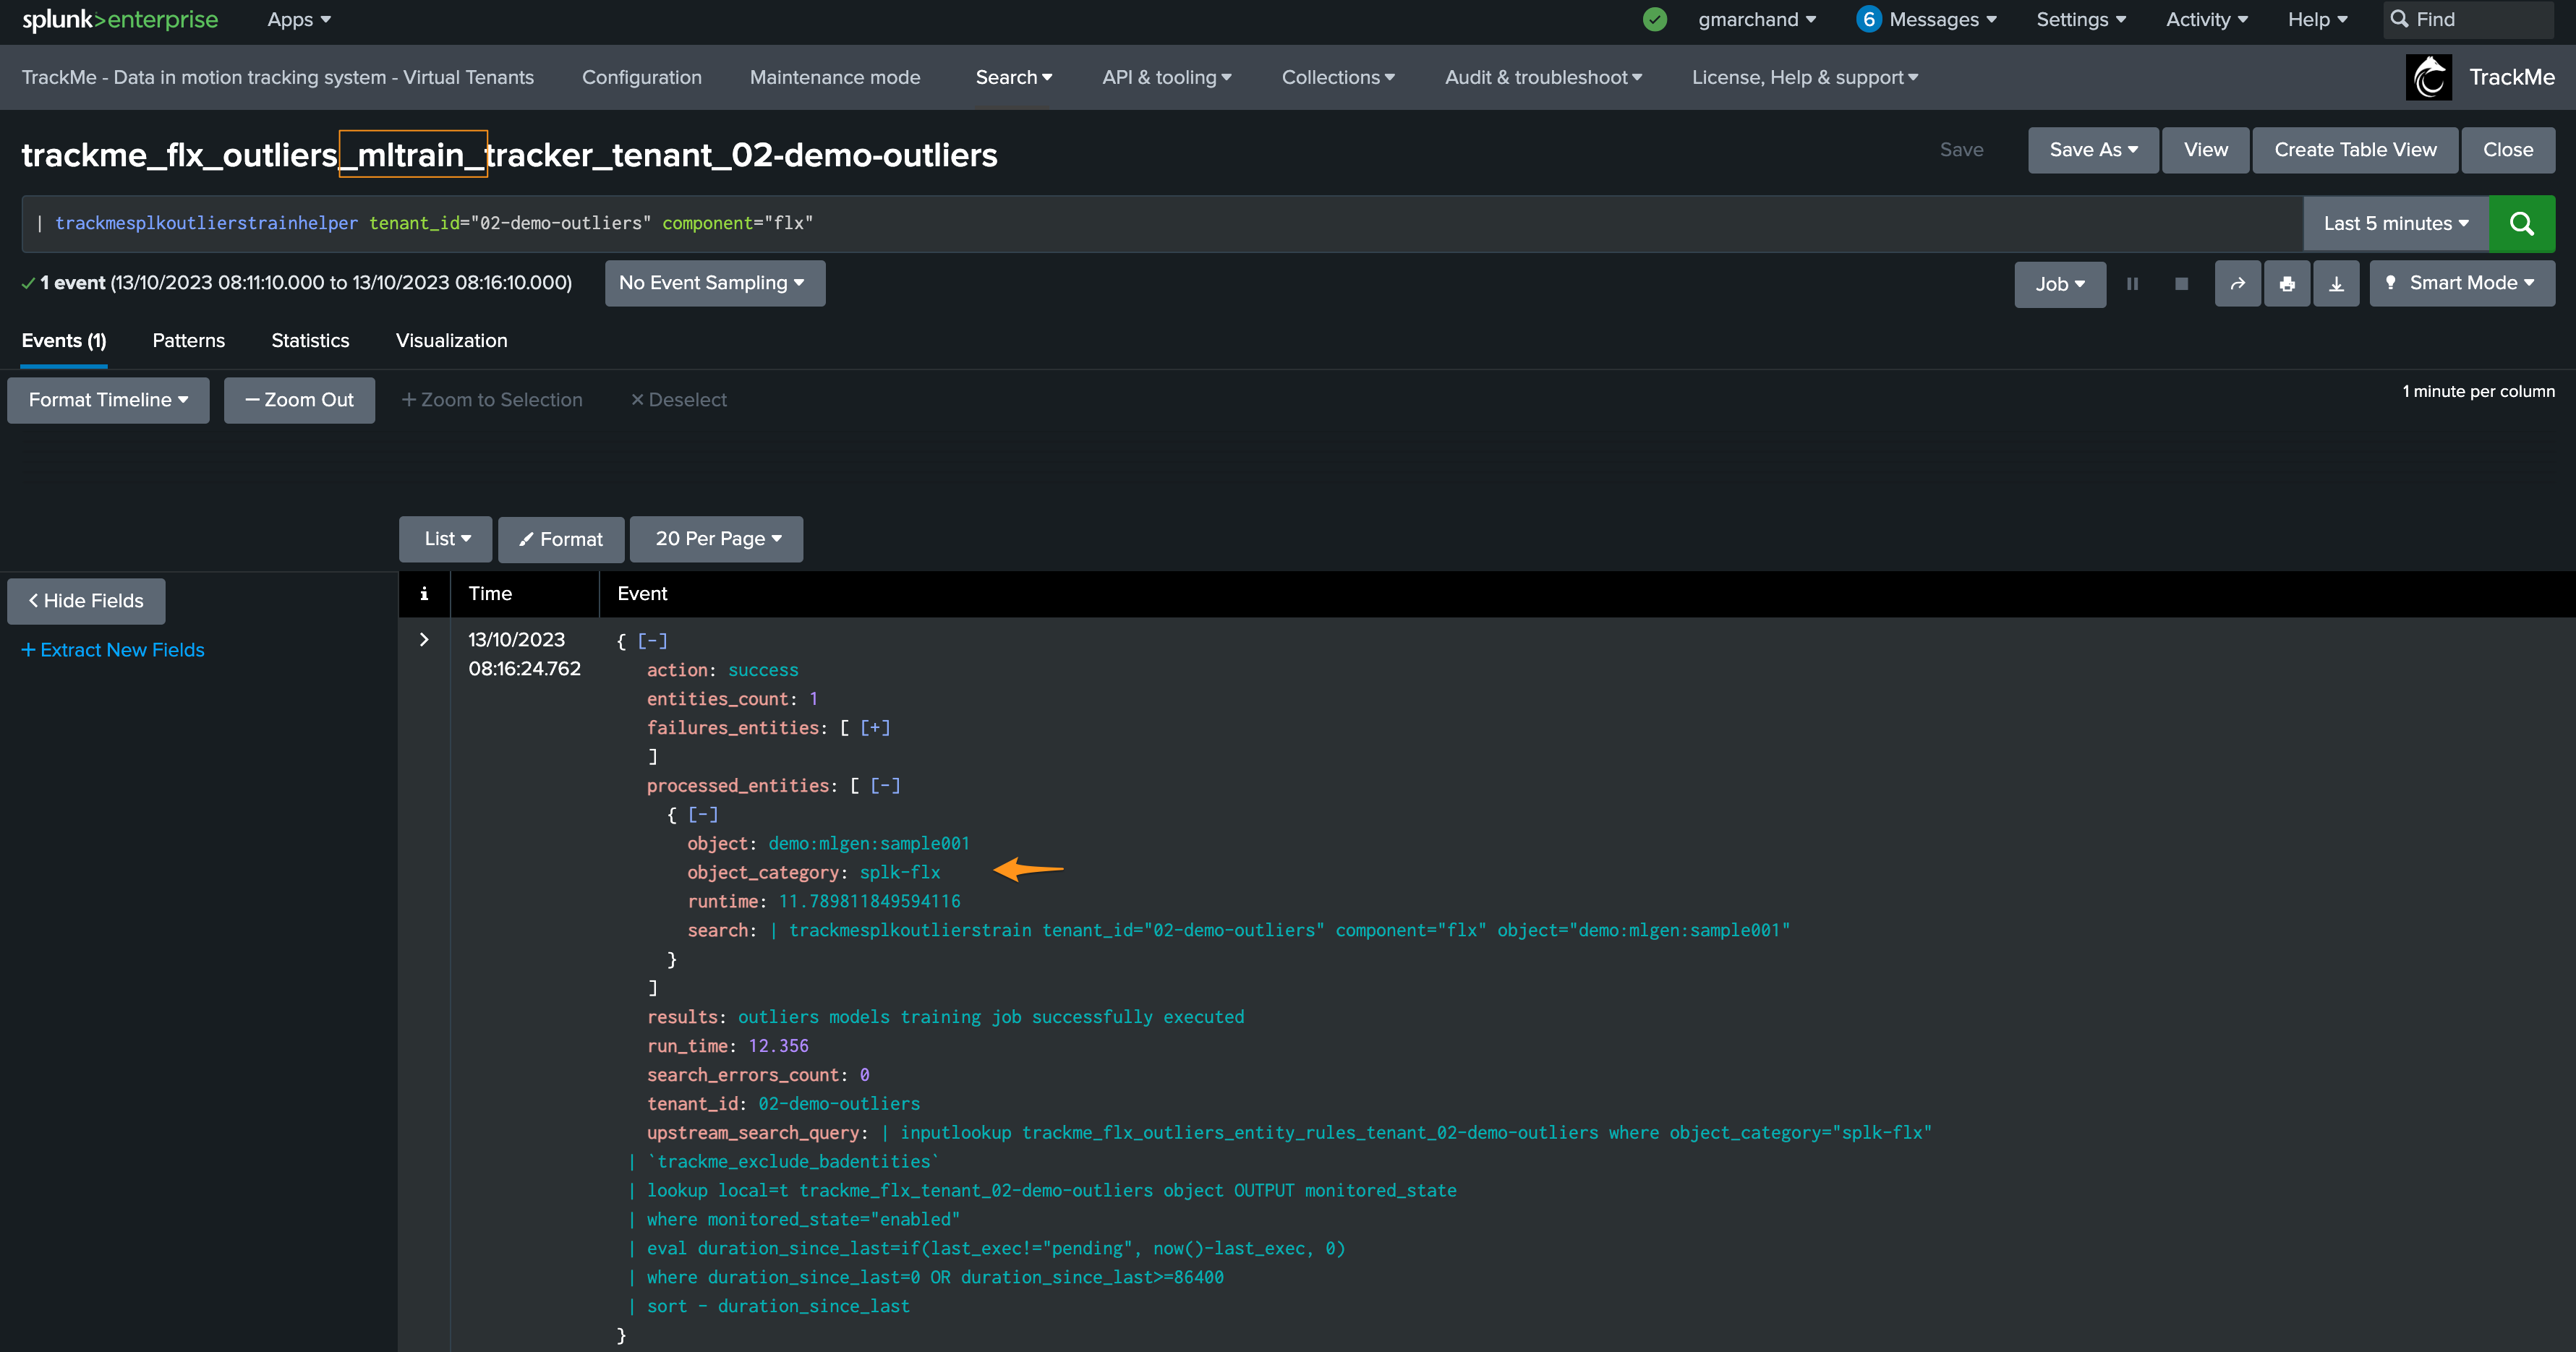
ML training scheduled jobs
When creating a Virtual Tenant, TrackMe creates a scheduled job called _ml_train_, this job is responsible for training the ML models for the entities of the tenant and a given component.
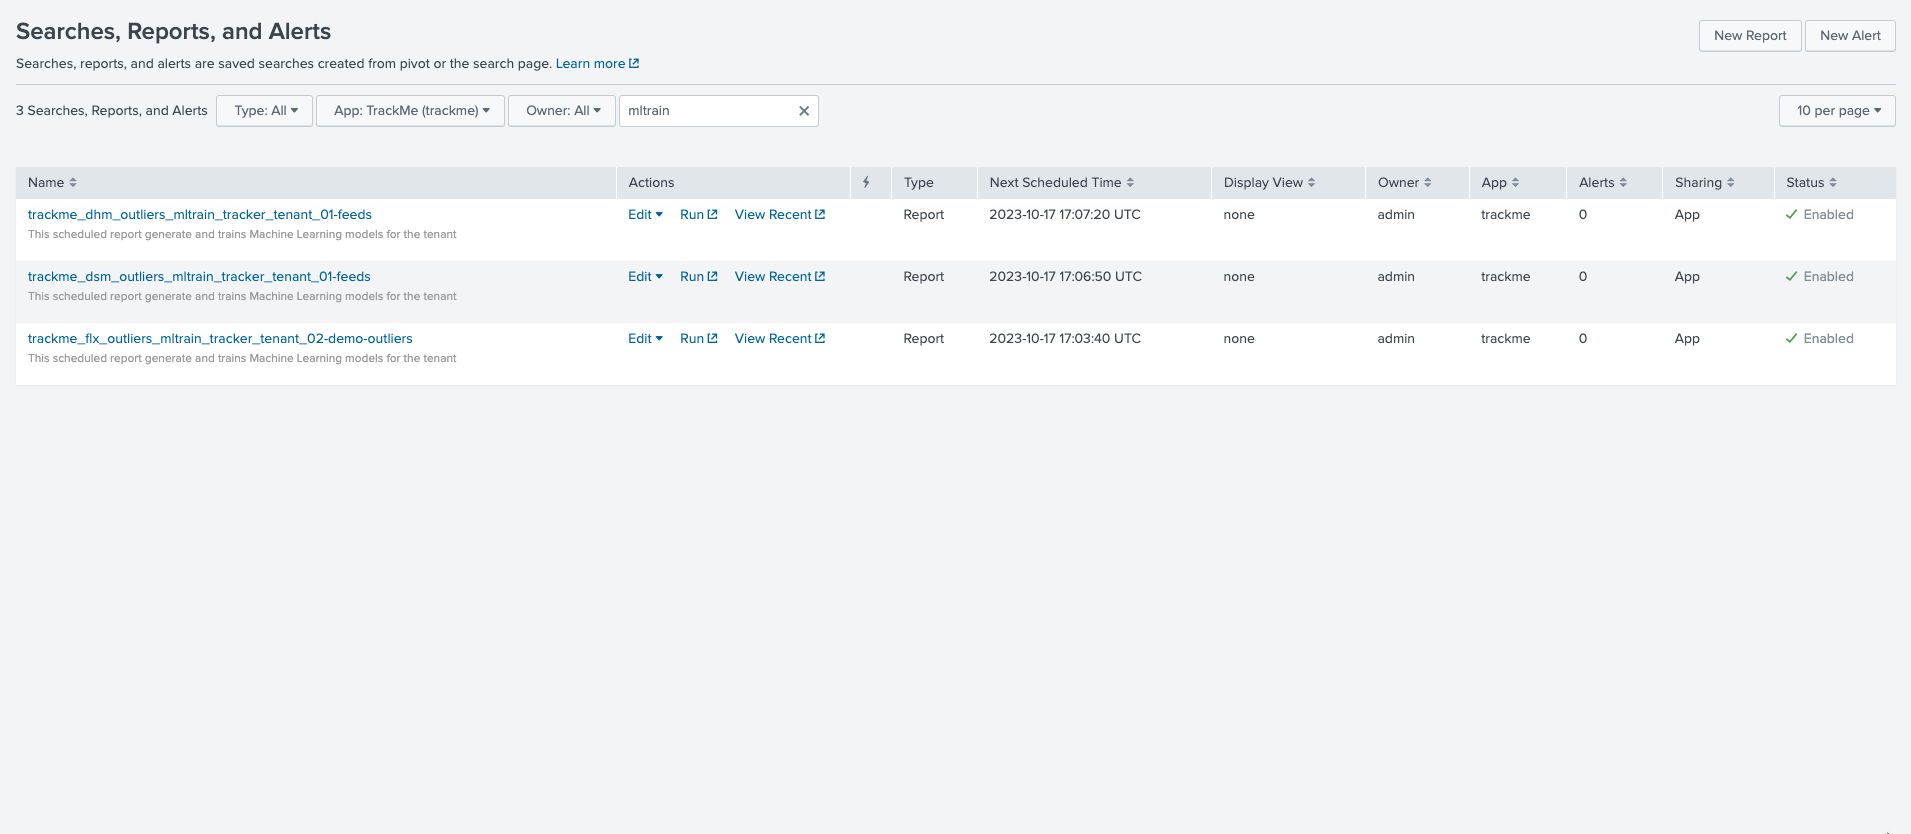
The scheduled ML training job behaves as follow:
The job is scheduled to run every once per hour
It runs for a certain amount of time which is driven by an implicit argument
max_runtimeto the commandtrackmesplkoutlierstrainhelper(defaults to 60 minutes minus a margin)
max_runtime_sec = Option(
    doc="""
    **Syntax:** **max_runtime_sec=****
    **Description:** The max runtime for the job in seconds, defaults to 60 minutes less 120 seconds of margin.""",
    require=False,
    default="3600",
    validate=validators.Match("max_runtime_sec", r"^\d*$"),
)
The job is influenced by system wide options:, see: ML Outliers system wide options
The job runs a first Splunk search to discover entities to be trained
The jobs logs its activity as follows:
index=_internal sourcetype=trackme:custom_commands:trackmesplkoutlierstrainhelper
For instance:
2023-10-17 16:07:02,992 INFO trackmesplkoutlierstrainhelper.py generate 481 {
"tenant_id": "01-feeds",
"action": "success",
"results": "outliers models training job successfully executed",
"run_time": 11.839,
"entities_count": 12,
"processed_entities": [
   {
      "object_category": "splk-dsm",
      "object": "webserver:apache:access:json",
      "search": "| trackmesplkoutlierstrain tenant_id=\"01-feeds\" component=\"dsm\" object=\"webserver:apache:access:json\"",
      "runtime": "0.5111777782440186"
   },
   {
      "object_category": "splk-dsm",
      "object": "webserver:nginx:plus:kv",
      "search": "| trackmesplkoutlierstrain tenant_id=\"01-feeds\" component=\"dsm\" object=\"webserver:nginx:plus:kv\"",
      "runtime": "0.5510256290435791"
   },
   <redacted>
],
"failures_entities": [],
"search_errors_count": 0,
"upstream_search_query": "| inputlookup trackme_dsm_outliers_entity_rules_tenant_01-feeds where object_category=\"splk-dsm\"\n | `trackme_exclude_badentities`\n | lookup local=t trackme_dsm_tenant_01-feeds object OUTPUT monitored_state\n | where monitored_state=\"enabled\"\n | eval duration_since_last=if(last_exec!=\"pending\", now()-last_exec, 0)\n | where duration_since_last=0 OR duration_since_last>=600\n | sort - duration_since_last"
}
In some cases and if you wish to reduce the number of changes performed by TrackMe, especially in a co-located SHC context (which we would recommend), you can update the scheduling plan and reduce its frequency.
After having loaded the list of entities to be trained, the ML training backend attempts to sequentially train as many entities as possible in the allowed max run time.
Each search is an highly efficient search relying on TrackMe metrics (mstats search)
Searches call the
MLTK applycommand to load the previously trained modelsSearches are driven by a TrackMe command called
trackmesplkoutlierstrainlogs are available here:
index=_internal sourcetype=trackme:custom_commands:trackmesplkoutlierstrain
ML monitor scheduled jobs
When creating a Virtual Tenant, TrackMe creates an _mlmonitor_ scheduled job, this job is responsible for monitoring the ML models for the entities of the tenant and a given component.
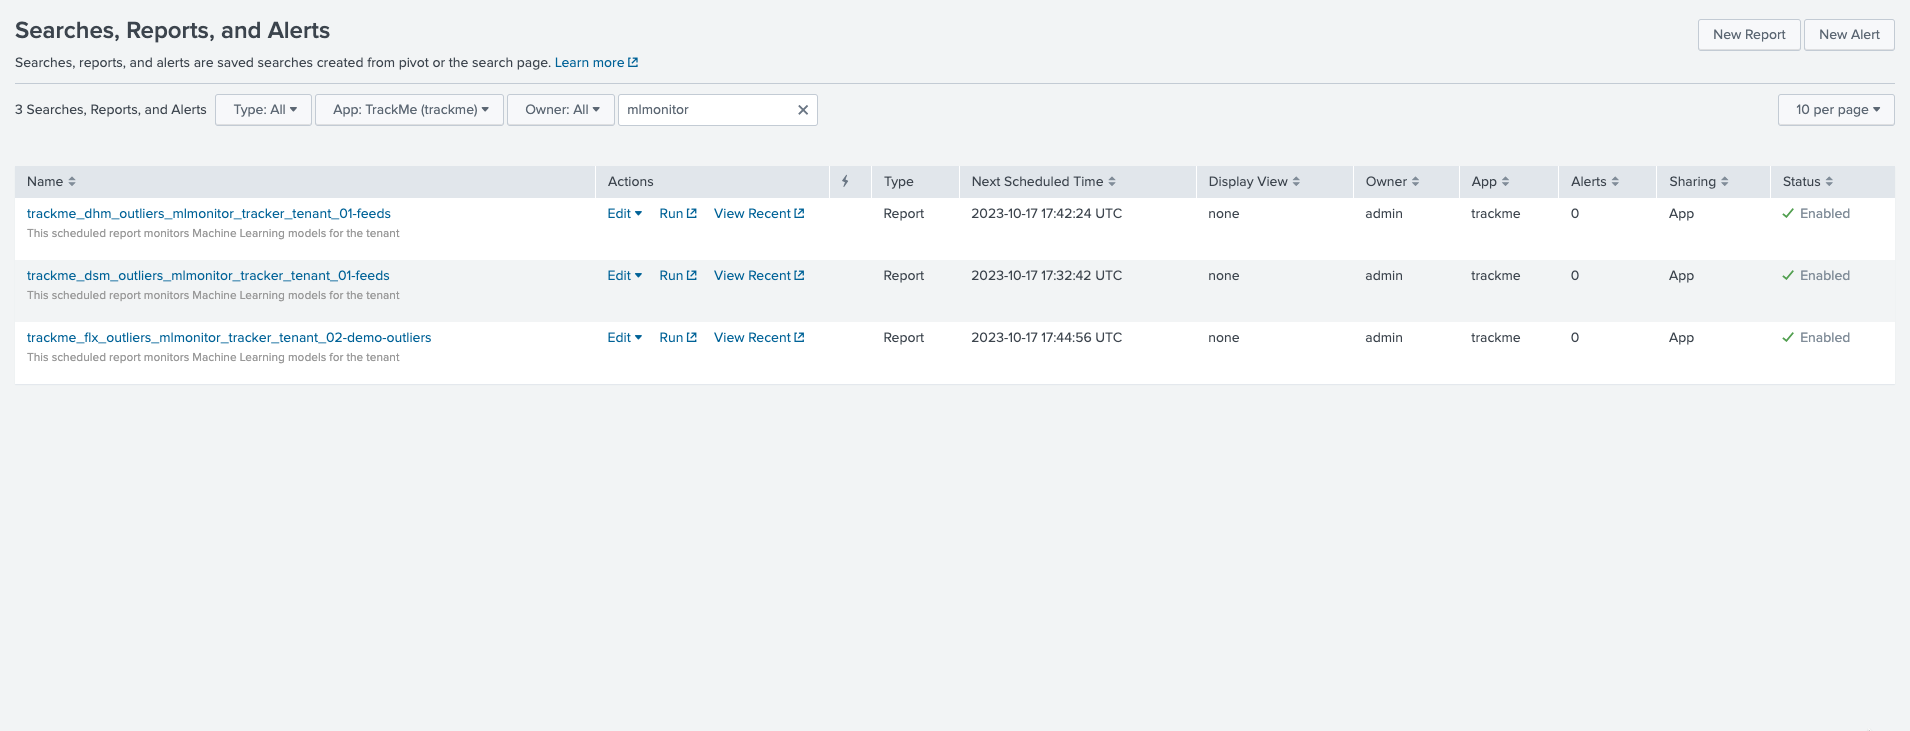
The scheduled ML monitor job behaves as follow:
The job is scheduled to run every 20 minutes
It runs for a maximum of 15 minutes (to avoid generating skipping searches), influenced by an implicit argument to the TrackMe command:
max_runtime = Option(
    doc="""
    **Syntax:** **max_runtime=****
    **Description:** Optional, The max value in seconds for the total runtime of the job, defaults to 900 (15 min) which is subtracted by 120 sec of margin. Once the job reaches this, it gets terminated""",
    require=False,
    default="900",
    validate=validators.Match("object", r"^\d*$"),
)
The job is influenced by system wide options:, see: ML Outliers system wide options
The job runs a first Splunk search to discover entities to be rendered
The jobs logs its activity as follows:
index=_internal sourcetype=trackme:custom_commands:trackmesplkoutlierstrackerhelper
The job processes sequentially entities to be rendered and runs an highly efficient search to render the ML models using mstats, orchestrated by the TrackMe command
trackmesplkoutliersrenderThe command logs its activity as follows:
index=_internal sourcetype=trackme:custom_commands:trackmesplkoutlierstrackerhelper
The command automatically updates the records in the outliers data KVstore collection
| inputlookup trackme_<component>_outliers_entity_data_tenant_<tenant_id>
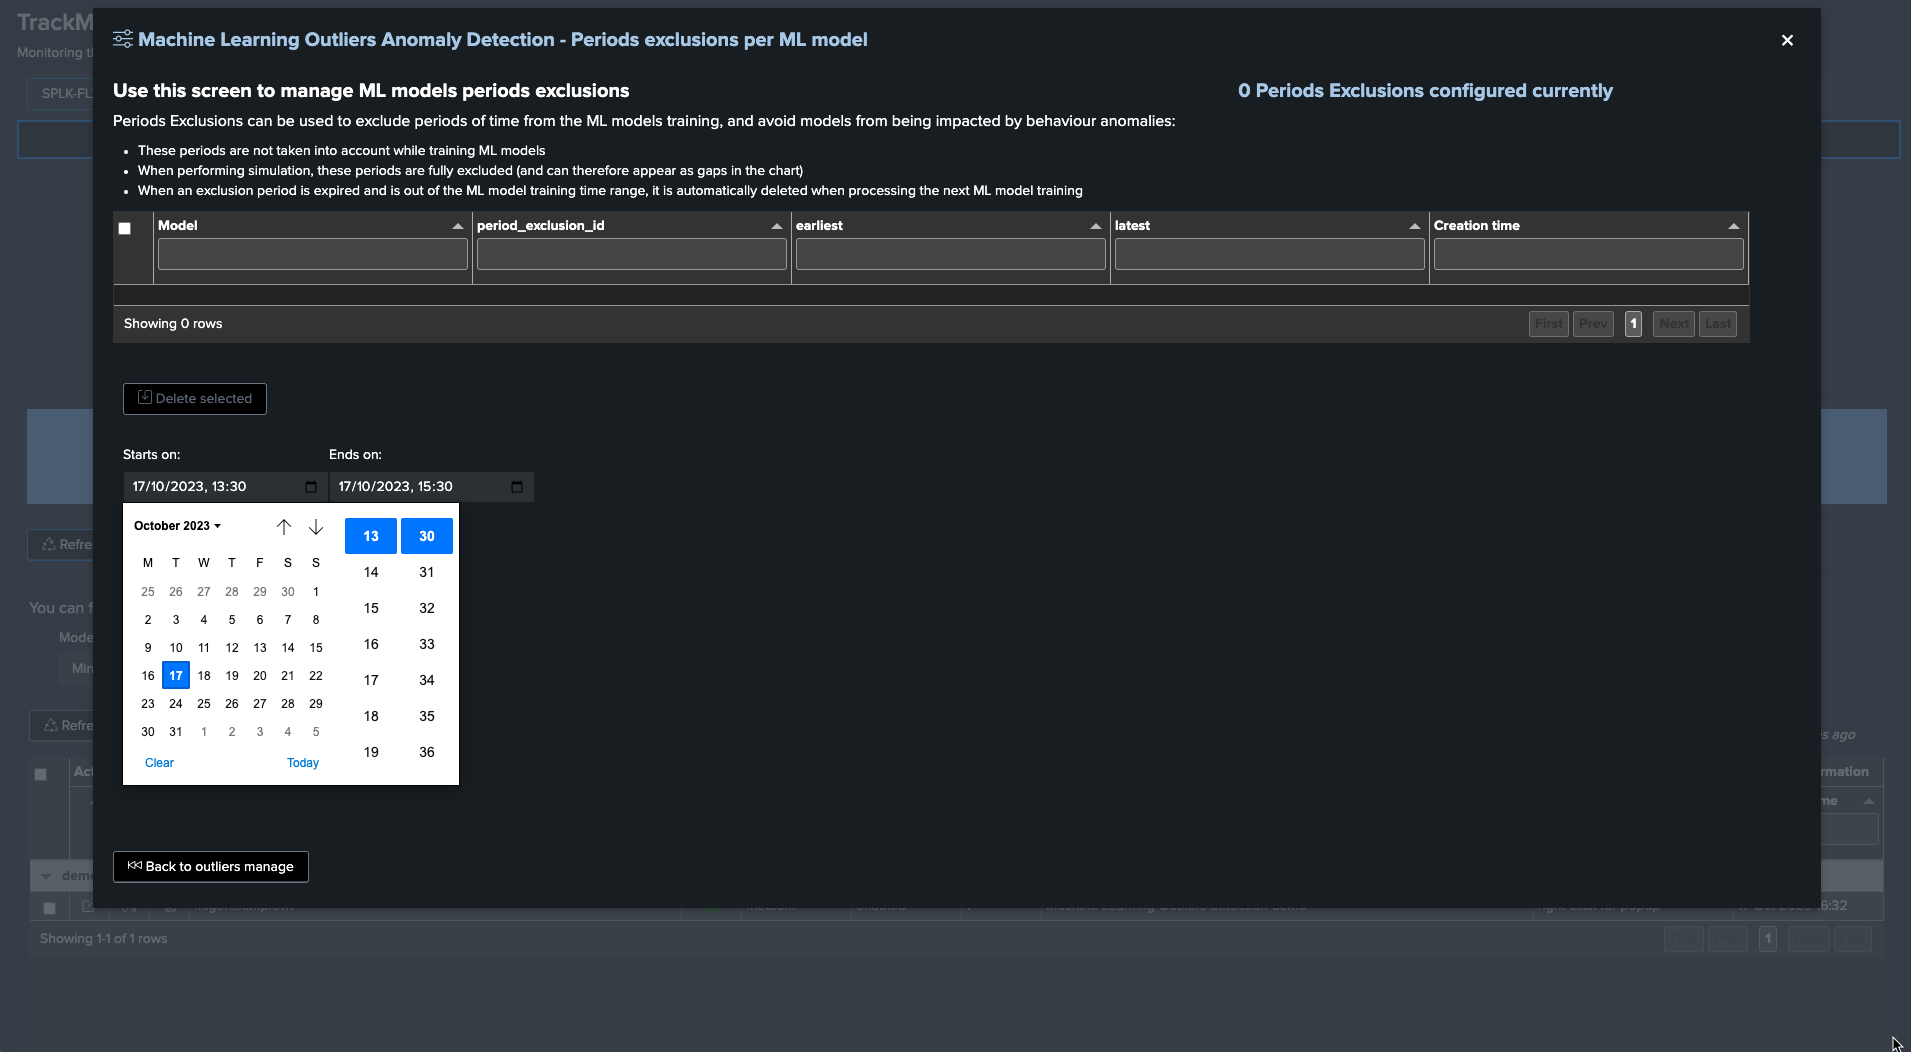
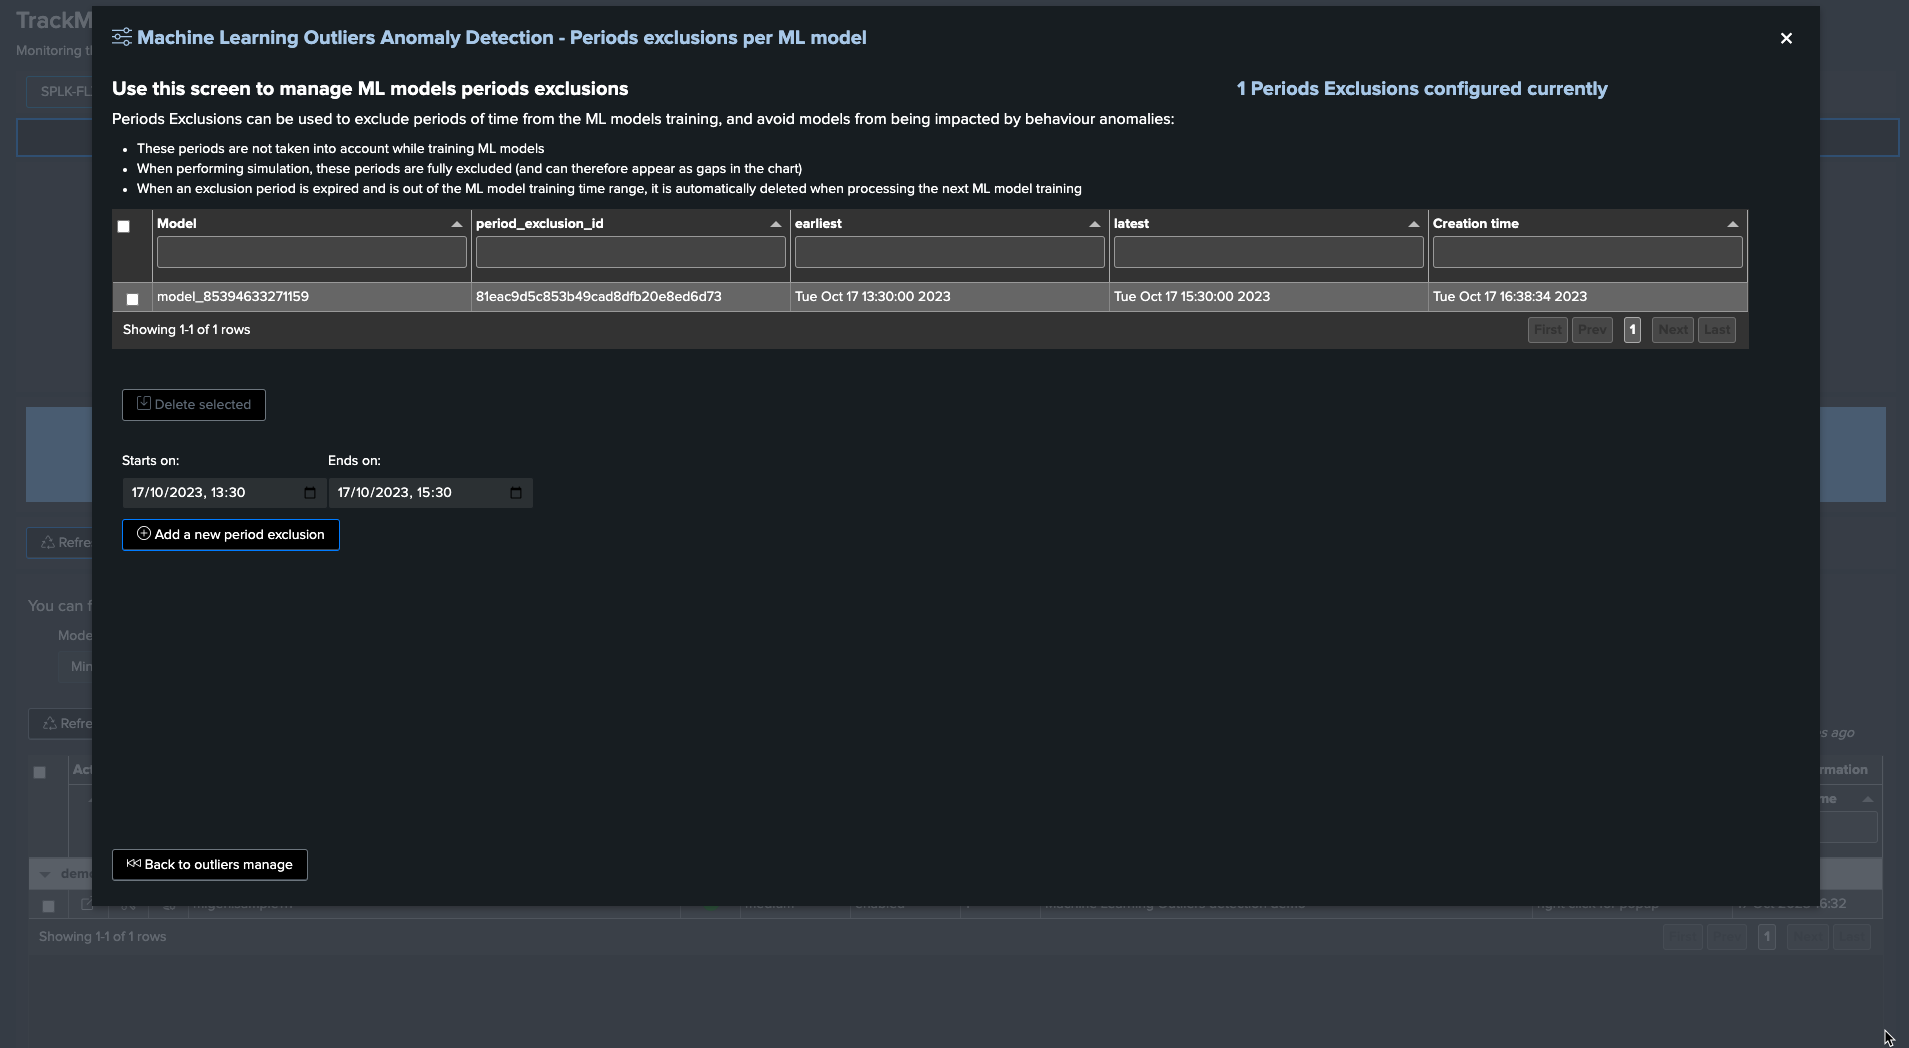
ML period exception: excluding periods of time
From TrackMe verison 2.0.62, you can exclude or more periods of time on a ML model basis:
If an incident occurs, you can exclude the period of time where the incident happened
Doing so will allow the ML model to learn from the data without the incident, and will therefore be more accurate in the future
When the exclusion period is expired because the latest time of the period is now out of the exclusion period, this period is deleted automatically from the ML model during the next ML training phase
For instance, the following entity was impacted by an abnormal behaviour, we can exclude the period of time where the incident happened:
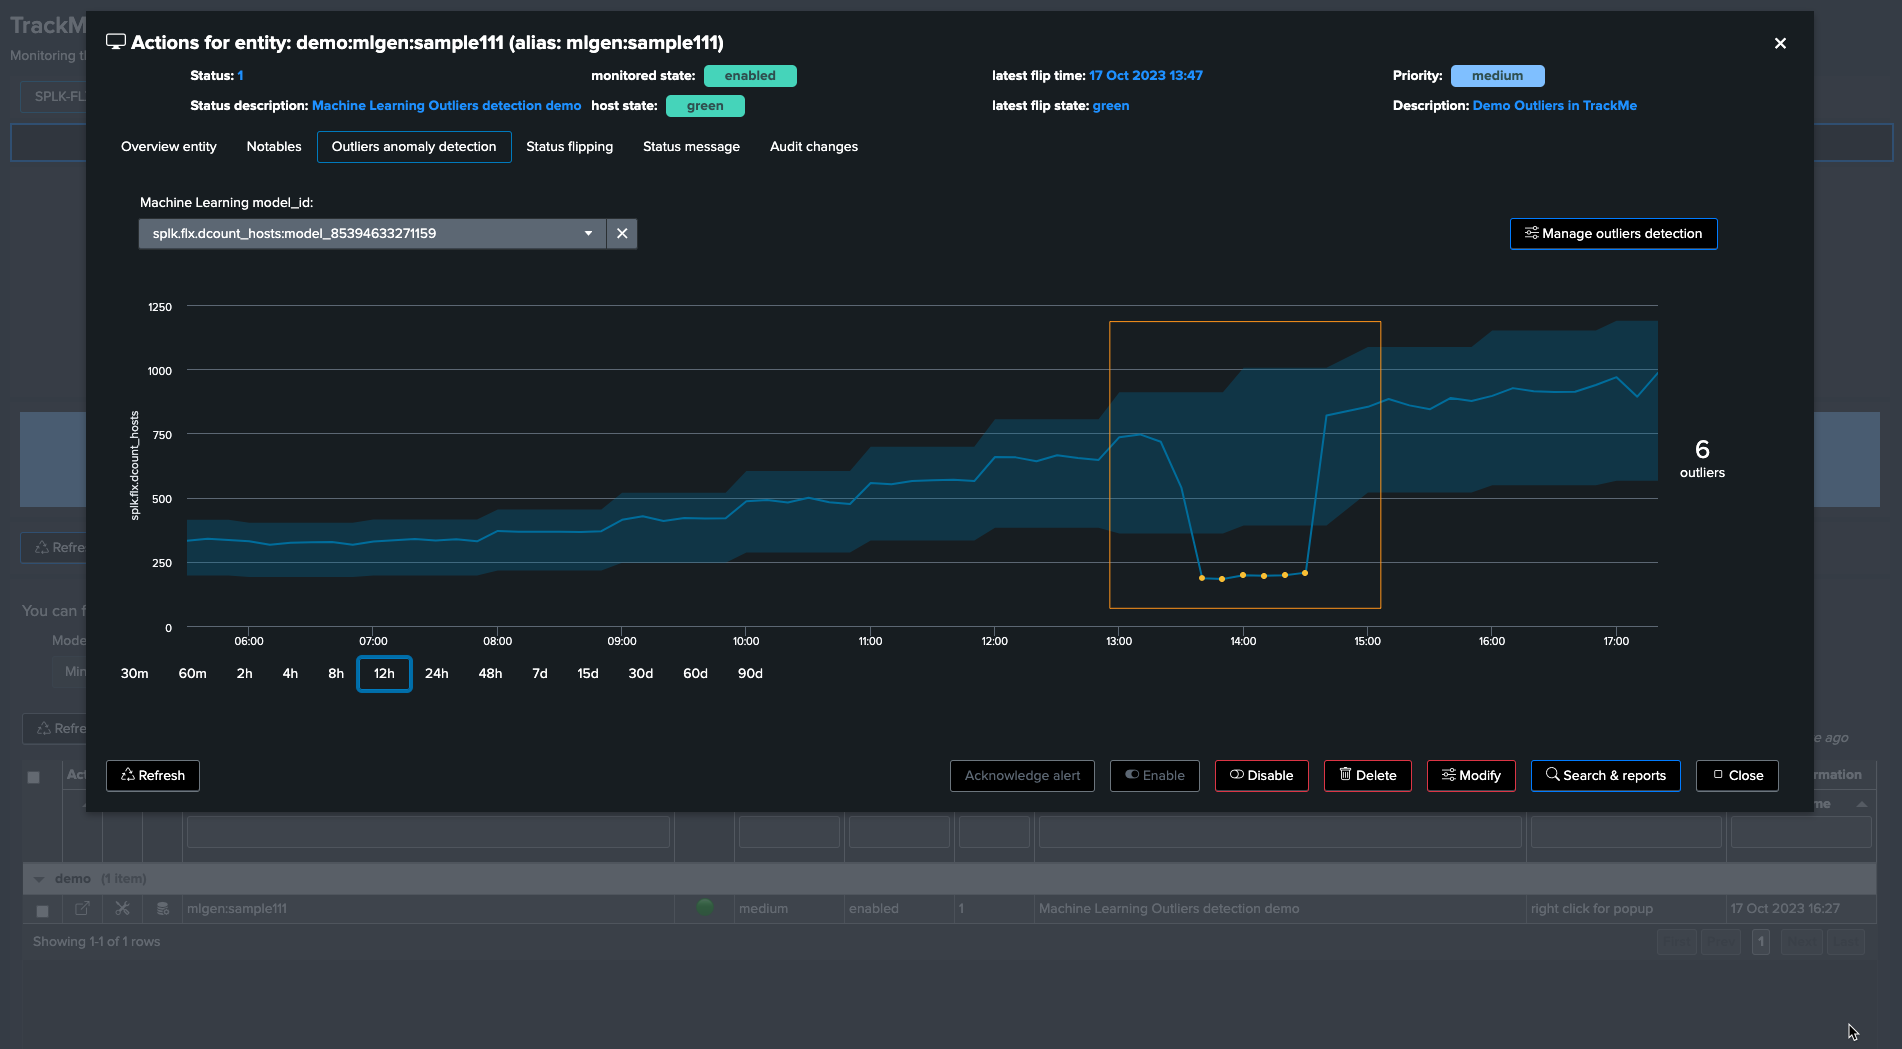
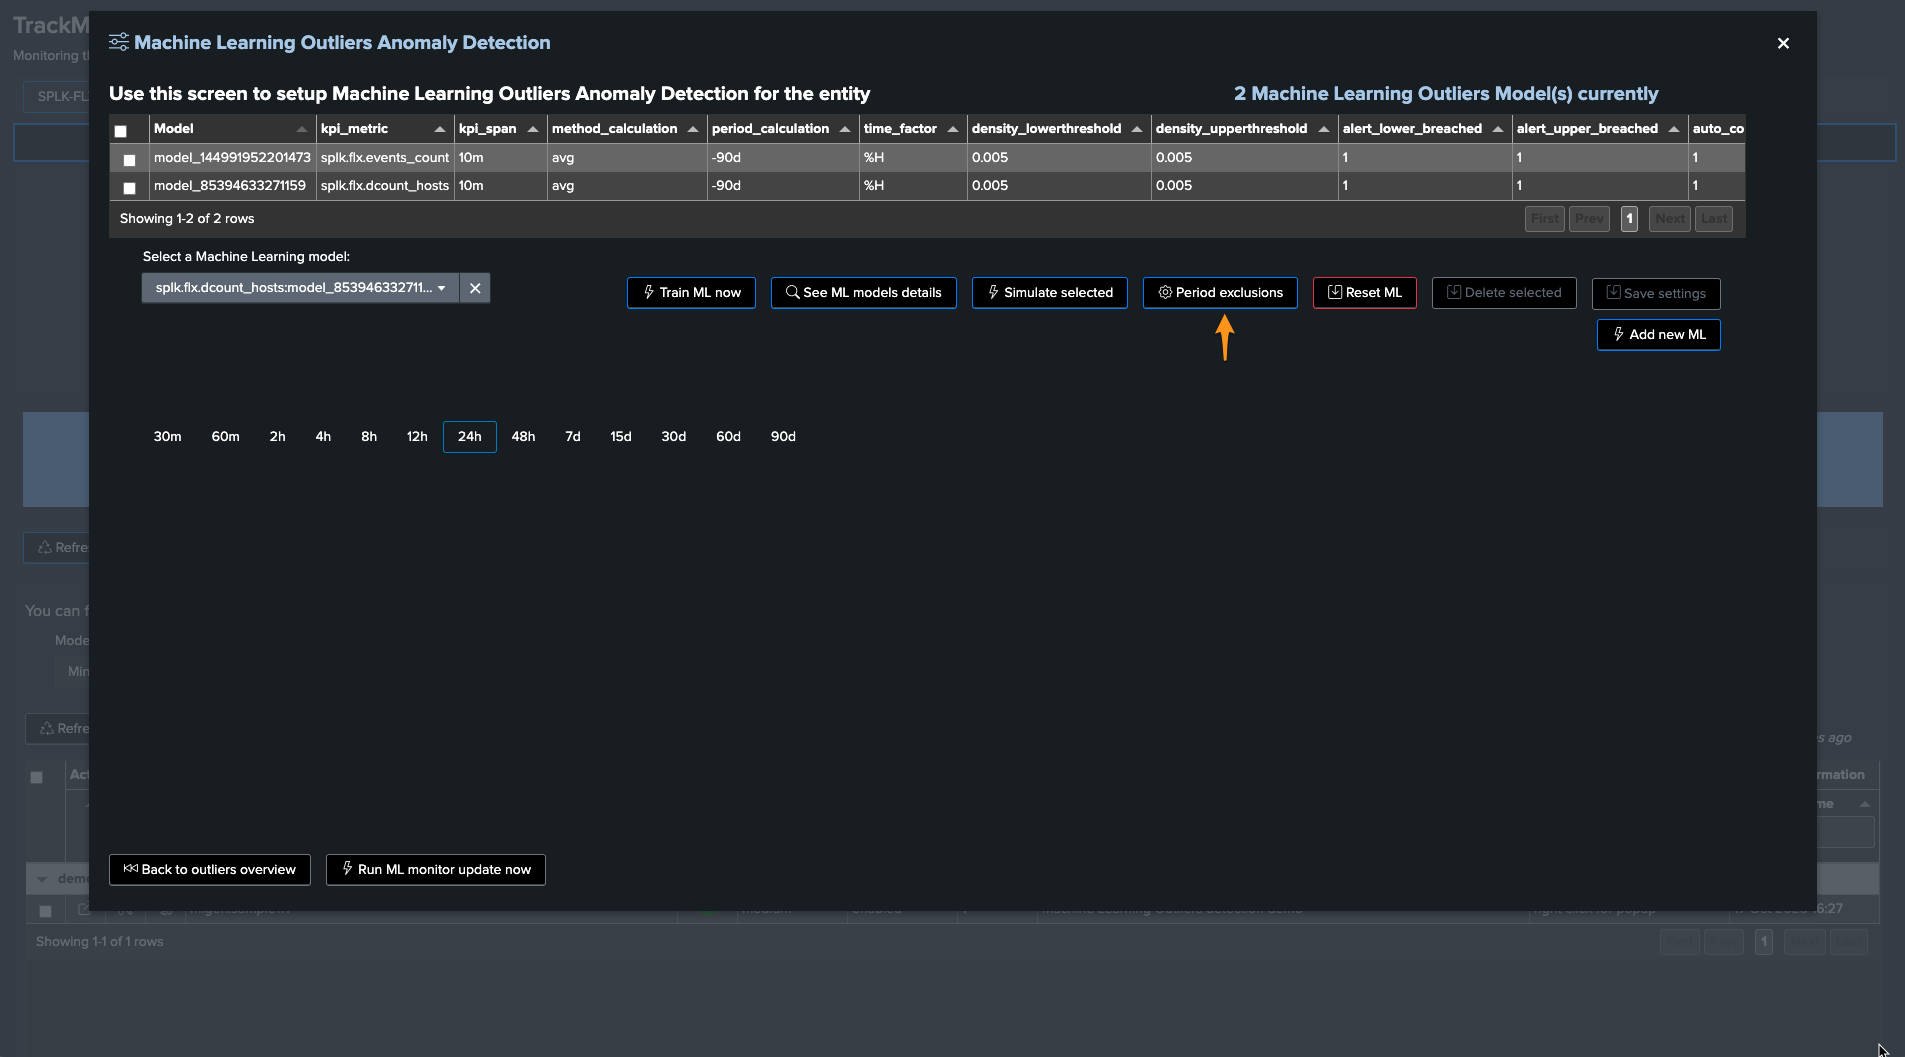
To exclude this period, click on “Manage Outliers detection” and then on “Period Exclusions”, note that exclusions apply per ML model:
When the next ML training happens for this entity, accessing the ML models details will show the exclusion period: (click on See ML model details)
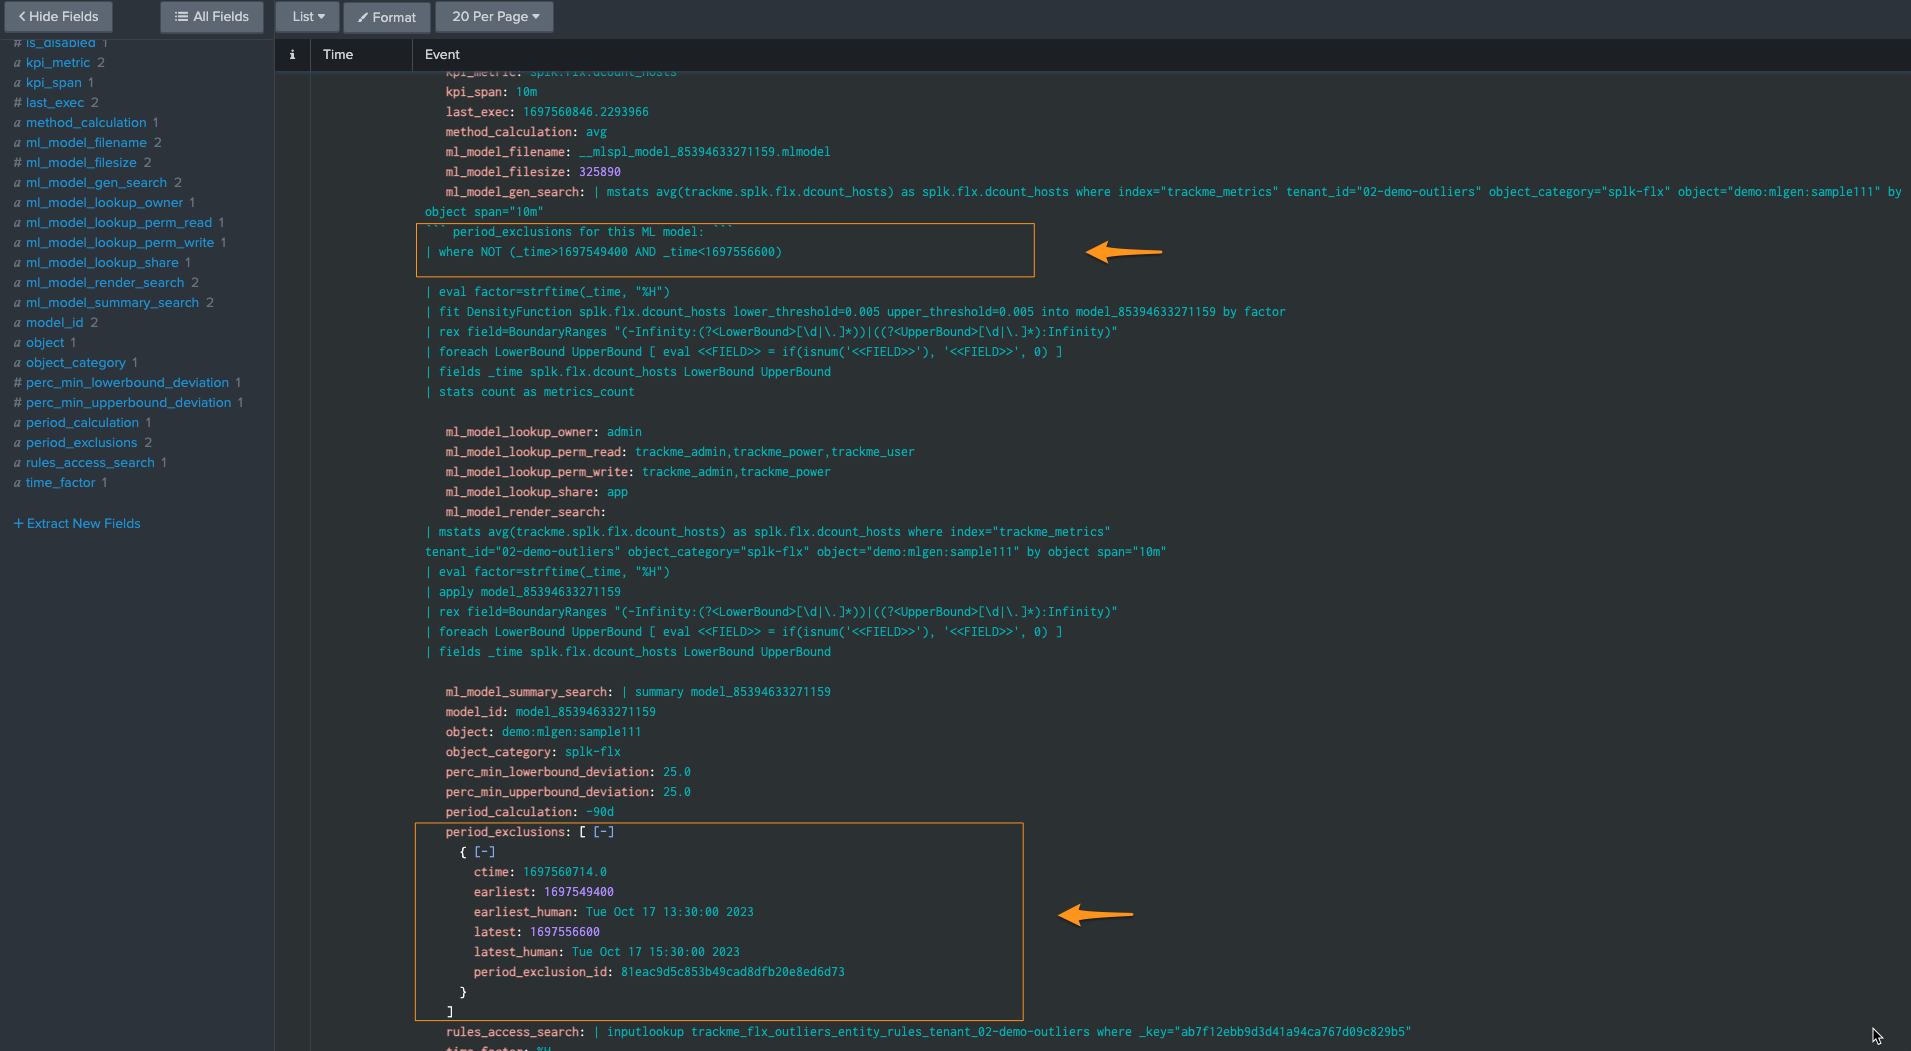
Finally, when the excluded period is out of the time range scope of the ML training, for instance if the ML is trained for the past 30 days and the exclusions period is beyond that, the exclusion period is deleted automatically:
index=_internal sourcetype="trackme:custom_commands:trackmesplkoutlierstrain" "period exclusion"
example:
2023-10-17 16:46:15,044 INFO trackmesplkoutlierstrain.py generate 486 tenant_id=02-demo-outliers, object=demo:mlgen:sample111, model_id=model_144991952201473 rejecting period exclusion as it is now out of the model period calculation: {
   "period_exclusion_id": "180ea7b1a6ec737c823cfc38a6cd9414",
   "earliest": 1682947800,
   "earliest_human": "Mon May  1 13:30:00 2023",
   "latest": 1683041400,
   "latest_human": "Tue May  2 15:30:00 2023",
   "ctime": "1697561162.0"
}
ML Outliers system wide options
The following options are applied globally, these influence the Outliers detection behaviours and/or ML models definition: (when entities are discovered or ML is being reset)

Options:
Option |
Purpose |
|---|---|
Requested time models training |
The time value in seconds requested for ML models to be trained for entities, a given entity will regularly get ML models trained if possible based on this value. (defaults to 1 day) |
Requested time models monitor |
The time value in seconds requested for ML models to be monitored for entities, a given entity will regularly get ML models monitored if possible based on this value. (defaults to 1 hour) |
Max runtime models training |
The time value in seconds requested to limit the max duration of the ML training models, defaults to 15 min (reduced by 30 sec) and should be set according to the cron schedule of the ML training job |
Disable outliers at discovery |
When a new entity is discovered, enable or disable the volume based outliers detection by default for that entity. The feature can still be managed on demand for that entity. |
Outliers default calculation |
The default calculation mode used for anomaly outliers detection, can be updated per entity. |
Density lower threshold |
The default value of the lower threshold applied to the DensityFunction algorithm, set at discovery and be updated per entity. |
Density upper threshold |
The default value of the upper threshold applied to the DensityFunction algorithm, set at discovery and be updated per entity. |
Volume lower breached |
Alert when the lower bound threshold is breached for volume based KPIs. |
Volume upper breached |
Alert when the upper bound threshold is breached for volume based KPIs. |
Latency lower breached |
Alert when the lower bound threshold is breached for volume based KPIs. |
Latency upper breached |
Alert when the upper bound threshold is breached for latency based KPIs. |
Default period for calculation |
The relative period used by default for outliers calculations, applied during entity discovery and can be updated per entity |
Default outliers time factor |
The default time factor applied for the outliers dynamic thresholds calculation |
Default latency kpi metric |
The default kpi metric for latency outliers detection |
Default volume kpi metric |
The default kpi metric for volume outliers detection |
Default auto correct |
When defining the model, enable or disable auto_correct by default, which uses the concept of auto correction based on min lower and upper deviation. |
Perc min lower deviation |
If an outlier is not deviant (LowerBound) from at least that percentage of the current KPI value, it will be considered as a false positive. |
Perc min upper deviation |
If an outlier is not deviant (UpperBound) from at least that percentage of the current KPI value, it will be considered as a false positive. |
ML Outliers options
Options per ML models can be accessed via the TrackMe UI:
The following options can be defined per ML Outlier model:
Option |
Purpose |
|---|---|
kpi_metric |
The Key Performance Indicator associated with the ML model |
kpi_span |
The span time value used for the calculations |
method_calculation |
The calculation method to be applied (e.g., average, perc95…) |
period_calculation |
The period for the calculation for the model training purposes |
time_factor |
Defines the time-based granularity for the ML model training |
density_lowerthreshold |
The lower bound threshold for the MLTK density function |
density_upperthreshold |
The upper bound threshold for the MLTK density function |
auto_correct |
Enable or disable the auto-correction features; its goal is to limit false positives using the deviation settings |
perc_min_lowerbound_deviation |
The min percentage of deviation between the lower bound and the KPI current value |
perc_min_upperbound_deviation |
The min percentage of deviation between the upper bound and the KPI current value |
alert_lower_breached |
Alert if the lower threshold is breached |
alert_upper_breached |
Alert if the upper threshold is breached |
is_disabled |
Enable or disable training and monitoring for this model |
Understanding and Troubleshooting ML rendering results
When TrackMe calls the ML rendering, the following command is called:
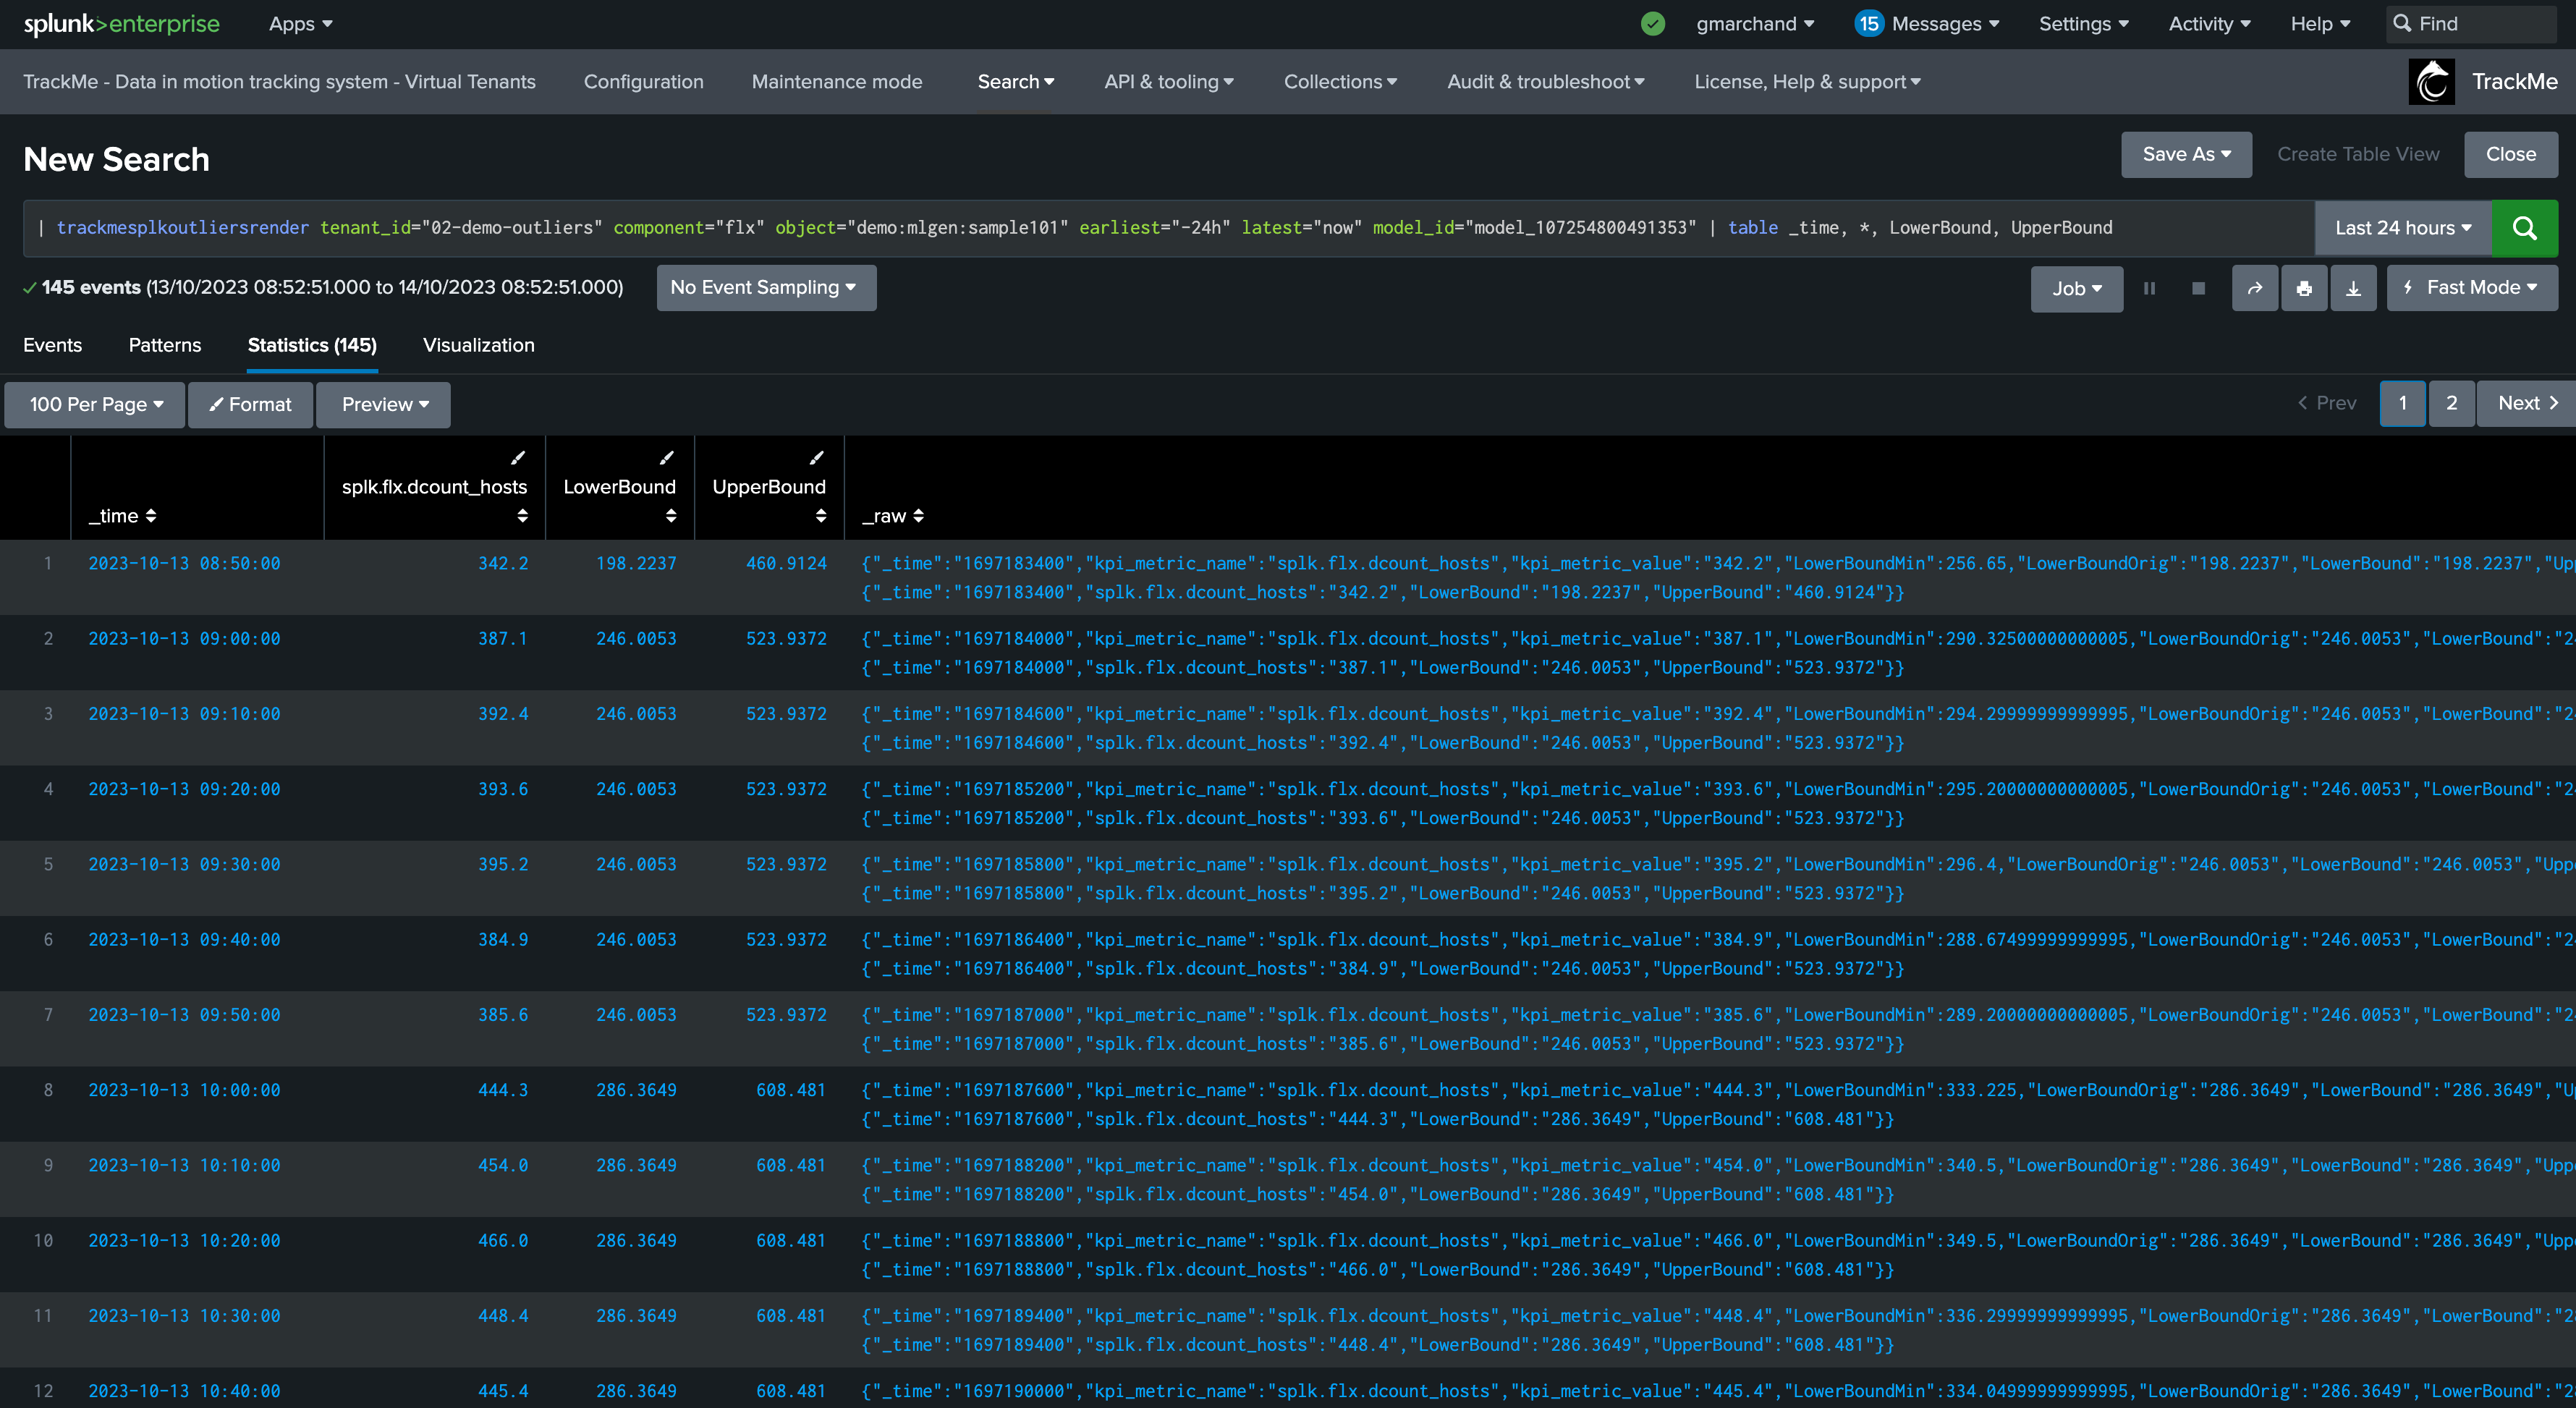
You can go in statistics mode and add the following SPL to review in details the ML decisions:
| fields _time, _raw
| trackmeprettyjson fields=_raw
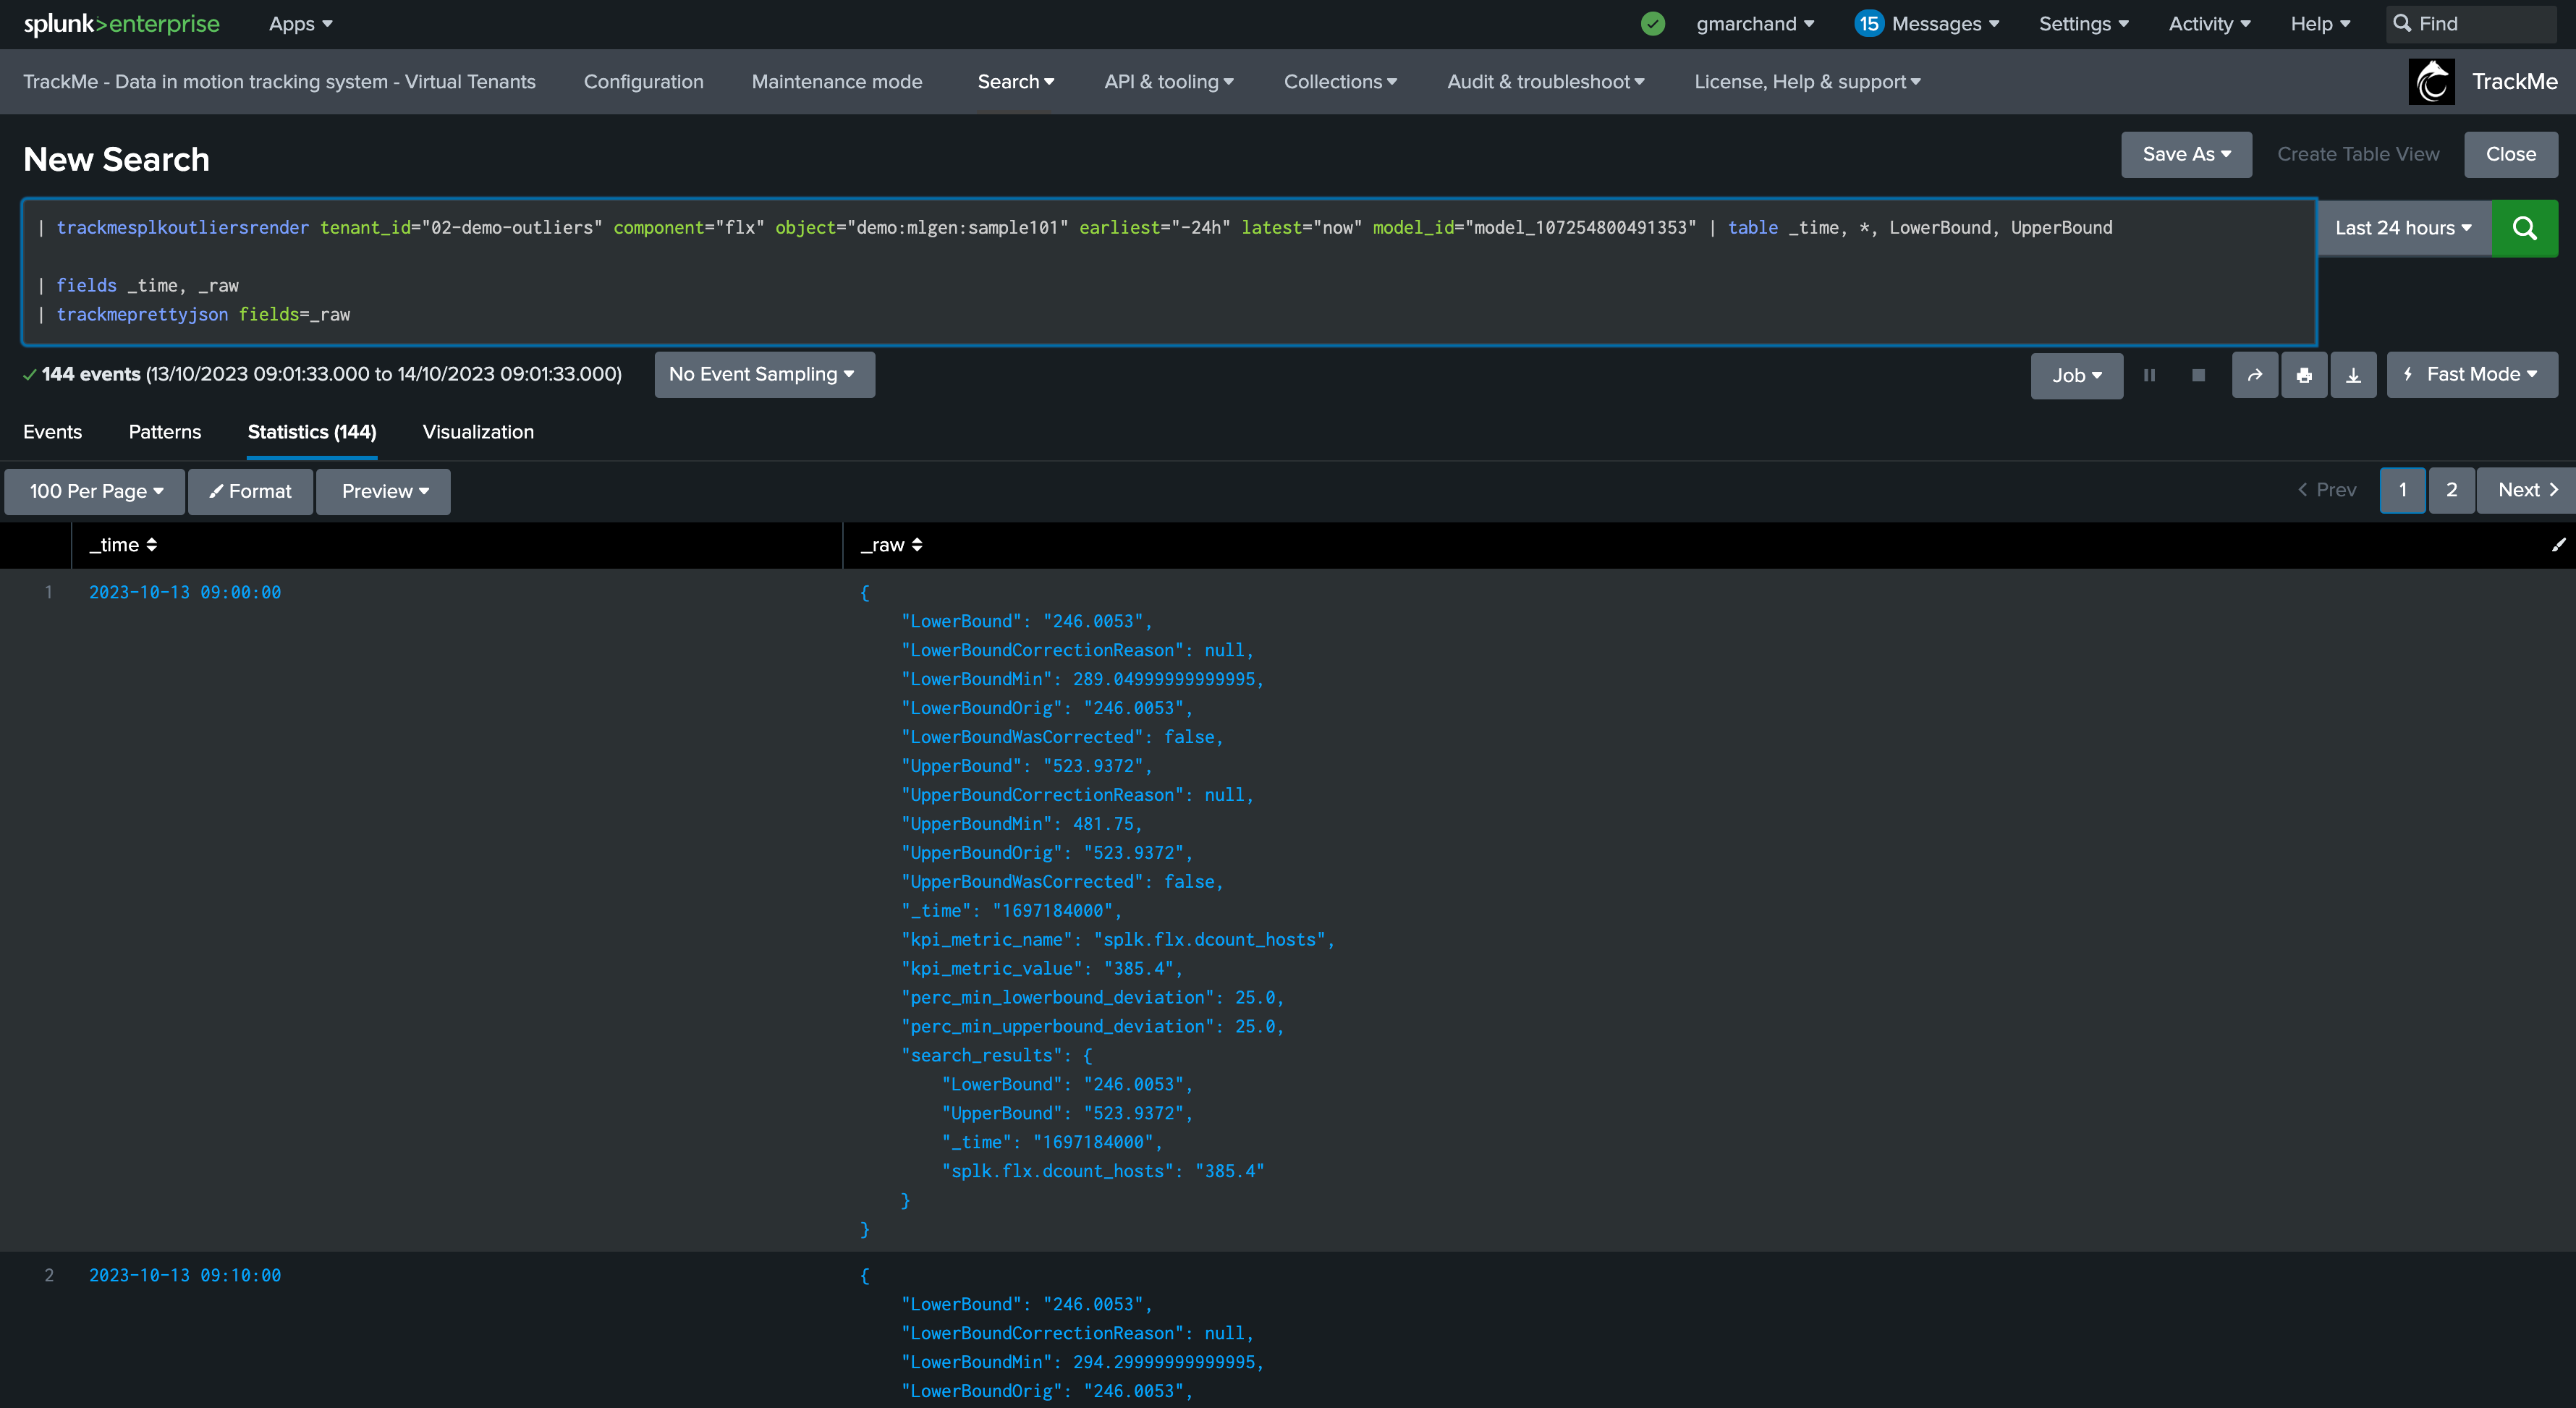
The JSON object contains various information such as the origin MLTK rendering results per time frame, and TrackMe Auto correction decisions.
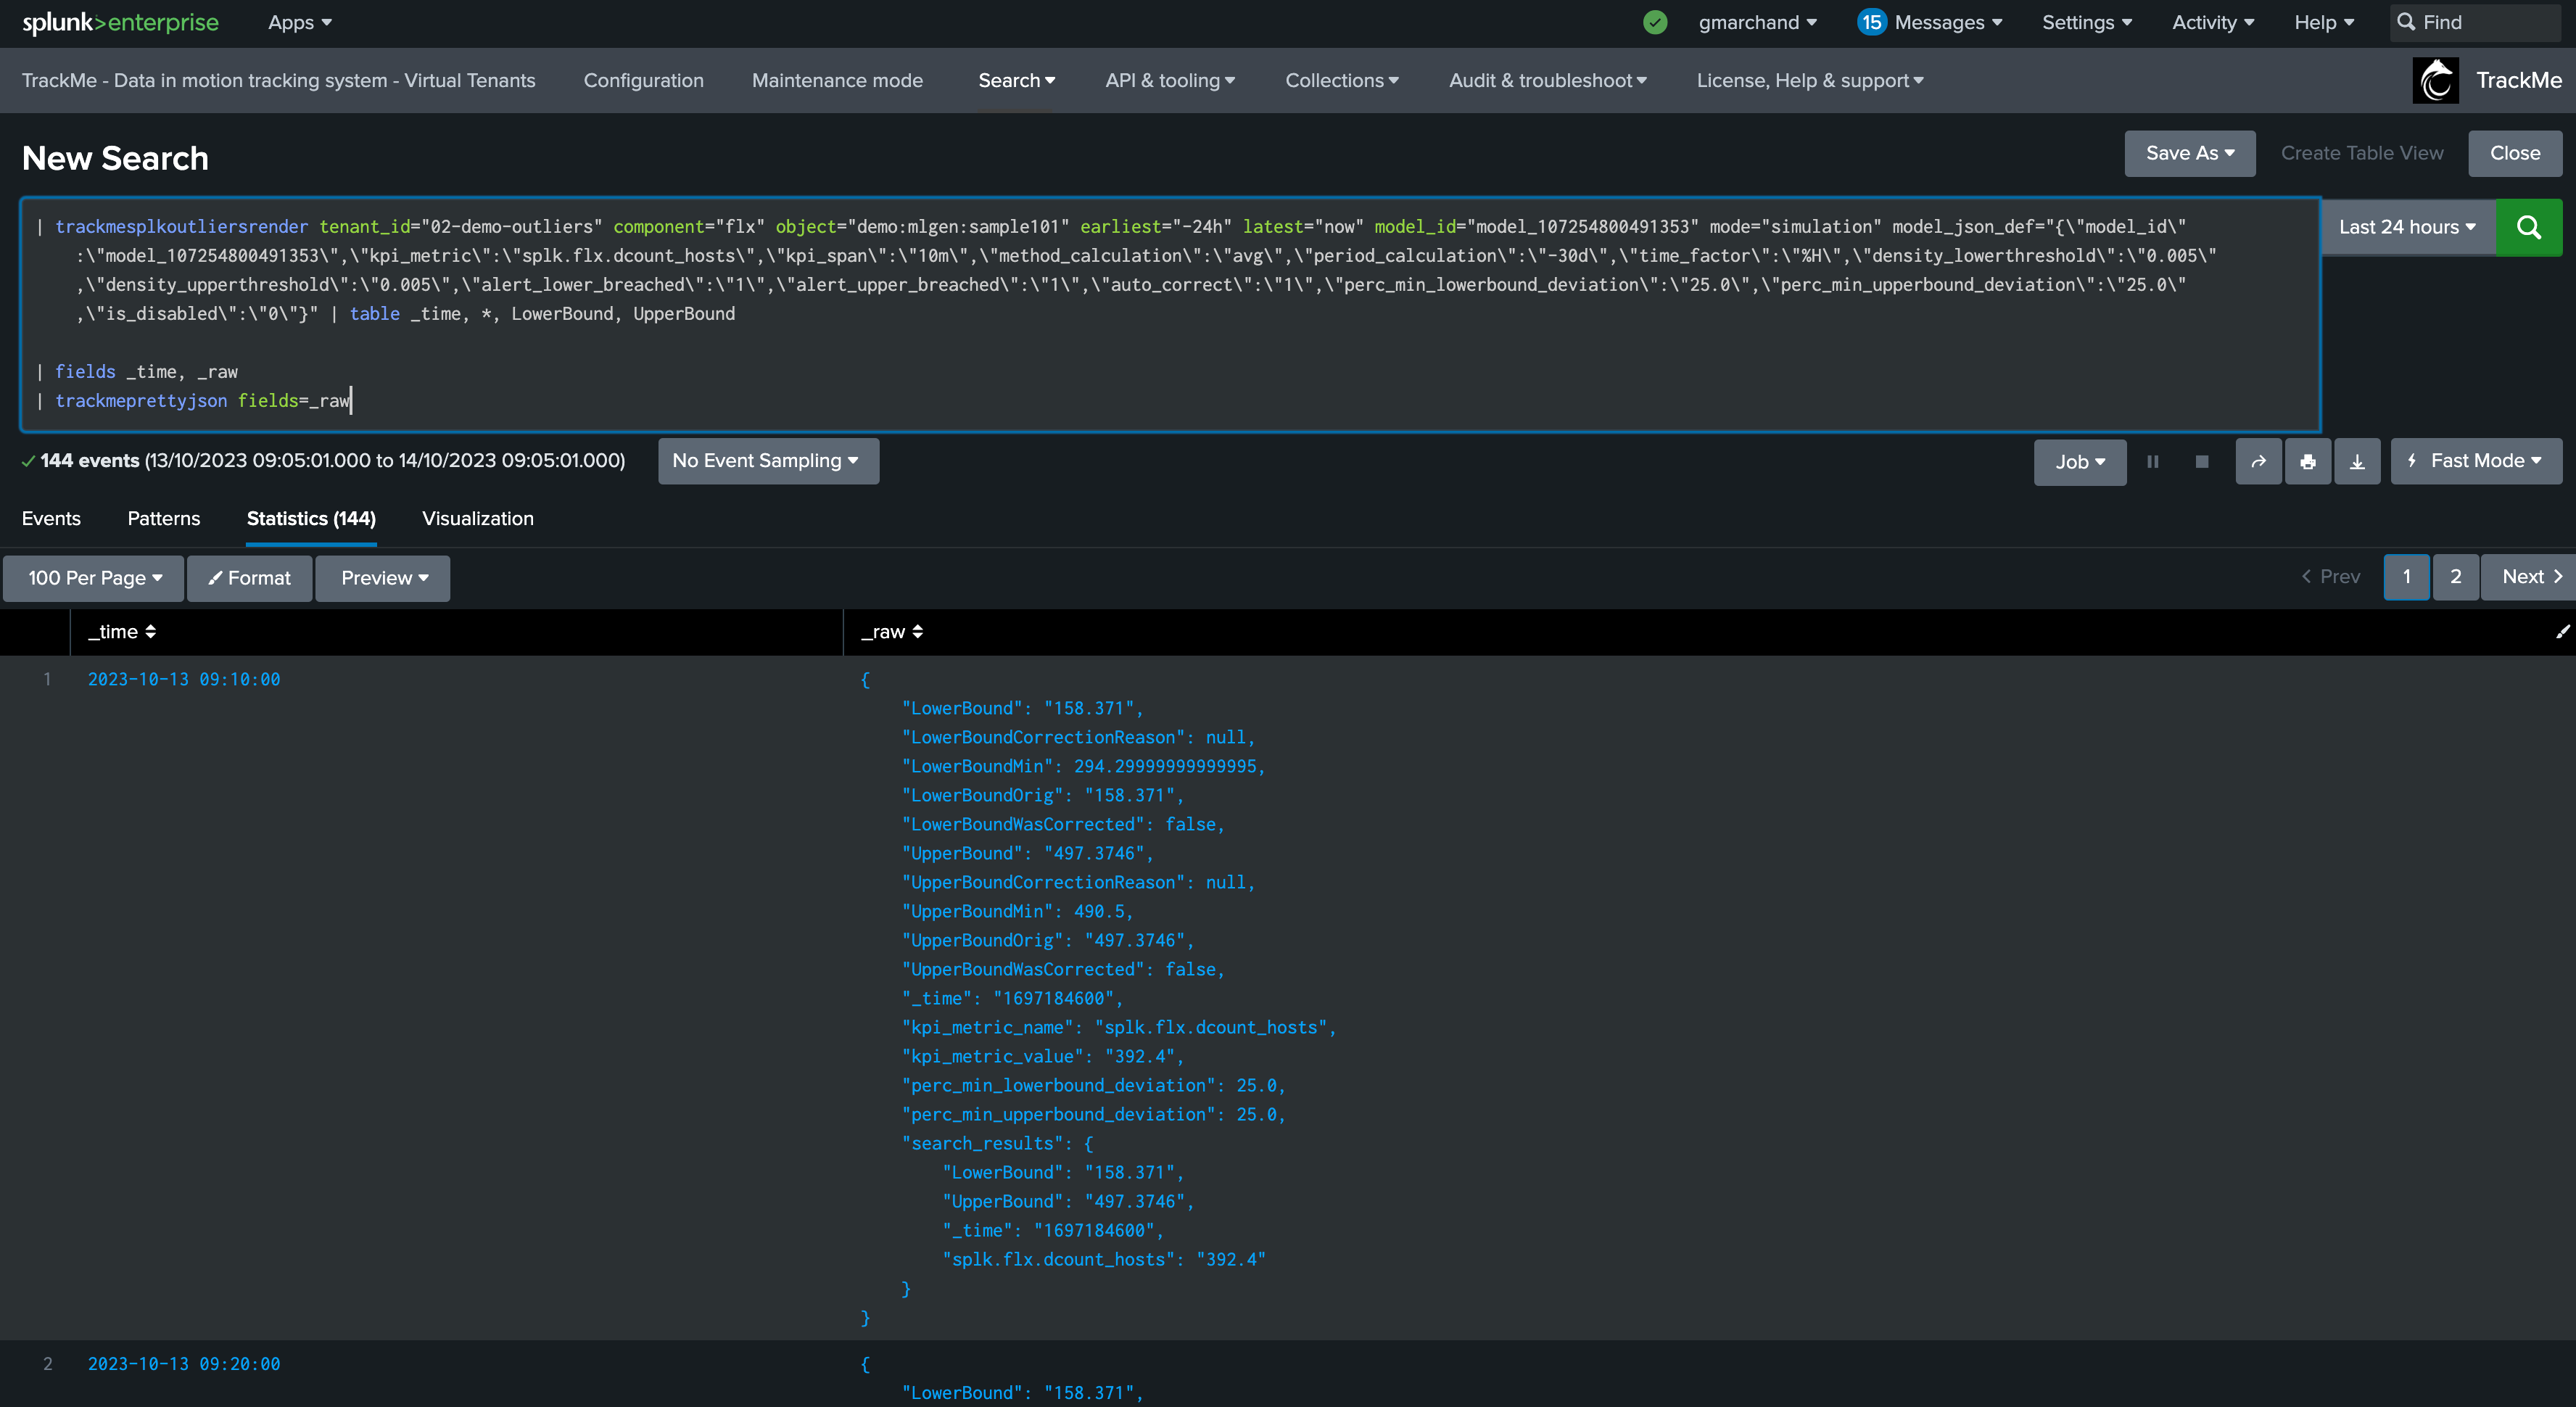
While in simulating mode, the same command is called with the simulation definition of the ML instead:
You can apply the same SPL lines to review the ML decisions:
Troubleshooting ML training logs
The first level of the training logic is handled via the command trackmesplkoutlierstrackerhelper, you can access logs via:
index=_internal sourcetype=trackme:custom_commands:trackmesplkoutlierstrackerhelper
notes: this command orchestrates the ML training activity for the tenant and the component, it will then proceed by iteration to the training calling the trackmesplkoutlierstrain command
The per entity ML training logic is handled via the command trackmesplkoutlierstrain, you can access logs via:
index=_internal sourcetype=trackme:custom_commands:trackmesplkoutlierstrackerhelper
Troubleshooting ML rendering (monitoring) logs
Similarly, the ML monitor phased is orchestrated by the trackmesplkoutlierstrackerhelper command, you can access logs via:
index=_internal sourcetype=trackme:custom_commands:trackmesplkoutlierstrackerhelper
It will then call the command trackmesplkoutliersrender, you can access logs via:
index=_internal sourcetype=trackme:custom_commands:trackmesplkoutliersrender
REST API endpoints for ML in TrackMe
TrackMe exposes different REST API endpoints for the ML Outliers purposes, the same endpoints are used by the UI:
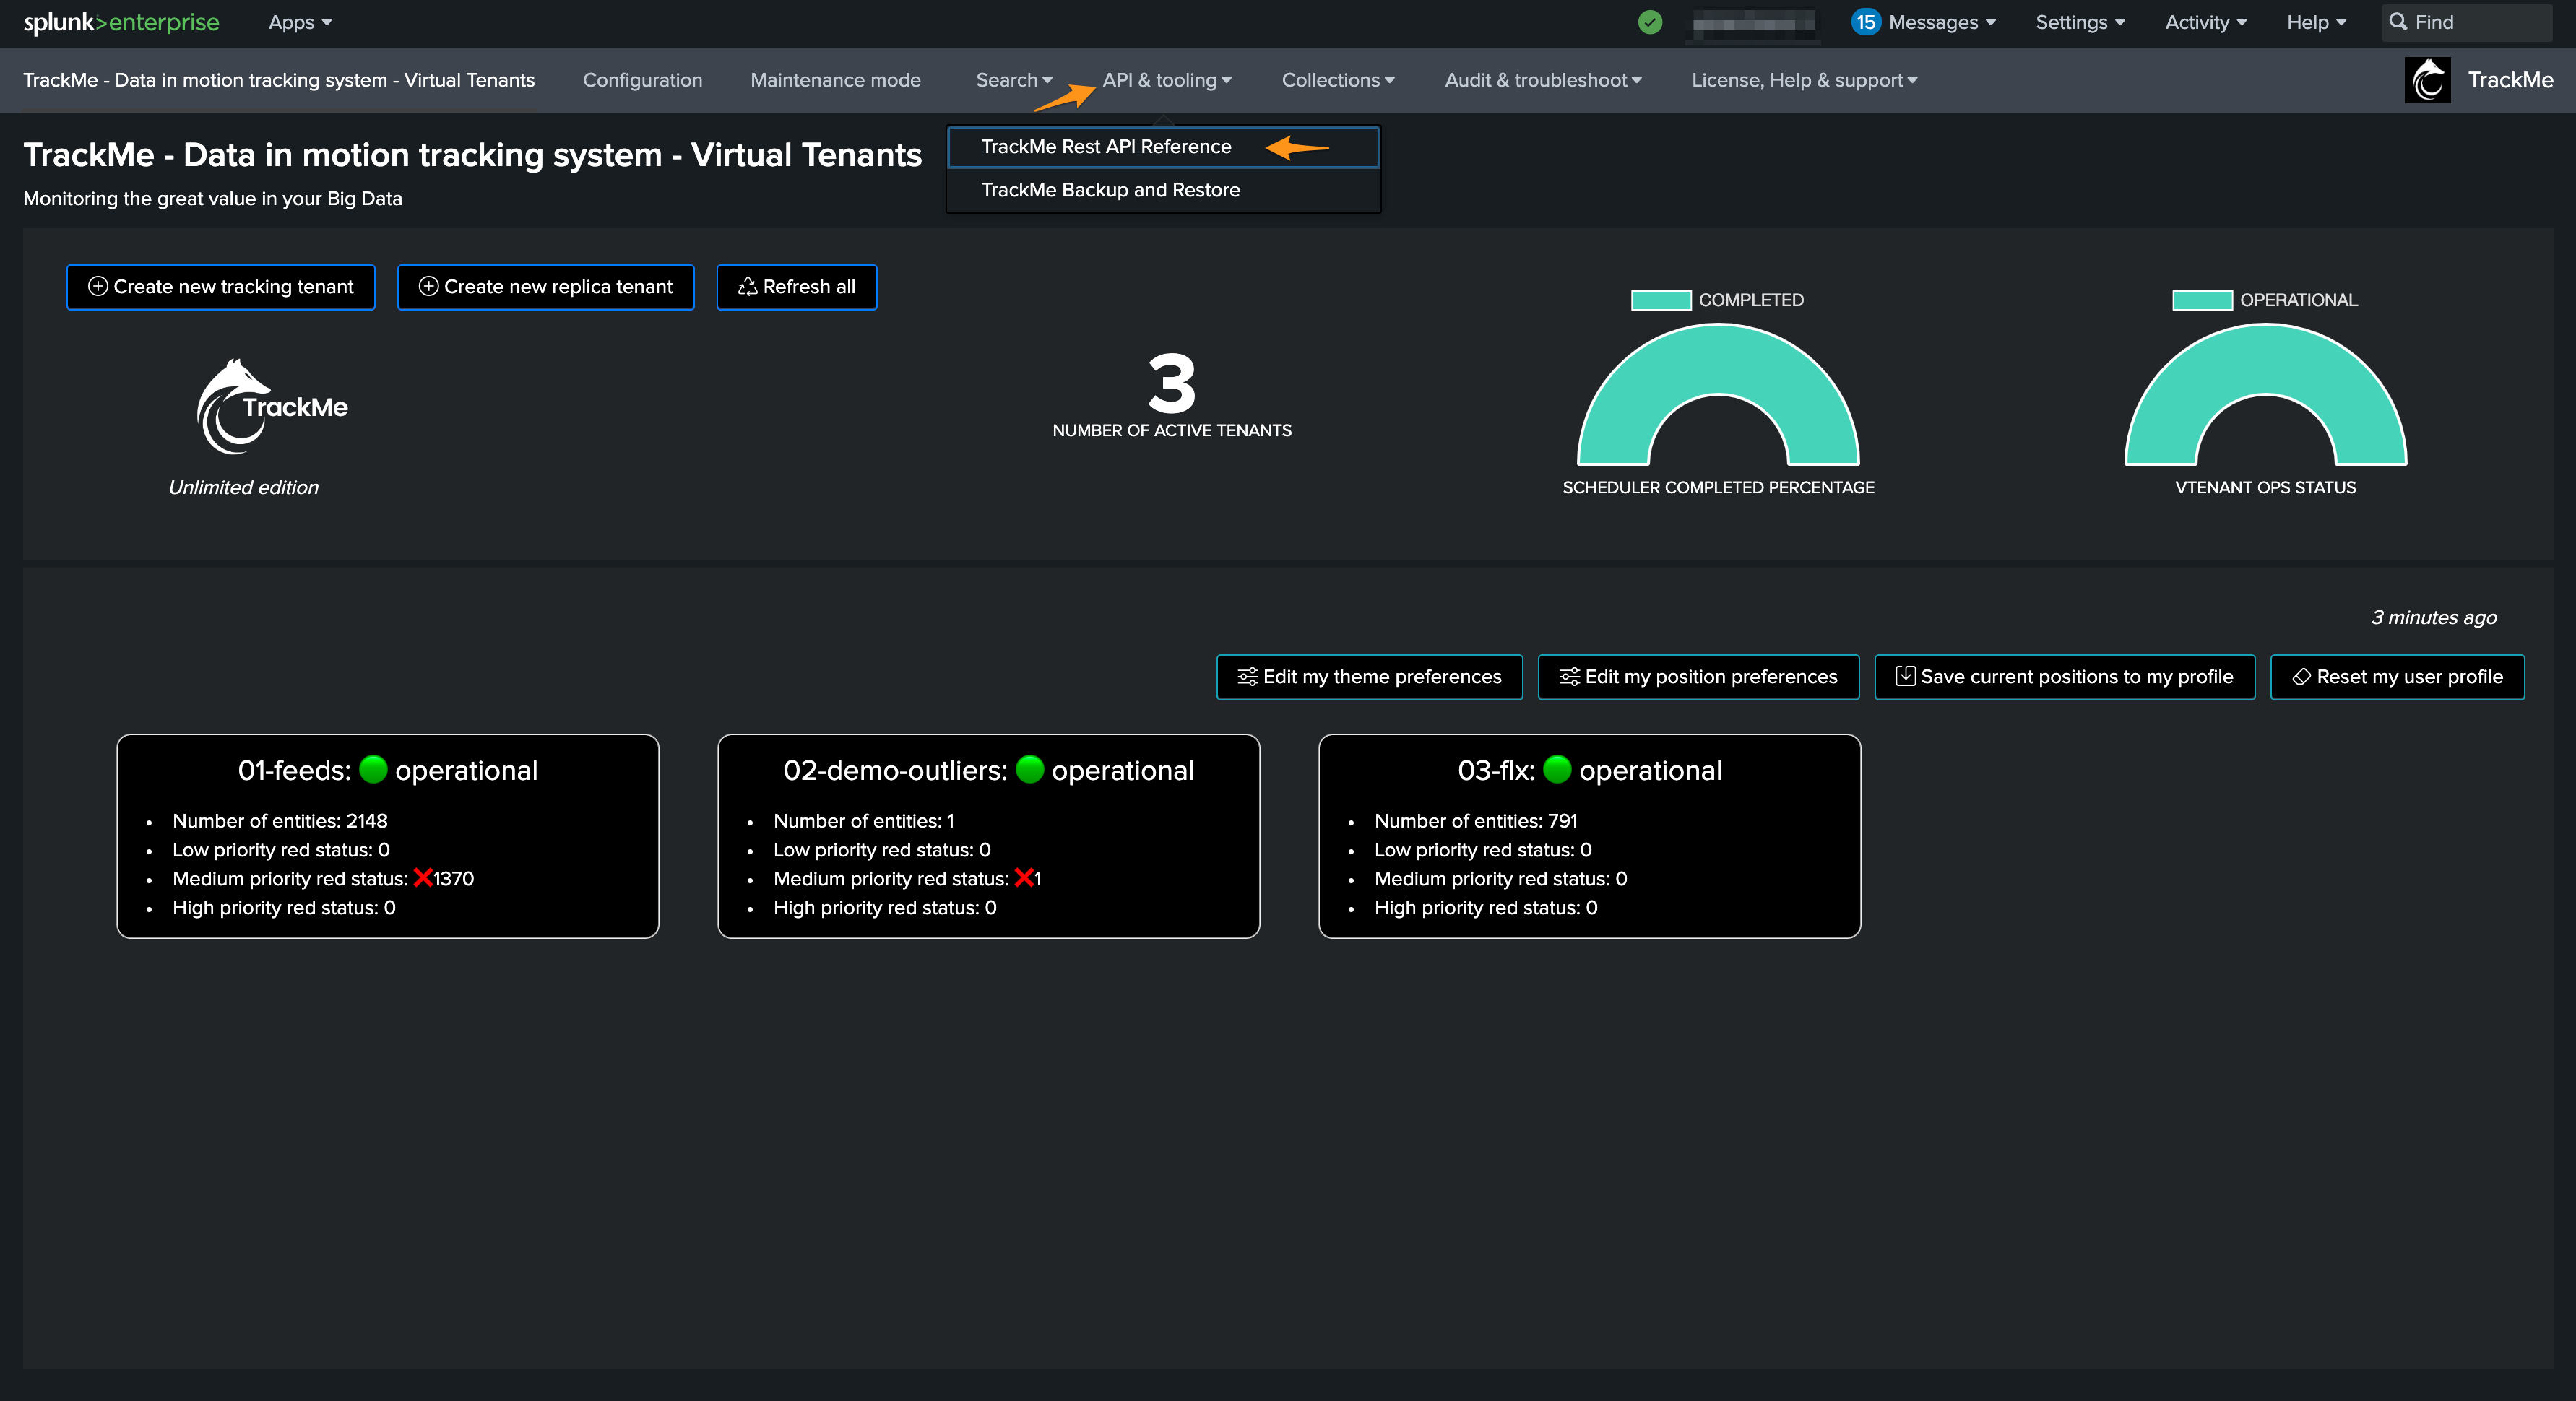
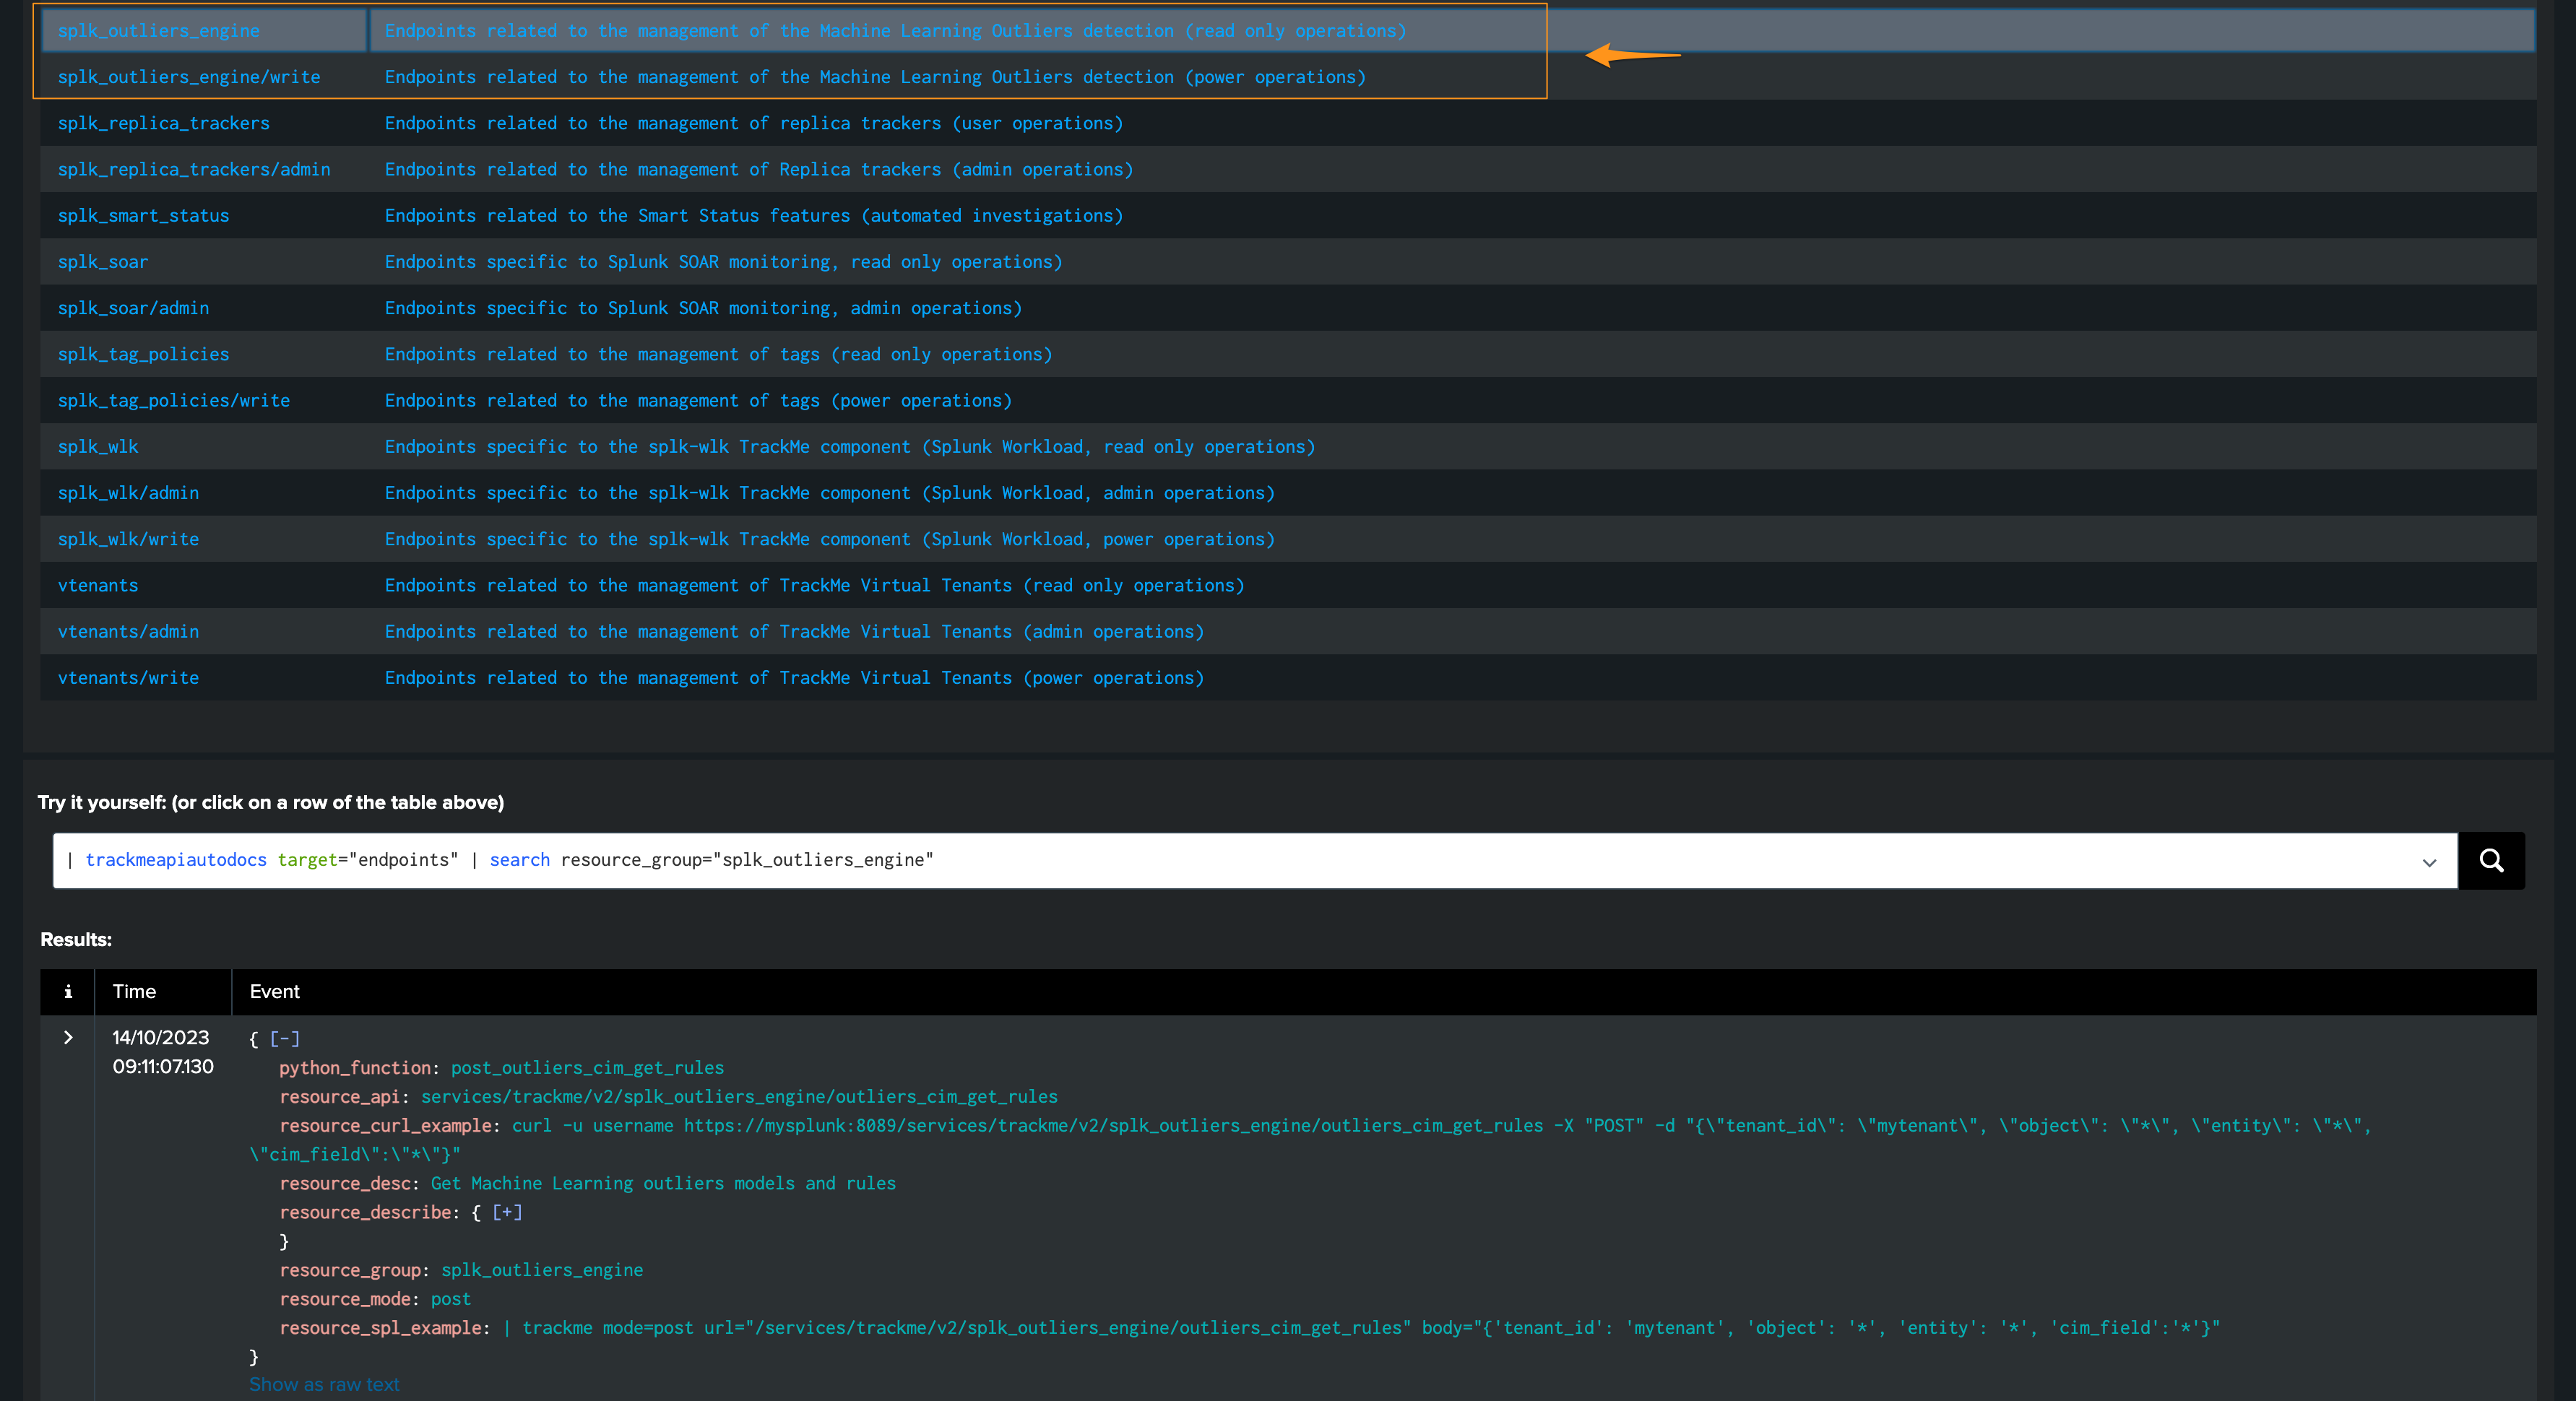
TrackMe provides usage examples with very endpoint, both in cURL and in SPL:

You can for instance reset ML models, or force training via the REST API:
train:
| trackme mode=post url="/services/trackme/v2/splk_outliers_engine/write/outliers_train_models" body="{'tenant_id':'02-demo-outliers','component':'flx','object':'demo:mlgen:sample101'}"
reset:
| trackme mode=post url="/services/trackme/v2/splk_outliers_engine/write/outliers_reset_models" body="{'tenant_id':'02-demo-outliers','component':'flx','object':'demo:mlgen:sample101'}"